 We recently had to use our PHP library with the Symfony framework. We managed it without too much hassle, but we lost some time with some Symfony specificities. So, we thought that a post on the topic could interest you.
Symfony is a popular PHP framework which allows you to save time when developing a web site. On top of the MVC framework, Symfony allows you to automate a large part of the tedious tasks when developing, thanks to the symfony command line tool. This tool allows you, for example, to remotely order the addition of packages, the migration of a database, as well as the deployment of the site. This tool even contains a web server that you can use when developing.
However, to really take advantage of this framework, you must follow the Symfony conventions. Indeed, Symfony is more than a simple library which can be added to an existing PHP project, Symfony IS the PHP project. This framework is designed to be the main framework and the entry point of the web site.
In short, Symfony is a convenient tool, but like any framework, you need to invest a number of hours to learn how it works before you can save time using it.
An example
We are going to see how to create a page that uses the HTTP callback mode of the YoctoHubs. This mode enables you to control the Yoctopuce modules installed behind a NAT filter. For more information on the HTTP callback mode, you can read our post on the topic as well as the documentation.
We assume that you have some knowledge of the Symfony framework. If you discover Symfony with this post, we recommend that you start by reading the first chapters of the Symfony documentation.
Creating the project
The first step is therefore to install the Symfony CLI tool and to create the base project. The Symfony CLI tool is available for all platforms and you can download it from the Symfony web site.
To create a web project, you must use the symfony new --full command.
symfony new --full my_project_name
This command creates the base tree, a git repository, and installs the Symfony framework.
Thanks to the embedded web server, you can test the project right away. You must use the following command to start the server and open a browser at the displayed address.
symfony server:start --allow-http -d
Adding the HTTP callback
Let's get to the heart of the matter and let's have a look at how to add a Yoctopuce HTTP callback to this project.
First, you must install our PHP library with composer. This step is very easy and you can do it directly with the Symfony CLI tool:
symfony composer require yoctopuce/yoctolib_php
Internally, Symfony uses composer to download and install our PHP programming library.
When you have performed this step, our library is added to the dependency list and is available anywhere in the project.
Then, you must create a controller in which you'll write the PHP code which uses our library. A Symfony controller is simply a PHP class which is responsible for processing an HTTP request.
You can create this file by hand, but it's simpler to use the Symfony tool to create this controller.
This command creates a YoctopuceCallbackController.php file which contains the controller's logic, as well as a index.html.twig file which is the twig template used by the PHP code.
Here is the code of the YoctopuceCallbackController.php file:
namespace App\Controller;
use Symfony\Bundle\FrameworkBundle\Controller\AbstractController;
use Symfony\Component\HttpFoundation\Response;
use Symfony\Component\Routing\Annotation\Route;
class YoctopuceCallbackController extends AbstractController
{
/**
* @Route("/yoctopuce/callback", name="yoctopuce_callback")
*/
public function index(): Response
{
return $this->render('yoctopuce_callback/index.html.twig', [
'controller_name' => 'YoctopuceCallbackController',
]);
}
}
The @Route() annotation of the index method registers the URL which is generated by this method. In other words, if you access the "/yoctopuce/callback" URL of the site, it's the index function which is run.
You must now "transform" this controller into a Yoctopuce HTTP callback. The first thing to do is to use the YAPI::TestHub method which enables you to determine whether the request is performed by a YoctoHub or a web browser. If this function returns YAPI::SUCESS, it's an HTTP callback performed by a YoctoHub or a VirtualHub. In this case, you can use the Yoctopuce API to interact with the Yoctopuce modules connected to the YoctoHub.
If it's an HTTP callback from a YoctoHub, you register the YoctoHub with the YAPI::RegisterHub method. Then, you can go through the list of connected modules with the YModule::FirstModule() and nextModule() methods. For each module, you reverse the state of the beacon led with the get_beacon() and set_beacon() methods. Finally, you return a Response object with an empty string.
If YAPI::TestHub returns an error, it's a request performed by a web browser, and we keep the default code displaying the yoctopuce_callback/index.html.twig template.
Here is the complete code of our HTTP callback:
namespace App\Controller;
use Symfony\Bundle\FrameworkBundle\Controller\AbstractController;
use Symfony\Component\HttpFoundation\Response;
use Symfony\Component\Routing\Annotation\Route;
use YAPI;
use YModule;
class YoctopuceCallbackController extends AbstractController
{
/**
* @Route("/yoctopuce/callback", name="yoctopuce_callback")
*/
public function index(): Response
{
$error = "";
if(YAPI::TestHub("callback", 10, $error) == YAPI::SUCCESS) {
YAPI::RegisterHub("callback");
$module = YModule::FirstModule();
while (!is_null($module)) {
if ($module->get_beacon() == YModule::BEACON_ON) {
$module->set_beacon(YModule::BEACON_OFF);
} else {
$module->set_beacon(YModule::BEACON_ON);
}
$module = $module->nextModule();
}
return new Response("");
}
return $this->render('yoctopuce_callback/index.html.twig', [
'controller_name' => 'YoctopuceCallbackController',
]);
}
}
For people used to our PHP library, note that you don't need to manually include the yocto_api.php file. You must simply import the YAPI and YModule classes in the namespace.
Configuring the YoctoHub
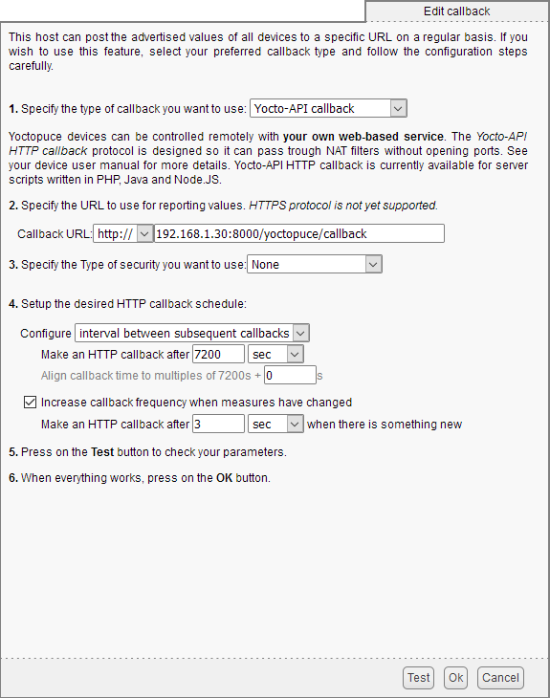
The only thing left to do is to configure the YoctoHub, or the VirtualHub, to connect to the HTTP callback with the URL of our server. In this case, the IP address of the machine is 192.168.1.30. The callback URL is therefore 192.168.1.30:8000/yoctopuce/callback.

The parameters for our HTTP callback
When you click on the test button, the YoctoHub connects itself to the callback and the blue leds of all the modules should go from static to blinking, or the reverse.
Avoiding HTTPS redirection
You may have noticed the use of the --allow-http option when starting the embedded web server.
Current YoctoHubs don't support HTTPS connections. We have a post on this topic, by the way. Therefore, the web server must support HTTP traffic.
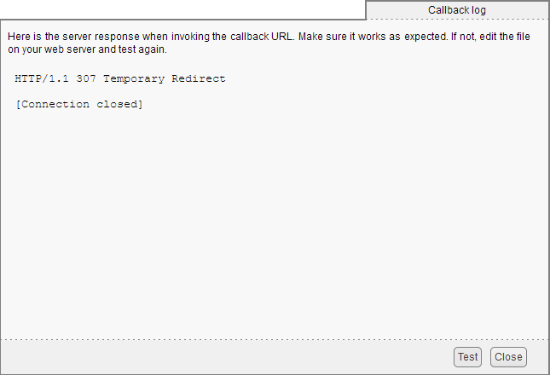
By default, Symfony embedded web server forces a redirection of all the HTTP traffic on HTTPS. So, if you don't use the --allow-http option, the YoctoHubs can't connect to the callback, and when testing, the following message is displayed:

Don't forget the --allow-http option when starting the web server
Conclusion
Symfony is an interesting framework, but it is rather complex at first sight. What you should know is that if you must use Yoctopuce modules in a Symfony project, you can do so.
As usual, you can find the sources of this example on GitHub:
https://github.com/yoctopuce-examples/symfony_test.


