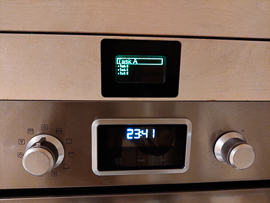
 A few years ago, we embedded a Yocto-MaxiDisplay in a kitchen. This device displayed upcoming events by connecting itself to a Google agenda. 8 years later, the system still works, but instead of displaying a calendar, we would like it to display the items of a Todoist to-do list.
For this project, we are going to reuse the hardware that we mounted 8 years ago. That is, a YoctoHub-Wireless-SR and a Yocto-MaxiDisplay.
The YoctoHub-Wireless-SR is not available anymore and has been replaced with the YoctoHub-Wireless-n, but all the updates and new features which were added to the new YoctoHub models have also been backported on our old modules. This means that our YoctoHub-Wireless-SR with an updated firmware has the same features as a new YoctoHub-Wireless-n.
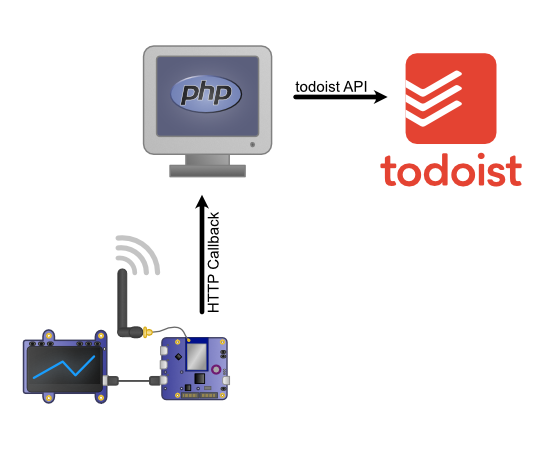
The working principle stays the same, the YoctoHub uses an HTTP callback to connect to a PHP script. The PHP script retrieves the list of tasks using the Todoist API and displays the current tasks on the YoctoMaxi-Display.

the YoctoHub uses an HTTP callback to connect to a PHP script. The PHP script retrieves the list of tasks.
The Todoist API
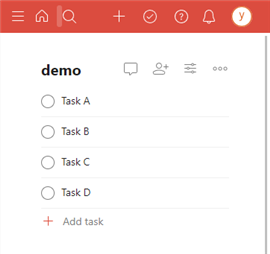
Todoist is a cloud service enabling you to create and manage to-do lists. Once you have created an account, you can add tasks. You can also sort them into different projects to organize these tasks; in short, traditional features for a to-do list application. Note that we are not in any way affiliated or sponsored by Todoist. It just so happens that we use this service in our private lives, that's all.
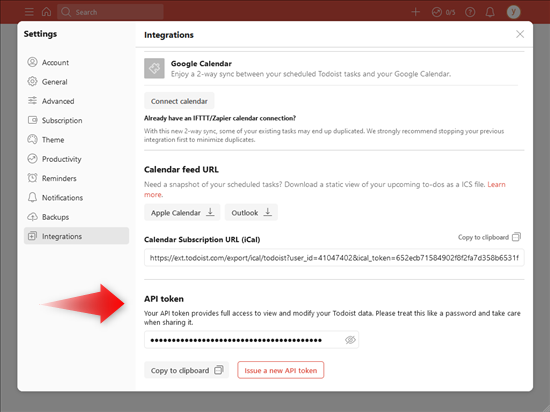
This services has a REST API which allows you to consult and modify the list of tasks. Unlike other services, the API is very easy to use and doesn't requite an OAuth2 authentication. To authenticate with Todoist, you must simply give as parameter a key which is available in the parameters of your account.

The authentication key to use the API is available in the parameters
Todoist doesn't yet offer an SDK in PHP (currently only Python and JavaScript are supported). Therefore, we created a TodoistAPI class forging HTTP request to access the API.
The constructor takes as parameter the authentication key. This key is added to the HTTP headers of all the requests sent to the Todoist sever.
The get_active_tasks method performs a request to the API to obtain the list of tasks and returns them in a PHP array with the tasks in the correct order.
{
private $api_key;
private $project_id = -1;
public function __construct($api_key)
{
$this->api_key = $api_key;
}
private function request($url, bool $post_request = false)
{
$ch = curl_init();
try {
curl_setopt($ch, CURLOPT_URL, $url);
if ($post_request) {
curl_setopt($ch, CURLOPT_POST, true);
}
curl_setopt($ch, CURLOPT_RETURNTRANSFER, true);
curl_setopt($ch, CURLOPT_HTTPHEADER, array(
"Authorization: Bearer " . $this->api_key
));
$response = curl_exec($ch);
if ($response === false && curl_errno($ch)) {
print_r(curl_error($ch));
die();
}
} catch (\Throwable $th) {
throw $th;
} finally {
curl_close($ch);
}
return json_decode($response, true);
}
public function get_active_tasks()
{
$all_tasks = $this->request("https://api.todoist.com/rest/v2/tasks");
$res = [];
foreach ($all_tasks as $task) {
if ($this->project_id < 0 ||
$task['project_id'] == $this->project_id) {
$res[] = $task;
}
}
uasort($res, function ($a, $b) {
if ($a['order'] == $b['order']) {
return 0;
}
return ($a['order'] < $b['order']) ? -1 : 1;
});
return $res;
}
....
}
This class is meant to work independently of the Yoctopuce library and is stored in the TodoistAPI.php file.
The PHP callback
Now that we have a PHP code enabling us to interact with the list of tasks, we only need to implement the PHP callback that the YoctoHub must call.
We are going to quickly gloss over the details of the HTTP callback, as we already have a large number of posts and tutorials explaining in details how the HTTP callback mode works as well as how to implement it.
The main code of the PHP script is the following:
const TODOIST_API_KEY = "REPLACE WITH YOUR API KEY";
const TODOIST_PROJECT = "";
$error = "";
$url = 'md5:' . CALLBACK_PASS . '@callback';
if (YAPI::TestHub($url, 10, $error) == YAPI::SUCCESS) {
YAPI::RegisterHub($url);
$todoist = new TodoistAPI(TODOIST_API_KEY);
$display = YDisplay::FirstDisplay();
if ($display != null){
if (TODOIST_PROJECT!=''){
$todoist->fiter_project(TODOIST_PROJECT);
}
update_display($todoist, $display);
print("All done.");
} else {
print("No Yoctopuce display connected.");
}
die();
}
The YAPI::TestHub method enables us to test whether the request actually comes from a YoctoHub. If it is the case, we initialize the connection to the YoctoHub with the YAPI::RegisterHub method.
We initialize our TodoistAPI object by giving it the API key. If a display is present, we call the update_display function which updates the Yocto-MaxiDisplay.
This function refreshes the display using the double buffering technique in order to avoid potential flickering when updating the information. That is, we write on layer 0 which is hidden, and at the end we swap layer 0 and layer 1.
{
$tasks = $todoist->get_active_tasks();
$layer0 = $display->get_displayLayer(0);
$layer0->hide();
$layer0->clear();
if (sizeof($tasks) == 0) {
$layer0->selectFont("Medium.yfm");
$layer0->drawText(64, 32, YDisplayLayer::ALIGN_CENTER, "empty :-)");
} else {
$is_first = true;
$v_pos = 0;
foreach ($tasks as $t) {
if ($is_first) {
$layer0->selectFont("Medium.yfm");
$layer0->drawText(2, $v_pos,
YDisplayLayer::ALIGN_TOP_LEFT,
$t['content']);
$layer0->drawRect(0, 0, 127, 15);
$is_first = false;
$v_pos += 18;
} else {
$layer0->selectFont("Small.yfm");
$layer0->drawCircle(3, $v_pos + 4, 2);
$layer0->drawText(8, $v_pos,
YDisplayLayer::ALIGN_TOP_LEFT,
$t['content']);
$v_pos += 10;
}
if ($v_pos > 64) {
break;
}
}
}
$display->swapLayerContent(0, 1);
$layer1 = $display->get_displayLayer(1);
$layer1->unhide();
}
As usual, the complete source code is available on GitHub: https://github.com/yoctopuce-examples/todoist_display
Installation
To install this script on your server, you must copy the files in your directory and edit the index.php file to update the following three variables:
const TODOIST_API_KEY = "REPLACE WITH YOUR API KEY";
const TODOIST_PROJECT = "";
The CALLBACK_MD5_PASS variable corresponds to the password used for the MD5 signature. TODOIST_API_KEY is the Todoist authentication key. Finally, TODOIST_PROJECT enables you to filter tasks to use only those of a specific project. If this value is an empty string, the tasks of all the projects are displayed.
Finally, for the HTTP callback mode to work, the PHP option allow_url_fopen must be enabled. If this option is disabled, the YAPI::RegisterHub returns a "URL file-access is disabled in the server configuration" error. In this case, you can consult our post on the HTTP callback mode which explains how to enable this option.
What's left is to configure the HTTP callback of the YoctoHub so that it connects to our PHP script, taking care to use the password that we defined above.
That's it! We have our to-do list displayed in our kitchen.


See you in 8 years to see if the modules still work and if we still use this service :-D


