![]() Many home automation projects use mini-PCs running under Linux. Some of these mini-PCs have an HDMI output, but other, such as the OLinuXino, don't have a video output. In this case, the solution to configure these boards is to use a serial console. The problem is that no computer has a serial port anymore and if you have an old enough computer to have an RS232 port, you can't use it because the RS232 port works in 12 Volts. The traditional solution is to use a USB-serial adapter sold by the constructor. But you can also use a Yocto-Serial.
Many home automation projects use mini-PCs running under Linux. Some of these mini-PCs have an HDMI output, but other, such as the OLinuXino, don't have a video output. In this case, the solution to configure these boards is to use a serial console. The problem is that no computer has a serial port anymore and if you have an old enough computer to have an RS232 port, you can't use it because the RS232 port works in 12 Volts. The traditional solution is to use a USB-serial adapter sold by the constructor. But you can also use a Yocto-Serial.
For this post, we are using an RT5350F OLinuXino. It's a small board using a mips CPU and it comes with a pre-installed OpenWRT distribution. Unfortunately, by default, the Wifi network is disabled and Ethernet ports are not routed. To access the OpenWRT interface, you must therefore start by modifying the network configuration. This is not easy because this board doesn't have a display output. The only solution is to activate the network with the serial console.
To access this serial console, you must connect the Yocto-Serial to the board three pins: GND, UART_TXD2, and UART_RXD2. Beware, you must connect the board UART_TXD2 line on the Yocto-Serial RX line, and vice-versa, otherwise communications won't work.

Wiring between the Yocto-Serial and the OLinuXino
Then, you must determine the serial port communication parameters. By looking at the board and at the OLinuXino documentation, we guess that we must configure the Yocto-Serial as follows:
- 57600 Bauds
- 8 data bits
- no parity bit
- one stop bit
- no flow control
- use TTL levels (3.3V)
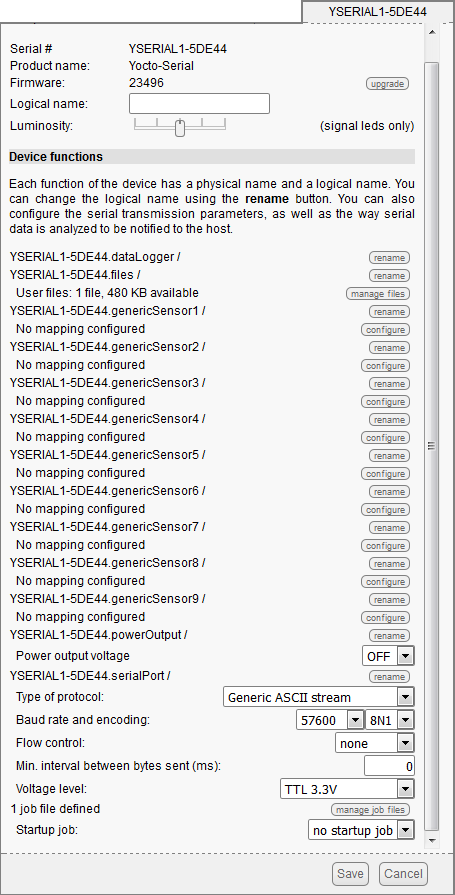
You can easily check these parameters with the VirtualHub. The Yocto-Serial configuration window allows you to enter the parameters listed above. For the VirtualHub to correctly display the characters sent by the OLinuXino, you must use the "Generic ASCII Stream" protocol.

The Yocto-Serial configuration to communicate with the OLinuXino
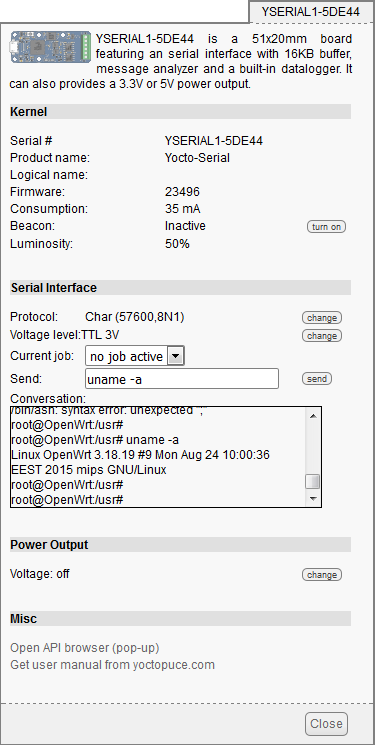
When you have saved these parameters, you can communicate with the OLinuXino from the Yocto-Serial detail window. As this window is very small and doesn't manage escape sequences, the result is not very readable, but you can nonetheless check that wiring is correct.

The Yocto-Serial detail window
You can send a few commands with the "Send" field, but it's really for troubleshooting only.
The best solution is to write a short program which correctly displays the data sent by
the OLinuXino and which transmits the keyboard inputs to the OLinuXino board. In short, you must write a "pseudo" VT100 terminal.
We decided to write this program in Python because it's a relatively simple and portable language, but we could have used any other language that we support.
The first thing that this pseudo terminal must do is to instantiate a YSerialPort object corresponding to the Yocto-Serial and to configure it to use the parameters used above. If you use the same Yocto-Serial, you don't really have to do it because these parameters are saved in the module, but it's good practice to ensure that every module works in the correct mode.
if YAPI.RegisterHub("usb", errmsg) != YAPI.SUCCESS:
sys.exit("init error" + errmsg.value)
serialPort.set_voltageLevel(YSerialPort.VOLTAGELEVEL_TTL3V)
serialPort.set_serialMode("57600,8N1")
serialPort.set_protocol("Char")
serialPort.reset()
serialPort.registerValueCallback(new_data_cb)
We register a new_data_cb callback function to display the received data. This function is called by the Yoctopuce library each time new data are available.
def new_data_cb(serial_port, value):
global unhandled_esc_sequ
read_str = serial_port.readStr(65535)
if read_str == '':
return
out_str, unhandled_esc_sequ = handle_esc_seq(unhandled_esc_sequ + read_str)
sys.stdout.write(out_str)
The parameters of this callback function are the YSerialPort object and a character string. As the Yocto-Serial can buffer up to 64K of received data, the value string doesn't directly contain the received data but the size of the data available on the Yocto-Serial and the last two characters. In this example, we are not going to use this parameter but simply call the readStr() which returns a character string with a maximum of 65535 characters containing the available data which haven't been read yet.
You must then correctly parse the ANSI escape codes to have a correct display. The code of this function is available with the sources of this project on GitHub. The last_part global variable is used to save a potential escape code which would straddle two readStr() calls.
Finally, you must retrieve the pressed keys and transmit them to the OLinuXino. Unfortunately, there is no Python module working both under Unix and under Windows to retrieve this information. Therefore, you must write two implementations. Under Windows, we used the msvcrt module which is very easy to use but limited. For the other platforms, we used the terminos module to disable echo and buffering on the standard input.
This code is not enough to create a true terminal fully supporting all the escape codes, but it is largely enough to comfortably read the Linux kernel boot logs and run a few commands to configure the network interface.
colorama.init()
fd = None
old_settings = None
if platform.system() == 'Windows':
import msvcrt
else:
import tty
import termios
import select
fd = sys.stdin.fileno()
old_settings = termios.tcgetattr(fd)
new_settings = termios.tcgetattr(fd)
new_settings[3] = (new_settings[3] & ~termios.ICANON & ~termios.ECHO)
termios.tcsetattr(fd, termios.TCSAFLUSH, new_settings)
ctr_c_pressed = False
while True:
try:
if kbhit():
c = getch()
ctr_c_pressed = False
keycode = ord(c)
if keycode == 224:
c = getch()
keycode = ord(c)
if keycode == 72:
serialPort.writeStr(colorama.ansi.Cursor.UP())
elif keycode == 77:
serialPort.writeStr(colorama.ansi.Cursor.FORWARD())
elif keycode == 80:
serialPort.writeStr(colorama.ansi.Cursor.DOWN())
elif keycode == 75:
serialPort.writeStr(colorama.ansi.Cursor.BACK())
else:
print("Keyco (%X %c)" % (keycode, c))
else:
serialPort.writeByte(keycode)
YAPI.HandleEvents()
YAPI.UpdateDeviceList()
except KeyboardInterrupt:
if ctr_c_pressed:
print("Exit serial_term")
break
else:
print("\nPress a second time Ctr-C to exit serial_term")
ctr_c_pressed = True
YAPI.FreeAPI()
# restore terminal settinsg
if platform.system() != 'Windows':
termios.tcsetattr(fd, termios.TCSAFLUSH, old_settings)
As always, the complete code is available on GitHub: https://github.com/yoctopuce-examples/basic_serial_terminal.
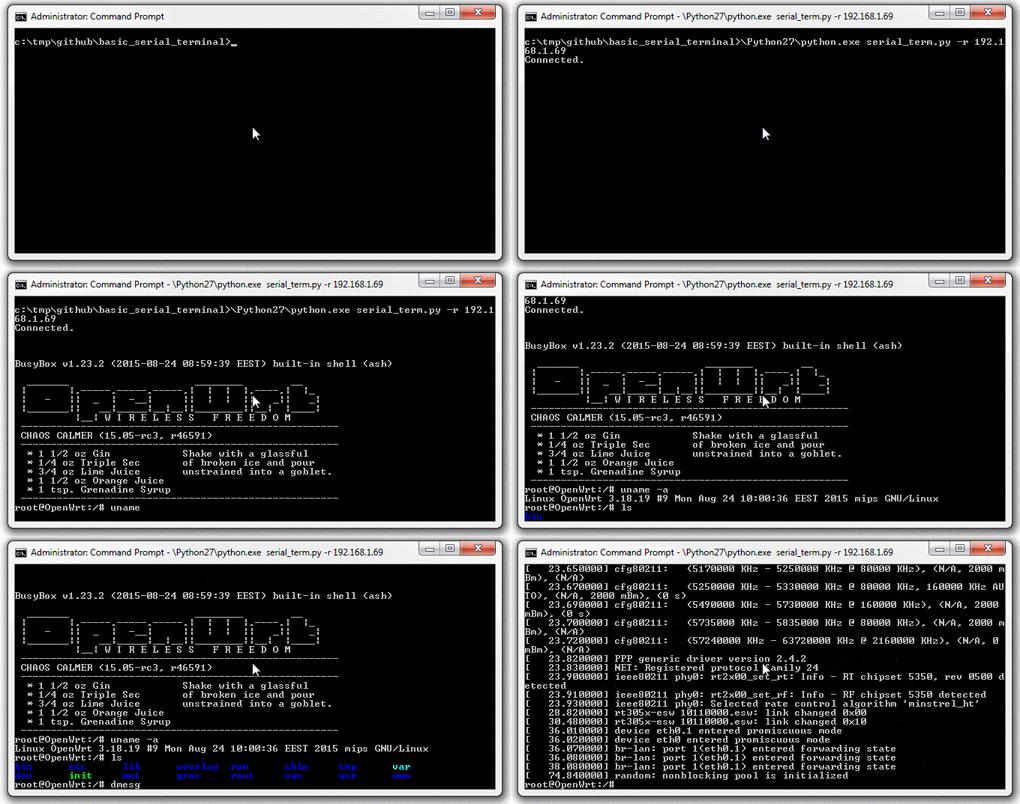
We can stop the VirtualHub and run our pseudo terminal to comfortably run the few commands needed to enable the network interface of the OLinuXino. We aren't going to detail the necessary commands to configure the OLinuXino network interfaces, as they are documented on the OpenWRT site and the goal of this post is to show how to run a command with a Yocto-Serial.

This pseudo terminal can run a few necessary commands
There are three advantages to using a Yocto-Serial instead of a proprietary cable: First, all these USB-serial adapters use an FTDI chip requiring you to install a driver. Second, these adapters create virtual COM ports linked to a single USB port. Thus, if you connect the same adapter on the same machine but on another USB port, a new virtual COM port is created and you must, therefore, modify the terminal configuration to use this new COM port. Finally, with a Yocto-Serial, you can connect it on a YoctoHub and you can thus use it with the Ethernet, Wifi, or GSM network.


