![]() This week, we are continuing our series of articles for the beginners. This time, we will have a look at the logical structure of Yoctopuce devices, and how to use it. If you are a beginner, we suggest that you read this article carefully, as it will allow you to get the best from your Yoctopuce devices.
This week, we are continuing our series of articles for the beginners. This time, we will have a look at the logical structure of Yoctopuce devices, and how to use it. If you are a beginner, we suggest that you read this article carefully, as it will allow you to get the best from your Yoctopuce devices.
From the Yoctopuce API point of view, all Yoctopuce devices have a similar structure. Once the principles are understood, you are likely to be able to use any Yoctopuce device.
A Device module = A feature set
In the Yoctopuce world, a device is just a set of features. For instance a Yocto-Meteo provides 3 main features:
- Humidity: allowing to work with the humidity measured by the device.
- Pressure: allowing to work with atmospheric pressure.
- Temperature: allowing to work with temperature.
Here is an other example: the Yocto-Thermocouple also makes available a Temperature feature, which is, from an API standpoint, equivalent to one offered by the Yocto-Meteo.
If addition of the main features directly linked to the device usage, each devices may offer additional features such as:
- Module : the "module" feature can be found on every device. It allows to work with the device global settings, such as luminosity, the localisation beacon etc.
- Datalogger : all Yoctopuce sensors provide a data logger feature, allowing to record measured data in the device flash memory.
Apart from a few exceptions, each feature is independent from the others. From the API standpoint, one can work on a feature without even knowing which device is hosting it.
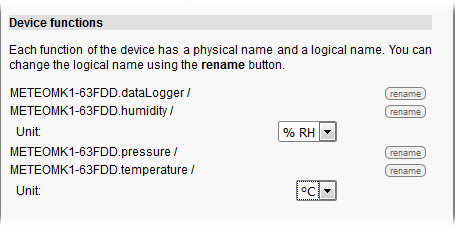
Should you need to know a device features list, you can use the VirtualHub: the configuration will list all of them.

All features hosted on a Yocto-Meteo, except 'module' which is implicit
Programming: the classes
The Yoctopuce API is distributed among several classes matching each feature. For instance if you need to work with the temperature sensor hosted on a Yocto-Meteo, you will need the YTemperature class. If you want to work with the atmospheric pressure, you will need the YPressure class and so on. Each class is defined in a file with the same name, for instance in python, YTemperature is defined in ytemperature.py. You will find the classes documentation here, included an interactive HTML version for each programming language. Some special classes such as YModule and YAPI are defined in the main file yocto_api. Since that file must always be included, theses classes are always available.
Lets consider a practical case: you want to write some python code in order to handle a Yocto-Meteo. You are interested in temperature humidity measures. Your program will start with:
from yocto_temperature import *
from yocto_humidity import *
Although the Yocto-Meteo do host a Pressure feature, you don't have to include yocto_pressure if you don't plan to work with atmospheric pressure.
API initialization
Lets make a brief, but much-needed, digression. No matter what you want to program, as long as it's for handling Yoctopuce devices, you must initialize the Yoctopuce API prior to anything. To do so, you will have to call RegisterHub. For instance, in C#, you should write something looking like:
{ Console.WriteLine("RegisterHub error: " + errmsg);
Environment.Exit(0);
}
Instead of the "usb" parameter you can also use an IP adress, this would allow to access Yoctopuce through the network. You will find detailed explanations about RegisterHub in that article we wrote some time ago.
Programing: Features enumeration
With the API it is quite easy to enumerate all the features of a given type among all the connected devices. For instance the following code will list all available Temperature features:
while (t!=null)
{ Console.WriteLine(t.get_friendyName());
t = t.nextTemperature();
}
If you are sure that your project features only one temperature sensor, you can use the following code to retrieve the sensor and its value:
if (t==null) Console.WriteLine("No available temperature sensor");
else Console.WriteLine(t.get_currentValue());
That code have an interesting side effect: if you replace the device featuring a temperature sensor with an other one also featuring a temperature sensor, the program will still work even if the device model differ. For instance you can replace a Yocto-Temperature with a Yocto-Meteo, and your code will still work, you won't even have to compile it again.
Beware: during a feature enumeration, you have no guaranty about the returned features order. If your have several features of the same type in a same project you might run into problems if you use that enumeration approach.
Programming: name based direct access
Indeed, situation might become a bit hairy as soon as one want to use several identical Yoctopuce devices in the same project. That's why one can work using names. Actually you have two name systems at your disposal: hardware ID and logical names:
Hardware IDs
Each feature have an hardware ID assigned at manufacturing time and which cannot be modified. Hardware ID follow a specific pattern: SERIAL.functionName. For instance, lets assume we have a Yocto-Meteo, serial number "METEOMK1-12345". Hardware IDs for that device features will be:
- METEOMK1-12345.modulefor the module part
- METEOMK1-12345.temperature for the temperature
- METEOMK1-12345.pressure for the atmospheric pressure
- METEOMK1-12345.humidity for the humidity
- METEOMK1-12345.datalogger for the data-logger
Beware, some devices can host several features of the same type, in that case harwdare IDs are numbered. For instance, lets consider a Yocto-Thermocouple, serial "THRMCPL1-12345", hardware IDs would be:
- THRMCPL1-12345.module for the module part
- THRMCPL1-12345.temperature1 for the temperature, channel 1
- THRMCPL1-12345.temperature2 for the temperature, channel 2
- METEOMK1-12345.datalogger for the data-logger
If you know the hardware ID of the feature you are interested in, it is quite easy to directly access to that feature. Lets assume you want to know the temperature measured by our Yocto-Meteo, serial still being METEOMK1-12345, one would write:
if (t.isOnline()) Console.WriteLine(t.get_currentValue());
else Console.WriteLine("Not available.");
Beware, YTemperature.FindTemperature will always return a valid object, no matter if the feature has been found or not. If you want to check if the matching device is really connected you have to use isOnline() as shown in the code above.
Should you need to find out what is the serial number of a device, you can use the VirtualHub. That serial number is also printed on the device packing bag.
Logical name
Hardware IDs are very convenient to access Yoctopuce devices. However, you might run into a problem if you want to build several copies of the same system. By definition, devices in each copy will not not have the same serial numbers. So, writing a programs able to handle each copy indifferently might be a bit tedious. That's why Yoctopuce devices can be accessed through Logical names.
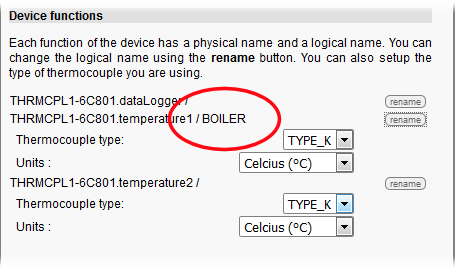
You can assign an arbitrary name to every feature hosted on a device. These logical names are persistent: the device will remember them even after a power cycle. The easiest way to assign a logical name is to use the VirtualHub. For instance in the screen-shot below, we configured a THRMCPL1-6C801 device and renamed "temperature1" feature to "BOILER".

Assigning logical names with the VirtualHub
Then one can use the following code:
if (t.isOnline()) Console.WriteLine(t.get_currentValue());
else Console.WriteLine("Not available.");
That way, you can build several copies of the same boiler monitoring system without having the wrote code specific to each installation. All you have to do is assign proper logical names at building time, and that's it. Obviously, each logical name should be unique inside the same system.
Conclusion
Here we are, you know the basics about Yoctopuce devices logical structure and how to access it through a program. That being said, the Yoctopuce API does feature some more subtleties, you will find more details in the devices documentation.


