 A few months ago, we wrote a post explaining how to drive the opening of Velux skylight windows with a KLF 200 interface. This week, we are going to improve this system by adding a control panel to it.
As a reminder, in our previous post we used two Yocto-MaxiPowerRelay to drive the Velux KLF 200 interface, which in turn controlled the opening and closing of the windows of the room. The initial aim was to open the windows if the CO2 rate went above a given threshold.
This system is still in operation, but with the first heat waves, we want to add a control panel enabling us to manually drive the opening and closing of the windows.
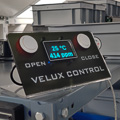
This control panel has two buttons which enable us to open and close all the windows, and a screen which displays the room ambient temperature and the CO2 rate.

The control panel
To implement this control panel, we used a Yocto-MaxiDisplay, a Yocto-Meteo-V2, and a YoctoHub-Wireless-n. The Yocto-MaxiDisplay is perfect for this type of application because on top of the screen it has 6 analog inputs on which you can connect buttons. The Yocto-Meteo-V2 enables us to obtain the ambient temperature. Note that we could have used any other Yoctopuce temperature sensor, such as the Yocto-Temperature which is cheaper.
In order to be able to put the control panel anywhere, we connected these modules to a YoctoHub-Wireless-n.

The modules composing the control panel
When the modules are assembled together, we must configure the YoctoHub-Wireless-n with the VirtualHub so that it connects itself to the local Wifi network.
Adapting the code
Thanks to the logical structure of Yoctopuce modules, we can easily modify the code to integrate this control panel.
The first modification is to include all the files of the functions that are used by the control panel, that is YDisplay, YTemperature, and YAnbutton.
from yocto_api import *
from yocto_relay import *
from yocto_carbondioxide import *
from yocto_display import *
from yocto_temperature import *
from yocto_anbutton import *
The second one is to call the YAPI.RegisterHub method for each YoctoHub. In the present case, the address of the YoctoHubs is taken from the configuration file.
if YAPI.RegisterHub(hub, errmsg) != YAPI.SUCCESS:
sys.exit("Unable connect to %s : %s" % (hub, errmsg.value))
We then added a refreshDislpays method which displays the current temperature as well as the measured CO2 rate. In order to avoid flickering issues when updating the information, we used two layers: one layer is always hidden and one layer is always displayed. The code "draws" the text on the hidden layer and when everything is ready, the swapLayerContent method swaps the content of the two layers.
for disp in self.displays:
if not disp.isOnline():
continue
try:
# retrieves the display size
w = disp.get_displayWidth()
h = disp.get_displayHeight()
# retrieves the first layer
l1 = disp.get_displayLayer(1)
l1.hide()
l1.clear()
l1.selectFont("Large.yfm")
if self.temperature.isOnline():
msg = "%.1d %s" % (self.temperature.get_currentValue(),
self.temperature.get_unit())
else:
msg = "Unk"
# displays a text in the middle of the screen
l1.drawText(w / 2, h / 4, YDisplayLayer.ALIGN.CENTER, msg)
if self.co2sensor.isOnline():
msg = "%.1d %s" % (self.co2sensor.get_currentValue(),
self.co2sensor.get_unit())
else:
msg = "Unk"
# displays a text in the middle of the screen
l1.drawText(w / 2, h / 4 * 3, YDisplayLayer.ALIGN.CENTER, msg)
l1.selectFont("Small.yfm")
l1.drawText(0, 0, YDisplayLayer.ALIGN.TOP_LEFT, "%d" % self._alive_counter)
self._alive_counter += 1
if self._alive_counter >= 10:
self._alive_counter = 0
disp.swapLayerContent(3, 1)
except YAPI_Exception:
print("unable to display information on " + disp.get_friendlyName())
To manage the buttons, we wrote a short VeluxButton object which enables us to cleanly encapsulate callback management for the analog inputs of the Yocto-MaxiDisplay. For each button of the panel that we need to manage, we must instantiate a VeluxButton object by passing it the hardwareId of the input, the pointer to the Velux controller, and the command to be performed (open or close).
def __init__(self, controler, cmd, targets, hwid):
self._controler = controler
self._cmd = cmd.lower()
self._target = targets
self._anButton = YAnButton.FindAnButton(hwid)
self._anButton.registerValueCallback(self.anButtonCB)
def anButtonCB(self, anbutton, value):
if sef._controler.isVerbose():
print("AnCB:" + anbutton.get_hardwareId() + "=" + value)
if int(value) != 0:
# value != 0 meant that the button is pressed
if (self._cmd == 'open'):
self._controler.open(self._target, True)
elif self._cmd == 'close':
self._controler.close(self._target, True)
Finally, we modified the main loop to add a call to our refreshDisplays method as well as to the YAPI.Sleep method which waits 1 second and calls the anButtonCB callbacks of the VeluxButton objects. For more information on callback mechanisms, you can read our post on the topic.
# starts with all Velux closed
self.close([], True)
self.manually_open = False
if self.verbose:
print("Co2 limit is set to %d ppm" % self.co2_open_limit)
# display clean up
for disp in self.displays:
if (disp.isOnline()):
disp.resetAll()
while True:
self.refreshDisplays()
if self.co2sensor.isOnline():
value = self.co2sensor.get_currentValue()
if value > self.co2_open_limit:
self.open([], false)
elif value < self.co2_close_limit and not self.manually_open:
self.close([], false)
YAPI.UpdateDeviceList()
YAPI.Sleep(1000)
We detailed only the parts of the code which interact with the Yoctopuce library, but you can download the complete code from GitHub: https://github.com/yoctopuce-examples/velux_controler.

