In the last few weeks, we have shown you our new web solution to control and remotely monitor Yoctopuce systems. We took care to provide you with a tool allowing you to perform the installation in a few clicks in most cases, but as we quickly met users for whom this was not enough, here is a more detailed installation guide of VirtualHub (for Web).
To explain how VirtualHub (for Web) should be installed, we need to start by understanding how it is intended to work.
Structure of a VirtualHub (for Web) installation
1. Entry point
VirtualHub (for Web) is intended to emulate on a PHP server the behavior of a VirtualHub or a YoctoHub. It has to respond to a number of different URLs, the exact list of which is not determined in advance. The web server must therefore be configured to send all requests to a single PHP script that serves as an entry point to the application and that parses the requested URL to provide the appropriate response. This is the mechanism used by most CMS, like WordPress for example. It is configured through a URL rewrite rule .
Since VirtualHub (for Web) does not claim to be the only application on your PHP server, the rewrite rule must be specific to the directory where it is installed. Moreover, we have already anticipated that you can have several instances of VirtualHub (for Web) on the same server, possibly using different versions of the code in order to be able to test new versions in pre-production. The URL rewriting rule must therefore return each request to the correct instance.
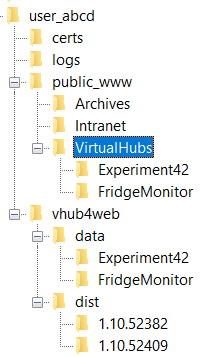
Here is what the public tree structure might look like on a web server on which VirtualHub (for Web) is installed:

Web server public file tree structure
Note that the VirtualHubs directory does not have to have this name, nor does it have to be placed at the root of the Web site: you can of course put it wherever you want and give it any name you like.
On an Apache server, the necessary rewrite rule can usually be configured very simply by putting in the VirtualHubs directory a .htaccess file with the following content:
RewriteEngine on
RewriteRule ^([^/]*)/.*$ $1/index.php [PT]
This is exactly what the VirtualHub (for Web) installer does. This solution has the advantage of being entirely local: you can move or rename the VirtualHubs directory, and the rewrite rule still works. But as some people will tell you that the use of .htaccess files has a negative impact on the performance of the web server, you can also put an equivalent rule in the global configuration of the Apache server if you prefer:
RewriteEngine on
RewriteCond %{DOCUMENT_ROOT}%{REQUEST_URI} !-f
RewriteRule ^(/VirtualHubs/[^/]*)/.*$1/index.php [PT]
The corresponding configuration on a nginx server would be:
On a Microsoft IIS server, it would be:
<match url="^(VirtualHubs/[^/]*)/.*$"/>
<action type="Rewrite" url="{R:1}/index.php;"/>
</rule>
And on a Caddy server, we would add to the Caddyfile:
path_regexp static ^(/VirtualHubs/[^/]*)/.*$
}
rewrite @vhub4web {re.static.1}/index.php
2. Code and data files
The entry point of VirtualHub (for web) is an index.php file which contains only four lines of PHP.
- It defines the VHUB4WEB_CODE directory, where the application code is located
- It defines the VHUB4WEB_DATAdirectory, where the instance specific data is located
- It passes control to [VHUB4WEB_CODE]/vhub4web-init.php
This structure not only avoids duplicating the code for each instance of VirtualHub (for web), but also allows several versions of the software to coexist on the server, thus making it easy to change an instance from one version to another by simply changing the VHUB4WEB_CODE constant.
Here is what a typical installation of VirtualHub (for Web) looks like, with two instances running on two different versions:

Full tree structure
The contents of the code directory for each version boils down to four files:
- vhub4web-init.php: the starting point, which defines the global system settings and loads the main code corresponding to the detected PHP version
- vhub4web-php7.php: the complete code of VirtualHub (for Web), for PHP 7.x
- vhub4web-php8.php: the complete code of VirtualHub (for Web), for PHP 8.x
- YFSImg.yfs: the Web interface files (HTML pages, stylesheets), packaged in a monolithic archive
Note that contrary to what some people thought, the vhub4web-php*.php files are not really the source files: they are bundles generated by a build process, which facilitate the installation on the server and allow loading the whole code in one block.
The data directory of each instance contains a few dozen files whose name starts with VHUB4WEB, which store different aspects of the state of the VirtualHub (for web) instance, and one .tar file per module connected to the instance. Each of these .tar files stores all the information about the state of the concerned module, including its logs, the latest values of its functions and the history of transmitted sensor values (data logger). There is no need to configure a database manager to use VirtualHub (for Web), since all measures are stored in these .tar files.
3. Simplified installation variant
The structure described above corresponds to the advanced installation mode proposed by the installer: this is the one we use the most.
For cases where the user would like to keep all the files necessary for operating VirtualHub (for Web) in a single place, the installer also proposes a simplified mode (Basic), where all the files are placed in the public tree structure on the Web server:
- VHUB4WEB_CODE then points to the root directory of all instances;
- VHUB4WEB_DATA points directly to the directory of the instance.
An important limitation of this simplified configuration is that the instances necessarily all share the same code version.
Configuring HTTP callbacks
The only type of HTTP callback that provides the necessary functions for VirtualHub (for Web) is the Yocto-API callback. For the PHP version (the only one available at the moment), you have to use a URL of type http:// pointing to the specific instance, with the suffix HTTPCallback. For example:
To ensure that only your hubs can connect to your instance, use the VirtualHub-4web configuration window to set an Incoming HTTP Yocto-API Callback password (MD5 Signature). Once configured, only HTTP callbacks signed with this password are taken into account. You must therefore configure the hub accordingly:

Securing the HTTP callbacks
The frequency of HTTP callbacks is another important element to configure depending on your application. The interval between callbacks can typically vary from ten seconds to one or two hours, depending on your needs. But beware, if you are using a cellular transmission, too frequent transmissions could cost you!
If the goal is simply to pull up measures for display using Yocto-Visualization (for Web), the frequency directly determines the refresh rate for displaying the measures. On the other hand, thanks to the fact that the YoctoHub is able to store measures between HTTP callbacks, you can perfectly use one callback per minute and get measure graphs with one point every ten seconds: you just have to set the measure frequency to "6/m" (six per minute), and the callback interval to 60 seconds. Every minute, six new points appear simultaneously in the graph.
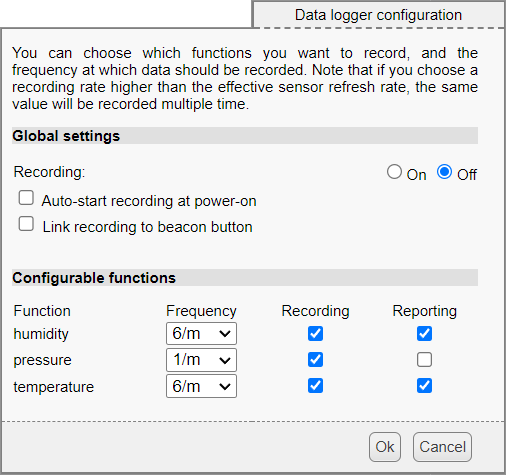
If your graph has holes in it, you have probably exceeded the hub measure storage capacity. A YoctoHub can store about 150 measures, so when you ask for too much, the oldest measures are lost. The most common cause of this hole problem is that other sensors which are also connected to the hub, but which you may not even be using, are sending measures every second - this is the factory setting. For each module connected to your hub, take care to open the measure frequency configuration interface and if necessary disable or slow down measure reporting to the hub for sensors that are not useful to you:

Frequency of measure reporting by the sensors
To help you optimize the frequency of callbacks in relation to the storage capacity of the hub, you can use the statistical data collected by VirtualHub (for Web): by clicking on the serial number VHUB4WEB-xxxx in the list of modules, you get the list of hubs that connect to this instance. Next to each hub, a view stats button gives you precise information about the actual interval between callbacks and the use rate of the hub measure buffer. When the use rate exceeds 100%, it means that measures have been lost, and that you need to either reduce the number of measures transmitted by the sensors, or increase the HTTP callbacks frequency in proportion to the overflow.

Measure buffer statistics of use
This statistics window has other tabs, which also allow you to anticipate the order of magnitude of the cost in terms of data sent and received, or to diagnose possible anomalies in the behavior of the modules (number of connected modules, cold restarts, and so on).
Confusing behaviors
Although the joint use of Yocto-Visualization (for Web) and VirtualHub (for Web) is generally quite intuitive, the direct use of the VirtualHub (for Web) interface can sometimes seem a bit... strange.
You have to realize that the module information displayed in the web interface is always based on the last known state of the module, during the previous HTTP callback. But when you make a configuration change on a module via this interface (for example if you change the frequency of transmission of measurements), this change is applied to the module only during the next HTTP callback. So while waiting for the next HTTP callback, it is always the state prior to your change that is displayed, as if your setting had been ignored. It is only a little later that your change does actually appear on the interface.
We are currently working on a modification of the interface that avoids this quirk and allows you to alternatively see the anticipated state of the module after applying the configuration changes, or the last confirmed state. But for now, just be aware of this issue, and don't worry about it. You can always check the list of configuration changes that are planned to be sent to the hub in the tab of the statistics window that encrypts the transmitted and received data.


