 Node-RED is a visual programming language that can be used to connect various Web services, API or peripherals together. Node-RED can use data coming from a Web server, a MQTT broker, a mail server or even Twitter, but not from Yoctopuce sensors. That is, until yesterday...
Node-RED is a service written in Node.js which can be used on most operating system (Windows, Linux, etc.). It is even included by default on Raspbian. The Web UI can be reached using a Web browser on port 1880. The key point of Node-RED is that it is not just an application, but a visual programming environment.
In opposition to standard programming languages, the user does not enter text to describe the interaction between objects, but he "draws" the relation between the objects. Each object is displayed as a "node" that the user places on the schema. Nodes outputs and inputs are then linked together. A node can represent a web service, like Twitter, a logical operation, like a test, a UI widget, or as we are going to see, a sensor device. Depending on the node role, it can have zero or one input and/or one or more outputs.
The default set of nodes offered by Node-RED is quite limited, but there are plenty of community-maintained packages which can easily be installed as add-ons. We have therefore created a new package that adds a new type of node named YSensor, which can be used to feed the measures from Yoctopuce sensors into Node-RED.
To add a YSensor node, you must install the package
node-red-contrib-yoctopuce-sensors into Node-RED configuration directory. By default this directory is ~/.node-red on Unix and %HOMEPATH%\.nodered under Windows.
npm install node-red-contrib-yoctopuce-sensors
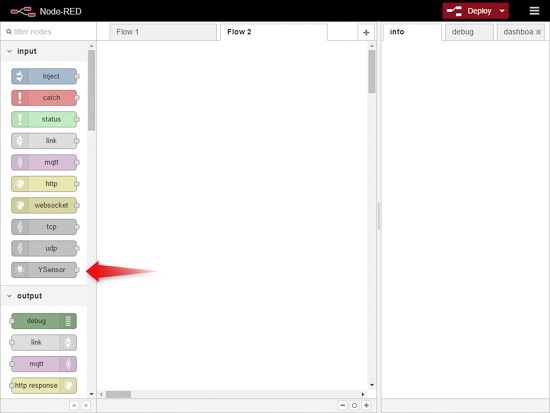
Once the package is installed, you must restart Node-RED so that the Node-RED UI displays the new YSensor node in the input section.

The YSensor node
The YSensor node
The YSensor node has a single output, which publishes the value of the corresponding Yoctopuce sensor. This node can be used directly by any other node.
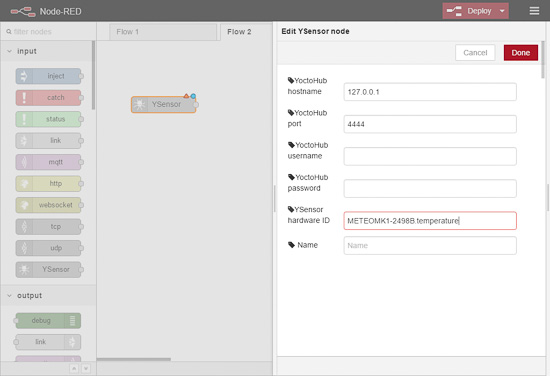
A YSensor node has six parameters:
- YoctoHub Hostname
- YoctoHub Port
- YoctoHub Username
- YoctoHub Password
- YSensor Hardware ID
- Name
The first four parameters correspond to the data needed to connect to the YoctoHub or VirtualHub on which the sensor is connected. If the sensor is connected directly on the Node-RED server, you must simply start the VirtualHub as well on the machine and use the default values. If the sensor is connected to a YoctoHub, you must change these parameters to match those configured in the YoctoHub.

YSensor node parameters
The YSensor Hardware ID corresponds to the hardware identifier of the sensor to use. Typically, it is set to SerialNumber.FunctionName. For instance, the temperature sensor on the Yocto-Meteo device with serial number METEOMK1-12345 would be METEOMK1-12345.temperature. Note that you you have set a logical name to a sensor, you can also use it instead of the hardware identifier.
The Name parameter can be used to provide human-readable name to the node, for the sake of clarity. This name is however not used by the Yoctopuce package itself.
Example
As it is not obvious to clearly describe clicks and drags in a visual programming environment, we have made three short videos that illustrate how the YSensor node can be used.
To start, we will make a very simple schema that simply logs the temperature measured by a Yocto-Meteo on the debug console.
We therefore use a YSensor node connected to a debug node. When configuring the YSensor node, we enter the hardware identifier of the temperature sensor (METEOMK1-2498B.temperature) and give the name "Indoor" to the node. We leave the connection parameters to their default values since the Yocto-Meteo is connected directly to a USB port of the Node-RED server.
| Simple use of the YSensor node | ||
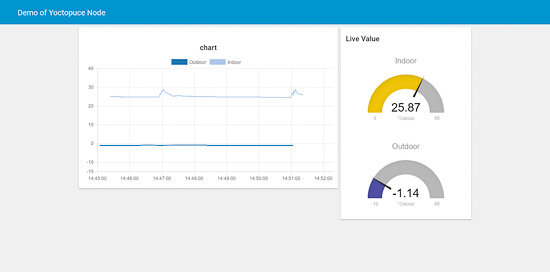
Then, we update the schema to add a graph node and a gauge node in order to add data visualization. We link the two new nodes to the Indoor node that represents our sensor.
| Yocto-Meteo temperature graph in Node-RED | ||
Eventually, we add a second temperature sensor to our schema. This time, the sensor is connected through a YoctoHub-Ethernet with IP address 192.168.1.67.
| Using two YSensor nodes | ||
Conclusion
Node-RED is a nice environment to implement simple interfaces or automation processes in almost no time.

It is possible to get good-looking graphs.
However, for real-life application, expect to hit soon or later the limits of visual programming: when schemas become overly complex, it is often easier to embed part of the application logic in a function, written as Javascript code. Which means, ending up by writing a program again...


