 When you jump with a mountain bike and you want to improve, it's convenient to film yourself so as notice your own errors. If there are several people, it's easy to give your smart phone to a friend and ask him to film you. But when you are alone, you must trigger the camera, climb back on your bike, jump, and then stop the camera. It's tedious, and you then have long minutes on video that you need to cut. This week, we are going to automate all this with our DIY project.
The aim is to have a system able to detect when the bike comes by and to trigger the camera recording for a given length of time. As this system is designed to be installed in a forest or in a field, it must be robust and you must be able to transport it easily.
The solution that we selected to implement for this system uses a Raspberry Pi 3, to which we connect a Yocto-3D-V2 to detect the passage of the bike, and a Yocto-Buzzer that beeps to confirm that the bike has been detected. To film the jump, we used a Garmin Virb Ultra 30 camera which communicates with the Raspberry Pi by wifi. Everything is powered by a large USB battery.

The system is composed of a Yocto-3D-V2, a Yocto-Buzzer, a Raspberry Pi, and a Garmin camera
Let's now look into more details on the choices we made...
Detecting the mountain bike
Our first idea was to use a system based on a Yocto-RangeFinder which would detect when the bike comes through. But we quickly abandoned this solution because for the Yocto-RangeFinder to work outside, we must align a test pattern opposite to it. This is not very convenient in the middle of a forest. Moreover, earth and dust don't work well with the optical sensor of the Yocto-RangeFinder.
Instead, we used a Yocto-3D-V2 that we fixed on an aluminum slider. The slider is put on the ground a little before the jump. The Yocto-3D-V2 is sensitive enough to detect the slider vibrations when the bike runs over it.

The Yocto-3D-V2 with its enclosure are simply glued to a 2mm aluminum slider
We put the Yocto-3D-V2 in its YoctoBox-3D-Black enclosure. The enclosure is then glued with the provided two-sided tape at the end of a 2mm wide aluminum slider. This solution is both easy to implement, cheap, portable, and compatible with a dusty environment.

We only need to put the slider on the path before the jump
The Yocto-3D-V2 is connected to the Raspberry Pi with a 1.5 meter USB cable.
From a software standpoint, our application must register a callback for the "accelerometer" function of the Yocto-3D-V2. In this callback, we added a small delay to filter the passage of the bike rear wheel.
self._accel = YAccelerometer.FindAccelerometer(hwid)
self._accel.registerValueCallback(self.valueCb)
def valueCb(self, accel, str_val):
value = float(str_val)
now = datetime.datetime.now()
print("Accel: %f" % value)
if (now - self._last_time) > self._vibration_duration:
self.trigger()
self._last_time = now
Raspberry Pi 3 configuration
The main element of this project is the Raspberry Pi 3 which runs our application written in Python. To power it, we simply used a large USB battery. The advantage of this solution is that it's not too expensive and it's quite sturdy.
We wrote the application in Python 3. This language is not installed by default. You must therefore install Python 3, but also the PyPI package manager with the following command:
sudo apt-get install python3-pip
Then, you must install two PyPI packages which are used by the application. The first one is our Python library, the second one is an implementation of the "Zero-configuration" protocol which enables the Raspberry to automatically find the IP address of the camera when it is connected to the wifi network.
sudo pip3 install yoctopuce sudo pip3 install zeroconf
The Raspberry must also serve as wifi access point for the camera. We are not going to detail here the configuration files which need to be modified, the process is already documented on the Raspberry Pi foundation web site:
https://www.raspberrypi.org/documentation/configuration/wireless/access-point.md
For our system, we created a network named "BIKE_CAM" with "aaabbbccc" as password. The IP address of the Rasberry Pi is 192.168.88.10.
To make your life easier, we included the configuration files that we used in the "pi_config" sub-directory of our GitHub project (see below).
The camera
We used a Garmin Virb Ultra 30 camera which has numerous advantages:
- It can film in 120 fps
- It is sturdy and waterproof
- It has a REST API which allows us to drive it by wifi

The camera is a Garmin Virb Ultra 30
When you first use it, you must simply configure the camera for it to use our "BIKE_CAM" network.
The application
The application is a python script which provide a web interface on the port 8000. This allows any smartphone to access it.
The source code of the application, including the wifi interface configuration files, are available on GitHub: https://github.com/yoctopuce-examples/bike_cam
To install the application, clone it simply in your home dir:
$ git clone https://github.com/yoctopuce-examples/bike_cam
Then, you must copy the bike_cam.service file into the /etc/systemd/system/ directory and enable the service. In this way, the application is automatically launched when the Raspberry Pi is started. For more information on this topic, you can read again our previous post.
$ sudo cp bike_cam.service /etc/systemd/system/ $ sudo systemctl enable bike_cam.service $ sudo systemctl start bike_cam.service
Now that you have installed and started the application, you can access its web interface with any smart phone which is connected to the "BIKE_CAM" network. You only need to use the http://192.168.88.1:8000 URL.

The web interface of the application
The interface is very basic. It displays the state of the system and enables you to change the recording duration, which is of 10 seconds by default.
A few comments
There is a slight lag of about 1.5 seconds, between the bike detection and the beginning of the recording. It's the time between the moment when the camera receives the command and the moment when the recording is effectively started. Unfortunately, we can't compress it. Depending on the bike speed, you must therefore put the aluminum slider between 2 and 3 meters ahead of the jump.
For easiness of use, we added a Raspberry Pi Touch Display which enables you to display the application web interface. This makes it completely possible to do without a smart phone.
We used a Garmin camera, but you can theoretically modify the code to make it work with GoPro cameras which connect to a wifi network. GoPro doesn't officially publish an API, but some people maintain an officious documentation: https://github.com/konradit/goprowifihack
We used a Yocto-3D-V2, but you can also use a Yocto-3D. Both products are compatible.
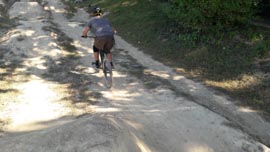
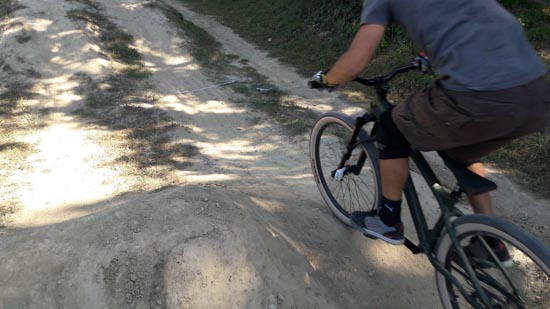
The result
Here are a few pictures of the system in use.

And here are a few videos recorded automatically with the system.

