![]() YoctoHubs can automatically publish sensor values on a MQTT broker, as we illustrated in a previous post on this topic. However, for scalability and security reasons, YoctoHubs cannot use MQTT messages to drive connected modules. There are however circumstances where it might be desirable to integrade Yoctopuce command devices in an existing MQTT architecture. In this case, it is enough to use a small gateway between the MQTT protocol and the Yoctopuce modules. This is what we are going to do this week.
YoctoHubs can automatically publish sensor values on a MQTT broker, as we illustrated in a previous post on this topic. However, for scalability and security reasons, YoctoHubs cannot use MQTT messages to drive connected modules. There are however circumstances where it might be desirable to integrade Yoctopuce command devices in an existing MQTT architecture. In this case, it is enough to use a small gateway between the MQTT protocol and the Yoctopuce modules. This is what we are going to do this week.
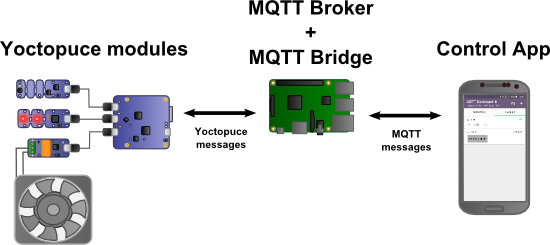
To represent an existing MQTT infrastructure, we used a Raspberry Pi 3 on which we installed the mosquitto MQTT broker. To send MQTT messages, we used the IoT MQTT Dashboard running on an Android smart phone. While perhaps not very realistic, this configuration is very easy to set up and allows us to illustrate the use of each component.
The aim is to add to this architecture a temperature sensor, a relay controlling a fan, and two signaling leds. To do so, we are going to use a Yocto-Temperature, a Yocto-PowerRelay,and a Yocto-Color-V2, everything being connected to a YoctoHub-Ethernet.

The architecture of our system
We want to publish the ambient temperature on MQTT under the "temperature" topic. The fan must subscribe to the "fan_control" topic which can take the "on" and "off" values. The leds must subscribe to the "leds_control" topic and the value passed is the RGB value in the #000000 format.
A Java MQTT gateway
We are going to write our gateway in Java because in this way it can be used both as an application and as a WebSocket callback.
The Java application must transmit to the broker the temperature measured by the Yocto-Temperature, listen to the "fan_control" and "leds_control" topics, and send the appropriate commands to the Yocto-Relay and to the Yocto-Color-V2. This Java gateway must simply "translate" the MQTT messages into Yoctopuce commands. The control of the system and the temperature display are managed by the Android application.
To begin, we must add the Paho Java library to our project. As the library is available under Maven, we only need to add the following code to the pom.xml file:
<groupId>org.eclipse.paho</groupId>
<artifactId>org.eclipse.paho.client.mqttv3</artifactId>
<version>1.1.0</version>
</dependency>
We must also add the Yoctopuce library as described in this previous post.
Setting the connections up
To begin, we must set up the connection with the YoctoHub:
private String _broker_url;
private MqttClient _sampleClient;
private YRelay _yrelay;
private ArrayList>YColorLed< _yleds = new ArrayList><();
// Constructor used for traditional application
public MQTTBridge(String hub_url, String broker_url) throws YAPI_Exception
{
_yctx = new YAPIContext();
_yctx.RegisterHub(hub_url);
_broker_url = broker_url;
}
Then, set up the connection with the MQTT broker using the MqttClient class of the Paho library.
{
...
MemoryPersistence persistence = new MemoryPersistence();
_sampleClient = new MqttClient(_broker_url, "MQTTBridge", persistence);
MqttConnectOptions connOpts = new MqttConnectOptions();
connOpts.setCleanSession(true);
System.out.println("Connecting to broker: " + _broker_url);
_sampleClient.connect(connOpts);
System.out.println("Connected");
Subscribing to the "fan_control" and "leds_control" topics
We must subscribe to the "fan_control" and "leds_control" topics and store the references of the YRelay and YColorLeds objects enabling us to control the relay and the leds.
// subscribes to events from MQTT
_sampleClient.subscribe("fan_control");
_sampleClient.subscribe("leds_control");
_yctx.UpdateDeviceList()
_yrelay = YRelay.FirstRelayInContext(_yctx);
YColorLed colorLed = YColorLed.FirstColorLedInContext(_yctx);
while (colorLed != null) {
_yleds.add(colorLed);
colorLed = colorLed.nextColorLed();
}
Then, we must deal with the incoming MQTT messages in the messsageArrived method. For the "fan_control" topic, we modify the position of the Yocto-PowerRelay with the set_output() method. For the "leds_control" topic, we decode the color and we apply it to all the leds with the set_rgbColor() method.
public void messageArrived(String topic, MqttMessage mqttMessage)
{
byte[] payload = mqttMessage.getPayload();
String message = new String(payload);
try {
switch (topic) {
case "fan_control":
int output;
if ("on".equalsIgnoreCase(message)) {
output = YRelay.OUTPUT_ON;
} else {
output = YRelay.OUTPUT_OFF;
}
_yrelay.set_output(output);
break;
case "led_test":
int color = Integer.parseInt(message.replaceFirst("#", ""), 16);
for (YColorLed colorLed : _leds){
colorLed.set_rgbColor(color);
}
break;
}
} catch (YAPI_Exception e) {
e.printStackTrace();
}
}
Publishing the temperature
We could be tempted to use and infinite loop and call the get_currentValues() method of the temperature sensor, but it is much more efficient to register a callback each time the sensor value changes.
temperature.registerValueCallback(this);
while (true) {
_yctx.Sleep(1000);
}
The callback directly receives the new temperature value as a character string and we must simply publish this new value for the "temperature" topic.
public void yNewValue(YTemperature temperature, String currentValue)
{
MqttMessage message = new MqttMessage(currentValue.getBytes());
try {
_sampleClient.publish("temperature", message);
} catch (MqttException e) {
e.printStackTrace();
}
}
Local network vs. cloud
To be able to use this gateway, we must simply run it on a machine which has access both to the MQTT broker and to the YoctoHub. The simplest location is to put it on the machine hosting the MQTT broker, that is the Raspberry Pi.
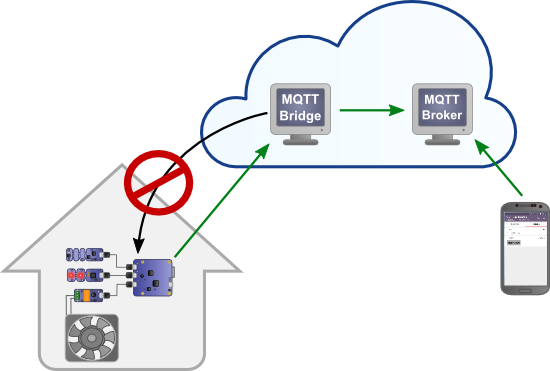
This solution works because in our example the MQTT broker and the YoctoHub are connected to the same local network. However, if the MQTT broker is in the cloud and the YoctoHub is behind a DSL router, or on a cellular network, this solution doesn't work anymore. The machine hosting the MQTT broker cannot connect itself directly to the YoctoHub because the router or the cellular network blocks incoming connections.
There are ways to work around this issue, such as opening a port on the DSL router, using a VPN, or hosting the gateway on another machine located on the same network as the YoctoHub. But there is another solution: to convert our Java application into a WebSocket callback.
The gateway as a WebSocket callback
Using a WebSocket callback solves our problem because the connection is set up by the YoctoHub and not by the Java gateway anymore. And if our YoctoHub can connect itself on the Internet, it can connect itself to the gateway as well.

Callbacks work even behind a NAT filter
If you don't have a Java application server, most of the work is to install an application server such as Tomcat or GlassFish. When this step is done, you must simply create a WebSocket endpoint instantiating the gateway and running the main loop in a thread.
public class YServerWebsocket
{
@OnOpen
public void onOpen(Session session)
{
// registers the YoctoHub/VirtualHub that starts the connection
try {
MQTTBridge bridge = new MQTTBridge(session,
"tcp://www.example.com:1883");
} catch (YAPI_Exception e) {
e.printStackTrace();
return;
}
Thread thread = new Thread(bridge);
thread.start();
}
}
The only modification you must bring to the Java code is to add a constructor taking as parameter the WebSocket session created by the application server instead of the YoctoHub URL. The call to the RegisterHub method is therefore replaced by a call to the PreregisterHubWebSocketCallback() method taking as parameter the WebSocket session. The rest of the code doesn't change.
{
_yctx = new YAPIContext();
_yctx.PreregisterHubWebSocketCallback(session);
_broker_url = broker_url;
}
We then only need to configure the YoctoHub to connect itself to our WebSocket endpoint.
Conclusion
As you can see, controlling Yoctopuce modules from a MQTT architecture requires to write a gateway, but the code is relatively simple and short. If you are not confident with Java, you can always start from this example and modify it for your purposes.
The complete code of these two examples is available on our GitHub account: https://github.com/yoctopuce-examples/mqtt_bridge
We also shot a small demo video:


