 This week, we are going to show you how to use our C++ library with the CLion IDE. This IDE is very practical, so much so that we updated our C++ examples for them to work directly in this IDE.
Note: We assume that you already have a some knowledge of the C++ language and of our programming library. If it's not the case, we recommend that you start by reading our post "How to start in C++ with Yoctopuce modules" which explains how our library works.
Let's start by stating that we are not in any way affiliated or sponsored by JetBrains, the company developing CLion. We performed this modification because some members of the Yoctopuce development team use these products daily. We thought that this could also be of interest to our customers.
The CLion IDE
C++ is a very powerful programming language, but it is complex to use, in particular if you work with several OSes. During the development phase, you must manage the differences between the OSes, for example both type of directory separators (/ vs. \). Moreover, each OS implements the Posix standard slightly differently.
But the main difficulty is to have to use several IDEs and compilers. Microsoft recommends using VisualStudio and its cl compiler, macOS recommends using the Xcode IDE and the Clang compiler, while under Linux you traditionally use the gcc compiler and a simple text editor. Naturally, you can install gcc under Windows and macOS as well, but the process is cumbersome, in particular if you use external libraries such as Pthread, openSSL, libUSB, and so on. In short, you often find yourself having to use and maintain two or three projects to compile a single application for several OSes. That's were CLion and CMake come in.
CLion is a multiplatform development environment (IDE). In the opposite to VisualStudio or XCode which have their own build system, CLion is based on already existing build systems, such as Gradle or CMake. CLion is in fact "only" a graphic overlay to a build system such as CMake.
The CLion code editor is very comfortable and has all the features of a modern IDE, such as autocomplete, automatic indentation, navigation between functions, compilation error highlighting, and so on. But the true feature of CLion is the integrated debugger which allows you to advance step by step into the application code directly from the IDE. Everyone who had to debug an application with gdb understands how valuable this feature is.
These features are present in VirtualStudio and in XCode, but under Linux, there isn't truly any other IDE with the same level of integration. Even if you only use Windows and macOS, this IDE enables you to gain in comfort by having the same IDE on all platforms.
Our C++ library
For the reasons that we just mentioned, we decided to add a CMake project for all the examples of our C++ library. As stated above, CLion supports CMake projects. Therefore, you can compile the C++ examples from a terminal with CMake or from the CLion IDE.
To be able to use these examples in CLion, you must therefore install on the machine CLion, CMake, and naturally a C++ compiler.
Installing CLion and CMake doesn't present any particular difficulty under Windows and macOS. Under Linux, the installation is somewhat different depending on your distribution, but nothing very complex. Note that if you are under Ubuntu, both applications are available directly from the "Ubuntu Software Manager" application.
You can download CLion from the JetBrains site, and CMake from https://cmake.org.
Example projects
We are not going to detail the content of the CMakeList.txt, because we already have a post on the topic. But we are going to see how to open and debug the sample program "Doc-Inventory" which is included in our C++ library.
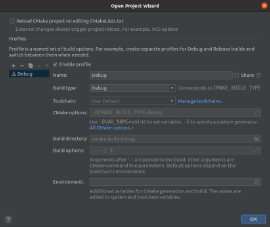
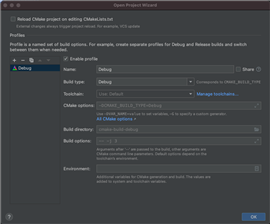
Opening an existing CMake project in CLion is trivial. You only need to select the main CMakeList.txt file when opening the project. In our case, it's the one located in the Examples/Doc-Inventory directory.

When opening the project, you must select the CMakeList.txt file
CLion parses this file, references all the source files, and detects the compilers installed on the machine. With this information, it generates a profile which is then used to compile the code.

The profile for Windows
The Linux and macOS profiles
When the profile has been validated, you can directly run the program with the play icon, but the most interesting part is to be able to add breakpoints from the editor and to debug the program directly from the IDE.

CLion enables you to comfortably debug C++ code
The graphical interface enables you to inspect variables and the runtime stack. As all source files from our library are present, you can even inspect the content of objects from our library and trace the execution even inside our code.
License and pricing
While CMake is open source and free, Clion is a closed source and paying product, with a subscription system. We are usually quite reluctant to subscription systems for computer software, but in this particular case the deal seems right.
First, if you subscribe for a minimum of 12 months in a row, you are then eligible for a "perpetual fallback license" enabling you to use for life the version available at the time of the subscription.
Second, you data are not made "captive" by CLion, as compilation is performed by CMake. If you stop your subscription, you can always edit the C++ project with a competitor product and compile your project from a terminal with CMake.
JetBrains seems to also offer free licenses for students and for Open Source projects, but we did not look in detail at the conditions required for eligibility.
We leave it to you to judge the price and the conditions of use of this product.

