![]() Some time ago, we announced a beta version of a Universal Windows Platform library. Today, we officially publish this new library and we take this opportunity to explain how to use it. We are going to write a short Windows Universal application displaying the value of a temperature sensor.
Some time ago, we announced a beta version of a Universal Windows Platform library. Today, we officially publish this new library and we take this opportunity to explain how to use it. We are going to write a short Windows Universal application displaying the value of a temperature sensor.
We assume that you already know what "Universal Windows Platform" is. If it's not the case, start by reading the UWP documentation on the Microsoft web site. We also assume that you have some knowledge of C#, as we wrote the application in this language.
In the same way, if you are not familiar with Yoctopuce modules, we recommend that you start by reading the previous posts of this series, in particular the one on the logical structure of Yoctopuce modules.
Installing the API
In order to use the Yoctopuce "Universal Windows Platform" library in your project, you must first download it and install it somewhere on your disk. You can download the library from our site on this page. It's a zip file containing the library, some usage examples, and the documentation. The important part is the "Sources" directory, containing the source files in C#. Copy this directory somewhere on your disk and the installation is done. Note that you can also download the library from GitHub if you'd rather use Git.
Creating the Visual Studio project
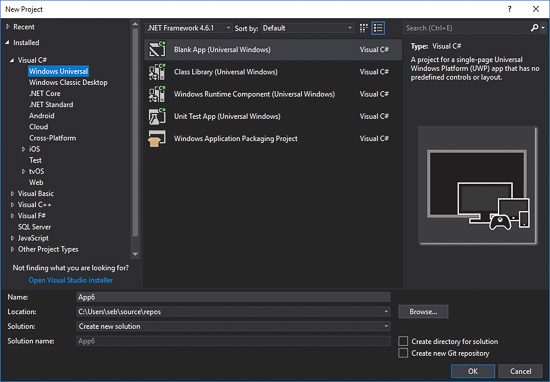
When you have started Visual Studio, create a new C# project of type Blank App (Universal Windows).

Create a new C# project of type Blank App (Universal Windows)
Then you must tell Visual Studio that it must compile and use the Yoctopuce library. To keep a project well organized, let's start by creating a new "yoctopuce" directory in the project. Right click on you project in the "Solution Explorer" panel and select Add > New Folder. Then, we are going to include all the library source files in this directory.
Still in the "Solution Explorer" panel, right click on the directory we have just created and chose Add > Existing Item.... Select all the files of the Sources directory of the UWP library and click on the "Add" button. Note that you can add only a reference to these files with the "Add as link" button. This allows you to use the files from their original location rather than copying them in your project. This latter option is very useful if you have several projects using the Yoctopuce library.
The Package.appxmanifest file
As under Android, by default, a Universal Windows application doesn't have access rights to the USB ports. If you want to access USB devices, you must imperatively declare it in the Package.appxmanifest file.
Unfortunately, the edition window of this file doesn't allow this operation and you must modify the Package.appxmanifest file by hand. In the "Solution Explorer" panel, right click on the Package.appxmanifest and select "View Code".
In this XML file, we must add a DeviceCapability node in the Capabilities node. This node must have a "Name" attribute with a "humaninterfacedevice" value.
Inside this node, you must declare all the modules that can be used. Concretely, for each module, you must add a "Device" node with an "Id" attribute, which has for value a character string "vidpid:USB_VENDORID USB_DEVICE_ID". The Yoctopuce USB_VENDORID is 24e0 and you can find the USB_DEVICE_ID of each Yoctopuce device in the documentation in the "Characteristics" section. Finally, the "Device" node must contain a "Function" node with the "Type" attribute with a value of "usage:ff00 0001".
For the Yocto-Temperature, here is what you must add in the "Capabilities" node:
<!-- Yocto-Temperature -->
<Device Id="vidpid:24e0 000b">
<Function Type="usage:ff00 0001" />
</Device>
</DeviceCapability>
Unfortunately, it's not possible to write a rule authorizing all Yoctopuce modules. Therefore, you must imperatively add each module that you want to use.
The user interface
We are going to insert two TextBlock: the first one to indicate the name of the sensor, the second to indicate the temperature.
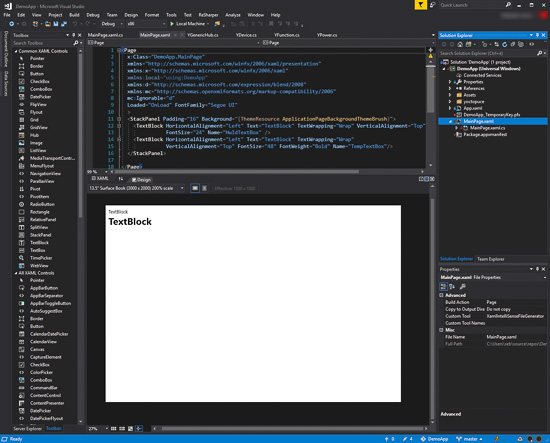
To do so, open the MainPage.xaml file and add two TextBlock tags, assigning them the names "HwIdTextBox" and "TempTextBox". We also take this opportunity to register the "OnLoad" method which is called when the application is loading. So we add the Loaded attribute in the Page tag.
In the end, the MainPage.xaml file looks like this:
x:Class="DemoApp.MainPage"
xmlns="http://schemas.microsoft.com/winfx/2006/xaml/presentation"
xmlns:x="http://schemas.microsoft.com/winfx/2006/xaml"
xmlns:local="using:DemoApp"
xmlns:d="http://schemas.microsoft.com/expression/blend/2008"
xmlns:mc="http://schemas.openxmlformats.org/markup-compatibility/2006"
mc:Ignorable="d"
Loaded="OnLoad"
>
<StackPanel Padding="16" Background="{ThemeResource ApplicationPageBackgroundThemeBrush}">
<TextBlock HorizontalAlignment="Left" Text="TextBlock"
TextWrapping="Wrap" VerticalAlignment="Top"
FontSize="24" Name="HwIdTextBox" />
<TextBlock HorizontalAlignment="Left" Text="TextBlock"
TextWrapping="Wrap" VerticalAlignment="Top"
FontSize="48" FontWeight="Bold" Name="TempTextBox"/>
</StackPanel>

We add two TextBox
Initializing the API
Now that we implemented our interface, we must code the OnLoad() method, in charge of initializing the UWP library. To do so, we open the MainPage.xaml file and we add the OnLoad() method which calls the YAPI.RegisterHub method. We also initialize the two TextBox.
{
try {
await YAPI.RegisterHub("usb");
} catch (YAPI_Exception ex) {
var dialog = new MessageDialog("Init error:" + ex.Message);
await dialog.ShowAsync();
return;
}
HwIdTextBox.Text = "No sensor detected";
TempTextBox.Text = "N/A";
}
Updating the interface with the temperature
In the opposite to a console application, we cannot create an endless loop to read the sensor permanently. Therefore we are going to use a DispatcherTimer which calls a function with a 10Hz frequency. It's this function which takes care of:
- Calling YAPI.HandleEvents on a regular basis. In fact, it's not a 100% necessary in our case, but it's good practice to give control to the Yoctopuce API from time to time.
- Calling YAPI.UpdateDeviceList once every two seconds, which forces the API to re-detect the connection of new modules. It's a rather heavy process, so we avoid doing it too often, hence the two second delay between two calls
- Detecting the first YTemperature function available with YTemperature.FirstTemperature()
- If this function is available, reading the temperature and updating the interface.
{
private NonReentrantDispatcherTimer timer;
private int hardwaredetect = 0;
private YTemperature sensor;
private async void OnLoad(object sender, RoutedEventArgs e)
{
HwIdTextBox.Text = "No sensor detected";
TempTextBox.Text = "N/A";
try {
await YAPI.RegisterHub("usb");
} catch (YAPI_Exception ex) {
var dialog = new MessageDialog("Init error:" + ex.Message);
await dialog.ShowAsync();
return;
}
timer = new NonReentrantDispatcherTimer();
timer.Interval = new TimeSpan(0, 0, 0, 0, 100);
timer.TickTask = async () => { await dispatcherTimer_Tick(); };
timer.Start();
}
async Task dispatcherTimer_Tick()
{
try {
if (hardwaredetect == 0) {
await YAPI.UpdateDeviceList();
}
hardwaredetect = (hardwaredetect + 1) % 20;
await YAPI.HandleEvents();
if (sensor == null)
sensor = YTemperature.FirstTemperature();
if (sensor != null) {
HwIdTextBox.Text = await sensor.get_friendlyName();
TempTextBox.Text = await sensor.get_currentValue()
+ await sensor.get_unit();
}
} catch (YAPI_Exception ex) {
HwIdTextBox.Text = "Sensor is offline";
TempTextBox.Text = "OFFLINE";
sensor = null;
}
}
}
public class NonReentrantDispatcherTimer : DispatcherTimer
{
private bool IsRunning;
public NonReentrantDispatcherTimer()
{
base.Tick += SmartDispatcherTimer_Tick;
}
async void SmartDispatcherTimer_Tick(object sender, object e)
{
if (TickTask == null || IsRunning) {
return;
}
try {
IsRunning = true;
await TickTask.Invoke();
} finally {
IsRunning = false;
}
}
public Func<Task> TickTask { get; set; }
}
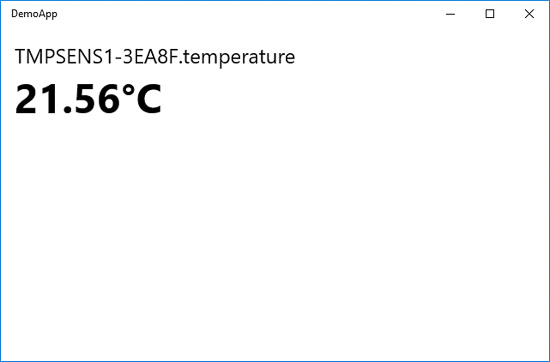
When we compile all this, we obtain the expected result, a Windows window displaying the temperature as soon as a Yoctopuce temperature sensor is connected.

It works!
Note: The complete code of the application is available on GitHub: https://github.com/yoctopuce-examples/uwp_beginners
A small improvement
This example manages only temperature sensors, but by modifying two lines only, we can make it work with any Yoctopuce sensor: we only have to use the YSensor class instead of the YTemperature class:
{
private NonReentrantDispatcherTimer timer;
private int hardwaredetect = 0;
private YSensor sensor;
private async void OnLoad(object sender, RoutedEventArgs e)
{
HwIdTextBox.Text = "No sensor detected";
TempTextBox.Text = "N/A";
try {
await YAPI.RegisterHub("usb");
} catch (YAPI_Exception ex) {
var dialog = new MessageDialog("Init error:" + ex.Message);
await dialog.ShowAsync();
return;
}
timer = new NonReentrantDispatcherTimer();
timer.Interval = new TimeSpan(0, 0, 0, 0, 100);
timer.TickTask = async () => { await dispatcherTimer_Tick(); };
timer.Start();
}
async Task dispatcherTimer_Tick()
{
try {
if (hardwaredetect == 0) {
await YAPI.UpdateDeviceList();
}
hardwaredetect = (hardwaredetect + 1) % 20;
await YAPI.HandleEvents();
if (sensor == null)
sensor = YSensor.FirstSensor();
if (sensor != null) {
HwIdTextBox.Text = await sensor.get_friendlyName();
TempTextBox.Text = await sensor.get_currentValue()
+ await sensor.get_unit();
}
} catch (YAPI_Exception ex) {
HwIdTextBox.Text = "Sensor is offline";
TempTextBox.Text = "OFFLINE";
sensor = null;
}
}
}
public class NonReentrantDispatcherTimer : DispatcherTimer
{
private bool IsRunning;
public NonReentrantDispatcherTimer()
{
base.Tick += SmartDispatcherTimer_Tick;
}
async void SmartDispatcherTimer_Tick(object sender, object e)
{
if (TickTask == null || IsRunning) {
return;
}
try {
IsRunning = true;
await TickTask.Invoke();
} finally {
IsRunning = false;
}
}
public Func<Task> TickTask { get; set; }
}
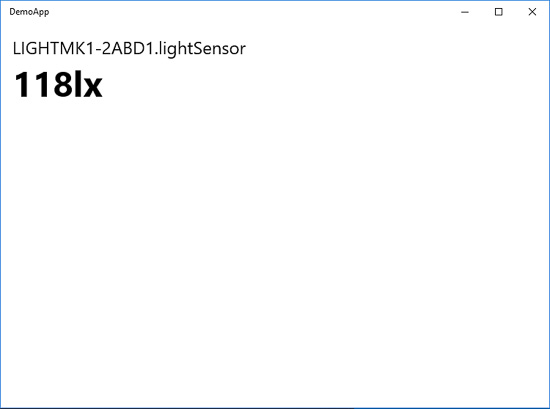
Now, the application works also with a light sensor, a voltmeter, or any Yoctopuce sensor.

It works with the other sensors as well
This "magic trick" works because all the Yoctopuce classes corresponding to sensor-type functions inherit from the YSensor class. You can thus use the YSensor class to access the basic functions of a sensor, such as obtaining the current value or the measuring unit.
Conclusion
We have purposefully kept this code very simple. For example, it manages only one sensor connected by USB. Obviously, the library allows for the management of several sensors, whether connected by USB or connected to a remote YoctoHub.
Now that we have seen the basics, you can write your own applications, with the help of the reference documentation.


