 Generally, we always try to use sensors which do not require any calibration. But, in some cases, we cannot work around this step, in particular if you need to compensate an external perturbation. All the Yoctopuce sensors have the possibility to automatically apply a correction to the value returned by the sensor. Let's see how it works.
You might need a calibration in three distinct situations:
- To compensate an external perturbation. For example, the effect of an enclosure on a luminosity measure, or the perturbation induced by extending an NTC temperature probe.
- To compensate the wear and tear of a measuring probe. For example, the wear and tear of a gas sensor connected to a Yocto-4-20mA-Rx.
- To take into account variations between each measuring probe. It's the case for thermistors which are accurate in relative value but significantly less in absolute value.
In all of these cases, a calibration enables you to obtain more accurate measures, as long as you have an accurate reference value.
All Yoctopuce modules containing a sensor support a calibration by linear interpolation from 1 to 5 points. This calibration is saved in the module flash memory and is applied directly to the measures. Using a calibration is therefore totally transparent for all the applications using a Yoctopuce sensor and doesn't require any code modification. This is also true for HTTP callbacks to services such as Emoncms or Valarm, calibration is applied to the posted values.
Naturally, you can apply a different calibration for each sensor of a module. For instance, you can apply 8 different calibrations for the 8 inputs of a Yocto-MaxiThermistor.
1 to 5 point linear interpolation
As mentioned, the calibration used by Yoctopuce modules uses a linear interpolation based on 1 to 5 reference points. Concretely, you must provide the module with 1 to 5 (Measured_value, Reference_value) pairs.
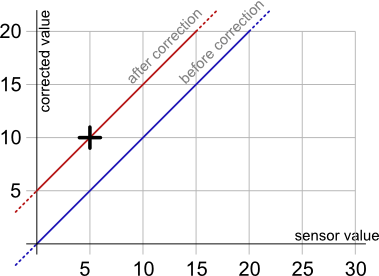
A single pair allows you only to correct an absolute shift.

Measure correction with 1 calibration point: (5, 10)
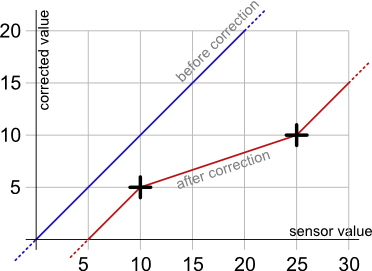
Two pairs allow you to perform both a shift and a multiplication by a given factor between the two points.

Measure correction with 2 calibration points: (10,5) and (25,10).
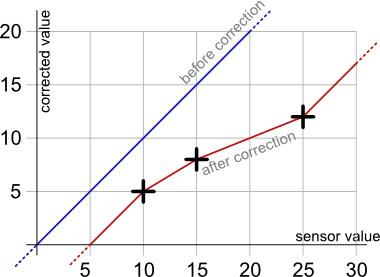
Other cases are only a generalization of the two point method, enabling you to create up to 4 correction intervals for more accuracy.

Correction example with 3 calibration points: (10,5), (15,7.5), and (25,10)
Taking reference measures
The first step to have a pertinent and efficient calibration is to have a series of measures performed with a reference device and a series of measures performed with the sensor to be calibrated.
These two measure series are very important and are going to determine the quality of the final calibration. Make sure to have accurate reference measures. Indeed, there is no point in calibrating a sensor with an inaccurate reference value. It makes sense to calibrate a thermocouple or a thermistor with a PT100, but not the reverse.
You must have a pertinent measure range. If you try to calibrate a thermocouple used when roasting coffee beans, you must have reference points on all the temperature range (0░ to 250░C). If your reference points are included in the -20░ to 50░C range, you won't be much more accurate. Points below zero are useless because they are temperatures which will never be measured and calibration won't do anything for measures above 50░C.
The two measure series must be performed in the same conditions. For example, if you calibrate a temperature probe, make sure the two probes are very close to one another. Calibration is useless if one on the probe is in the shade and the other one in full sunshine.
Selecting the calibration points
If your reference measure series has more than 5 points, deciding which ones to select is not necessarily obvious. A solution is to select the minimum and the maximum, then to try all the possible combinations for the three remaining points.
For each combination, you compute a score like this:
- You simulate using this calibration for all the measured values.
- You compute for each value the difference between the reference values and the "calibrated" value.
- You compute the global score by adding the squared differences.
The best combination has the lowest score. This "brute force" approach is not the most elegant but is works well.
To avoid you having to code this algorithm, we designed a small web page enabling you to select the best points. This page allows you to post your (Measured_value, Reference_value) pairs and selects the 5 most efficient pairs.
This page is available here: http://www.yoctopuce.com/EN/interactive/calibrator.
Applying the calibration
When you have selected the calibration points, you must use the calibrateFromPoints() function for the corresponding sensor. A solution is to use the YSensor tool of the command line library. For example, to apply to the light sensor of the Yocto-Light-V3 a calibration based on the three points (10 -> 5), (15 -> 7.5), and (25 -> 10) of the graph above, you must run:
You can also add a "calibration" function to an already existing application. For example:
{
var ValuesBefore = [10, 15, 25];
var ValuesAfter = [5, 7.5, 10];
var light = YLightSensor.FindLightSensor(name);
light.calibrateFromPoints(ValuesBefore, ValuesAfter);
light.get_module().saveToFlash();
}
...
ApplyCalibrationTo("LIGHTMK3-123456.lightSensor");
In this case, make sure to call the saveToFlash() function to save the calibration in the module flash memory, otherwise the calibration is lost as soon as the module is disconnected.
Conclusion
As we have seen, using calibration in Yoctopuce modules is relatively simple to implement, at least from a software point of view. The difficulties lie in performing accurate reference measures and then in correctly selecting the 5 calibration points. For the later you can always use our web page: http://www.yoctopuce.com/EN/interactive/calibrator. However, we cannot yet teleport to perform the measures for you :-)


