 Last week, we saw that it is now possible to send commands to our modules from an MQTT broker. To illustrate this feature, this week we see how to make a "night light" using a Yocto-Color-V2 and Node-RED.
The goal is to turn on the LEDs of the Yocto-Color-V2 at sunset and turn them off at sunrise. The Yocto-Color-V2 is connected to a Yocto-Hub-Ethernet so that we can move this night light wherever we want.
There are many ways to realize such an application, but today we use the MQTT protocol for the communication between the application and the Yocto-Hub-Ethernet. For the application, we use the graphical programming language Node-RED because it natively supports the MQTT protocol.
In the end the architecture of our night light looks like this:
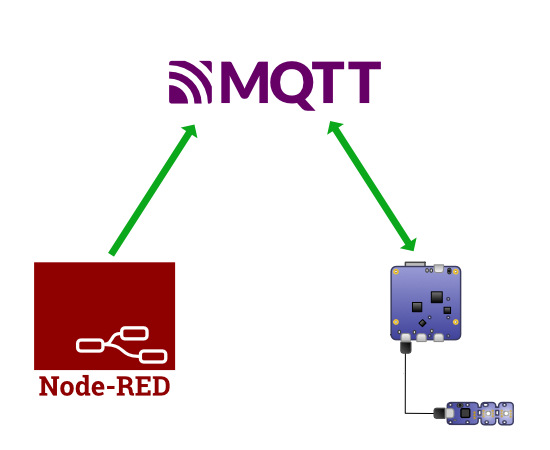
The architecture of the system
The MQTT Broker
To use the MQTT protocol, we need an MQTT broker. We used mosquitto, an open source broker that works on all OSes. The installation procedure is simple and documented on their website. In our case, the broker is installed on a Raspberry Pi which has the 192.168.1.96 address.
The configuration of the Yocto-Color-V2
In order to simplify our life in our Node-RED flow, we have assigned the logical name nightlight to the Yocto-Color-V2. This way we can reference the Yocto-Color with this name.
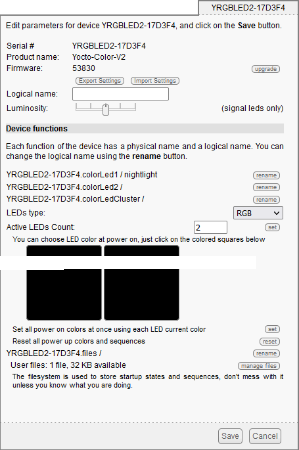
We assign the nightlight logical name to the module
The configuration of the YoctoHub
The second step is to configure the YoctoHub so that it automatically connects to our broker. To do so, we need to configure an Outgoing callback with the following parameters:
- Type of callback is MQTT
- We use the address and the port of our mosquitto broker (in our case 192.168.1.96 and 1883
- We set the Root topic to yocto in order to group the traffic under a single topic
- The option Allow MQTT clients to control Yoctopuce devices is activated in order to allow the modification of the Yocto-Color-V2 state from MQTT
- The option Disable instant values for sensors (use timed reports only) is enabled to reduce the traffic generated by the Yocto-Hub. For this application these notifications are not useful.
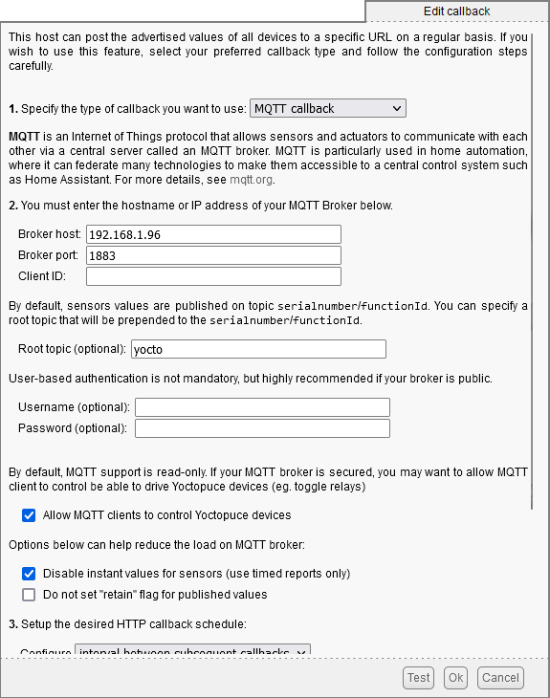
YoctoHub callback configuration
Once these parameters are entered, we can check that the YoctoHub manages to connect to the MQTT broker and, if so, save the configuration. Now we just have to write the application in Node-RED to send the right commands.
Node-RED
As for mosquitto, we do not describe in details the installation and the functioning of Node-RED. The procedure is documented on their site and we already have several posts that talk about Node-RED.
We need to add an mqtt out node to our flow and configure it to send a message to the Yocto-Color. The parameters of the MQTT broker are the same as those used in the YoctoHub.
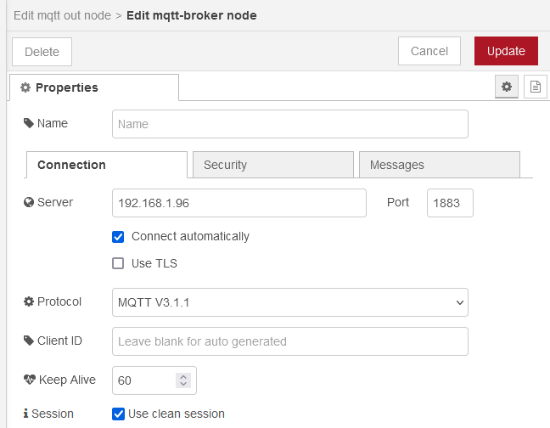
The parameters of the broker
The other parameter to configure is the topic of the MQTT message. Referring to last week's post, we find that we have to send the message with the topic yocto/nightlight/colorLed1/set/rgbColor. The payload of the message is the RGB color that Yocto-Color should display.
- Topic: yocto/nightlight/colorLed1/set/rgbColor
- Payload: 0xffffff
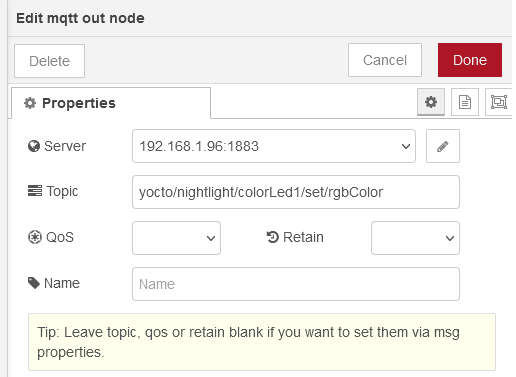
The rest of the parameters of the MQTT node
Now that we have an MQTT node that allows us to control the Yocto-Color-V2 LED, we need to "code" the rest of the application.
To determine if the sun is down, we used the nighttime node which computes the sunset and sunrise times based on GPS coordinates. We use the first output of this node, which is a boolean indicating if the sun is down.
We can't connect the output of this node directly to our MQTT node. We have to insert a function node between the two. This node contains 5 lines of JavaScript that convert the boolean of the nighttime node into RGB color.
msg.payload = 0xffffff;
}else{
msg.payload = 0;
}
return msg;
In the end, we have the following flow:

The Node-RED flow
If you want to import it in your Node-RED installation, here is the source code:
{
"id": "77367932292fc50c",
"type": "tab",
"label": "Flow 1",
"disabled": false,
"info": "",
"env": []
},
{
"id": "ad8db877ec355015",
"type": "nighttime",
"z": "77367932292fc50c",
"name": "",
"lon": "-68",
"lat": "34.052235",
"start": "sunrise",
"end": "sunset",
"x": 360,
"y": 220,
"wires": [
[
"d2e0b60ff5997daf"
],
[]
]
},
{
"id": "d2e0b60ff5997daf",
"type": "function",
"z": "77367932292fc50c",
"name": "function 1",
"func": "if(msg.payload){\n msg.payload = 0xffffff;\n}else{\n msg.payload = 0;\n}\nreturn msg;",
"outputs": 1,
"noerr": 0,
"initialize": "",
"finalize": "",
"libs": [],
"x": 540,
"y": 220,
"wires": [
[
"e1ce8981f8ecd5fb"
]
]
},
{
"id": "e1ce8981f8ecd5fb",
"type": "mqtt out",
"z": "77367932292fc50c",
"name": "",
"topic": "yocto/nightlight/colorLed1/set/rgbColor",
"qos": "",
"retain": "",
"respTopic": "",
"contentType": "",
"userProps": "",
"correl": "",
"expiry": "",
"broker": "02da79a0e03267fd",
"x": 800,
"y": 220,
"wires": []
},
{
"id": "02da79a0e03267fd",
"type": "mqtt-broker",
"name": "",
"broker": "192.168.1.96",
"port": "1883",
"clientid": "",
"autoConnect": true,
"usetls": false,
"protocolVersion": "4",
"keepalive": "60",
"cleansession": true,
"birthTopic": "",
"birthQos": "0",
"birthPayload": "",
"birthMsg": {},
"closeTopic": "",
"closeQos": "0",
"closePayload": "",
"closeMsg": {},
"willTopic": "",
"willQos": "0",
"willPayload": "",
"willMsg": {},
"userProps": "",
"sessionExpiry": ""
}
]
Conclusion
The option "Allow MQTT clients to control Yoctopuce devices" allows you to control Yoctopuce modules from any application or language that uses MQTT without the need to use our programming libraries.
If you don't have any other devices that use MQTT, it is probably easier to use our programming libraries and communicate directly with our modules. However, if you already have an existing MQTT infrastructure, this option makes it fairly easy to integrate our modules into an existing system.


