Yocto-Thermocouple : User's guide
1.1 Safety Information 1.2 Environmental conditions 2. Presentation
2.1 Common elements 2.2 Specific elements 2.3 Optional accessories 3. How thermocouples work
4. First steps
4.1 Prerequisites 4.2 Testing USB connectivity 4.3 Localization 4.4 Test of the module 4.5 Configuration 5. Assembly and connections
5.1 Fixing 5.2 Connecting the thermocouple 5.3 Moving the sensor part away 5.4 USB power distribution 5.5 Electromagnetic compatibility (EMI) 6. Programming, general concepts
6.1 Programming paradigm 6.2 The Yocto-Thermocouple module 6.3 Module 6.4 Temperature 6.5 DataLogger 6.6 What interface: Native, DLL or Service ? 6.7 Accessing modules through a hub 6.8 Programming, where to start? 7. Using the Yocto-Thermocouple in command line
7.1 Installing 7.2 Use: general description 7.3 Control of the Temperature function 7.4 Control of the module part 7.5 Limitations 8. Using the Yocto-Thermocouple with Python
8.1 Source files 8.2 Dynamic library 8.3 Control of the Temperature function 8.4 Control of the module part 8.5 Error handling 9. Using Yocto-Thermocouple with C++
9.1 Control of the Temperature function 9.2 Control of the module part 9.3 Error handling 9.4 Integration variants for the C++ Yoctopuce library 10. Using Yocto-Thermocouple with C#
10.1 Installation 10.2 Using the Yoctopuce API in a Visual C# project 10.3 Control of the Temperature function 10.4 Control of the module part 10.5 Error handling 11. Using the Yocto-Thermocouple with LabVIEW
11.1 Architecture 11.2 Compatibility 11.3 Installation 11.4 Presentation of Yoctopuce VIs 11.5 Functioning and use of VIs 11.6 Using Proxy objects 11.7 Managing the data logger 11.8 Function list 11.9 A word on performances 11.10 A full example of a LabVIEW program 11.11 Differences from other Yoctopuce APIs 12. Using the Yocto-Thermocouple with Java
12.1 Getting ready 12.2 Control of the Temperature function 12.3 Control of the module part 12.4 Error handling 13. Using the Yocto-Thermocouple with Android
13.1 Native access and VirtualHub 13.2 Getting ready 13.3 Compatibility 13.4 Activating the USB port under Android 13.5 Control of the Temperature function 13.6 Control of the module part 13.7 Error handling 14. Using Yocto-Thermocouple with TypeScript
14.1 Using the Yoctopuce library for TypeScript 14.2 Refresher on asynchronous I/O in JavaScript 14.3 Control of the Temperature function 14.4 Control of the module part 14.5 Error handling 15. Using Yocto-Thermocouple with JavaScript / EcmaScript
15.1 Blocking I/O versus Asynchronous I/O in JavaScript 15.2 Using Yoctopuce library for JavaScript / EcmaScript 2017 15.3 Control of the Temperature function 15.4 Control of the module part 15.5 Error handling 16. Using Yocto-Thermocouple with PHP
16.1 Getting ready 16.2 Control of the Temperature function 16.3 Control of the module part 16.4 HTTP callback API and NAT filters 16.5 Error handling 17. Using Yocto-Thermocouple with Visual Basic .NET
17.1 Installation 17.2 Using the Yoctopuce API in a Visual Basic project 17.3 Control of the Temperature function 17.4 Control of the module part 17.5 Error handling 18. Using Yocto-Thermocouple with Delphi or Lazarus
18.1 Preparation 18.2 About examples 18.3 Control of the Temperature function 18.4 Control of the module part 18.5 Error handling 19. Using the Yocto-Thermocouple with Universal Windows Platform
19.1 Blocking and asynchronous functions 19.2 Installation 19.3 Using the Yoctopuce API in a Visual Studio project 19.4 Control of the Temperature function 19.5 A real example 19.6 Control of the module part 19.7 Error handling 20. Using Yocto-Thermocouple with Objective-C
20.1 Control of the Temperature function 20.2 Control of the module part 20.3 Error handling 21. Using with unsupported languages
21.1 Command line 21.2 .NET Assembly 21.3 VirtualHub and HTTP GET 21.4 Using dynamic libraries 21.5 Porting the high level library 22. Advanced programming
22.1 Event programming 22.2 The data logger 22.3 Sensor calibration 23. Firmware Update
23.1 VirtualHub or the YoctoHub 23.2 The command line library 23.3 The Android application Yocto-Firmware 23.4 Updating the firmware with the programming library 23.5 The "update" mode 24. High-level API Reference
24.1 Class YAPI 24.2 Class YModule 24.3 Class YTemperature 24.4 Class YDataLogger 24.5 Class YDataSet 24.6 Class YMeasure 25. Troubleshooting
25.1 Where to start? 25.2 Programming examples don't seem to work 25.3 Linux and USB 25.4 ARM Platforms: HF and EL 25.5 Powered module but invisible for the OS 25.6 Another process named xxx is already using yAPI 25.7 Disconnections, erratic behavior 25.8 After a failed firmware update, the device stopped working 25.9 Registering VirtualHub disconnects another instance 25.10 Dropped commands 25.11 Noisy readings 25.12 Damaged device 26. Characteristics
27. Index
1. Introduction
The Yocto-Thermocouple is a 45x20mm electronic module which allows you to measure the temperature by USB with the help of thermocouples. It contains two channels with a 1°C 1% accuracy.
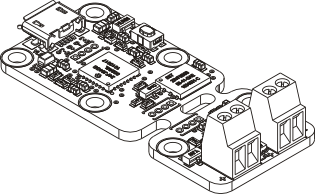
The Yocto-Thermocouple module
The Yocto-Thermocouple is not in itself a complete product. It is a component intended to be integrated into a solution used in laboratory equipments, or in industrial process-control equipments, or for similar applications in domestic and commercial environments. In order to use it, you must at least install it in a protective enclosure and connect it to a host computer.
Yoctopuce thanks you for buying this Yocto-Thermocouple and sincerely hopes that you will be satisfied with it. The Yoctopuce engineers have put a large amount of effort to ensure that your Yocto-Thermocouple is easy to install anywhere and easy to drive from a maximum of programming languages. If you are nevertheless disappointed with this module, or if you need additional information, do not hesitate to contact Yoctopuce support:
| E-mail address: | support@yoctopuce.com |
| Web site: | www.yoctopuce.com |
| Postal address: | Route de Cartigny 33 |
| ZIP code, city: | 1236 Cartigny |
| Country: | Switzerland |
1.1. Safety Information
The Yocto-Thermocouple is designed to meet the requirements of IEC 61010-1:2010 safety standard. It does not create any serious hazards to the operator and surrounding area, even in single fault condition, as long as it is integrated and used according to the instructions contained in this documentation, and in this section in particular.
Protective enclosure
The Yocto-Thermocouple should not be used without a protective enclosure, because of the accessible bare electronic components. For optimal safety, it should be put into a non-metallic, non-inflammable enclosure, resistant to a mechanical stress level of 5 J. For instance, use a polycarbonate (e.g. LEXAN) enclosure rated IK08 with a IEC 60695-11-10 flammability rating of V-1 or better. Using a lower quality enclosure may require specific warnings for the operator and/or compromise conformity with the safety standard.
Maintenance
If a damage is observed on the electronic board or on the enclosure, it should be replaced in order to ensure continued safety of the equipment, and to prevent damaging other parts of the system due to overload that a short circuit could cause.
Identification
In order to ease the maintenance and the identification of risks during maintenance, you should stick the water-resistant identification label provided together with the electronic board as close as possible to the device. If the device is put in a dedicated enclosure, the identification label should be affixed on the outside of the enclosure. This label is resistant to humidity and to the usual rubbing that can occur during normal maintenance.
Identification label is integrated in the package label.
Application
The safety standard applied is intended to cover laboratory equipment, industrial process-control equipment and similar applications in residential or commercial environment. If you intend to use the Yocto-Thermocouple for another kind of application, you should check the safety regulations according to the standard applicable to your application.
In particular, the Yocto-Thermocouple is not certified for use in medical environments or for life-support applications.
Environment
The Yocto-Thermocouple is not certified for use in hazardous locations, explosive environments, or life-threatening applications. Environmental ratings are provided below.
IEC 61140 Protection Class III
 The Yocto-Thermocouple has been designed to work with safety extra-low voltages only.
Do not exceed voltages indicated in this manual, and never connect to the
Yocto-Thermocouple terminal blocks any wire that could be connected to the mains.
The Yocto-Thermocouple has been designed to work with safety extra-low voltages only.
Do not exceed voltages indicated in this manual, and never connect to the
Yocto-Thermocouple terminal blocks any wire that could be connected to the mains.
1.2. Environmental conditions
Yoctopuce devices have been designed for indoor use in a standard office or laboratory environment (IEC 60664 pollution degree 2): air pollution is expected to be limited and mainly non-conductive. Relative humidity is expected to be between 10% and 90% RH, non condensing. Use in environments with significant solid pollution or conductive pollution requires a protection from such pollution using an IP67 or IP68 enclosure. The products are designed for use up to altitude 2000m.
All Yoctopuce devices are warranted to perform according to their documentation and technical specifications under normal temperature conditions according to IEC61010-1, i.e. 5°C to 40°C. In addition, most devices can also be used on an extended temperature range, where some limitations may apply from case to case.
The extended operating temperature range for the Yocto-Thermocouple is -30...85°C. This temperature range has been determined based on components manufacturer recommendations, and on controlled environment tests performed during a limited duration (1h). If you plan to use the Yocto-Thermocouple in harsh environments for a long period of time, we strongly advise you to run extensive tests before going to production.
2. Presentation
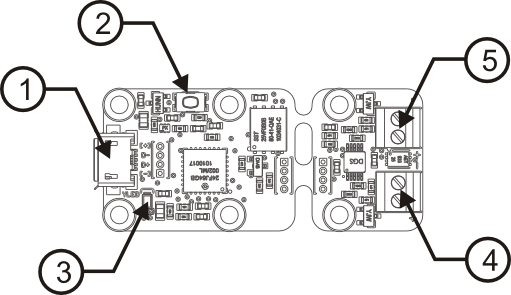
| 1: | Micro-B USB socket | 3: | Yocto-led |
| 2: | Yocto-button | 4: | Thermocouple 1 connection |
| 5: | Thermocouple 2 connection |
2.1. Common elements
All Yocto-modules share a number of common functionalities.
USB connector
Yoctopuce modules all come with a USB 2.0 micro-B socket. Warning: the USB connector is simply soldered in surface and can be pulled out if the USB plug acts as a lever. In this case, if the tracks stayed in position, the connector can be soldered back with a good iron and using flux to avoid bridges. Alternatively, you can solder a USB cable directly in the 1.27mm-spaced holes near the connector.
If you plan to use a power source other then a standard USB host port to power the device through the USB connector, that power source must respect the assigned values of USB 2.0 specifications:
- Voltage min.: 4.75 V DC
- Voltage max.: 5.25 V DC
- Over-current protection: 5.0 A max.
A higher voltage is likely to destroy the device. The behaviour with a lower voltage is not specified, but it can result firmware corruption.
Yocto-button
The Yocto-button has two functionalities. First, it can activate the Yocto-beacon mode (see below under Yocto-led). Second, if you plug in a Yocto-module while keeping this button pressed, you can then reprogram its firmware with a new version. Note that there is a simpler UI-based method to update the firmware, but this one works even in case of severely damaged firmware.
Yocto-led
Normally, the Yocto-led is used to indicate that the module is working smoothly. The Yocto-led then emits a low blue light which varies slowly, mimicking breathing. The Yocto-led stops breathing when the module is not communicating any more, as for instance when powered by a USB hub which is disconnected from any active computer.
When you press the Yocto-button, the Yocto-led switches to Yocto-beacon mode. It starts flashing faster with a stronger light, in order to facilitate the localization of a module when you have several identical ones. It is indeed possible to trigger off the Yocto-beacon by software, as it is possible to detect by software that a Yocto-beacon is on.
The Yocto-led has a third functionality, which is less pleasant: when the internal software which controls the module encounters a fatal error, the Yocto-led starts emitting an SOS in morse 1. If this happens, unplug and re-plug the module. If it happens again, check that the module contains the latest version of the firmware, and, if it is the case, contact Yoctopuce support2.
Current sensor
Each Yocto-module is able to measure its own current consumption on the USB bus. Current supply on a USB bus being quite critical, this functionality can be of great help. You can only view the current consumption of a module by software.
Serial number
Each Yocto-module has a unique serial number assigned to it at the factory. For Yocto-Thermocouple modules, this number starts with THRMCPL1. The module can be software driven using this serial number. The serial number cannot be modified.
Logical name
The logical name is similar to the serial number: it is a supposedly unique character string which allows you to reference your module by software. However, in the opposite of the serial number, the logical name can be modified at will. The benefit is to enable you to build several copies of the same project without needing to modify the driving software. You only need to program the same logical name in each copy. Warning: the behavior of a project becomes unpredictable when it contains several modules with the same logical name and when the driving software tries to access one of these modules through its logical name. When leaving the factory, modules do not have an assigned logical name. It is yours to define.
2.2. Specific elements
The thermocouple terminal blocks
These terminal blocks are intended to connect thermocouple probes, and nothing else. You should not connect any other voltage source, as it may damage your device. The measurement circuit is a safety extra low voltage (SELV) circuit. It should not be presented with voltages exceeding 0.5V, nor connected to mains circuits.
The Yocto-Thermocouple is delivered with a type K thermocouple, but it is designed to work with most thermocouples available on the market. The thermocouple type determines the usable temperature range.
| Thermocouple type | Use range |
|---|---|
| Type K | -200..1372°C |
| Type E | -200..1000°C |
| Type J | -210..1200°C |
| Type N | -200..1300°C |
| Type R | -50..1760°C |
| Type S | -50..1760°C |
| Type T | -200..400°C |
Beware, these are only the values that the Yocto-Thermocouple module is able to measure. To reach these value ranges, you must also make sure that the insulant used to build your thermocouple supports the same temperature range. Generally, the most extreme the temperatures, the most expensive the thermocouple. The thermocouple provided with your Yocto-Thermocouple is a common variety of supple thermocouple using PFTE, which supports temperatures from -75° to +260°C.
2.3. Optional accessories
The accessories below are not necessary to use the Yocto-Thermocouple module but might be useful depending on your project. These are mostly common products that you can buy from your favorite DIY store. To save you the tedious job of looking for them, most of them are also available on the Yoctopuce shop.
Screws and spacers
In order to mount the Yocto-Thermocouple module, you can put small screws in the 2.5mm assembly holes, with a screw head no larger than 4.5mm. The best way is to use threaded spacers, which you can then mount wherever you want. You can find more details on this topic in the chapter about assembly and connections.
Micro-USB hub
If you intend to put several Yoctopuce modules in a very small space, you can connect them directly to a micro-USB hub. Yoctopuce builds a USB hub particularly small for this purpose (down to 20mmx36mm), on which you can directly solder a USB cable instead of using a USB plug. For more details, see the micro-USB hub information sheet.
YoctoHub-Ethernet, YoctoHub-Wireless and YoctoHub-GSM
You can add network connectivity to your Yocto-Thermocouple, thanks to the YoctoHub-Ethernet, the YoctoHub-Wireless and the YoctoHub-GSM which provides respectively Ethernet, WiFi and GSM connectivity. All of them can drive up to three devices and behave exactly like a regular computer running VirtualHub.
1.27mm (or 1.25mm) connectors
In case you wish to connect your Yocto-Thermocouple to a Micro-hub USB or a YoctoHub without using a bulky USB connector, you can use the four 1.27mm pads just behind the USB connector. There are two options.
You can mount the Yocto-Thermocouple directly on the hub using screw and spacers, and connect it using 1.27mm board-to-board connectors. To prevent shortcuts, it is best to solder the female connector on the hub and the male connector on the Yocto-Thermocouple.
You can also use a small 4-wires cable with a 1.27mm connector. 1.25mm works as well, it does not make a difference for 4 pins. This makes it possible to move the device a few inches away. Don't put it too far away if you use that type of cable, because as the cable is not shielded, it may cause undesirable electromagnetic emissions.
Enclosure
Your Yocto-Thermocouple has been designed to be installed as is in your project. Nevertheless, Yoctopuce sells enclosures specifically designed for Yoctopuce devices. These enclosures have removable mounting brackets and magnets allowing them to stick on ferromagnetic surfaces. More details are available on the Yoctopuce web site 3. The suggested enclosure model for your Yocto-Thermocouple is the YoctoBox-Short-Thick-Black.
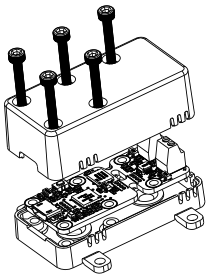
You can install your Yocto-Thermocouple in an optional enclosure
3. How thermocouples work
A thermocouple is made of two metallic wires, using two specific metallic alloys. The two wires are put into contact by a solder at one end. The contact of these alloys at this end (the measure point) creates a very small tension (a few microvolts) at the other end of the wires, which are connected to a measuring device such as the Yocto-Thermocouple. Although very low, this tension is quantifiable and varies according to the temperature difference between the soldered end and the end where the potential difference is measured. This tension enables the deduction of the temperature difference between the two ends of the thermocouple. Obviously, the variation is not simply proportional to the temperature difference but depends also on the alloys used. Therefore, thermocouples are classified into several types and you must configure your Yocto-Thermocouple to tell it the type of the connected thermocouple.
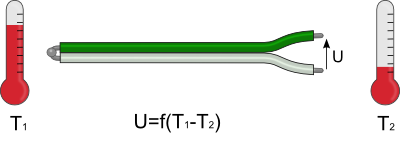
The tension at the free end of a thermocouple depends on the temperature difference between its two ends.
On its own, a thermocouple enables you only to measure the temperature difference between its two ends. To compute an absolute temperature at the thermocouple solder point (the measure point), you must know the absolute temperature at the other end, that is at the precise location where you measure the tension created by the thermocouple. You then only need to add to it the temperature difference measured with the created tension, and you can know very precisely the temperature at the measure point. This is what the Yocto-Thermocouple does in a completely transparent way.
If you need to extend a thermocouple, do not use standard electric wire at all, but a thermocouple extension using the same materials as your thermocouple. Be aware that the longer a thermocouple, the less precise it is because of its internal resistance and of parasites it may gather: a too long thermocouple tends to behave like an antenna. It is often simpler and less expensive to move away the sensor part of the Yocto-Thermocouple rather than to try to use a very long thermocouple. The device has been neither designed nor tested for thermocouple wires longer than 3m.
If you decide to shorten a thermocouple, make sure both wires stay of the same length.
Some thermocouples are electrically isolated, others are not. The thermocouple provided with your Yocto-Thermocouple is not isolated. If you must measure the temperature of an object which may be under tension, use an isolated thermocouple, otherwise you risk to destroy your Yocto-Thermocouple and probably your computer.
4. First steps
By design, all Yoctopuce modules are driven the same way. Therefore, user's guides for all the modules of the range are very similar. If you have already carefully read through the user's guide of another Yoctopuce module, you can jump directly to the description of the module functions.
4.1. Prerequisites
In order to use your Yocto-Thermocouple module, you should have the following items at hand.
A computer
Yoctopuce modules are intended to be driven by a computer (or possibly an embedded microprocessor). You will write the control software yourself, according to your needs, using the information provided in this manual.
Yoctopuce provides software libraries to drive its modules for the following operating systems: Windows, Linux, macOS, and Android. Yoctopuce modules do not require the installation of specific drivers, as they use the HID driver4 standardly supplied in all operating systems.
The general rule regarding supported operating system versions is as follows: Yoctopuce development tools are supported for all versions covered by the operating system vendor's support, including the duration of extended support (long term support or LTS). Yoctopuce pays particular attention to long-term support, and whenever possible with reasonable effort, our tools are designed so that they can be used on older systems even several years after the end of the manufacturer's extended support.
Moreover, the programming libraries used to drive our modules being available in source code, you can generally recompile them to run on even older operating systems. To date, our programming library can still be compiled to run on operating systems released in 2008, such as Windows XP SP3 or Linux Debian Squeeze.
The architectures supported by Yoctopuce software libraries are as follows:
- Windows: Intel 64 bits and 32 bits
- Linux: Intel 64 bits and 32 bits, ARM 64 bits and 32 bits, including Raspberry Pi OS.
- macOS: Intel 64 bits and Apple Silicon (ARM)
Under Linux, communication with our USB modules requires the libusb library, version 1.0 or higher, which is available on all common distributions. Libraries and command-line tools should be easy to recompile on any UNIX variant (Linux, FreeBSD, ...) from the last fifteen years for which libusb-1.0 is available and functional.
Under Android, the ability to connect a USB module depends on whether the tablet or phone supports the USB Host mode.
A USB 2.0 cable, type A-micro B
USB connectors come in several shapes. The "standard" size is the one you probably use to connect your printer. The "mini" size has more or less disappeared. The "micro" size was the smallest when the first Yoctopuce modules were designed, and it is still the one we use. Over the last few years, USB-C connectors have appeared, but in order not to multiply the number of connectors in our product range, we have so far stuck with the "micro-B" standard.

The most common USB 2.0 connectors: A, B, Mini B, Micro B et USB-C.
To connect your Yocto-Thermocouple module to a computer, you need a USB 2.0 cable of type A-micro B. The price of this cable may vary a lot depending on the source, look for it under the name USB 2.0 A to micro B Data cable. Make sure not to buy a simple USB charging cable without data connectivity. The correct type of cable is available on the Yoctopuce shop.

You must plug in your Yocto-Thermocouple module with a USB 2.0 cable of type A - micro B
If you insert a USB hub between the computer and the Yocto-Thermocouple module, make sure to take into account the USB current limits. If you do not, be prepared to face unstable behaviors and unpredictable failures. You can find more details on this topic in the chapter about assembly and connections.
4.2. Testing USB connectivity
At this point, your Yocto-Thermocouple should be connected to your computer, which should have recognized it. It is time to make it work.
Go to the Yoctopuce web site and download the Virtual Hub software5. It is available for Windows, Linux, and macOS. Normally, VirtualHub serves as an abstraction layer for languages which cannot access the hardware layers of your computer. However, it also offers a succinct interface to configure your modules and to test their basic functions. You access this interface with a simple web browser6. Start VirtualHub in a command line, open your preferred web browser and enter the URL http://127.0.0.1:4444. The list of the Yoctopuce modules connected to your computer is displayed.
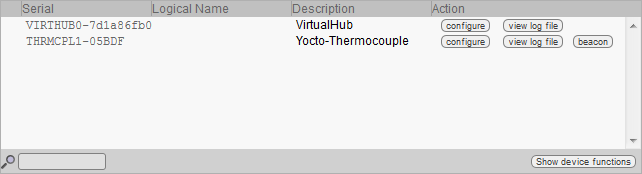
Module list as displayed in your web bowser
4.3. Localization
You can then physically localize each of the displayed modules by clicking on the beacon button. This puts the Yocto-led of the corresponding module in Yocto-beacon mode. It starts flashing, which allows you to easily localize it. The second effect is to display a little blue circle on the screen. You obtain the same behavior when pressing the Yocto-button of the module.
4.4. Test of the module
The first item to check is that your module is working well: click on the serial number corresponding to your module. This displays a window summarizing the properties of your Yocto-Thermocouple.
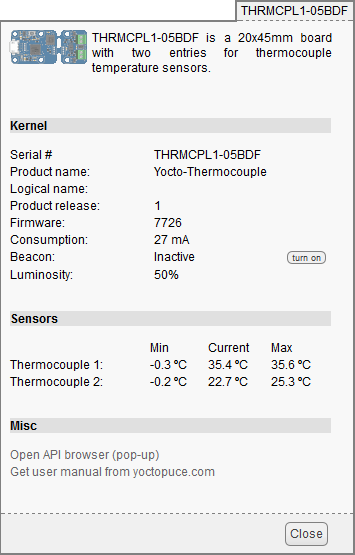
Properties of the Yocto-Thermocouple module
This window allows you, among other things, to play with your module to check how it is working, as temperature values are displayed in real time.
4.5. Configuration
When, in the module list, you click on the configure button corresponding to your module, the configuration window is displayed.
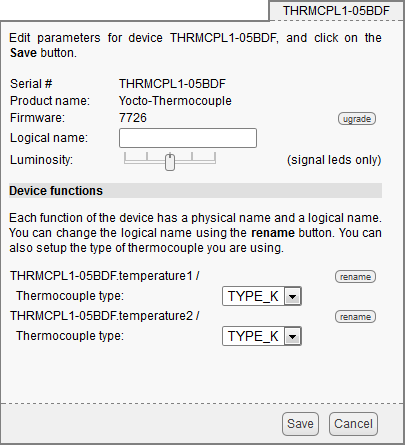
Yocto-Thermocouple module configuration.
Firmware
The module firmware can easily be updated with the help of the interface. Firmware destined for Yoctopuce modules are available as .byn files and can be downloaded from the Yoctopuce web site.
To update a firmware, simply click on the upgrade button on the configuration window and follow the instructions. If the update fails for one reason or another, unplug and re-plug the module and start the update process again. This solves the issue in most cases. If the module was unplugged while it was being reprogrammed, it does probably not work anymore and is not listed in the interface. However, it is always possible to reprogram the module correctly by using VirtualHub 7 in command line 8.
Logical name of the module
The logical name is a name that you choose, which allows you to access your module, in the same way a file name allows you to access its content. A logical name has a maximum length of 19 characters. Authorized characters are A..Z, a..z, 0..9, _, and -. If you assign the same logical name to two modules connected to the same computer and you try to access one of them through this logical name, behavior is undetermined: you have no way of knowing which of the two modules answers.
Luminosity
This parameter allows you to act on the maximal intensity of the leds of the module. This enables you, if necessary, to make it a little more discreet, while limiting its power consumption. Note that this parameter acts on all the signposting leds of the module, including the Yocto-led. If you connect a module and no led turns on, it may mean that its luminosity was set to zero.
Logical names of functions
Each Yoctopuce module has a serial number and a logical name. In the same way, each function on each Yoctopuce module has a hardware name and a logical name, the latter can be freely chosen by the user. Using logical names for functions provides a greater flexibility when programming modules.
The functions provided by the Yocto-Thermocouple module are the two functions "temperature1" and "temperature2" corresponding to each of the two channels. Simply click on the corresponding "rename" button to assign them new logical names.
Thermocouple type
By default, the two channels are configured to work with type K thermocouples. This type is the most common and the least expensive. If you wish to use another type of thermocouple, you need to change the setting of the corresponding function.
5. Assembly and connections
This chapter provides important information regarding the use of the Yocto-Thermocouple module in real-world situations. Make sure to read it carefully before going too far into your project if you want to avoid pitfalls.
5.1. Fixing
While developing your project, you can simply let the module hang at the end of its cable. Check only that it does not come in contact with any conducting material (such as your tools). When your project is almost at an end, you need to find a way for your modules to stop moving around.
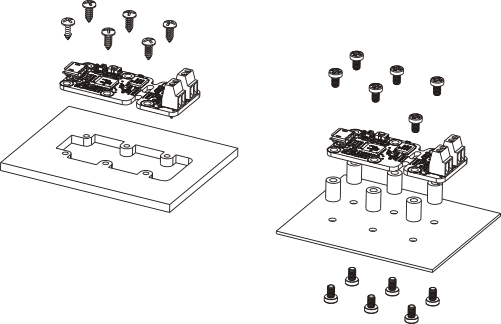
Examples of assembly on supports
The Yocto-Thermocouple module contains 2.5mm assembly holes. You can use these holes for screws. The screw head diameter must not be larger than 4.5mm or they will damage the module circuits. Make sure that the lower surface of the module is not in contact with the support. We recommend using spacers, but other methods are possible. Nothing prevents you from fixing the module with a glue gun; it will not be good-looking, but it will hold.
If your intend to screw your module directly against a conducting part, for example a metallic frame, insert an isolating layer in between. Otherwise you are bound to induce a short circuit: there are naked pads under your module. Simple insulating tape should be enough.
5.2. Connecting the thermocouple
To connect a thermocouple on your Yocto-Thermocouple, simply screw its end into the terminal. Many thermocouples available on the market are sold with a plug. Disassemble this plug to free the bare wires of the thermocouple and connect the latter to the Yocto-Thermocouple.
Thermocouple standard plugs can be disassembled to free the bare end of the wire.
Beware, thermocouples are polarized: you must connect them in the right order. If you do not know the polarity of your thermocouple, connect it in any order, and check that the temperature returned by the Yocto-Thermocouple increases when you heat the end of the thermocouple9. If the temperature decreases, then your thermocouple is connected the other way around.
In the thermocouple delivered in standard with your Yocto-Thermocouple, the green wire is positive.
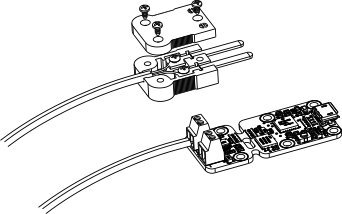
5.3. Moving the sensor part away
The Yocto-Thermocouple module is designed so that you can split it into two parts, allowing you to move away the sensor part from the command sub-module. You can split the module by simply breaking the circuit. However, you will obtain better results if you use a good pincer, or cutting pliers. When you have split the sub-modules, you can sandpaper the protruding parts without risk.

The Yocto-Thermocouple module is designed so that you can split it into two
parts.
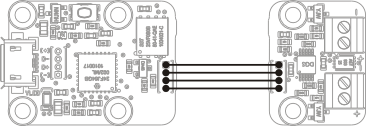
Wiring under the modules once separated.
Once the module is split into two, you must rewire the sub-modules. Several solutions are available. You can connect the sub-modules by soldering simple electric wires, but you will obtain a better result with 1.27 pitch ribbon cable. Consider using solid copper cables, rather than threaded ones: solid copper cables are somewhat less flexible, but much easier to solder.
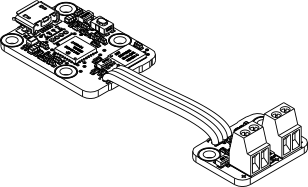
Moving the sensor away with a simple ribbon cable.
Warning, divisible Yoctopuce modules very often have very similar connection systems. Nevertheless, sub-modules from different models are not all compatible. If you connect your Yocto-Thermocouple sub-module to another type of module like a Yocto-Temperature for instance, it will not work, and you run a high risk of damaging your equipment.
5.4. USB power distribution
Although USB means Universal Serial BUS, USB devices are not physically organized as a flat bus but as a tree, using point-to-point connections. This has consequences on power distribution: to make it simple, every USB port must supply power to all devices directly or indirectly connected to it. And USB puts some limits.
In theory, a USB port provides 100mA, and may provide up to 500mA if available and requested by the device. In the case of a hub without external power supply, 100mA are available for the hub itself, and the hub should distribute no more than 100mA to each of its ports. This is it, and this is not much. In particular, it means that in theory, it is not possible to connect USB devices through two cascaded hubs without external power supply. In order to cascade hubs, it is necessary to use self-powered USB hubs, that provide a full 500mA to each subport.
In practice, USB would not have been as successful if it was really so picky about power distribution. As it happens, most USB hub manufacturers have been doing savings by not implementing current limitation on ports: they simply connect the computer power supply to every port, and declare themselves as self-powered hub even when they are taking all their power from the USB bus (in order to prevent any power consumption check in the operating system). This looks a bit dirty, but given the fact that computer USB ports are usually well protected by a hardware current limitation around 2000mA, it actually works in every day life, and seldom makes hardware damage.
What you should remember: if you connect Yoctopuce modules through one, or more, USB hub without external power supply, you have no safe-guard and you depend entirely on your computer manufacturer attention to provide as much current as possible on the USB ports, and to detect overloads before they lead to problems or to hardware damages. When modules are not provided enough current, they may work erratically and create unpredictable bugs. If you want to prevent any risk, do not cascade hubs without external power supply, and do not connect peripherals requiring more than 100mA behind a bus-powered hub.
In order to help you controlling and planning overall power consumption for your project, all Yoctopuce modules include a built-in current sensor that indicates (with 5mA precision) the consumption of the module on the USB bus.
Note also that the USB cable itself may also cause power supply issues, in particular when the wires are too thin or when the cable is too long 10. Good cables are usually made using AWG 26 or AWG 28 wires for data lines and AWG 24 wires for power.
5.5. Electromagnetic compatibility (EMI)
Connection methods to integrate the Yocto-Thermocouple obviously have an impact on the system overall electromagnetic emissions, and therefore also impact the conformity with international standards.
When we perform reference measurements to validate the conformity of our products with IEC CISPR 11, we do not use any enclosure but connect the devices using a shielded USB cable, compliant with USB 2.0 specifications: the cable shield is connected to both connector shells, and the total resistance from shell to shell is under 0.6Ω. The USB cable length is 3m, in order to expose one meter horizontally, one meter vertically and keep the last meter close to the host computer within a ferrite bead.
If you use a non-shielded USB cable, or an improperly shielded cable, your system will work perfectly well but you may not remain in conformity with the emission standard. If you are building a system made of multiple devices connected using 1.27mm pitch connectors, or with a sensor moved away from the device CPU, you can generally recover the conformity by using a metallic enclosure acting as an external shield.
Still on the topic of electromagnetic compatibility, the maximum supported length of the USB cable is 3m. In addition to the voltage drop issue mentionned above, using longer wires would require to run extra tests to assert compatibility with the electromagnetic immunity standards.
6. Programming, general concepts
The Yoctopuce API was designed to be at the same time simple to use and sufficiently generic for the concepts used to be valid for all the modules in the Yoctopuce range, and this in all the available programming languages. Therefore, when you have understood how to drive your Yocto-Thermocouple with your favorite programming language, learning to use another module, even with a different language, will most likely take you only a minimum of time.
6.1. Programming paradigm
The Yoctopuce API is object oriented. However, for simplicity's sake, only the basics of object programming were used. Even if you are not familiar with object programming, it is unlikely that this will be a hinderance for using Yoctopuce products. Note that you will never need to allocate or deallocate an object linked to the Yoctopuce API: it is automatically managed.
There is one class per Yoctopuce function type. The name of these classes always starts with a Y followed by the name of the function, for example YTemperature, YRelay, YPressure, and so on. There is also a YModule class, dedicated to managing the modules themselves, and finally there is the static YAPI class, that supervises the global workings of the API and manages low level communications.

Structure of the Yoctopuce API
The YSensor class
Each Yoctopuce sensor function has its dedicated class: YTemperature to measure the temperature, YVoltage to measure a voltage, YRelay to drive a relay, etc. However there is a special class that can do more: YSensor.
The YSensor class is the parent class for all Yoctopuce sensors, and can provide access to any sensor, regardless of its type. It includes methods to access all common functions. This makes it easier to create applications that use many different sensors. Moreover, if you create an application based on YSensor, it will work with all Yoctopuce sensors, even those which do no yet exist.
Programmation
In the Yoctopuce API, priority was put on the ease of access to the module functions by offering the possibility to make abstractions of the modules implementing them. Therefore, it is quite possible to work with a set of functions without ever knowing exactly which module are hosting them at the hardware level. This tremendously simplifies programming projects with a large number of modules.
From the programming stand point, your Yocto-Thermocouple is viewed as a module hosting a given number of functions. In the API, these functions are objects which can be found independently, in several ways.
Access to the functions of a module
Access by logical name
Each function can be assigned an arbitrary and persistent logical name: this logical name is stored in the flash memory of the module, even if this module is disconnected. An object corresponding to an Xxx function to which a logical name has been assigned can then be directly found with this logical name and the YXxx.FindXxx method. Note however that a logical name must be unique among all the connected modules.
Access by enumeration
You can enumerate all the functions of the same type on all the connected modules with the help of the classic enumeration functions FirstXxx and nextXxxx available for each YXxx class.
Access by hardware name
Each module function has a hardware name, assigned at the factory and which cannot be modified. The functions of a module can also be found directly with this hardware name and the YXxx.FindXxx function of the corresponding class.
Difference between Find and First
The YXxx.FindXxxx and YXxx.FirstXxxx methods do not work exactly the same way. If there is no available module, YXxx.FirstXxxx returns a null value. On the opposite, even if there is no corresponding module, YXxx.FindXxxx returns a valid object, which is not online but which could become so if the corresponding module is later connected.
Function handling
When the object corresponding to a function is found, its methods are available in a classic way. Note that most of these subfunctions require the module hosting the function to be connected in order to be handled. This is generally not guaranteed, as a USB module can be disconnected after the control software has started. The isOnline method, available in all the classes, is then very helpful.
Access to the modules
Even if it is perfectly possible to build a complete project while making a total abstraction of which function is hosted on which module, the modules themselves are also accessible from the API. In fact, they can be handled in a way quite similar to the functions. They are assigned a serial number at the factory which allows you to find the corresponding object with YModule.Find(). You can also assign arbitrary logical names to the modules to make finding them easier. Finally, the YModule class contains the YModule.FirstModule() and nextModule() enumeration methods allowing you to list the connected modules.
Functions/Module interaction
From the API standpoint, the modules and their functions are strongly uncorrelated by design. Nevertheless, the API provides the possibility to go from one to the other. Thus, the get_module() method, available for each function class, allows you to find the object corresponding to the module hosting this function. Inversely, the YModule class provides several methods allowing you to enumerate the functions available on a module.
6.2. The Yocto-Thermocouple module
The Yocto-Thermocouple module provides deux instances of the Temperature function, corresponding to the temperature at the end of the two thermocouples, as well as the temperature on the sensor board. The typical accuracy of the thermocouples is of 0.25 degrees plus 1% of the difference of temperature between the sensor board and the themocouple hot end.
module : Module
| attribute | type | modifiable ? |
|---|---|---|
| productName | String | read-only |
| serialNumber | String | read-only |
| logicalName | String | modifiable |
| productId | Hexadecimal number | read-only |
| productRelease | Hexadecimal number | read-only |
| firmwareRelease | String | read-only |
| persistentSettings | Enumerated | modifiable |
| luminosity | 0..100% | modifiable |
| beacon | On/Off | modifiable |
| upTime | Time | read-only |
| usbCurrent | Used current (mA) | read-only |
| rebootCountdown | Integer | modifiable |
| userVar | Integer | modifiable |
temperature1 : Temperature
temperature2 : Temperature
| attribute | type | modifiable ? |
|---|---|---|
| logicalName | String | modifiable |
| advertisedValue | String | modifiable |
| unit | String | modifiable |
| currentValue | Fixed-point number | read-only |
| lowestValue | Fixed-point number | modifiable |
| highestValue | Fixed-point number | modifiable |
| currentRawValue | Fixed-point number | read-only |
| logFrequency | Frequency | modifiable |
| reportFrequency | Frequency | modifiable |
| advMode | Enumerated | modifiable |
| calibrationParam | Calibration parameters | modifiable |
| resolution | Fixed-point number | modifiable |
| sensorState | Integer | read-only |
| sensorType | Enumerated | modifiable |
| signalValue | Fixed-point number | read-only |
| signalUnit | String | read-only |
| command | String | modifiable |
dataLogger : DataLogger
| attribute | type | modifiable ? |
|---|---|---|
| logicalName | String | modifiable |
| advertisedValue | String | modifiable |
| currentRunIndex | Integer | read-only |
| timeUTC | UTC time | modifiable |
| recording | Enumerated | modifiable |
| autoStart | On/Off | modifiable |
| beaconDriven | On/Off | modifiable |
| usage | 0..100% | read-only |
| clearHistory | Boolean | modifiable |
6.3. Module
Global parameters control interface for all Yoctopuce devices
The YModule class can be used with all Yoctopuce USB devices. It can be used to control the module global parameters, and to enumerate the functions provided by each module.
productName
Character string containing the commercial name of the module, as set by the factory.
serialNumber
Character string containing the serial number, unique and programmed at the factory. For a Yocto-Thermocouple module, this serial number always starts with THRMCPL1. You can use the serial number to access a given module by software.
logicalName
Character string containing the logical name of the module, initially empty. This attribute can be modified at will by the user. Once initialized to an non-empty value, it can be used to access a given module. If two modules with the same logical name are in the same project, there is no way to determine which one answers when one tries accessing by logical name. The logical name is limited to 19 characters among A..Z,a..z,0..9,_, and -.
productId
USB device identifier of the module, preprogrammed to 40 at the factory.
productRelease
Release number of the module hardware, preprogrammed at the factory. The original hardware release returns value 1, revision B returns value 2, and so on.
firmwareRelease
Release version of the embedded firmware, changes each time the embedded software is updated.
persistentSettings
State of persistent module settings: loaded from flash memory, modified by the user or saved to flash memory.
luminosity
Lighting strength of the informative leds (e.g. the Yocto-Led) contained in the module. It is an integer value which varies between 0 (LEDs turned off) and 100 (maximum led intensity). The default value is 50. To change the strength of the module LEDs, or to turn them off completely, you only need to change this value.
beacon
Activity of the localization beacon of the module.
upTime
Time elapsed since the last time the module was powered on.
usbCurrent
Current consumed by the module on the USB bus, in milli-amps.
rebootCountdown
Countdown to use for triggering a reboot of the module.
userVar
32bit integer variable available for user storage.
6.4. Temperature
temperature sensor control interface, available for instance in the Yocto-Meteo-V2, the Yocto-PT100, the Yocto-Temperature or the Yocto-Thermocouple
The YTemperature class allows you to read and configure Yoctopuce temperature sensors. It inherits from YSensor class the core functions to read measurements, to register callback functions, and to access the autonomous datalogger. This class adds the ability to configure some specific parameters for some sensors (connection type, temperature mapping table).
logicalName
Character string containing the logical name of the temperature sensor, initially empty. This attribute can be modified at will by the user. Once initialized to an non-empty value, it can be used to access the temperature sensor directly. If two temperature sensors with the same logical name are used in the same project, there is no way to determine which one answers when one tries accessing by logical name. The logical name is limited to 19 characters among A..Z,a..z,0..9,_, and -.
advertisedValue
Short character string summarizing the current state of the temperature sensor, that is automatically advertised up to the parent hub. For a temperature sensor, the advertised value is the current value of the temperature.
unit
Short character string representing the measuring unit for the temperature.
currentValue
Current value of the temperature, in Celsius, as a floating point number.
lowestValue
Minimal value of the temperature, in Celsius, as a floating point number.
highestValue
Maximal value of the temperature, in Celsius, as a floating point number.
currentRawValue
Uncalibrated, unrounded raw value returned by the sensor, as a floating point number.
logFrequency
Datalogger recording frequency, or "OFF" when measures should not be stored in the data logger flash memory.
reportFrequency
Timed value notification frequency, or "OFF" when timed value notifications are disabled for this function.
advMode
Measuring mode for the advertised value pushed to the parent hub.
calibrationParam
Extra calibration parameters (for instance to compensate for the effects of an enclosure), as an array of 16 bit words.
resolution
Measure resolution (i.e. precision of the numeric representation, not necessarily of the measure itself).
sensorState
Sensor state (zero when a current measure is available).
sensorType
Thermal sensor type used in the device, this can be a digital sensor, a specific type for a thermocouple, a PT100, a thermistor or a IR sensor
signalValue
Current value of the electrical signal measured by the sensor (except for digital sensors) as a floating point number.
signalUnit
Short character string representing the measuring unit of the electrical signal used by the sensor.
command
Magic attribute used to setup physical sensor parameters.
6.5. DataLogger
DataLogger control interface, available on most Yoctopuce sensors.
A non-volatile memory for storing ongoing measured data is available on most Yoctopuce sensors. Recording can happen automatically, without requiring a permanent connection to a computer. The YDataLogger class controls the global parameters of the internal data logger. Recording control (start/stop) as well as data retrieval is done at sensor objects level.
logicalName
Character string containing the logical name of the data logger, initially empty. This attribute can be modified at will by the user. Once initialized to an non-empty value, it can be used to access the data logger directly. If two data loggers with the same logical name are used in the same project, there is no way to determine which one answers when one tries accessing by logical name. The logical name is limited to 19 characters among A..Z,a..z,0..9,_, and -.
advertisedValue
Short character string summarizing the current state of the data logger, that is automatically advertised up to the parent hub. For a data logger, the advertised value is its recording state (ON or OFF).
currentRunIndex
Current run number, corresponding to the number of time the module was powered on with the dataLogger enabled at some point.
timeUTC
Current UTC time, in case it is desirable to bind an absolute time reference to the data stored by the data logger. This time must be set up by software.
recording
Activation state of the data logger. The data logger can be enabled and disabled at will, using this attribute, but its state on power on is determined by the autoStart persistent attribute. When the datalogger is enabled but not yet ready to record data, its state is set to PENDING.
autoStart
Automatic start of the data logger on power on. Setting this attribute ensures that the data logger is always turned on when the device is powered up, without need for a software command. Note: if the device doesn't have any time source at his disposal, it will wait for ~8 seconds before automatically starting to record.
beaconDriven
Synchronize the sate of the localization beacon and the state of the data logger. If this attribute is set, it is possible to start the recording with the Yocto-button or the attribute beacon of the function YModule. In the same way, if the attribute recording is changed, the sate of the localization beacon is updated. Note: when this attribute is set the localization beacon pulses at a slower rate than usual.
usage
Percentage of datalogger memory in use.
clearHistory
Attribute that can be set to true to clear recorded data.
6.6. What interface: Native, DLL or Service ?
There are several methods to control you Yoctopuce module by software.
Native control
In this case, the software driving your project is compiled directly with a library which provides control of the modules. Objectively, it is the simplest and most elegant solution for the end user. The end user then only needs to plug the USB cable and run your software for everything to work. Unfortunately, this method is not always available or even possible.
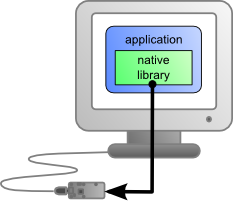
The application uses the native library to control the locally connected module
Native control by DLL
Here, the main part of the code controlling the modules is located in a DLL. The software is compiled with a small library which provides control of the DLL. It is the fastest method to code module support in a given language. Indeed, the "useful" part of the control code is located in the DLL which is the same for all languages: the effort to support a new language is limited to coding the small library which controls the DLL. From the end user stand point, there are few differences: one must simply make sure that the DLL is installed on the end user's computer at the same time as the main software.
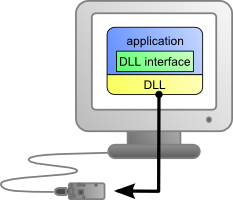
The application uses the DLL to natively control the locally connected module
Control by service
Some languages do simply not allow you to easily gain access to the hardware layers of the machine. It is the case for Javascript, for instance. To deal with this case, Yoctopuce provides a solution in the form of a small piece of software called VirtualHub11. It can access the modules, and your application only needs to use a library which offers all necessary functions to control the modules via this VirtualHub. The end users will have to start VirtualHub before running the project control software itself, unless they decide to install the hub as a service/deamon, in which case VirtualHub starts automatically when the machine starts up.
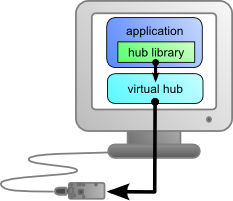
The application connects itself to VirtualHub to gain access to the module
The service control method comes with a non-negligible advantage: the application does not need to run on the machine on which the modules are connected. The application can very well be located on another machine which connects itself to the service to drive the modules. Moreover, the native libraries and DLL mentioned above are also able to connect themselves remotely to one or several machines running VirtualHub.
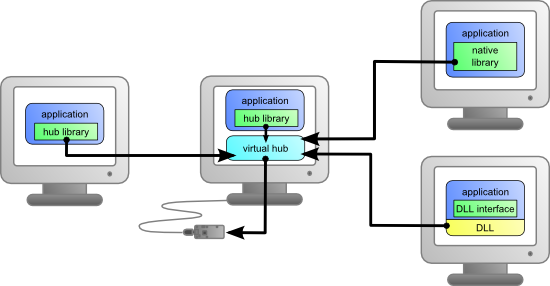
When VirtualHub is used, the control application does not need
to reside on the same machine as the module.
Whatever the selected programming language and the control paradigm used, programming itself stays strictly identical. From one language to another, functions bear exactly the same name, and have the same parameters. The only differences are linked to the constraints of the languages themselves.
| Language | Native | Native with DLL | VirtualHub |
|---|---|---|---|
| Command line | ✔ | - | ✔ |
| Python | - | ✔ | ✔ |
| C++ | ✔ | ✔ | ✔ |
| C# .Net | - | ✔ | ✔ |
| C# UWP | ✔ | - | ✔ |
| LabVIEW | - | ✔ | ✔ |
| Java | - | ✔ | ✔ |
| Java for Android | ✔ | - | ✔ |
| TypeScript | - | - | ✔ |
| JavaScript / ECMAScript | - | - | ✔ |
| PHP | - | - | ✔ |
| VisualBasic .Net | - | ✔ | ✔ |
| Delphi | - | ✔ | ✔ |
| Objective-C | ✔ | - | ✔ |
Support methods for different languages
6.7. Accessing modules through a hub
VirtualHub to work around USB access limitation
Only one application at a given time can have native access to Yoctopuce devices. This limitation is related to the fact that two different processes cannot talk to a USB device at the same time. Usually, this kind of problem is solved by a driver that takes care of the police work to prevent multiple processes fighting over the same device. But Yoctopuce products do not use drivers. Therefore, the first process that manages to access the native mode keeps it for itself until UnregisterHub or FreeApi is called.
If your application tries to communicate in native mode with Yoctopuce devices, but that another application prevents you from accessing them, you receive the following error message:
Another process is already using yAPI
The solution is to use VirtualHub locally on your machine and to use it as a gateway for your applications. In this way, if all your applications use VirtualHub, you do not have conflicts anymore and you can access all your devices all the time.
With a YoctoHub
A YoctoHub behaves itself exactly like a computer running VirtualHub. The only difference between a program using the Yoctopuce API with modules in native USB and the same program with Yoctopuce modules connected to a YoctoHub is located at the level of the RegisterHub function call. To use USB modules connected natively, the RegisterHub parameter is usb. To use modules connected to a YoctoHub, you must simply replace this parameter by the IP address of the YoctoHub.
So there are three possible modes: native mode, network mode via VirtualHub on your local machine, or via a YoctoHub. To switch from native to network mode on your local machine, you only need to change the parameter when calling YAPI.RegisterHub, as shown in the examples below:
YAPI.RegisterHub("usb",errmsg); // native USB mode
YAPI.RegisterHub("127.0.0.1",errmsg); // local network mode with VirtualHub
YAPI.RegisterHub("192.168.0.10",errmsg); // YoctoHub mode, with 192.168.0.10 as YoctoHub IP address
6.8. Programming, where to start?
At this point of the user's guide, you should know the main theoretical points of your Yocto-Thermocouple. It is now time to practice. You must download the Yoctopuce library for your favorite programming language from the Yoctopuce web site12. Then skip directly to the chapter corresponding to the chosen programming language.
All the examples described in this guide are available in the programming libraries. For some languages, the libraries also include some complete graphical applications, with their source code.
When you have mastered the basic programming of your module, you can turn to the chapter on advanced programming that describes some techniques that will help you make the most of your Yocto-Thermocouple.
7. Using the Yocto-Thermocouple in command line
When you want to perform a punctual operation on your Yocto-Thermocouple, such as reading a value, assigning a logical name, and so on, you can obviously use VirtualHub, but there is a simpler, faster, and more efficient method: the command line API.
The command line API is a set of executables, one by type of functionality offered by the range of Yoctopuce products. These executables are provided pre-compiled for all the Yoctopuce officially supported platforms/OS. Naturally, the executable sources are also provided13.
7.1. Installing
Download the command line API14. You do not need to run any setup, simply copy the executables corresponding to your platform/OS in a directory of your choice. You may add this directory to your PATH variable to be able to access these executables from anywhere. You are all set, you only need to connect your Yocto-Thermocouple, open a shell, and start working by typing for example:
To use the command line API on Linux, you need either have root privileges or to define an udev rule for your system. See the Troubleshooting chapter for more details.
7.2. Use: general description
All the command line API executables work on the same principle. They must be called the following way
C:\>Executable [options] [target] command [parameter]
[options] manage the global workings of the commands, they allow you, for instance, to pilot a module remotely through the network, or to force the module to save its configuration after executing the command.
[target] is the name of the module or of the function to which the command applies. Some very generic commands do not need a target. You can also use the aliases "any" and "all", or a list of names separated by comas without space.
command is the command you want to run. Almost all the functions available in the classic programming APIs are available as commands. You need to respect neither the case nor the underlined characters in the command name.
[parameters] are logically the parameters needed by the command.
At any time, the command line API executables can provide a rather detailed help. Use for instance:
C:\>executable /help
to know the list of available commands for a given command line API executable, or even:
C:\>executable command /help
to obtain a detailed description of the parameters of a command.
7.3. Control of the Temperature function
To control the Temperature function of your Yocto-Thermocouple, you need the YTemperature executable file.
For instance, you can launch:
This example uses the "any" target to indicate that we want to work on the first Temperature function found among all those available on the connected Yoctopuce modules when running. This prevents you from having to know the exact names of your function and of your module.
But you can use logical names as well, as long as you have configured them beforehand. Let us imagine a Yocto-Thermocouple module with the THRMCPL1-123456 serial number which you have called "MyModule", and its temperature function which you have renamed "MyFunction". The five following calls are strictly equivalent (as long as MyFunction is defined only once, to avoid any ambiguity).
C:\>YTemperature THRMCPL1-123456.temperature describe
C:\>YTemperature THRMCPL1-123456.MyFunction describe
C:\>YTemperature MyModule.temperature describe
C:\>YTemperature MyModule.MyFunction describe
C:\>YTemperature MyFunction describe
To work on all the Temperature functions at the same time, use the "all" target.
C:\>YTemperature all describe
For more details on the possibilities of the YTemperature executable, use:
C:\>YTemperature /help
7.4. Control of the module part
Each module can be controlled in a similar way with the help of the YModule executable. For example, to obtain the list of all the connected modules, use:
C:\>YModule inventory
You can also use the following command to obtain an even more detailed list of the connected modules:
C:\>YModule all describe
Each xxx property of the module can be obtained thanks to a command of the get_xxxx() type, and the properties which are not read only can be modified with the set_xxx() command. For example:
C:\>YModule THRMCPL1-12346 set_logicalName MonPremierModule
C:\>YModule THRMCPL1-12346 get_logicalName
Changing the settings of the module
When you want to change the settings of a module, simply use the corresponding set_xxx command. However, this change happens only in the module RAM: if the module restarts, the changes are lost. To store them permanently, you must tell the module to save its current configuration in its nonvolatile memory. To do so, use the saveToFlash command. Inversely, it is possible to force the module to forget its current settings by using the revertFromFlash method. For example:
C:\>YModule THRMCPL1-12346 set_logicalName MonPremierModule
C:\>YModule THRMCPL1-12346 saveToFlash
Note that you can do the same thing in a single command with the -s option.
C:\>YModule -s THRMCPL1-12346 set_logicalName MonPremierModule
Warning: the number of write cycles of the nonvolatile memory of the module is limited. When this limit is reached, nothing guaranties that the saving process is performed correctly. This limit, linked to the technology employed by the module micro-processor, is located at about 100000 cycles. In short, you can use the saveToFlash() function only 100000 times in the life of the module. Make sure you do not call this function within a loop.
7.5. Limitations
The command line API has the same limitation than the other APIs: there can be only one application at a given time which can access the modules natively. By default, the command line API works in native mode.
You can easily work around this limitation by using a Virtual Hub: run VirtualHub15 on the concerned machine, and use the executables of the command line API with the -r option. For example, if you use:
C:\>YModule inventory
you obtain a list of the modules connected by USB, using a native access. If another command which accesses the modules natively is already running, this does not work. But if you run VirtualHub, and you give your command in the form:
C:\>YModule -r 127.0.0.1 inventory
it works because the command is not executed natively anymore, but through VirtualHub. Note that VirtualHub counts as a native application.
8. Using the Yocto-Thermocouple with Python
Python is an interpreted object oriented language developed by Guido van Rossum. Among its advantages is the fact that it is free, and the fact that it is available for most platforms, Windows as well as UNIX. It is an ideal language to write small scripts on a napkin. The Yoctopuce library is compatible with Python 2.7 and 3.x up to the latest official versions. It works under Windows, macOS, and Linux, Intel as well as ARM. Python interpreters are available on the Python web site16.
8.1. Source files
The Yoctopuce library classes17 for Python that you will use are provided as source files. Copy all the content of the Sources directory in the directory of your choice and add this directory to the PYTHONPATH environment variable. If you use an IDE to program in Python, refer to its documentation to configure it so that it automatically finds the API source files.
8.2. Dynamic library
A section of the low-level library is written in C, but you should not need to interact directly with it: it is provided as a DLL under Windows, as a .so files under UNIX, and as a .dylib file under macOS. Everything was done to ensure the simplest possible interaction from Python: the distinct versions of the dynamic library corresponding to the distinct operating systems and architectures are stored in the cdll directory. The API automatically loads the correct file during its initialization. You should not have to worry about it.
If you ever need to recompile the dynamic library, its complete source code is located in the Yoctopuce C++ library.
In order to keep them simple, all the examples provided in this documentation are console applications. Naturally, the libraries function in a strictly identical manner if you integrate them in an application with a graphical interface.
8.3. Control of the Temperature function
A few lines of code are enough to use a Yocto-Thermocouple. Here is the skeleton of a Python code snipplet to use the Temperature function.
[...]
# Enable detection of USB devices
errmsg=YRefParam()
YAPI.RegisterHub("usb",errmsg)
[...]
# Retrieve the object used to interact with the device
temperature = YTemperature.FindTemperature("THRMCPL1-123456.temperature")
# Hot-plug is easy: just check that the device is online
if temperature.isOnline():
# Use temperature.get_currentValue()
[...]
[...]
Let's look at these lines in more details.
YAPI.RegisterHub
The yAPI.RegisterHub function initializes the Yoctopuce API and indicates where the modules should be looked for. When used with the parameter "usb", it will use the modules locally connected to the computer running the library. If the initialization does not succeed, this function returns a value different from YAPI.SUCCESS and errmsg contains the error message.
YTemperature.FindTemperature
The YTemperature.FindTemperature function allows you to find a temperature sensor from the serial number of the module on which it resides and from its function name. You can use logical names as well, as long as you have initialized them. Let us imagine a Yocto-Thermocouple module with serial number THRMCPL1-123456 which you have named "MyModule", and for which you have given the temperature function the name "MyFunction". The following five calls are strictly equivalent, as long as "MyFunction" is defined only once.
temperature = YTemperature.FindTemperature("THRMCPL1-123456.temperature")
temperature = YTemperature.FindTemperature("THRMCPL1-123456.MyFunction")
temperature = YTemperature.FindTemperature("MyModule.temperature")
temperature = YTemperature.FindTemperature("MyModule.MyFunction")
temperature = YTemperature.FindTemperature("MyFunction")
YTemperature.FindTemperature returns an object which you can then use at will to control the temperature sensor.
isOnline
The isOnline() method of the object returned by YTemperature.FindTemperature allows you to know if the corresponding module is present and in working order.
About python imports
This documentation assumes that you are using the Python library downloaded directly from the Yoctopuce website, but if you are using the library installed with PIP, then you will need to prefix all imports with yoctopuce.. Meaning all the import examples shown in the documentation, such as:
from yocto_api import *
need to be converted , when the yoctopuce library was installed by PIP, to:
from yoctopuce.yocto_api import *
get_currentValue
The get_currentValue() method of the object returned by YTemperature.FindTemperature provides the temperature currently measured by the sensor. The value returned is a floating number, equal to the current number of Celsius degrees.
A real example
Launch Python and open the corresponding sample script provided in the directory Examples/Doc-GettingStarted-Yocto-Thermocouple of the Yoctopuce library.
In this example, you will recognize the functions explained above, but this time used with all side materials needed to make it work nicely as a small demo.
# -*- coding: utf-8 -*-
import os, sys
from yocto_api import *
from yocto_temperature import *
def usage():
scriptname = os.path.basename(sys.argv[0])
print("Usage:")
print(scriptname + ' <serial_number>')
print(scriptname + ' <logical_name>')
print(scriptname + ' any ')
sys.exit()
def die(msg):
sys.exit(msg + ' (check USB cable)')
errmsg = YRefParam()
if len(sys.argv) < 2:
usage()
target = sys.argv[1]
# Setup the API to use local USB devices
if YAPI.RegisterHub("usb", errmsg) != YAPI.SUCCESS:
sys.exit("init error" + errmsg.value)
if target == 'any':
# retreive any temperature sensor
sensor = YTemperature.FirstTemperature()
if sensor is None:
die('No module connected')
else:
sensor = YTemperature.FindTemperature(target + '.temperature1')
if not (sensor.isOnline()):
die('device not connected')
# retreive module serial
serial = sensor.get_module().get_serialNumber()
# retreive both channels
channel1 = YTemperature.FindTemperature(serial + '.temperature1')
channel2 = YTemperature.FindTemperature(serial + '.temperature2')
while channel1.isOnline():
print("channel 1/2: " + "%2.1f / " % channel1.get_currentValue() + \
"%2.1f" % channel2.get_currentValue() + \
" deg C (Ctrl-C to stop)")
YAPI.Sleep(1000)
YAPI.FreeAPI()
8.4. Control of the module part
Each module can be controlled in a similar manner, you can find below a simple sample program displaying the main parameters of the module and enabling you to activate the localization beacon.
# -*- coding: utf-8 -*-
import os, sys
from yocto_api import *
def usage():
sys.exit("usage: demo <serial or logical name> [ON/OFF]")
errmsg = YRefParam()
if YAPI.RegisterHub("usb", errmsg) != YAPI.SUCCESS:
sys.exit("RegisterHub error: " + str(errmsg))
if len(sys.argv) < 2:
usage()
m = YModule.FindModule(sys.argv[1]) # # use serial or logical name
if m.isOnline():
if len(sys.argv) > 2:
if sys.argv[2].upper() == "ON":
m.set_beacon(YModule.BEACON_ON)
if sys.argv[2].upper() == "OFF":
m.set_beacon(YModule.BEACON_OFF)
print("serial: " + m.get_serialNumber())
print("logical name: " + m.get_logicalName())
print("luminosity: " + str(m.get_luminosity()))
if m.get_beacon() == YModule.BEACON_ON:
print("beacon: ON")
else:
print("beacon: OFF")
print("upTime: " + str(m.get_upTime() / 1000) + " sec")
print("USB current: " + str(m.get_usbCurrent()) + " mA")
print("logs:\n" + m.get_lastLogs())
else:
print(sys.argv[1] + " not connected (check identification and USB cable)")
YAPI.FreeAPI()
Each property xxx of the module can be read thanks to a method of type YModule.get_xxxx(), and properties which are not read-only can be modified with the help of the YModule.set_xxx() method. For more details regarding the used functions, refer to the API chapters.
Changing the module settings
When you want to modify the settings of a module, you only need to call the corresponding YModule.set_xxx() function. However, this modification is performed only in the random access memory (RAM) of the module: if the module is restarted, the modifications are lost. To memorize them persistently, it is necessary to ask the module to save its current configuration in its permanent memory. To do so, use the YModule.saveToFlash() method. Inversely, it is possible to force the module to forget its current settings by using the YModule.revertFromFlash() method. The short example below allows you to modify the logical name of a module.
# -*- coding: utf-8 -*-
import os, sys
from yocto_api import *
def usage():
sys.exit("usage: demo <serial or logical name> <new logical name>")
if len(sys.argv) != 3:
usage()
errmsg = YRefParam()
if YAPI.RegisterHub("usb", errmsg) != YAPI.SUCCESS:
sys.exit("RegisterHub error: " + str(errmsg))
m = YModule.FindModule(sys.argv[1]) # use serial or logical name
if m.isOnline():
newname = sys.argv[2]
if not YAPI.CheckLogicalName(newname):
sys.exit("Invalid name (" + newname + ")")
m.set_logicalName(newname)
m.saveToFlash() # do not forget this
print("Module: serial= " + m.get_serialNumber() + " / name= " + m.get_logicalName())
else:
sys.exit("not connected (check identification and USB cable")
YAPI.FreeAPI()
Warning: the number of write cycles of the nonvolatile memory of the module is limited. When this limit is reached, nothing guaranties that the saving process is performed correctly. This limit, linked to the technology employed by the module micro-processor, is located at about 100000 cycles. In short, you can use the YModule.saveToFlash() function only 100000 times in the life of the module. Make sure you do not call this function within a loop.
Listing the modules
Obtaining the list of the connected modules is performed with the YModule.yFirstModule() function which returns the first module found. Then, you only need to call the nextModule() function of this object to find the following modules, and this as long as the returned value is not null. Below a short example listing the connected modules.
# -*- coding: utf-8 -*-
import os, sys
from yocto_api import *
errmsg = YRefParam()
# Setup the API to use local USB devices
if YAPI.RegisterHub("usb", errmsg) != YAPI.SUCCESS:
sys.exit("init error" + str(errmsg))
print('Device list')
module = YModule.FirstModule()
while module is not None:
print(module.get_serialNumber() + ' (' + module.get_productName() + ')')
module = module.nextModule()
YAPI.FreeAPI()
8.5. Error handling
When you implement a program which must interact with USB modules, you cannot disregard error handling. Inevitably, there will be a time when a user will have unplugged the device, either before running the software, or even while the software is running. The Yoctopuce library is designed to help you support this kind of behavior, but your code must nevertheless be conceived to interpret in the best possible way the errors indicated by the library.
The simplest way to work around the problem is the one used in the short examples provided in this chapter: before accessing a module, check that it is online with the isOnline function, and then hope that it will stay so during the fraction of a second necessary for the following code lines to run. This method is not perfect, but it can be sufficient in some cases. You must however be aware that you cannot completely exclude an error which would occur after the call to isOnline and which could crash the software. The only way to prevent this is to implement one of the two error handling techniques described below.
The method recommended by most programming languages for unpredictable error handling is the use of exceptions. By default, it is the behavior of the Yoctopuce library. If an error happens while you try to access a module, the library throws an exception. In this case, there are three possibilities:
- If your code catches the exception and handles it, everything goes well.
- If your program is running in debug mode, you can relatively easily determine where the problem happened and view the explanatory message linked to the exception.
- Otherwise... the exception makes your program crash, bang!
As this latest situation is not the most desirable, the Yoctopuce library offers another possibility for error handling, allowing you to create a robust program without needing to catch exceptions at every line of code. You simply need to call the YAPI.DisableExceptions() function to commute the library to a mode where exceptions for all the functions are systematically replaced by specific return values, which can be tested by the caller when necessary. For each function, the name of each return value in case of error is systematically documented in the library reference. The name always follows the same logic: a get_state() method returns a ClassName.STATE_INVALID value, a get_currentValue method returns a ClassName.CURRENTVALUE_INVALID value, and so on. In any case, the returned value is of the expected type and is not a null pointer which would risk crashing your program. At worst, if you display the value without testing it, it will be outside the expected bounds for the returned value. In the case of functions which do not normally return information, the return value is YAPI_SUCCESS if everything went well, and a different error code in case of failure.
When you work without exceptions, you can obtain an error code and an error message explaining the source of the error. You can request them from the object which returned the error, calling the errType() and errMessage() methods. Their returned values contain the same information as in the exceptions when they are active.
9. Using Yocto-Thermocouple with C++
C++ is not the simplest language to master. However, if you take care to limit yourself to its essential functionalities, this language can very well be used for short programs quickly coded, and it has the advantage of being easily ported from one operating system to another. Under Windows, C++ is supported with Microsoft Visual Studio 2017 and more recent versions. Under macOS, we support the XCode versions supported by Apple. And under Linux, we support all GCC version published since 2008. Moreover, under Max OS X and under Linux, you can compile the examples using a command line with GCC using the provided GNUmakefile. In the same manner under Windows, a Makefile allows you to compile examples using a command line, fully knowing the compilation and linking arguments.
Yoctopuce C++ libraries18 are integrally provided as source files. A section of the low-level library is written in pure C, but you should not need to interact directly with it: everything was done to ensure the simplest possible interaction from C++. The library is naturally also available as binary files, so that you can link it directly if you prefer.
You will soon notice that the C++ API defines many functions which return objects. You do not need to deallocate these objects yourself, the API does it automatically at the end of the application.
In order to keep them simple, all the examples provided in this documentation are console applications. Naturally, the libraries function in a strictly identical manner if you integrate them in an application with a graphical interface. You will find in the last section of this chapter all the information needed to create a wholly new project linked with the Yoctopuce libraries.
9.1. Control of the Temperature function
A few lines of code are enough to use a Yocto-Thermocouple. Here is the skeleton of a C++ code snipplet to use the Temperature function.
#include "yocto_api.h"
#include "yocto_temperature.h"
[...]
// Enable detection of USB devices
String errmsg;
YAPI::RegisterHub("usb", errmsg);
[...]
// Retrieve the object used to interact with the device
YTemperature *temperature;
temperature = YTemperature::FindTemperature("THRMCPL1-123456.temperature");
// Hot-plug is easy: just check that the device is online
if(temperature->isOnline())
{
// Use temperature->get_currentValue()
[...]
}
Let's look at these lines in more details.
yocto_api.h et yocto_temperature.h
These two include files provide access to the functions allowing you to manage Yoctopuce modules. yocto_api.h must always be used, yocto_temperature.h is necessary to manage modules containing a temperature sensor, such as Yocto-Thermocouple.
YAPI::RegisterHub
The YAPI::RegisterHub function initializes the Yoctopuce API and indicates where the modules should be looked for. When used with the parameter "usb", it will use the modules locally connected to the computer running the library. If the initialization does not succeed, this function returns a value different from YAPI_SUCCESS and errmsg contains the error message.
YTemperature::FindTemperature
The YTemperature::FindTemperature function allows you to find a temperature sensor from the serial number of the module on which it resides and from its function name. You can use logical names as well, as long as you have initialized them. Let us imagine a Yocto-Thermocouple module with serial number THRMCPL1-123456 which you have named "MyModule", and for which you have given the temperature function the name "MyFunction". The following five calls are strictly equivalent, as long as "MyFunction" is defined only once.
YTemperature *temperature = YTemperature::FindTemperature("THRMCPL1-123456.temperature");
YTemperature *temperature = YTemperature::FindTemperature("THRMCPL1-123456.MyFunction");
YTemperature *temperature = YTemperature::FindTemperature("MyModule.temperature");
YTemperature *temperature = YTemperature::FindTemperature("MyModule.MyFunction");
YTemperature *temperature = YTemperature::FindTemperature("MyFunction");
YTemperature::FindTemperature returns an object which you can then use at will to control the temperature sensor.
isOnline
The isOnline() method of the object returned by YTemperature::FindTemperature allows you to know if the corresponding module is present and in working order.
get_currentValue
The get_currentValue() method of the object returned by yFindTemperature provides the temperature currently measured by the sensor. The value returned is a floating number, equal to the current number of Celsius degrees.
A real example
Launch your C++ environment and open the corresponding sample project provided in the directory Examples/Doc-GettingStarted-Yocto-Thermocouple of the Yoctopuce library. If you prefer to work with your favorite text editor, open the file main.cpp, and type make to build the example when you are done.
In this example, you will recognize the functions explained above, but this time used with all side materials needed to make it work nicely as a small demo.
#include "yocto_temperature.h"
#include <iostream>
#include <stdlib.h>
using namespace std;
static void usage(void)
{
cout << "usage: demo <serial_number> " << endl;
cout << " demo <logical_name>" << endl;
cout << " demo any" << endl;
u64 now = YAPI::GetTickCount();
while (YAPI::GetTickCount() - now < 3000) {
// wait 3 sec to show the message
}
exit(1);
}
int main(int argc, const char * argv[])
{
string errmsg, target;
YTemperature *tsensor;
if (argc < 2) {
usage();
}
target = (string) argv[1];
// Setup the API to use local USB devices
if (YAPI::RegisterHub("usb", errmsg) != YAPI::SUCCESS) {
cerr << "RegisterHub error: " << errmsg << endl;
return 1;
}
if (target == "any") {
tsensor = YTemperature::FirstTemperature();
if (tsensor == NULL) {
cout << "No module connected (check USB cable)" << endl;
return 1;
}
} else {
tsensor = YTemperature::FindTemperature(target + ".temperature1");
}
string serial = tsensor->get_module()->get_serialNumber();
YTemperature *t1 = YTemperature::FindTemperature(serial + ".temperature1");
YTemperature *t2 = YTemperature::FindTemperature(serial + ".temperature2");
while (1) {
if (!t1->isOnline() || !t2->isOnline()) {
cout << "Module not connected (check identification and USB cable)";
break;
}
cout << "Channel 1 : " << t1->get_currentValue() << " deg C" << endl;
cout << "Channel 2 : " << t2->get_currentValue() << " deg C" << endl;
cout << " (press Ctrl-C to exit)" << endl;
YAPI::Sleep(1000, errmsg);
};
YAPI::FreeAPI();
return 0;
}
9.2. Control of the module part
Each module can be controlled in a similar manner, you can find below a simple sample program displaying the main parameters of the module and enabling you to activate the localization beacon.
#include <stdlib.h>
#include "yocto_api.h"
using namespace std;
static void usage(const char *exe)
{
cout << "usage: " << exe << " <serial or logical name> [ON/OFF]" << endl;
exit(1);
}
int main(int argc, const char * argv[])
{
string errmsg;
// Setup the API to use local USB devices
if(YAPI::RegisterHub("usb", errmsg) != YAPI::SUCCESS) {
cerr << "RegisterHub error: " << errmsg << endl;
return 1;
}
if(argc < 2)
usage(argv[0]);
YModule *module = YModule::FindModule(argv[1]); // use serial or logical name
if (module->isOnline()) {
if (argc > 2) {
if (string(argv[2]) == "ON")
module->set_beacon(Y_BEACON_ON);
else
module->set_beacon(Y_BEACON_OFF);
}
cout << "serial: " << module->get_serialNumber() << endl;
cout << "logical name: " << module->get_logicalName() << endl;
cout << "luminosity: " << module->get_luminosity() << endl;
cout << "beacon: ";
if (module->get_beacon() == Y_BEACON_ON)
cout << "ON" << endl;
else
cout << "OFF" << endl;
cout << "upTime: " << module->get_upTime() / 1000 << " sec" << endl;
cout << "USB current: " << module->get_usbCurrent() << " mA" << endl;
cout << "Logs:" << endl << module->get_lastLogs() << endl;
} else {
cout << argv[1] << " not connected (check identification and USB cable)"
<< endl;
}
YAPI::FreeAPI();
return 0;
}
Each property xxx of the module can be read thanks to a method of type get_xxxx(), and properties which are not read-only can be modified with the help of the set_xxx() method. For more details regarding the used functions, refer to the API chapters.
Changing the module settings
When you want to modify the settings of a module, you only need to call the corresponding set_xxx() function. However, this modification is performed only in the random access memory (RAM) of the module: if the module is restarted, the modifications are lost. To memorize them persistently, it is necessary to ask the module to save its current configuration in its permanent memory. To do so, use the saveToFlash() method. Inversely, it is possible to force the module to forget its current settings by using the revertFromFlash() method. The short example below allows you to modify the logical name of a module.
#include <stdlib.h>
#include "yocto_api.h"
using namespace std;
static void usage(const char *exe)
{
cerr << "usage: " << exe << " <serial> <newLogicalName>" << endl;
exit(1);
}
int main(int argc, const char * argv[])
{
string errmsg;
// Setup the API to use local USB devices
if(YAPI::RegisterHub("usb", errmsg) != YAPI::SUCCESS) {
cerr << "RegisterHub error: " << errmsg << endl;
return 1;
}
if(argc < 2)
usage(argv[0]);
YModule *module = YModule::FindModule(argv[1]); // use serial or logical name
if (module->isOnline()) {
if (argc >= 3) {
string newname = argv[2];
if (!yCheckLogicalName(newname)) {
cerr << "Invalid name (" << newname << ")" << endl;
usage(argv[0]);
}
module->set_logicalName(newname);
module->saveToFlash();
}
cout << "Current name: " << module->get_logicalName() << endl;
} else {
cout << argv[1] << " not connected (check identification and USB cable)"
<< endl;
}
YAPI::FreeAPI();
return 0;
}
Warning: the number of write cycles of the nonvolatile memory of the module is limited. When this limit is reached, nothing guaranties that the saving process is performed correctly. This limit, linked to the technology employed by the module micro-processor, is located at about 100000 cycles. In short, you can use the saveToFlash() function only 100000 times in the life of the module. Make sure you do not call this function within a loop.
Listing the modules
Obtaining the list of the connected modules is performed with the yFirstModule() function which returns the first module found. Then, you only need to call the nextModule() function of this object to find the following modules, and this as long as the returned value is not NULL. Below a short example listing the connected modules.
#include "yocto_api.h"
using namespace std;
int main(int argc, const char * argv[])
{
string errmsg;
// Setup the API to use local USB devices
if(YAPI::RegisterHub("usb", errmsg) != YAPI::SUCCESS) {
cerr << "RegisterHub error: " << errmsg << endl;
return 1;
}
cout << "Device list: " << endl;
YModule *module = YModule::FirstModule();
while (module != NULL) {
cout << module->get_serialNumber() << " ";
cout << module->get_productName() << endl;
module = module->nextModule();
}
YAPI::FreeAPI();
return 0;
}
9.3. Error handling
When you implement a program which must interact with USB modules, you cannot disregard error handling. Inevitably, there will be a time when a user will have unplugged the device, either before running the software, or even while the software is running. The Yoctopuce library is designed to help you support this kind of behavior, but your code must nevertheless be conceived to interpret in the best possible way the errors indicated by the library.
The simplest way to work around the problem is the one used in the short examples provided in this chapter: before accessing a module, check that it is online with the isOnline function, and then hope that it will stay so during the fraction of a second necessary for the following code lines to run. This method is not perfect, but it can be sufficient in some cases. You must however be aware that you cannot completely exclude an error which would occur after the call to isOnline and which could crash the software. The only way to prevent this is to implement one of the two error handling techniques described below.
The method recommended by most programming languages for unpredictable error handling is the use of exceptions. By default, it is the behavior of the Yoctopuce library. If an error happens while you try to access a module, the library throws an exception. In this case, there are three possibilities:
- If your code catches the exception and handles it, everything goes well.
- If your program is running in debug mode, you can relatively easily determine where the problem happened and view the explanatory message linked to the exception.
- Otherwise... the exception makes your program crash, bang!
As this latest situation is not the most desirable, the Yoctopuce library offers another possibility for error handling, allowing you to create a robust program without needing to catch exceptions at every line of code. You simply need to call the YAPI.DisableExceptions() function to commute the library to a mode where exceptions for all the functions are systematically replaced by specific return values, which can be tested by the caller when necessary. For each function, the name of each return value in case of error is systematically documented in the library reference. The name always follows the same logic: a get_state() method returns a ClassName.STATE_INVALID value, a get_currentValue method returns a ClassName.CURRENTVALUE_INVALID value, and so on. In any case, the returned value is of the expected type and is not a null pointer which would risk crashing your program. At worst, if you display the value without testing it, it will be outside the expected bounds for the returned value. In the case of functions which do not normally return information, the return value is YAPI_SUCCESS if everything went well, and a different error code in case of failure.
When you work without exceptions, you can obtain an error code and an error message explaining the source of the error. You can request them from the object which returned the error, calling the errType() and errMessage() methods. Their returned values contain the same information as in the exceptions when they are active.
9.4. Integration variants for the C++ Yoctopuce library
Depending on your needs and on your preferences, you can integrate the library into your projects in several distinct manners. This section explains how to implement the different options.
Integration in source format (recommended)
Integrating all the sources of the library into your projects has several advantages:
- It guaranties the respect of the compilation conventions of your project (32/64 bits, inclusion of debugging symbols, unicode or ASCII characters, etc.);
- It facilitates debugging if you are looking for the cause of a problem linked to the Yoctopuce library;
- It reduces the dependencies on third party components, for example in the case where you would need to recompile this project for another architecture in many years;
- It does not require the installation of a dynamic library specific to Yoctopuce on the final system, everything is in the executable.
To integrate the source code, the easiest way is to simply include the Sources directory of your Yoctopuce library into your IncludePath, and to add all the files of this directory (including the sub-directory yapi) to your project.
For your project to build correctly, you need to link with your project the prerequisite system libraries, that is:
- For Windows: the libraries are added automatically
- For macOS: IOKit.framework and CoreFoundation.framework
- For Linux: libm, libpthread, libusb1.0, and libstdc++
Integration as a static library
With the integration of the Yoctopuce library as a static library, you do not need to install a dynamic library specific to Yoctopuce, everything is in the executable.
To use the static library, you must first compile it using the shell script build.sh on UNIX, or build.bat on Windows. This script, located in the root directory of the library, detects the OS and recompiles all the corresponding libraries as well as the examples.
Then, to integrate the static Yoctopuce library to your project, you must include the Sources directory of the Yoctopuce library into your IncludePath, and add the sub-directory Binaries/... corresponding to your operating system into your libPath.
Finally, for you project to build correctly, you need to link with your project the Yoctopuce library and the prerequisite system libraries:
- For Windows: yocto-static.lib
- For macOS: libyocto-static.a, IOKit.framework, and CoreFoundation.framework
- For Linux: libyocto-static.a, libm, libpthread, libusb1.0, and libstdc++.
Note, under Linux, if you wish to compile in command line with GCC, it is generally advisable to link system libraries as dynamic libraries, rather than as static ones. To mix static and dynamic libraries on the same command line, you must pass the following arguments:
gcc (...) -Wl,-Bstatic -lyocto-static -Wl,-Bdynamic -lm -lpthread -lusb-1.0 -lstdc++
Integration as a dynamic library
Integration of the Yoctopuce library as a dynamic library allows you to produce an executable smaller than with the two previous methods, and to possibly update this library, if a patch reveals itself necessary, without needing to recompile the source code of the application. On the other hand, it is an integration mode which systematically requires you to copy the dynamic library on the target machine where the application will run (yocto.dll for Windows, libyocto.so.1.0.1 for macOS and Linux).
To use the dynamic library, you must first compile it using the shell script build.sh on UNIX, or build.bat on Windows. This script, located in the root directory of the library, detects the OS and recompiles all the corresponding libraries as well as the examples.
Then, To integrate the dynamic Yoctopuce library to your project, you must include the Sources directory of the Yoctopuce library into your IncludePath, and add the sub-directory Binaries/... corresponding to your operating system into your LibPath.
Finally, for you project to build correctly, you need to link with your project the dynamic Yoctopuce library and the prerequisite system libraries:
- For Windows: yocto.lib
- For macOS: libyocto, IOKit.framework, and CoreFoundation.framework
- For Linux: libyocto, libm, libpthread, libusb1.0, and libstdc++.
With GCC, the command line to compile is simply:
gcc (...) -lyocto -lm -lpthread -lusb-1.0 -lstdc++
10. Using Yocto-Thermocouple with C#
C# (pronounced C-Sharp) is an object-oriented programming language promoted by Microsoft, it is somewhat similar to Java. Like Visual-Basic and Delphi, it allows you to create Windows applications quite easily. C# is supported under Windows Visual Studio 2017 and its more recent versions.
Our programming library is also compatible with Mono, the open source version of C# that also works on Linux and macOS. Under Linux, use Mono version 5.20 or more recent. Under macOS, support is limited to 32bit systems, which makes it virtually useless nowadays. You will find on our web site various articles that describe how to configure Mono to use our library.
10.1. Installation
Download the Visual C# Yoctopuce library from the Yoctopuce web site19. There is no setup program, simply copy the content of the zip file into the directory of your choice. You mostly need the content of the Sources directory. The other directories contain the documentation and a few sample programs. All sample projects are Visual C# 2010, projects, if you are using a previous version, you may have to recreate the projects structure from scratch.
10.2. Using the Yoctopuce API in a Visual C# project
The Visual C#.NET Yoctopuce library is composed of a DLL and of source files in Visual C#. The DLL is not a .NET DLL, but a classic DLL, written in C, which manages the low level communications with the modules20. The source files in Visual C# manage the high level part of the API. Therefore, your need both this DLL and the .cs files of the sources directory to create a project managing Yoctopuce modules.
Configuring a Visual C# project
The following indications are provided for Visual Studio Express 2010, but the process is similar for other versions. Start by creating your project. Then, on the Solution Explorer panel, right click on your project, and select "Add" and then "Add an existing item".
A file selection window opens. Select the yocto_api.cs file and the files corresponding to the functions of the Yoctopuce modules that your project is going to manage. If in doubt, select all the files.
You then have the choice between simply adding these files to your project, or to add them as links (the Add button is in fact a scroll-down menu). In the first case, Visual Studio copies the selected files into your project. In the second case, Visual Studio simply keeps a link on the original files. We recommend you to use links, which makes updates of the library much easier.
Then add in the same manner the yapi.dll DLL, located in the Sources/dll directory21. Then, from the Solution Explorer window, right click on the DLL, select Properties and in the Properties panel, set the Copy to output folder to always. You are now ready to use your Yoctopuce modules from Visual Studio.
In order to keep them simple, all the examples provided in this documentation are console applications. Naturally, the libraries function in a strictly identical manner if you integrate them in an application with a graphical interface.
10.3. Control of the Temperature function
A few lines of code are enough to use a Yocto-Thermocouple. Here is the skeleton of a C# code snipplet to use the Temperature function.
[...]
// Enable detection of USB devices
string errmsg ="";
YAPI.RegisterHub("usb", errmsg);
[...]
// Retrieve the object used to interact with the device
YTemperature temperature = YTemperature.FindTemperature("THRMCPL1-123456.temperature");
// Hot-plug is easy: just check that the device is online
if (temperature.isOnline())
{
// Use temperature.get_currentValue()
[...]
}
Let's look at these lines in more details.
YAPI.RegisterHub
The YAPI.RegisterHub function initializes the Yoctopuce API and indicates where the modules should be looked for. When used with the parameter "usb", it will use the modules locally connected to the computer running the library. If the initialization does not succeed, this function returns a value different from YAPI.SUCCESS and errmsg contains the error message.
YTemperature.FindTemperature
The YTemperature.FindTemperature function allows you to find a temperature sensor from the serial number of the module on which it resides and from its function name. You can use logical names as well, as long as you have initialized them. Let us imagine a Yocto-Thermocouple module with serial number THRMCPL1-123456 which you have named "MyModule", and for which you have given the temperature function the name "MyFunction". The following five calls are strictly equivalent, as long as "MyFunction" is defined only once.
temperature = YTemperature.FindTemperature("THRMCPL1-123456.temperature");
temperature = YTemperature.FindTemperature("THRMCPL1-123456.MyFunction");
temperature = YTemperature.FindTemperature("MyModule.temperature");
temperature = YTemperature.FindTemperature("MyModule.MyFunction");
temperature = YTemperature.FindTemperature("MyFunction");
YTemperature.FindTemperature returns an object which you can then use at will to control the temperature sensor.
isOnline
The isOnline() method of the object returned by YTemperature.FindTemperature allows you to know if the corresponding module is present and in working order.
get_currentValue
The get_currentValue() method of the object returned by YTemperature.FindTemperature provides the temperature currently measured by the sensor. The value returned is a floating number, equal to the current number of Celsius degrees.
A real example
Launch Microsoft Visual C# and open the corresponding sample project provided in the directory Examples/Doc-GettingStarted-Yocto-Thermocouple of the Yoctopuce library.
In this example, you will recognize the functions explained above, but this time used with all side materials needed to make it work nicely as a small demo.
using System.Collections.Generic;
using System.Linq;
using System.Text;
namespace ConsoleApplication1
{
class Program
{
static void usage()
{
string execname = System.AppDomain.CurrentDomain.FriendlyName;
Console.WriteLine(execname + " <serial_number>");
Console.WriteLine(execname + " <logical_name>");
Console.WriteLine(execname + " any ");
System.Threading.Thread.Sleep(2500);
Environment.Exit(0);
}
static void Main(string[] args)
{
string errmsg = "";
string target;
YTemperature tsensor;
if (args.Length < 1) usage();
target = args[0].ToUpper();
// Setup the API to use local USB devices
if (YAPI.RegisterHub("usb", ref errmsg) != YAPI.SUCCESS) {
Console.WriteLine("RegisterHub error: " + errmsg);
Environment.Exit(0);
}
if (target == "ANY") {
tsensor = YTemperature.FirstTemperature();
if (tsensor == null) {
Console.WriteLine("No module connected (check USB cable) ");
Environment.Exit(0);
}
Console.WriteLine("Using: " + tsensor.get_module().get_serialNumber());
} else {
tsensor = YTemperature.FindTemperature(target + ".temperature1");
}
// retreive module serial
string serial = tsensor.get_module().get_serialNumber();
// retreive both channels
YTemperature ch1 = YTemperature.FindTemperature(serial + ".temperature1");
YTemperature ch2 = YTemperature.FindTemperature(serial + ".temperature2");
if (!ch2.isOnline()) {
Console.WriteLine("Module not connected");
Console.WriteLine("check identification and USB cable");
Environment.Exit(0);
}
while (ch2.isOnline()) {
Console.Write("Channel 1 : " + ch1.get_currentValue().ToString() + " °C ");
Console.Write("Channel 2 : " + ch2.get_currentValue().ToString() + " °C ");
Console.WriteLine(" (press Ctrl-C to exit)");
YAPI.Sleep(1000, ref errmsg);
}
YAPI.FreeAPI();
}
}
}
10.4. Control of the module part
Each module can be controlled in a similar manner, you can find below a simple sample program displaying the main parameters of the module and enabling you to activate the localization beacon.
using System.Collections.Generic;
using System.Linq;
using System.Text;
namespace ConsoleApplication1
{
class Program
{
static void usage()
{
string execname = System.AppDomain.CurrentDomain.FriendlyName;
Console.WriteLine("Usage:");
Console.WriteLine(execname + " <serial or logical name> [ON/OFF]");
System.Threading.Thread.Sleep(2500);
Environment.Exit(0);
}
static void Main(string[] args)
{
YModule m;
string errmsg = "";
if (YAPI.RegisterHub("usb", ref errmsg) != YAPI.SUCCESS) {
Console.WriteLine("RegisterHub error: " + errmsg);
Environment.Exit(0);
}
if (args.Length < 1) usage();
m = YModule.FindModule(args[0]); // use serial or logical name
if (m.isOnline()) {
if (args.Length >= 2) {
if (args[1].ToUpper() == "ON") {
m.set_beacon(YModule.BEACON_ON);
}
if (args[1].ToUpper() == "OFF") {
m.set_beacon(YModule.BEACON_OFF);
}
}
Console.WriteLine("serial: " + m.get_serialNumber());
Console.WriteLine("logical name: " + m.get_logicalName());
Console.WriteLine("luminosity: " + m.get_luminosity().ToString());
Console.Write("beacon: ");
if (m.get_beacon() == YModule.BEACON_ON)
Console.WriteLine("ON");
else
Console.WriteLine("OFF");
Console.WriteLine("upTime: " + (m.get_upTime() / 1000 ).ToString() + " sec");
Console.WriteLine("USB current: " + m.get_usbCurrent().ToString() + " mA");
Console.WriteLine("Logs:\r\n" + m.get_lastLogs());
} else {
Console.WriteLine(args[0] + " not connected (check identification and USB cable)");
}
YAPI.FreeAPI();
}
}
}
Each property xxx of the module can be read thanks to a method of type YModule.get_xxxx(), and properties which are not read-only can be modified with the help of the YModule.set_xxx() method. For more details regarding the used functions, refer to the API chapters.
Changing the module settings
When you want to modify the settings of a module, you only need to call the corresponding YModule.set_xxx() function. However, this modification is performed only in the random access memory (RAM) of the module: if the module is restarted, the modifications are lost. To memorize them persistently, it is necessary to ask the module to save its current configuration in its permanent memory. To do so, use the YModule.saveToFlash() method. Inversely, it is possible to force the module to forget its current settings by using the YModule.revertFromFlash() method. The short example below allows you to modify the logical name of a module.
using System.Collections.Generic;
using System.Linq;
using System.Text;
namespace ConsoleApplication1
{
class Program
{
static void usage()
{
string execname = System.AppDomain.CurrentDomain.FriendlyName;
Console.WriteLine("Usage:");
Console.WriteLine("usage: demo <serial or logical name> <new logical name>");
System.Threading.Thread.Sleep(2500);
Environment.Exit(0);
}
static void Main(string[] args)
{
YModule m;
string errmsg = "";
string newname;
if (args.Length != 2) usage();
if (YAPI.RegisterHub("usb", ref errmsg) != YAPI.SUCCESS) {
Console.WriteLine("RegisterHub error: " + errmsg);
Environment.Exit(0);
}
m = YModule.FindModule(args[0]); // use serial or logical name
if (m.isOnline()) {
newname = args[1];
if (!YAPI.CheckLogicalName(newname)) {
Console.WriteLine("Invalid name (" + newname + ")");
Environment.Exit(0);
}
m.set_logicalName(newname);
m.saveToFlash(); // do not forget this
Console.Write("Module: serial= " + m.get_serialNumber());
Console.WriteLine(" / name= " + m.get_logicalName());
} else {
Console.Write("not connected (check identification and USB cable");
}
YAPI.FreeAPI();
}
}
}
Warning: the number of write cycles of the nonvolatile memory of the module is limited. When this limit is reached, nothing guaranties that the saving process is performed correctly. This limit, linked to the technology employed by the module micro-processor, is located at about 100000 cycles. In short, you can use the YModule.saveToFlash() function only 100000 times in the life of the module. Make sure you do not call this function within a loop.
Listing the modules
Obtaining the list of the connected modules is performed with the YModule.yFirstModule() function which returns the first module found. Then, you only need to call the nextModule() function of this object to find the following modules, and this as long as the returned value is not null. Below a short example listing the connected modules.
using System.Collections.Generic;
using System.Linq;
using System.Text;
namespace ConsoleApplication1
{
class Program
{
static void Main(string[] args)
{
YModule m;
string errmsg = "";
if (YAPI.RegisterHub("usb", ref errmsg) != YAPI.SUCCESS) {
Console.WriteLine("RegisterHub error: " + errmsg);
Environment.Exit(0);
}
Console.WriteLine("Device list");
m = YModule.FirstModule();
while (m != null) {
Console.WriteLine(m.get_serialNumber() + " (" + m.get_productName() + ")");
m = m.nextModule();
}
YAPI.FreeAPI();
}
}
}
10.5. Error handling
When you implement a program which must interact with USB modules, you cannot disregard error handling. Inevitably, there will be a time when a user will have unplugged the device, either before running the software, or even while the software is running. The Yoctopuce library is designed to help you support this kind of behavior, but your code must nevertheless be conceived to interpret in the best possible way the errors indicated by the library.
The simplest way to work around the problem is the one used in the short examples provided in this chapter: before accessing a module, check that it is online with the isOnline function, and then hope that it will stay so during the fraction of a second necessary for the following code lines to run. This method is not perfect, but it can be sufficient in some cases. You must however be aware that you cannot completely exclude an error which would occur after the call to isOnline and which could crash the software. The only way to prevent this is to implement one of the two error handling techniques described below.
The method recommended by most programming languages for unpredictable error handling is the use of exceptions. By default, it is the behavior of the Yoctopuce library. If an error happens while you try to access a module, the library throws an exception. In this case, there are three possibilities:
- If your code catches the exception and handles it, everything goes well.
- If your program is running in debug mode, you can relatively easily determine where the problem happened and view the explanatory message linked to the exception.
- Otherwise... the exception makes your program crash, bang!
As this latest situation is not the most desirable, the Yoctopuce library offers another possibility for error handling, allowing you to create a robust program without needing to catch exceptions at every line of code. You simply need to call the YAPI.DisableExceptions() function to commute the library to a mode where exceptions for all the functions are systematically replaced by specific return values, which can be tested by the caller when necessary. For each function, the name of each return value in case of error is systematically documented in the library reference. The name always follows the same logic: a get_state() method returns a ClassName.STATE_INVALID value, a get_currentValue method returns a ClassName.CURRENTVALUE_INVALID value, and so on. In any case, the returned value is of the expected type and is not a null pointer which would risk crashing your program. At worst, if you display the value without testing it, it will be outside the expected bounds for the returned value. In the case of functions which do not normally return information, the return value is YAPI_SUCCESS if everything went well, and a different error code in case of failure.
When you work without exceptions, you can obtain an error code and an error message explaining the source of the error. You can request them from the object which returned the error, calling the errType() and errMessage() methods. Their returned values contain the same information as in the exceptions when they are active.
11. Using the Yocto-Thermocouple with LabVIEW
LabVIEW is edited by National Instruments since 1986. It is a graphic development environment: rather than writing lines of code, the users draw their programs, somewhat like a flow chart. LabVIEW was designed mostly to interface measuring tools, hence the Virtual Instruments name for LabVIEW programs. With visual programming, drawing complex algorithms becomes quickly fastidious. The LabVIEW Yoctopuce library was thus designed to make it as easy to use as possible. In other words, LabVIEW being an environment extremely different from other languages supported by Yoctopuce, there are major differences between the LabVIEW API and the other APIs.
11.1. Architecture
The LabVIEW library is based on the Yoctopuce DotNetProxy library contained in the DotNetProxyLibrary.dll DLL. In fact, it is this DotNetProxy library which takes care or most of the work by relying on the C# library which, in turn, uses the low level library coded in yapi.dll (32bits) and amd64\yapi.dll( 64bits).
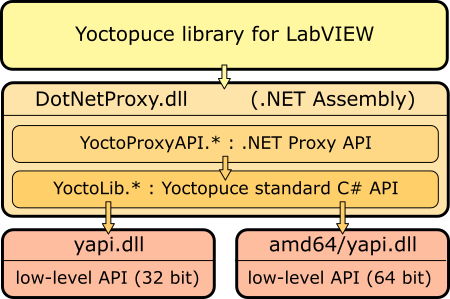
LabVIEW Yoctopuce API architecture
You must therefore imperatively distribute the DotNetProxyLibrary.dll, yapi.dll, and amd64\yapi.dll with your LabVIEW applications using the Yoctopuce API.
If need be, you can find the low level API sources in the C# library and the DotNetProxyLibrary.dll sources in the DotNetProxy library.
11.2. Compatibility
Firmware
For the LabVIEW Yoctopuce library to work correctly with your Yoctopuce modules, these modules need to have firmware 37120, or higher.
LabVIEW for Linux and MacOS
At the time of writing, the LabVIEW Yoctopuce API has been tested under Windows only. It is therefore most likely that it simply does not work with the Linux and MacOS versions of LabVIEW.
LabVIEW NXG
The LabVIEW Yoctopuce library uses many techniques which are not yet available in the new generation of LabVIEW. The library is therefore absolutely not compatible with LabVIEW NXG.
About DotNewProxyLibrary.dll
In order to be compatible with as many versions of Windows as possible, including Windows XP, the DotNetProxyLibrary.dll library is compiled in .NET 3.5, which is available by default on all the Windows versions since XP.
11.3. Installation
Download the LabVIEW library from the Yoctopuce web site22. It is a ZIP file in which there is a distinct directory for each version of LabVIEW. Each of these directories contains two subdirectories: the first one contains programming examples for each Yoctopuce product; the second one, called VIs, contains all the VIs of the API and the required DLLs.
Depending on Windows configuration and the method used to copy the DotNetProxyLibrary.dll on your system, Windows may block it because it comes from an other computer. This may happen when the library zip file is uncompressed with Window's file explorer. If the DLL is blocked, LabVIEW will not be able to load it and an error 1386 will occur whenever any of the Yoctopuce VIs is executed.
There are two ways to fix this. The simplest is to unblock the file with the Windows file explorer: right click / properties on the DotNetProxyLibrary.dll file, and click on the unblock button. But this has to be done each time a new version of the DLL is copied on your system.
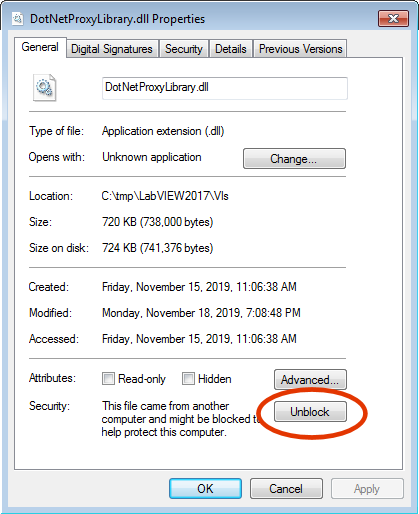
Unblock the DotNetProxyLibrary DLL.
Alternatively, one can modify the LabVIEW configuration by creating, in the same directory as the labview.exe executable, an XML file called labview.exe.config containing the following code:
<?xml version ="1.0"?>
<configuration>
<runtime>
<loadFromRemoteSources enabled="true" />
</runtime>
</configuration>
Make sure to select the correct directory depending on the LabVIEW version you are using (32 bits vs. 64 bits). You can find more information about this file on the National Instruments web site.23
To install the LabVIEW Yoctopuce API, there are several methods.
Method 1 : "Take-out" installation
The simplest way to use the Yoctopuce library is to copy the content of the VIs directory wherever you want and to use the VIs in LabVIEW with a simple drag-n-drop operation.
To use the examples provided with the API, it is simpler if you add the directory of Yoctopuce VIs into the list of where LabVIEW must look for VIs that it has not found. You can access this list through the Tools > Options > Paths > VI Search Path menu.
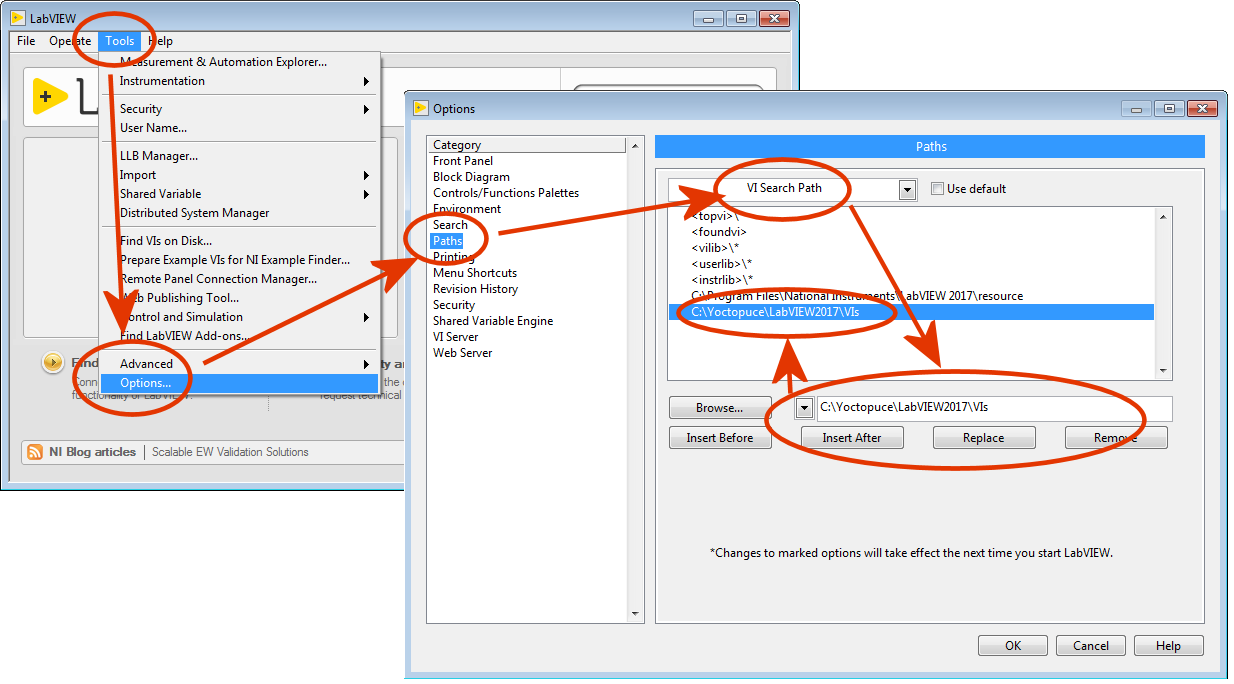
Configuring the "VI Search Path"
Method 2 : Provided installer
In each LabVIEW folder of the Library, you will find a VI named "Install.vi", just open the one matching your LabVIEW version.
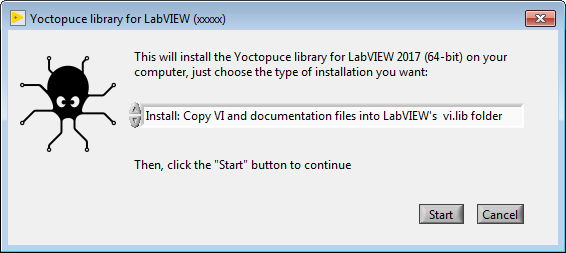
The provider installer
This installer provide 3 installation options:
Install: Keep VI and documentation files where they are.
With this option, VI files are keep in the place where the library has been unzipped. So you will have to make sure these files are not deleted as long as you need them. Here is what the installer will do if that option is chosen:
- All references to Yoctopuce any library paths will be removed from the viSearchPath option in the labview.ini file.
- A dir.mnu palette file referring to VIs in the install folder will be created in
C:\Program Files xx\National Instruments\LabVIEW 20xx\vi.lib\addons\Yoctopuce - A reference to the VIs source install path will inserted into the viSearchPath option in the labview.ini file.
Install: Copy VI and documentation files into LabVIEW's vi.lib folder
In that case all required files are copied inside the LabVIEW's installation folder, so you will be able to delete the installation folder once the original installation is complete. Note that programming examples won't be copied. Here is the exact behaviour of the installer in that case:
- All references to Yoctopuce library paths will be removed from viSearchPath in labview.ini file
- All VIs, DLLs, and documentation files will be copied into:
C:\Program Files xx\National Instruments\LabVIEW 20xx\vi.lib\Yoctopuce - VIs will be patched with the path to copied documentation files
- A dir.mnu palette file referring to copied VIs will be created in
C:\Program Files xx\National Instruments\LabVIEW 20xx\vi.lib\addons\Yoctopuce
Uninstall Yoctopuce Library
this option is meant to remove the LabVIEW library from your LabVIEW installation, here is how it is done:
- All references to Yoctopuce library paths will be removed from viSearchPath in labview.ini file
- Following folders, if exists, will be removed:
C:\Program Files xx\National Instruments\LabVIEW 20xx\vi.lib\addons\Yoctopuce
C:\Program Files xx\National Instruments\LabVIEW 20xx\vi.lib\Yoctopuce
In any case, if the labview.ini file needs to be modified, a backup copy will be made beforehand.
The installer identifies Yoctopuce VIs library folders by checking the presence of the YRegisterHub.vi file in said folders.
Once the installation is complete, a Yoctopuce palette will appear in Functions/Addons menu.
Method 3 : Installation in a LabVIEW palette (ancillary method)
The steps to manually install the VIs directly in the LabVIEW palette are somewhat more complex. You can find the detailed procedure on the National Instruments web site 24, but here is a summary:
- Create a Yoctopuce/API directory in the C:\Program Files\National Instruments\LabVIEW xxxx\vi.lib directory and copy all the VIs and DLLs of the VIs directory into it.
- Create a Yoctopuce directory in the C:\Program Files\National Instruments\LabVIEW xxxx\menus\Categories directory.
- Run LabVIEW and select the option Tools>Advanced>Edit Palette Set
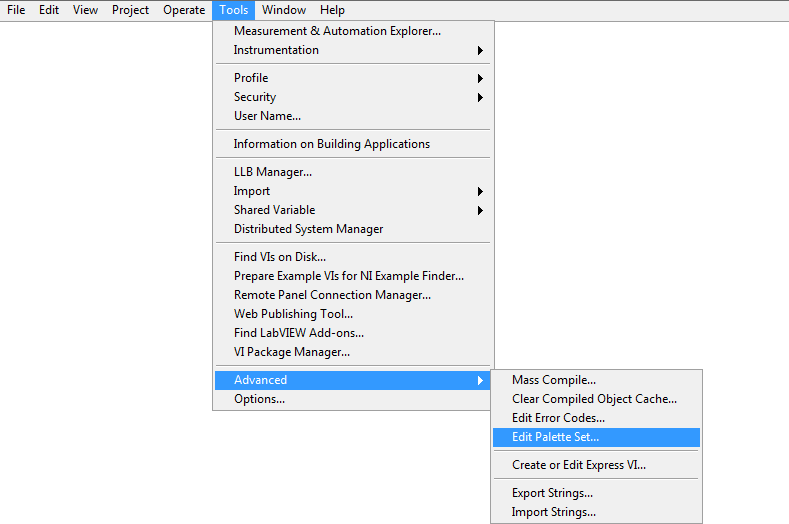
Three windows pop up:
- "Edit Controls and Functions Palette Set"
- "Functions"
- "Controls"

In the Function window, there is a Yoctopuce icon. Double-click it to create an empty "Yoctopuce" window.
- In the Yoctopuce window, perform a Right click>Insert>Vi(s)..
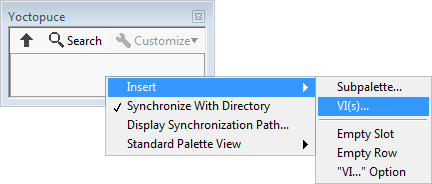
in order to open a file chooser. Put the file chooser in the vi.lib\Yoctopuce\API directory that you have created in step 1 and click on Current Folder
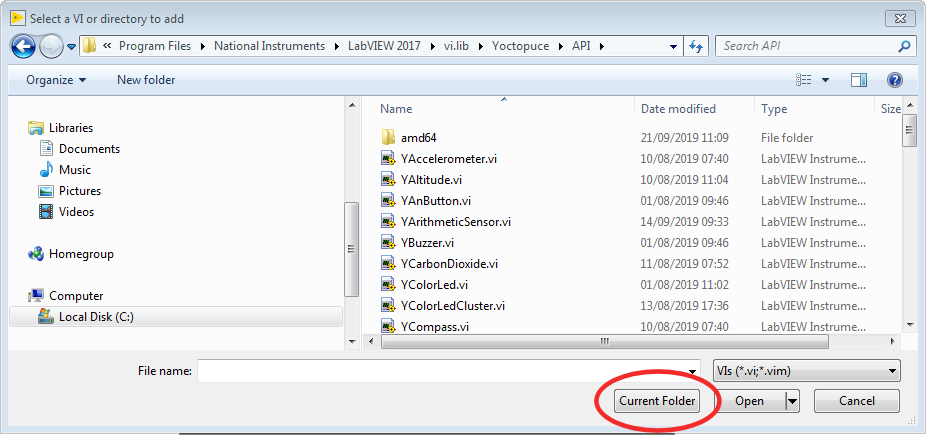
All the Yoctopuce VIs now appear in the Yoctopuce window. By default, they are sorted by alphabetical order, but you can arrange them as you see fit by moving them around with the mouse. For the palette to be easy to use, we recommend to reorganize the icons over 8 columns. - In the "Edit Controls and Functions Palette Set" window, click on the
"Save Changes" button, the window indicates that it has created a dir.mnu
file in your Documents directory.
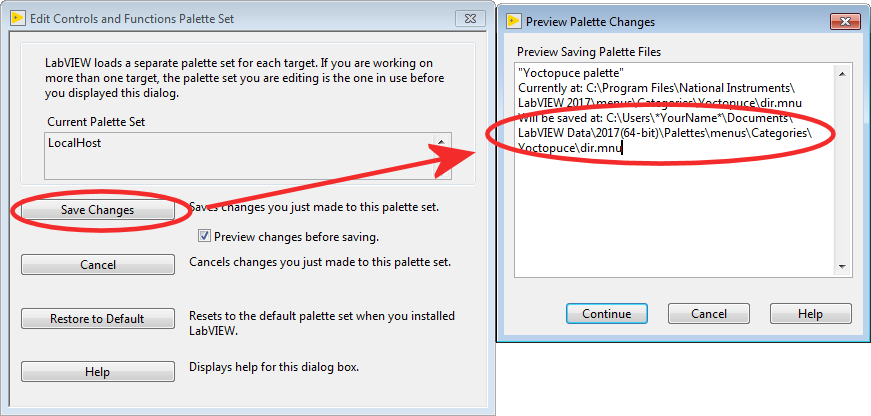
Copy this file in the "menus\Categories\Yoctopuce" directory that you have created in step 2. - Restart LabVIEW, the LabVIEW palette now contains a Yoctopuce sub-palette with all the
VIs of the API.
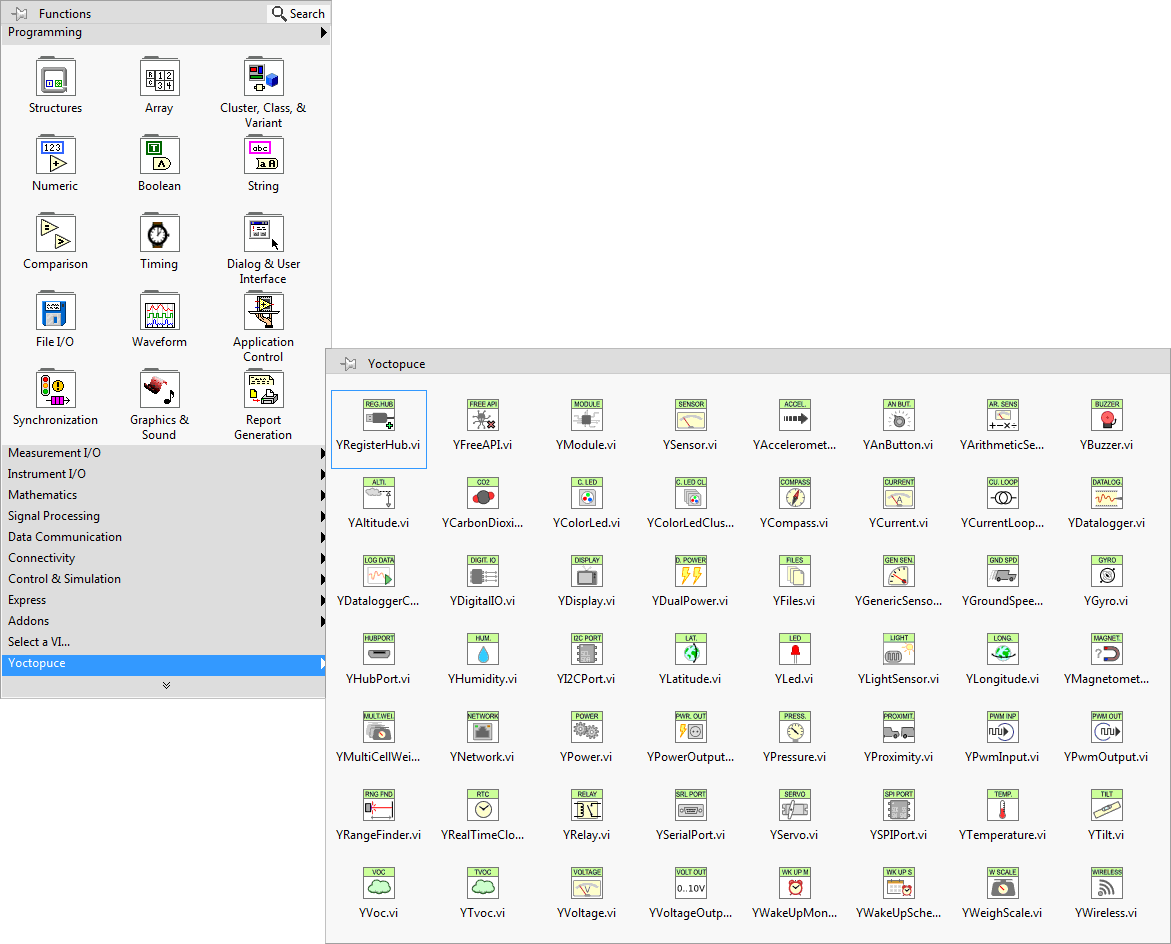
11.4. Presentation of Yoctopuce VIs
The LabVIEW Yoctopuce library contains one VI per class of the Yoctopuce API, as well as a few special VIs. All the VIs have the traditional connectors Error IN and Error Out.
YRegisterHub
The YRegisterHub VI is used to initialize the API. You must imperatively call this VI once before you do anything in relation with Yoctopuce modules.

The YRegisterHub VI
The YRegisterHub VI takes a url parameter which can be:
- The "usb" character string to indicated that you wish to work with local modules, directly connected by USB
- An IP address to indicate that you wish to work with modules which are available through a network connection. This IP address can be that of a YoctoHub25 or even that of a machine on which the VirtualHub26 application is running.
In the case of an IP address, the YRegisterHub VI tries to contact this address and generates and error if it does not succeed, unless the async parameter is set to TRUE. If async is set to TRUE, no error is generated and Yoctopuce modules corresponding to that IP address become automatically available as soon as the said machine can be reached.
If everything went well, the successful output contains the value TRUE. In the opposite case, it contains the value FALSE and the error msg output contains a string of characters with a description of the error.
You can use several YRegisterHub VIs with distinct URLs if you so wish. However, on the same machine, there can be only one process accessing local Yoctopuce modules directly by USB (url set to "usb"). You can easily work around this limitation by running the VirtualHub software on the local machine and using the "127.0.0.1" url.
YFreeAPI
The YFreeAPI VI enables you to free resources allocated by the Yoctopuce API.

The YFreeAPI VI
You must call the YFreeAPI VI when your code is done with the Yoctopuce API. Otherwise, direct USB access (url set to "usb") could stay locked after the execution of your VI, and stay so for as long as LabVIEW is not completely closed.
Structure of the VIs corresponding to a class
The other VIs correspond to each function/class of the Yoctopuce API, they all have the same structure:
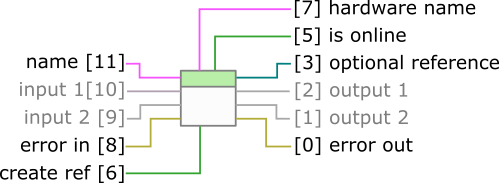
Structure of most VIs of the API.
- Connector [11]: name must contain the hardware name or the logical name of the intended function.
- Connectors [10] and [9]: input parameters depending on the nature of the VI.
- Connectors [8] and [0] : error in and error out.
- Connector [7] : Unique hardware name of the found function.
- Connector [5] : is online contains TRUE if the function is available, FALSE otherwise.
- Connectors [2] and [1]: output values depending on the nature of the VI.
- Connector [6]: If this input is set to TRUE, connector [3] contains a reference to the Proxy objects implemented by the VI27. This input is initialized to FALSE by default.
- Connector [3]: Reference on the Proxy object implemented by the VI if input [6] is TRUE. This object enables you to access additional features.
You can find the list of functions available on your Yocto-Thermocouple in chapter Programming, general concepts.
If the desired function (parameter name) is not available, this does not generate an error, but the is online output contains FALSE and all the other outputs contain the value "N/A" whenever possible. If the desired function becomes available later in the life of your program, is online switches to TRUE automatically.
If the name parameter contains an empty string, the VI targets the first available function of the same type. If no function is available, is online is set to FALSE.
The YModule VI
The YModule VI enables you to interface with the "module" section of each Yoctopuce module. It enables you to drive the module led and to know the serial number of the module.

The YModule VI
The name input works slightly differently from other VIs. If it is called with a name parameter corresponding to a function name, the YModule VI finds the Module function of the module hosting the function. You can therefore easily find the serial number of the module of any function. This enables you to build the name of other functions which are located on the same module. The following example finds the first available YHumidity function and builds the name of the YTemperature function located on the same module. The examples provided with the Yoctopuce API make extensive use of this technique.

Using the YModule VI to retrieve functions hosted on the same module
The sensor VIs
All the VIs corresponding to Yoctopuce sensors have exactly the same geometry. Both outputs enable you to retrieve the value measured by the corresponding sensor as well the unit used.

The sensor VIs have all exactly the same geometry
The update freq input parameter is a character string enabling you to configure the way in which the output value is updated:
- "auto" : The VI value is updated as soon as the sensor detects a significant modification of the value. It is the default behavior.
- "x/s": The VI value is updated x times per second with the current value of the sensor.
- "x/m","x/h": The VI value is updated x times per minute (resp. hour) with the average value over the latest period. Note, maximum frequencies are (60/m) and (3600/h), for higher frequencies use the (x/s) syntax.
The update frequency of the VI is a parameter managed by the physical Yoctopuce module. If several VIs try to change the frequency of the same sensor, the valid configuration is that of the latest call. It is however possible to set different update frequencies to different sensors on the same Yoctopuce module.
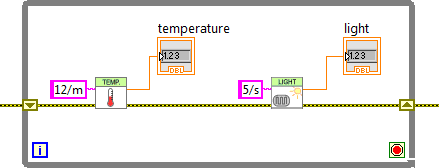
Changing the update frequency of the same module
The update frequency of the VI is completely independent from the sampling frequency of the sensor, which you usually cannot modify. It is useless and counterproductive to define an update frequency higher than the sensor sampling frequency.
11.5. Functioning and use of VIs
Here is one of the simplest example of VIs using the Yoctopuce API.
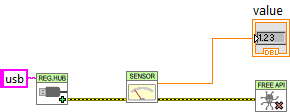
Minimal example of use of the LabVIEW Yoctopuce API
This example is based on the YSensor VI which is a generic VI enabling you to interface any sensor function of a Yoctopuce module. You can replace this VI by any other from the Yoctopuce API, they all have the same geometry and work in the same way. This example is limited to three actions:
- It initializes the API in native ("usb") mode with the YRegisterHub VI.
- It displays the value of the first Yoctopuce sensor it finds thanks to the YSensor VI.
- It frees the API thanks to the YFreeAPI VI.
This example automatically looks for an available sensor. If there is such a sensor, we can retrieve its name through the hardware name output and the isOnline output equals TRUE. If there is no available sensor, the VI does not generate an error but emulates a ghost sensor which is "offline". However, if later in the life of the application, a sensor becomes available because it has been connected, isOnline switches to TRUE and the hardware name contains the name of the sensor. We can therefore easily add a few indicators in the previous example to know how the executions goes.
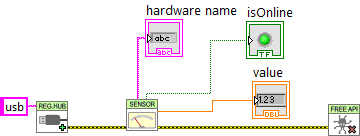
Use of the hardware name and isOnline outputs
The VIs of the Yoctopuce API are actually an entry door into the library. Internally, this mechanism works independently of the Yoctopuce VIs. Indeed, most communications with electronic modules are managed automatically as background tasks. Therefore, you do not necessarily need to take any specific care to use Yoctopuce VIs, you can for example use them in a non-delayed loop without creating any specific problem for the API.
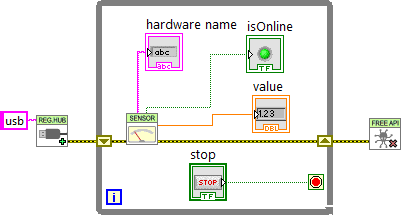
The Yoctopuce VIs can be used in a non-delayed loop
Note that the YRegisterHub VI is not inside the loop. The YRegisterHub VI is used to initialize the API. Unless you have several URLs that you need to register, it is better to call the YRegisterHub VI only once.
When the name parameter is initialized to an empty string, the Yoctopuce VIs automatically look for a function they can work with. This is very handy when you know that there is only one function of the same type available and when you do not want to manage its name. If the name parameter contains a hardware name or a logical name, the VI looks for the corresponding function. If it does not find it, it emulates an offline function while it waits for the true function to become available.
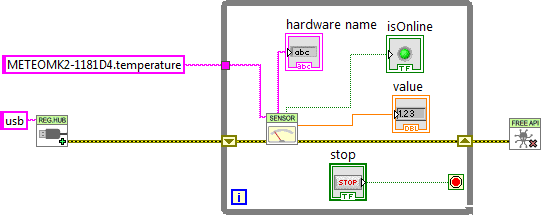
Using names to identify the functions to be used
Error handling
The LabVIEW Yoctopuce API is coded to handle errors as smoothly as possible: for example, if you use a VI to access a function which does not exist, the isOnline output is set to FALSE, the other outputs are set to NaN, and thus the inputs do not have any impact. Fatal errors are propagated through the traditional error in, error out channel.
However, the YRegisterHub VI manages connection errors slightly differently. In order to make them easier to manage, connection errors are signaled with Success and error msg outputs. If there is an issue during a call to the YRegisterHub VI, Success contains FALSE and error msg contains a description of the error.
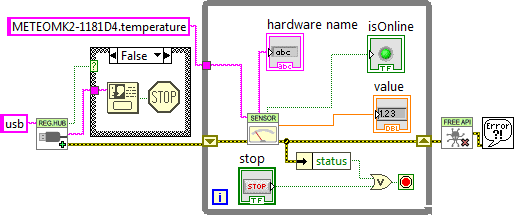
Error handling
The most common error message is "Another process is already using yAPI". It means that another application, LabVIEW or other, already uses the API in native USB mode. For technical reasons, the native USB API can be used by only one application at the same time on the same machine. You can easily work around this limitation by using the network mode.
11.6. Using Proxy objects
The Yoctopuce API contains hundreds of methods, functions, and properties. It was not possible, or desirable, to create a VI for each of them. Therefore, there is a VI per class that shows the two properties that Yoctopuce deemed the most useful, but this does not mean that the rest is not available.
Each VI corresponding to a class has two connectors create ref and optional ref which enable you to obtain a reference on the Proxy object of the .NET Proxy API on which the LabVIEW library is built.
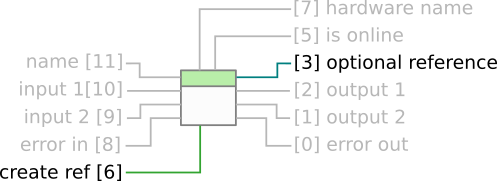
The connectors to obtain a reference on the Proxy object corresponding to the VI
To obtain this reference, you only need to set optional ref to TRUE. Note, it is essential to close all references created in this way, otherwise you risk to quickly saturate the computer memory.
Here is an example which uses this technique to change the luminosity of the leds of a Yoctopuce module.
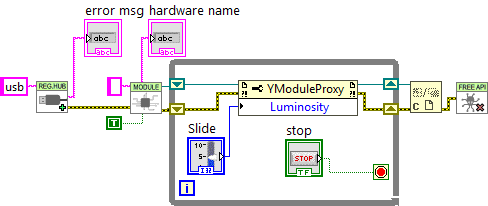
Regulating the luminosity of the leds of a module
Note that each reference allows you to obtain properties (property nodes) as well as methods (invoke nodes). By convention, properties are optimized to generate a minimum of communication with the modules. Therefore, we recommend to use them rather than the corresponding get_xxx and set_xxx methods which might seem equivalent but which are not optimized. Properties also enable you to retrieve the various constants of the API, prefixed with the "_" character. For technical reasons, the get_xxx and set_xxx methods are not all available as properties.
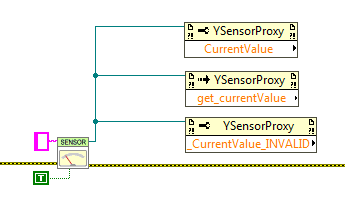
Property and Invoke nodes: Using properties, methods and constants
You can find a description of all the available properties, functions, and methods in the documentation of the .NET Proxy API.
Network mode
On a given machine, there can be only one process accessing local Yoctopuce modules directly by USB (url set to "usb"). It is however possible that multiple process connect in parallel to YoctoHubs28 or tp a machine on which VirtualHub29 is running, including the local machine. Therefore, if you use the local address of your machine (127.0.0.1) and if a VirtualHub runs on it, you can work around the limitation which prevents using the native USB API in parallel.
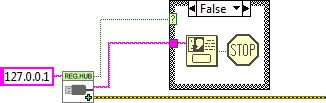
Network mode
In the same way, there is no limitation on the number of network interfaces to which the API can connect itself in parallel. This means that it is quite possible to make multiple calls to the YRegisterHub VI. This is the only case where it is useful to call the YRegisterHub VI several times in the life of the application.
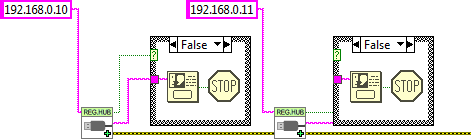
You can have multiple network connections
By default, the YRegisterHub VI tries to connect itself on the address given as parameter and generates an error (success=FALSE) when it cannot do so because nobody answers. But if the async parameter is initialized to TRUE, no error is generated when the connection does not succeed. If the connection becomes possible later in the life of the application, the corresponding modules are automatically made available.
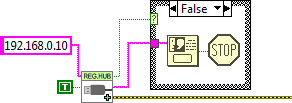
Asynchronous connection
11.7. Managing the data logger
Almost all the Yoctopuce sensors have a data logger which enables you to store the measures of the sensors in the non-volatile memory of the module. You can configure the data logger with the VirtualHub, but also with a little bit of LabVIEW code.
Logging
To do so, you must configure the logging frequency by using the "LogFrequency" property which you can reach with a reference on the Proxy object of the sensor you are using. Then, you must turn the data logger on thanks to the YDataLogger VI. Note that, like with the YModule VI, you can obtain the YDataLogger VI corresponding to a module with its own name, but also with the name of any of the functions available on the same module.
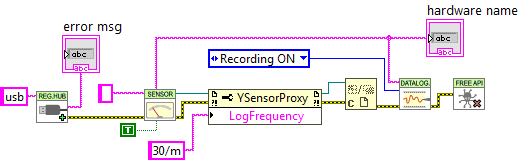
Activating the data logger
Reading
You can retrieve the data in the data logger with the YDataLoggerContents VI.

The YDataLoggerContents VI
Retrieving the data from the logger of a Yoctopuce module is a slow process which can take up to several tens of seconds. Therefore, we designed the VI enabling this operation to work iteratively.
As a first step, you must call the VI with a sensor name, a start date, and an end date (UTC UNIX timestamp). The (0,0) pair enables you to obtain the complete content of the data logger. This first call enables you to obtain a summary of the data logger content and a context.
As a second step, you must call the YDataLoggerContents VI in a loop with the context parameter, until the progress output reaches the 100 value. At this time, the data output represents the content of the data logger.
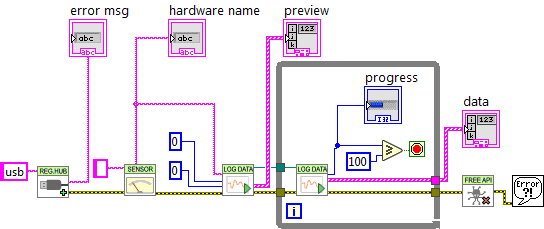
Retrieving the content of the data logger
The results and the summary are returned as an array of structures containing the following fields:
- startTime: beginning of the measuring period
- endTime: end of the measuring period
- averageValue: average value for the period
- minValue: minimum value over the period
- maxValue: maximum value over the period
Note that if the logging frequency is superior to 1Hz, the data logger stores only current values. In this case, averageValue, minValue, and maxValue share the same value.
11.8. Function list
Each VI corresponding to an object of the Proxy API enables you to list all the functions of the same class with the getSimilarfunctions() method of the corresponding Proxy object. Thus, you can easily perform an inventory of all the connected modules, of all the connected sensors, of all the connected relays, and so on.
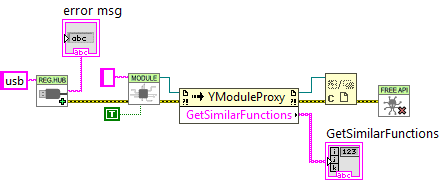
Retrieving the list of all the modules which are connected
11.9. A word on performances
The LabVIEW Yoctopuce API is optimized so that all the VIs and .NET Proxy API object properties generate a minimum of communication with Yoctopuce modules. Thus, you can use them in loops without taking any specific precaution: you do not have to slow down the loops with a timer.
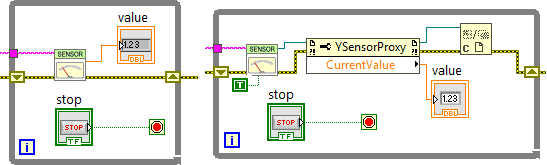
These two loops generate little USB communication and do not need to be slowed down
However, almost all the methods of the available Proxy objects initiate a communication with the Yoctopuce modules each time they are called. You should therefore avoid calling them too often without purpose.
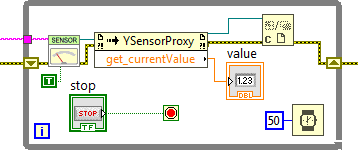
This loop, using a method, must be slowed down
11.10. A full example of a LabVIEW program
Here is a short example of how to use the Yocto-Thermocouple in LabVIEW. After a call to the RegisterHub VI, the YTemperature VI finds the first temperature sensor available, then use the YModule VI to find out the device serial number. This number is used to build the name of all sensors present on the device. Theses names are used to initialize one VI per sensor. This technique avoids ambiguities when several Yocto-Thermocouple are connected at the same time. Once every VI is initialized, the sensor value can be displayed. When the application is about to exit, it frees the Yoctopuce API, thanks to the YFreeAPI VI.
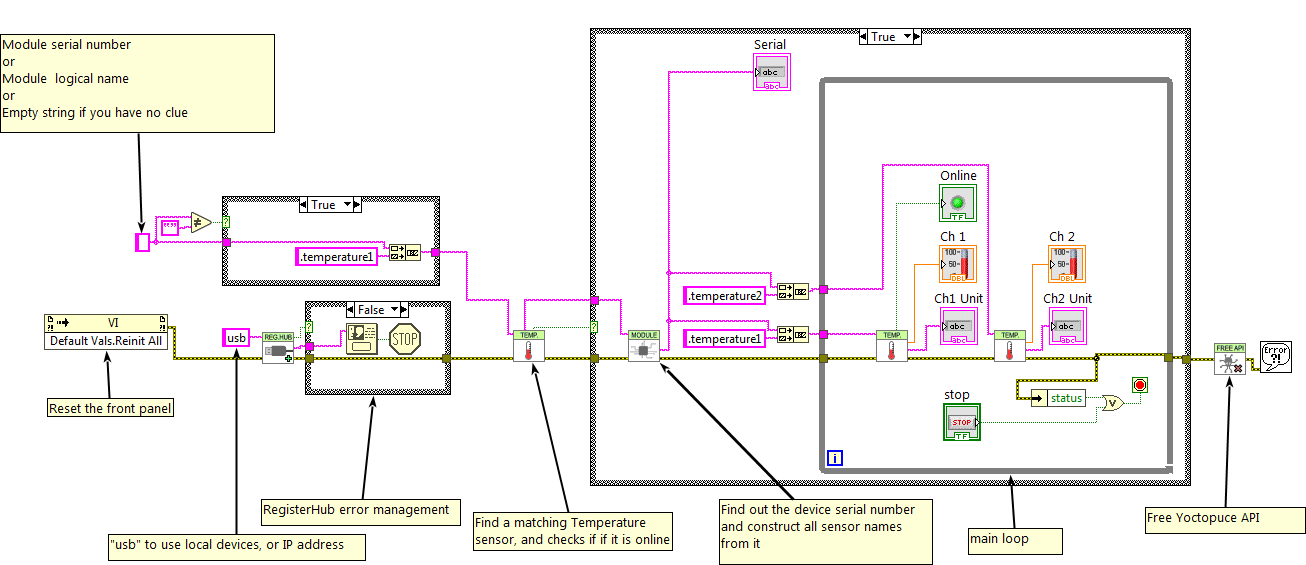
Example of Yocto-Thermocouple usage in LabVIEW
If you read this documentation on screen, you can zoom on the image above. You can also find this example in the LabVIEW Yoctopuce library.
11.11. Differences from other Yoctopuce APIs
Yoctopuce does everything it can to maintain a strong coherence between its different programming libraries. However, LabVIEW being clearly apart as an environment, there are, as a consequence, important differences from the other libraries.
These differences were introduced to make the use of modules as easy as possible and requiring a minimum of LabVIEW code.
YFreeAPI
In the opposite to other languages, you must absolutely free the native API by calling the YFreeAPI VI when your code does not need to use the API anymore. If you forget this call, the native API risks to stay locked for the other applications until LabVIEW is completely closed.
Properties
In the opposite to classes of the other APIs, classes available in LabVIEW implement properties. By convention, these properties are optimized to generate a minimum of communication with the modules while automatically refreshing. By contrast, methods of type get_xxx and set_xxx systematically generate communications with the Yoctopuce modules and must be called sparingly.
Callback vs. Properties
There is no callback in the LabVIEW Yoctopuce API, the VIs automatically refresh: they are based on the properties of the .NET Proxy API objects.
12. Using the Yocto-Thermocouple with Java
Java is an object oriented language created by Sun Microsystem. Beside being free, its main strength is its portability. Unfortunately, this portability has an excruciating price. In Java, hardware abstraction is so high that it is almost impossible to work directly with the hardware. Therefore, the Yoctopuce API does not support native mode in regular Java. The Java API needs VirtualHub to communicate with Yoctopuce devices.
12.1. Getting ready
Go to the Yoctopuce web site and download the following items:
The library is available as source files as well as a jar file. Decompress the library files in a folder of your choice, connect your modules, run VirtualHub, and you are ready to start your first tests. You do not need to install any driver.
In order to keep them simple, all the examples provided in this documentation are console applications. Naturally, the libraries function in a strictly identical manner if you integrate them in an application with a graphical interface.
12.2. Control of the Temperature function
A few lines of code are enough to use a Yocto-Thermocouple. Here is the skeleton of a Java code snippet to use the Temperature function.
[...]
// Get access to your device, through the VirtualHub running locally
YAPI.RegisterHub("127.0.0.1");
[...]
// Retrieve the object used to interact with the device
temperature = YTemperature.FindTemperature("THRMCPL1-123456.temperature");
// Hot-plug is easy: just check that the device is online
if (temperature.isOnline())
{
// Use temperature.get_currentValue()
[...]
}
[...]
Let us look at these lines in more details.
YAPI.RegisterHub
The yAPI.RegisterHub function initializes the Yoctopuce API and indicates where the modules should be looked for. The parameter is the address of the Virtual Hub able to see the devices. If the initialization does not succeed, an exception is thrown.
YTemperature.FindTemperature
The YTemperature.FindTemperature function allows you to find a temperature sensor from the serial number of the module on which it resides and from its function name. You can use logical names as well, as long as you have initialized them. Let us imagine a Yocto-Thermocouple module with serial number THRMCPL1-123456 which you have named "MyModule", and for which you have given the temperature function the name "MyFunction". The following five calls are strictly equivalent, as long as "MyFunction" is defined only once.
temperature = YTemperature.FindTemperature("THRMCPL1-123456.temperature")
temperature = YTemperature.FindTemperature("THRMCPL1-123456.MyFunction")
temperature = YTemperature.FindTemperature("MyModule.temperature")
temperature = YTemperature.FindTemperature("MyModule.MyFunction")
temperature = YTemperature.FindTemperature("MyFunction")
YTemperature.FindTemperature returns an object which you can then use at will to control the temperature sensor.
isOnline
The isOnline() method of the object returned by YTemperature.FindTemperature allows you to know if the corresponding module is present and in working order.
get_currentValue
The get_currentValue() method of the object returned by YTemperature.FindTemperature provides the temperature currently measured by the sensor. The value returned is a floating number, equal to the current number of Celsius degrees.
A real example
Launch you Java environment and open the corresponding sample project provided in the directory Examples/Doc-GettingStarted-Yocto-Thermocouple of the Yoctopuce library.
In this example, you will recognize the functions explained above, but this time used with all the side materials needed to make it work nicely as a small demo.
public class Demo {
public static void main(String[] args) {
try {
// setup the API to use local VirtualHub
YAPI.RegisterHub("127.0.0.1");
} catch (YAPI_Exception ex) {
System.out.println("Cannot contact VirtualHub on 127.0.0.1 (" + ex.getLocalizedMessage() + ")");
System.out.println("Ensure that the VirtualHub application is running");
System.exit(1);
}
String serial = "";
if (args.length == 0) {
YTemperature tmp = YTemperature.FirstTemperature();
if (tmp == null) {
System.out.println("No module connected (check USB cable)");
System.exit(1);
}
try {
serial = tmp.module().get_serialNumber();
} catch (YAPI_Exception ex) {
System.out.println("No module connected (check USB cable)");
System.exit(1);
}
} else {
serial = args[0];
}
// retreive both channels
YTemperature ch1 = YTemperature.FindTemperature(serial + ".temperature1");
YTemperature ch2 = YTemperature.FindTemperature(serial + ".temperature2");
while (true) {
try {
System.out.println("Channel 1 temperature: " + ch1.get_currentValue() + " C");
System.out.println("Channel 2 temperature: " + ch2.get_currentValue() + " C");
System.out.println(" (press Ctrl-C to exit)");
YAPI.Sleep(1000);
} catch (YAPI_Exception ex) {
System.out.println("Module not connected (check identification and USB cable)");
break;
}
}
YAPI.FreeAPI();
}
}
12.3. Control of the module part
Each module can be controlled in a similar manner, you can find below a simple sample program displaying the main parameters of the module and enabling you to activate the localization beacon.
import com.yoctopuce.YoctoAPI.*;
import java.util.logging.Level;
import java.util.logging.Logger;
public class Demo {
public static void main(String[] args)
{
try {
// setup the API to use local VirtualHub
YAPI.RegisterHub("127.0.0.1");
} catch (YAPI_Exception ex) {
System.out.println("Cannot contact VirtualHub on 127.0.0.1 (" + ex.getLocalizedMessage() + ")");
System.out.println("Ensure that the VirtualHub application is running");
System.exit(1);
}
System.out.println("usage: demo [serial or logical name] [ON/OFF]");
YModule module;
if (args.length == 0) {
module = YModule.FirstModule();
if (module == null) {
System.out.println("No module connected (check USB cable)");
System.exit(1);
}
} else {
module = YModule.FindModule(args[0]); // use serial or logical name
}
try {
if (args.length > 1) {
if (args[1].equalsIgnoreCase("ON")) {
module.setBeacon(YModule.BEACON_ON);
} else {
module.setBeacon(YModule.BEACON_OFF);
}
}
System.out.println("serial: " + module.get_serialNumber());
System.out.println("logical name: " + module.get_logicalName());
System.out.println("luminosity: " + module.get_luminosity());
if (module.get_beacon() == YModule.BEACON_ON) {
System.out.println("beacon: ON");
} else {
System.out.println("beacon: OFF");
}
System.out.println("upTime: " + module.get_upTime() / 1000 + " sec");
System.out.println("USB current: " + module.get_usbCurrent() + " mA");
System.out.println("logs:\n" + module.get_lastLogs());
} catch (YAPI_Exception ex) {
System.out.println(args[1] + " not connected (check identification and USB cable)");
}
YAPI.FreeAPI();
}
}
Each property xxx of the module can be read thanks to a method of type YModule.get_xxxx(), and properties which are not read-only can be modified with the help of the YModule.set_xxx() method. For more details regarding the used functions, refer to the API chapters.
Changing the module settings
When you want to modify the settings of a module, you only need to call the corresponding YModule.set_xxx() function. However, this modification is performed only in the random access memory (RAM) of the module: if the module is restarted, the modifications are lost. To memorize them persistently, it is necessary to ask the module to save its current configuration in its permanent memory. To do so, use the YModule.saveToFlash() method. Inversely, it is possible to force the module to forget its current settings by using the YModule.revertFromFlash() method. The short example below allows you to modify the logical name of a module.
public class Demo {
public static void main(String[] args)
{
try {
// setup the API to use local VirtualHub
YAPI.RegisterHub("127.0.0.1");
} catch (YAPI_Exception ex) {
System.out.println("Cannot contact VirtualHub on 127.0.0.1 (" + ex.getLocalizedMessage() + ")");
System.out.println("Ensure that the VirtualHub application is running");
System.exit(1);
}
if (args.length != 2) {
System.out.println("usage: demo <serial or logical name> <new logical name>");
System.exit(1);
}
YModule m;
String newname;
m = YModule.FindModule(args[0]); // use serial or logical name
try {
newname = args[1];
if (!YAPI.CheckLogicalName(newname))
{
System.out.println("Invalid name (" + newname + ")");
System.exit(1);
}
m.set_logicalName(newname);
m.saveToFlash(); // do not forget this
System.out.println("Module: serial= " + m.get_serialNumber());
System.out.println(" / name= " + m.get_logicalName());
} catch (YAPI_Exception ex) {
System.out.println("Module " + args[0] + "not connected (check identification and USB cable)");
System.out.println(ex.getMessage());
System.exit(1);
}
YAPI.FreeAPI();
}
}
Warning: the number of write cycles of the nonvolatile memory of the module is limited. When this limit is reached, nothing guaranties that the saving process is performed correctly. This limit, linked to the technology employed by the module micro-processor, is located at about 100000 cycles. In short, you can use the YModule.saveToFlash() function only 100000 times in the life of the module. Make sure you do not call this function within a loop.
Listing the modules
Obtaining the list of the connected modules is performed with the YModule.yFirstModule() function which returns the first module found. Then, you only need to call the nextModule() function of this object to find the following modules, and this as long as the returned value is not null. Below a short example listing the connected modules.
public class Demo {
public static void main(String[] args)
{
try {
// setup the API to use local VirtualHub
YAPI.RegisterHub("127.0.0.1");
} catch (YAPI_Exception ex) {
System.out.println("Cannot contact VirtualHub on 127.0.0.1 (" + ex.getLocalizedMessage() + ")");
System.out.println("Ensure that the VirtualHub application is running");
System.exit(1);
}
System.out.println("Device list");
YModule module = YModule.FirstModule();
while (module != null) {
try {
System.out.println(module.get_serialNumber() + " (" + module.get_productName() + ")");
} catch (YAPI_Exception ex) {
break;
}
module = module.nextModule();
}
YAPI.FreeAPI();
}
}
12.4. Error handling
When you implement a program which must interact with USB modules, you cannot disregard error handling. Inevitably, there will be a time when a user will have unplugged the device, either before running the software, or even while the software is running. The Yoctopuce library is designed to help you support this kind of behavior, but your code must nevertheless be conceived to interpret in the best possible way the errors indicated by the library.
The simplest way to work around the problem is the one used in the short examples provided in this chapter: before accessing a module, check that it is online with the isOnline function, and then hope that it will stay so during the fraction of a second necessary for the following code lines to run. This method is not perfect, but it can be sufficient in some cases. You must however be aware that you cannot completely exclude an error which would occur after the call to isOnline and which could crash the software.
In the Java API, error handling is implemented with exceptions. Therefore you must catch and handle correctly all exceptions that might be thrown by the API if you do not want your software to crash as soon as you unplug a device.
13. Using the Yocto-Thermocouple with Android
To tell the truth, Android is not a programming language, it is an operating system developed by Google for mobile appliances such as smart phones and tablets. But it so happens that under Android everything is programmed with the same programming language: Java. Nevertheless, the programming paradigms and the possibilities to access the hardware are slightly different from classical Java, and this justifies a separate chapter on Android programming.
13.1. Native access and VirtualHub
In the opposite to the classical Java API, the Java for Android API can access USB modules natively. However, as there is no VirtualHub running under Android, it is not possible to remotely control Yoctopuce modules connected to a machine under Android. Naturally, the Java for Android API remains perfectly able to connect itself to VirtualHub running on another OS.
13.2. Getting ready
Go to the Yoctopuce web site and download the Java for Android programming library32. The library is available as source files, and also as a jar file. Connect your modules, decompress the library files in the directory of your choice, and configure your Android programming environment so that it can find them.
To keep them simple, all the examples provided in this documentation are snippets of Android applications. You must integrate them in your own Android applications to make them work. However, your can find complete applications in the examples provided with the Java for Android library.
13.3. Compatibility
In an ideal world, you would only need to have a smart phone running under Android to be able to make Yoctopuce modules work. Unfortunately, it is not quite so in the real world. A machine running under Android must fulfil to a few requirements to be able to manage Yoctopuce USB modules natively.
Android version
Our library can be compiled to work with older versions, as long as the Android tools allow us to support them, i.e. approximately versions of the last ten years.
USB host support
Naturally, not only must your machine have a USB port, this port must also be able to run in host mode. In host mode, the machine literally takes control of the devices which are connected to it. The USB ports of a desktop computer, for example, work in host mode. The opposite of the host mode is the device mode. USB keys, for instance, work in device mode: they must be controlled by a host. Some USB ports are able to work in both modes, they are OTG (On The Go) ports. It so happens that many mobile devices can only work in device mode: they are designed to be connected to a charger or a desktop computer, and nothing else. It is therefore highly recommended to pay careful attention to the technical specifications of a product working under Android before hoping to make Yoctopuce modules work with it.
Unfortunately, having a correct version of Android and USB ports working in host mode is not enough to guaranty that Yoctopuce modules will work well under Android. Indeed, some manufacturers configure their Android image so that devices other than keyboard and mass storage are ignored, and this configuration is hard to detect. As things currently stand, the best way to know if a given Android machine works with Yoctopuce modules consists in trying.
13.4. Activating the USB port under Android
By default, Android does not allow an application to access the devices connected to the USB port. To enable your application to interact with a Yoctopuce module directly connected on your tablet on a USB port, a few additional steps are required. If you intend to interact only with modules connected on another machine through the network, you can ignore this section.
In your AndroidManifest.xml, you must declare using the "USB Host" functionality by adding the <uses-feature android:name="android.hardware.usb.host" /> tag in the manifest section.
<manifest ...>
...
<uses-feature android:name="android.hardware.usb.host" />;
...
</manifest>
When first accessing a Yoctopuce module, Android opens a window to inform the user that the application is going to access the connected module. The user can deny or authorize access to the device. If the user authorizes the access, the application can access the connected device as long as it stays connected. To enable the Yoctopuce library to correctly manage these authorizations, your must provide a pointer on the application context by calling the EnableUSBHost method of the YAPI class before the first USB access. This function takes as arguments an object of the android.content.Context class (or of a subclass). As the Activity class is a subclass of Context, it is simpler to call YAPI.EnableUSBHost(this); in the method onCreate of your application. If the object passed as parameter is not of the correct type, a YAPI_Exception exception is generated.
...
@Override
public void onCreate(Bundle savedInstanceState) {
super.onCreate(savedInstanceState);
try {
// Pass the application Context to the Yoctopuce Library
YAPI.EnableUSBHost(this);
} catch (YAPI_Exception e) {
Log.e("Yocto",e.getLocalizedMessage());
}
}
...
Autorun
It is possible to register your application as a default application for a USB module. In this case, as soon as a module is connected to the system, the application is automatically launched. You must add <action android:name="android.hardware.usb.action.USB_DEVICE_ATTACHED"/> in the section <intent-filter> of the main activity. The section <activity> must have a pointer to an XML file containing the list of USB modules which can run the application.
<manifest xmlns:android="http://schemas.android.com/apk/res/android"
...
<uses-feature android:name="android.hardware.usb.host" />
...
<application ... >
<activity
android:name=".MainActivity" >
<intent-filter>
<action android:name="android.intent.action.MAIN" />
<action android:name="android.hardware.usb.action.USB_DEVICE_ATTACHED" />
<category android:name="android.intent.category.LAUNCHER" />
</intent-filter>
<meta-data
android:name="android.hardware.usb.action.USB_DEVICE_ATTACHED"
android:resource="@xml/device_filter" />
</activity>
</application>
</manifest>
The XML file containing the list of modules allowed to run the application must be saved in the res/xml directory. This file contains a list of USB vendorId and deviceID in decimal. The following example runs the application as soon as a Yocto-Relay or a YoctoPowerRelay is connected. You can find the vendorID and the deviceID of Yoctopuce modules in the characteristics section of the documentation.
<?xml version="1.0" encoding="utf-8"?>
<resources>
<usb-device vendor-id="9440" product-id="12" />
<usb-device vendor-id="9440" product-id="13" />
</resources>
13.5. Control of the Temperature function
A few lines of code are enough to use a Yocto-Thermocouple. Here is the skeleton of a Java code snippet to use the Temperature function.
[...]
// Enable detection of USB devices
YAPI.EnableUSBHost(this);
YAPI.RegisterHub("usb");
[...]
// Retrieve the object used to interact with the device
temperature = YTemperature.FindTemperature("THRMCPL1-123456.temperature");
// Hot-plug is easy: just check that the device is online
if (temperature.isOnline()) {
// Use temperature.get_currentValue()
[...]
}
[...]
Let us look at these lines in more details.
YAPI.EnableUSBHost
The YAPI.EnableUSBHost function initializes the API with the Context of the current application. This function takes as argument an object of the android.content.Context class (or of a subclass). If you intend to connect your application only to other machines through the network, this function is facultative.
YAPI.RegisterHub
The yAPI.RegisterHub function initializes the Yoctopuce API and indicates where the modules should be looked for. The parameter is the address of the virtual hub able to see the devices. If the string "usb" is passed as parameter, the API works with modules locally connected to the machine. If the initialization does not succeed, an exception is thrown.
YTemperature.FindTemperature
The YTemperature.FindTemperature function allows you to find a temperature sensor from the serial number of the module on which it resides and from its function name. You can use logical names as well, as long as you have initialized them. Let us imagine a Yocto-Thermocouple module with serial number THRMCPL1-123456 which you have named "MyModule", and for which you have given the temperature function the name "MyFunction". The following five calls are strictly equivalent, as long as "MyFunction" is defined only once.
temperature = YTemperature.FindTemperature("THRMCPL1-123456.temperature")
temperature = YTemperature.FindTemperature("THRMCPL1-123456.MyFunction")
temperature = YTemperature.FindTemperature("MyModule.temperature")
temperature = YTemperature.FindTemperature("MyModule.MyFunction")
temperature = YTemperature.FindTemperature("MyFunction")
YTemperature.FindTemperature returns an object which you can then use at will to control the temperature sensor.
isOnline
The isOnline() method of the object returned by YTemperature.FindTemperature allows you to know if the corresponding module is present and in working order.
get_currentValue
The get_currentValue() method of the object returned by YTemperature.FindTemperature provides the temperature currently measured by the sensor. The value returned is a floating number, equal to the current number of Celsius degrees.
A real example
Launch you Java environment and open the corresponding sample project provided in the directory Examples//Doc-Examples of the Yoctopuce library.
In this example, you can recognize the functions explained above, but this time used with all the side materials needed to make it work nicely as a small demo.
import android.app.Activity;
import android.os.Bundle;
import android.os.Handler;
import android.view.View;
import android.widget.AdapterView;
import android.widget.AdapterView.OnItemSelectedListener;
import android.widget.ArrayAdapter;
import android.widget.Spinner;
import android.widget.TextView;
import com.yoctopuce.YoctoAPI.YAPI;
import com.yoctopuce.YoctoAPI.YAPI_Exception;
import com.yoctopuce.YoctoAPI.YModule;
import com.yoctopuce.YoctoAPI.YTemperature;
public class GettingStarted_Yocto_Thermocouple extends Activity implements OnItemSelectedListener
{
private ArrayAdapter<String> aa;
private String serial = "";
private Handler handler = null;
@Override
public void onCreate(Bundle savedInstanceState)
{
super.onCreate(savedInstanceState);
setContentView(R.layout.gettingstarted_yocto_thermocouple);
Spinner my_spin = (Spinner) findViewById(R.id.spinner1);
my_spin.setOnItemSelectedListener(this);
aa = new ArrayAdapter<String>(this, android.R.layout.simple_spinner_item);
aa.setDropDownViewResource(android.R.layout.simple_spinner_dropdown_item);
my_spin.setAdapter(aa);
handler = new Handler();
}
@Override
protected void onStart()
{
super.onStart();
try {
aa.clear();
YAPI.EnableUSBHost(this);
YAPI.RegisterHub("usb");
YModule module = YModule.FirstModule();
while (module != null) {
if (module.get_productName().equals("Yocto-Thermocouple")) {
String serial = module.get_serialNumber();
aa.add(serial);
}
module = module.nextModule();
}
} catch (YAPI_Exception e) {
e.printStackTrace();
}
aa.notifyDataSetChanged();
handler.postDelayed(r, 500);
}
@Override
protected void onStop()
{
super.onStop();
handler.removeCallbacks(r);
YAPI.FreeAPI();
}
@Override
public void onItemSelected(AdapterView<?> parent, View view, int pos, long id)
{
serial = parent.getItemAtPosition(pos).toString();
}
@Override
public void onNothingSelected(AdapterView<?> arg0)
{
}
final Runnable r = new Runnable()
{
public void run()
{
if (serial != null) {
YTemperature temp_sensor = YTemperature.FindTemperature(serial + ".temperature1");
try {
TextView view = (TextView) findViewById(R.id.tempfield1);
view.setText(String.format("%.1f %s", temp_sensor.getCurrentValue(), temp_sensor.getUnit()));
} catch (YAPI_Exception e) {
e.printStackTrace();
}
temp_sensor = YTemperature.FindTemperature(serial + ".temperature2");
try {
TextView view = (TextView) findViewById(R.id.tempfield2);
view.setText(String.format("%.1f %s", temp_sensor.getCurrentValue(), temp_sensor.getUnit()));
} catch (YAPI_Exception e) {
e.printStackTrace();
}
}
handler.postDelayed(this, 1000);
}
};
}
13.6. Control of the module part
Each module can be controlled in a similar manner, you can find below a simple sample program displaying the main parameters of the module and enabling you to activate the localization beacon.
import android.app.Activity;
import android.os.Bundle;
import android.view.View;
import android.widget.AdapterView;
import android.widget.AdapterView.OnItemSelectedListener;
import android.widget.ArrayAdapter;
import android.widget.Spinner;
import android.widget.Switch;
import android.widget.TextView;
import com.yoctopuce.YoctoAPI.YAPI;
import com.yoctopuce.YoctoAPI.YAPI_Exception;
import com.yoctopuce.YoctoAPI.YModule;
public class ModuleControl extends Activity implements OnItemSelectedListener
{
private ArrayAdapter<String> aa;
private YModule module = null;
@Override
public void onCreate(Bundle savedInstanceState)
{
super.onCreate(savedInstanceState);
setContentView(R.layout.modulecontrol);
Spinner my_spin = (Spinner) findViewById(R.id.spinner1);
my_spin.setOnItemSelectedListener(this);
aa = new ArrayAdapter<String>(this, android.R.layout.simple_spinner_item);
aa.setDropDownViewResource(android.R.layout.simple_spinner_dropdown_item);
my_spin.setAdapter(aa);
}
@Override
protected void onStart()
{
super.onStart();
try {
aa.clear();
YAPI.EnableUSBHost(this);
YAPI.RegisterHub("usb");
YModule r = YModule.FirstModule();
while (r != null) {
String hwid = r.get_hardwareId();
aa.add(hwid);
r = r.nextModule();
}
} catch (YAPI_Exception e) {
e.printStackTrace();
}
// refresh Spinner with detected relay
aa.notifyDataSetChanged();
}
@Override
protected void onStop()
{
super.onStop();
YAPI.FreeAPI();
}
private void DisplayModuleInfo()
{
TextView field;
if (module == null)
return;
try {
field = (TextView) findViewById(R.id.serialfield);
field.setText(module.getSerialNumber());
field = (TextView) findViewById(R.id.logicalnamefield);
field.setText(module.getLogicalName());
field = (TextView) findViewById(R.id.luminosityfield);
field.setText(String.format("%d%%", module.getLuminosity()));
field = (TextView) findViewById(R.id.uptimefield);
field.setText(module.getUpTime() / 1000 + " sec");
field = (TextView) findViewById(R.id.usbcurrentfield);
field.setText(module.getUsbCurrent() + " mA");
Switch sw = (Switch) findViewById(R.id.beaconswitch);
sw.setChecked(module.getBeacon() == YModule.BEACON_ON);
field = (TextView) findViewById(R.id.logs);
field.setText(module.get_lastLogs());
} catch (YAPI_Exception e) {
e.printStackTrace();
}
}
@Override
public void onItemSelected(AdapterView<?> parent, View view, int pos, long id)
{
String hwid = parent.getItemAtPosition(pos).toString();
module = YModule.FindModule(hwid);
DisplayModuleInfo();
}
@Override
public void onNothingSelected(AdapterView<?> arg0)
{
}
public void refreshInfo(View view)
{
DisplayModuleInfo();
}
public void toggleBeacon(View view)
{
if (module == null)
return;
boolean on = ((Switch) view).isChecked();
try {
if (on) {
module.setBeacon(YModule.BEACON_ON);
} else {
module.setBeacon(YModule.BEACON_OFF);
}
} catch (YAPI_Exception e) {
e.printStackTrace();
}
}
}
Each property xxx of the module can be read thanks to a method of type YModule.get_xxxx(), and properties which are not read-only can be modified with the help of the YModule.set_xxx() method. For more details regarding the used functions, refer to the API chapters.
Changing the module settings
When you want to modify the settings of a module, you only need to call the corresponding YModule.set_xxx() function. However, this modification is performed only in the random access memory (RAM) of the module: if the module is restarted, the modifications are lost. To memorize them persistently, it is necessary to ask the module to save its current configuration in its permanent memory. To do so, use the YModule.saveToFlash() method. Inversely, it is possible to force the module to forget its current settings by using the YModule.revertFromFlash() method. The short example below allows you to modify the logical name of a module.
import android.app.Activity;
import android.os.Bundle;
import android.view.View;
import android.widget.AdapterView;
import android.widget.AdapterView.OnItemSelectedListener;
import android.widget.ArrayAdapter;
import android.widget.EditText;
import android.widget.Spinner;
import android.widget.TextView;
import android.widget.Toast;
import com.yoctopuce.YoctoAPI.YAPI;
import com.yoctopuce.YoctoAPI.YAPI_Exception;
import com.yoctopuce.YoctoAPI.YModule;
public class SaveSettings extends Activity implements OnItemSelectedListener
{
private ArrayAdapter<String> aa;
private YModule module = null;
@Override
public void onCreate(Bundle savedInstanceState)
{
super.onCreate(savedInstanceState);
setContentView(R.layout.savesettings);
Spinner my_spin = (Spinner) findViewById(R.id.spinner1);
my_spin.setOnItemSelectedListener(this);
aa = new ArrayAdapter<String>(this, android.R.layout.simple_spinner_item);
aa.setDropDownViewResource(android.R.layout.simple_spinner_dropdown_item);
my_spin.setAdapter(aa);
}
@Override
protected void onStart()
{
super.onStart();
try {
aa.clear();
YAPI.EnableUSBHost(this);
YAPI.RegisterHub("usb");
YModule r = YModule.FirstModule();
while (r != null) {
String hwid = r.get_hardwareId();
aa.add(hwid);
r = r.nextModule();
}
} catch (YAPI_Exception e) {
e.printStackTrace();
}
// refresh Spinner with detected relay
aa.notifyDataSetChanged();
}
@Override
protected void onStop()
{
super.onStop();
YAPI.FreeAPI();
}
private void DisplayModuleInfo()
{
TextView field;
if (module == null)
return;
try {
YAPI.UpdateDeviceList();// fixme
field = (TextView) findViewById(R.id.logicalnamefield);
field.setText(module.getLogicalName());
} catch (YAPI_Exception e) {
e.printStackTrace();
}
}
@Override
public void onItemSelected(AdapterView<?> parent, View view, int pos, long id)
{
String hwid = parent.getItemAtPosition(pos).toString();
module = YModule.FindModule(hwid);
DisplayModuleInfo();
}
@Override
public void onNothingSelected(AdapterView<?> arg0)
{
}
public void saveName(View view)
{
if (module == null)
return;
EditText edit = (EditText) findViewById(R.id.newname);
String newname = edit.getText().toString();
try {
if (!YAPI.CheckLogicalName(newname)) {
Toast.makeText(getApplicationContext(), "Invalid name (" + newname + ")", Toast.LENGTH_LONG).show();
return;
}
module.set_logicalName(newname);
module.saveToFlash(); // do not forget this
edit.setText("");
} catch (YAPI_Exception ex) {
ex.printStackTrace();
}
DisplayModuleInfo();
}
}
Warning: the number of write cycles of the nonvolatile memory of the module is limited. When this limit is reached, nothing guaranties that the saving process is performed correctly. This limit, linked to the technology employed by the module micro-processor, is located at about 100000 cycles. In short, you can use the YModule.saveToFlash() function only 100000 times in the life of the module. Make sure you do not call this function within a loop.
Listing the modules
Obtaining the list of the connected modules is performed with the YModule.yFirstModule() function which returns the first module found. Then, you only need to call the nextModule() function of this object to find the following modules, and this as long as the returned value is not null. Below a short example listing the connected modules.
import android.app.Activity;
import android.os.Bundle;
import android.util.TypedValue;
import android.view.View;
import android.widget.LinearLayout;
import android.widget.TextView;
import com.yoctopuce.YoctoAPI.YAPI;
import com.yoctopuce.YoctoAPI.YAPI_Exception;
import com.yoctopuce.YoctoAPI.YModule;
public class Inventory extends Activity
{
@Override
public void onCreate(Bundle savedInstanceState)
{
super.onCreate(savedInstanceState);
setContentView(R.layout.inventory);
}
public void refreshInventory(View view)
{
LinearLayout layout = (LinearLayout) findViewById(R.id.inventoryList);
layout.removeAllViews();
try {
YAPI.UpdateDeviceList();
YModule module = YModule.FirstModule();
while (module != null) {
String line = module.get_serialNumber() + " (" + module.get_productName() + ")";
TextView tx = new TextView(this);
tx.setText(line);
tx.setTextSize(TypedValue.COMPLEX_UNIT_SP, 20);
layout.addView(tx);
module = module.nextModule();
}
} catch (YAPI_Exception e) {
e.printStackTrace();
}
}
@Override
protected void onStart()
{
super.onStart();
try {
YAPI.EnableUSBHost(this);
YAPI.RegisterHub("usb");
} catch (YAPI_Exception e) {
e.printStackTrace();
}
refreshInventory(null);
}
@Override
protected void onStop()
{
super.onStop();
YAPI.FreeAPI();
}
}
13.7. Error handling
When you implement a program which must interact with USB modules, you cannot disregard error handling. Inevitably, there will be a time when a user will have unplugged the device, either before running the software, or even while the software is running. The Yoctopuce library is designed to help you support this kind of behavior, but your code must nevertheless be conceived to interpret in the best possible way the errors indicated by the library.
The simplest way to work around the problem is the one used in the short examples provided in this chapter: before accessing a module, check that it is online with the isOnline function, and then hope that it will stay so during the fraction of a second necessary for the following code lines to run. This method is not perfect, but it can be sufficient in some cases. You must however be aware that you cannot completely exclude an error which would occur after the call to isOnline and which could crash the software.
In the Java API for Android, error handling is implemented with exceptions. Therefore you must catch and handle correctly all exceptions that might be thrown by the API if you do not want your software to crash soon as you unplug a device.
14. Using Yocto-Thermocouple with TypeScript
TypeScript is an enhanced version of the JavaScript programming language. It is a syntaxic superset with strong typing, therefore increasing the code reliability, but transpiled - aka compiled - into JavaScript for execution in any standard Web browser or Node.js environment.
This Yoctopuce library therefore makes it possible to implement JavaScript applications using strong typing. Similarly to our EcmaScript library, it uses the new asynchronous features introduced in ECMAScript 2017, which are now available in all modern JavaScript environments. Note however that at the time of writting, Web browsers and Node.JS cannot use TypeScript code directly, so you must first compile your TypeScript into JavaScript before running it.
The library works both in a Web browser and in Node.js. In order to allow for a static resolution of dependencies, and to avoid ambiguities that can arise when using hybrid environments such as Electron, the choice of the runtime environment must be done explicitly upon import of the library, by referencing in the project either yocto_api_nodejs.js or yocto_api_html.js.
The library can be integrated in your projects in multiple ways, depending on what best fits your requirements:
- by directly copying the TypeScript library source files into your project, and by adding them to your build script. Only a few files are usually needed to handle most use-cases. You will find TypeScript source files in the src subdirectory of our library.
- by using CommonJS module resolution, natively supported by TypeScript, with a package manager such as npm. You will find a version of the library transpiled according to CommonJS module standard in the dist/cjs subdirectory, including all type definition files (with extension .d.ts) and source maps (with extension .js.map) enabling source-level error reporting and debugging. We have also published these files on npmjs under the name yoctolib-cjs.
- by using ECMAScript standard module resolution, also supported by TypeScript, usually referenced by relative path. You will find a version of the library transpiled as an ECMAScript 2015 module in the dist/esm subdirectory, including all type definition files (with extension .d.ts) and source maps (with extension .js.map) enabling source-level error reporting and debugging. We have also published these files on npmjs under the name yoctolib-esm.
14.1. Using the Yoctopuce library for TypeScript
1. Start by installing TypeScript on your machine if this is not yet done. In order to do so:
- Install on your development machine the official version of Node.js (version 10 or more recent). You can download it for free from the official web site: http://nodejs.org. Make sure to install it fully, including npm, and add it to the system path.
- Then install TypeScript on your machine using the command line:
npm install -g typescript
2. Go to the Yoctopuce web site and download the following items:
- The TypeScript programming library33
- The VirtualHub software34 for Windows, macOS, or Linux, depending on your OS. TypeScript and JavaScript are part of those languages which do not generally allow you to directly access to USB peripherals. Therefore the library can only be used to access network-enabled devices (connected through a YoctoHub), or USB devices accessible through Yoctopuce TCP/IP to USB gateway, named VirtualHub. No extra driver will be needed, though.
3. Extract the library files in a folder of your choice, and open a command window in the directory where you have installed it. In order to install the few dependencies which are necessary to start the examples, run this command:
npm install
When the command has run without error, you are ready to explore the examples. They are available in two different trees, depending on the environment that you need to use: example_html for running the Yoctopuce library within a Web browser, or example_nodejs if you plan to use the library in a Node.js environment.
The method to use for launching the examples depends on the environment. You will find more about it below.
14.2. Refresher on asynchronous I/O in JavaScript
JavaScript is single-threaded by design. In order to handle time-consuming I/O operations, JavaScript relies on asynchronous operations: the I/O call is only triggered but then the code execution flow is suspended. The JavaScript engine is therefore free to handle other pending tasks, such as user interface. Whenever the pending I/O call is completed, the system invokes a callback function with the result of the I/O call to resume execution of the original execution flow.
When used with plain callback functions, as pervasive in Node.js libraries, asynchronous I/O tend to produce code with poor readability, as the execution flow is broken into many disconnected callback functions. Fortunately, the ECMAScript 2015 standard came in with Promise objects and a new async / await syntax to abstract calls to asynchronous calls:
- a function declared async automatically encapsulates its result as a Promise
- within an async function, any function call prefixed with by await chains the Promise returned by the function with a promise to resume execution of the caller
- any exception during the execution of an async function automatically invokes the Promise failure continuation
To make a long story short, async and await make it possible to write TypeScript code with all the benefits of asynchronous I/O, but without breaking the code flow. It is almost like multi-threaded execution, except that control switch between pending tasks only happens at places where the await keyword appears.
This TypeScript library uses the Promise objects and async methods, to allow you to use the await syntax. To keep it easy to remember, all public methods of the TypeScript library are async, i.e. return a Promise object, except:
- GetTickCount(), because returning a time stamp asynchronously does not make sense...
- FindModule(), FirstModule(), nextModule(), ... because device detection and enumeration always works on internal device lists handled in background, and does not require immediate asynchronous I/O.
In most cases, TypeScript strong typing will remind you to use await when calling an asynchronous method.
14.3. Control of the Temperature function
A few lines of code are enough to use a Yocto-Thermocouple. Here is the skeleton of a TypeScript code snipplet to use the Temperature function.
// For Node.js, the library is referenced through the NPM package
// For HTML, we would use instead a relative path (depending on the build environment)
import { YAPI, YErrorMsg, YModule } from 'yoctolib-cjs/yocto_api_nodejs.js';
import { YTemperature } from 'yoctolib-cjs/yocto_temperature.js';
[...]
// Get access to your device, through the VirtualHub running locally
await YAPI.RegisterHub('127.0.0.1');
[...]
// Retrieve the object used to interact with the device
var temperature: YTemperature = YTemperature.FindTemperature("THRMCPL1-123456.temperature");
// Check that the module is online to handle hot-plug
if(await temperature.isOnline())
{
// Use temperature.get_currentValue()
[...]
}
Let us look at these lines in more details.
yocto_api and yocto_temperature import
These two imports provide access to functions allowing you to manage Yoctopuce modules. yocto_api is always needed, yocto_temperature is necessary to manage modules containing a temperature sensor, such as Yocto-Thermocouple. Other imports can be useful in other cases, such as YModule which can let you enumerate any type of Yoctopuce device.
In order to properly bind yocto_api to the proper network libraries (provided either by Node.js or by the web browser for an HTML application), you must import at least once in your project one of the two variants yocto_api_nodejs.js or yocto_api_html.js.
Note that this example imports the Yoctopuce library as a CommonJS module, which is the most frequently used with Node.JS, but if your project is designed around EcmaScript native modules, you can also replace in the import directive the prefix yoctolib-cjs by yoctolib-esm.
YAPI.RegisterHub
The RegisterHub method allows you to indicate on which machine the Yoctopuce modules are located, more precisely on which machine the VirtualHub software is running. In our case, the 127.0.0.1:4444 address indicates the local machine, port 4444 (the standard port used by Yoctopuce). You can very well modify this address, and enter the address of another machine on which the VirtualHub software is running, or of a YoctoHub. If the host cannot be reached, this function will trigger an exception.
As explained above, using RegisterHub("usb") is not supported in TypeScript, because the JavaScript engine has no direct access to USB devices. It needs to go through the VirtualHub via a localhost connection.
YTemperature.FindTemperature
The FindTemperature method allows you to find a temperature sensor from the serial number of the module on which it resides and from its function name. You can also use logical names, as long as you have initialized them. Let us imagine a Yocto-Thermocouple module with serial number THRMCPL1-123456 which you have named "MyModule", and for which you have given the temperature function the name "MyFunction". The following five calls are strictly equivalent, as long as "MyFunction" is defined only once.
temperature = YTemperature.FindTemperature("THRMCPL1-123456.temperature")
temperature = YTemperature.FindTemperature("THRMCPL1-123456.MaFonction")
temperature = YTemperature.FindTemperature("MonModule.temperature")
temperature = YTemperature.FindTemperature("MonModule.MaFonction")
temperature = YTemperature.FindTemperature("MaFonction")
YTemperature.FindTemperature returns an object which you can then use at will to control the temperature sensor.
isOnline
The isOnline() method of the object returned by FindTemperature allows you to know if the corresponding module is present and in working order.
get_currentValue
The get_currentValue() method of the object returned by YTemperature.FindTemperature provides the temperature currently measured by the sensor. The value returned is a floating number, equal to the current number of Celsius degrees.
A real example, for Node.js
Open a command window (a terminal, a shell...) and go into the directory example_nodejs/Doc-GettingStarted-Yocto-Thermocouple within Yoctopuce library for TypeScript. In there, you will find a file named demo.ts with the sample code below, which uses the functions explained above, but this time used with all side materials needed to make it work nicely as a small demo.
If your Yocto-Thermocouple is not connected on the host running the browser, replace in the example the address 127.0.0.1 by the IP address of the host on which the Yocto-Thermocouple is connected and where you run the VirtualHub.
import { YTemperature } from 'yoctolib-cjs/yocto_temperature.js'
let temp1: YTemperature;
let temp2: YTemperature;
async function startDemo(): Promise<void>
{
await YAPI.LogUnhandledPromiseRejections();
// Setup the API to use the VirtualHub on local machine
let errmsg: YErrorMsg = new YErrorMsg();
if(await YAPI.RegisterHub('127.0.0.1', errmsg) != YAPI.SUCCESS) {
console.log('Cannot contact VirtualHub on 127.0.0.1: '+errmsg.msg);
return;
}
// Select specified device, or use first available one
let serial: string = process.argv[process.argv.length-1];
if(serial[8] != '-') {
// by default use any connected module suitable for the demo
let anysensor = YTemperature.FirstTemperature();
if(anysensor) {
let module: YModule = await anysensor.get_module();
serial = await module.get_serialNumber();
} else {
console.log('No matching sensor connected, check cable !');
await YAPI.FreeAPI();
return;
}
}
console.log('Using device '+serial);
temp1 = YTemperature.FindTemperature(serial+".temperature1");
temp2 = YTemperature.FindTemperature(serial+".temperature2");
refresh();
}
async function refresh(): Promise<void>
{
if (await temp1.isOnline()) {
console.log('Temperature 1 : '+(await temp1.get_currentValue())
+ (await temp1.get_unit()));
console.log('Temperature 2 : '+(await temp2.get_currentValue())
+ (await temp2.get_unit()));
} else {
console.log('Module not connected');
}
setTimeout(refresh, 500);
}
startDemo();
As explained at the beginning of this chapter, you need to have installed the TypeScript compiler on your machine to test these examples, and to install the typescript library dependencies. If you have done that, you can now type the following two commands in the example directory, to finalize the resolution of the example-specific dependencies:
npm install
You ar now ready to start the sample code with Node.js. The easiest way to do it is to use the following command, replacing the [...] by the arguments that you want to pass to the demo code:
npm run demo [...]
This command, defined in package.json, will first start the TypeScript compiler using the simple tsc command, then run the transpiled code in Node.js.
The compilation uses the parameters specified in the file tsconfig.json, and produces
- a JavaScript file named demo.js, that Node.js can run
- a debug file named demo.js.map, that will help Node.js to locate the source of errors in the original TypeScript source file rather than reporting them in the JavaScript compiled file.
Note that the package.json file in our examples uses a relative reference to the local copy of the library, to avoid duplicating the library in each example. But of course, for your application, you can refer to the package directly in npm repository, by adding it to your project using the command:
npm install yoctolib-cjs
Same example, but this time running in a browser
If you want to see how to use the library within a browser rather than with Node.js, switch to the directory example_html/Doc-GettingStarted-Yocto-Thermocouple. You will find there an HTML file named app.html, and a TypeScript file app.ts similar to the code above, but with a few changes since it has to interact through an HTML page rather than through the JavaScript console.
No installation is needed to run this example, as the TypeScript library is referenced using a relative path. However, in order to allow the browser to run the code, the HTML page must be served by a Web server. We therefore provide a simple test server for this purpose, that you can start with the command:
npm run app-server
This command will compile the TypeScript sample code, make it available via an HTTP server on port 3000 and open a Web browser on this example. If you change the example source code, the TypeScript compiler will automatically be triggered to update the transpiled code and a simple page reload on the browser will make it possible to test the change.
As for the Node.js example, the compilation process will create a source map file which makes it possible to debug the example code in TypeScript source form within the browser debugger. Note that as of the writing of this document, this works on Chromium-based browsers but not yet in Firefox.
14.4. Control of the module part
Each module can be controlled in a similar manner, you can find below a simple sample program displaying the main parameters of the module and enabling you to activate the localization beacon.
async function startDemo(args: string[]): Promise<void>
{
await YAPI.LogUnhandledPromiseRejections();
// Setup the API to use the VirtualHub on local machine
let errmsg: YErrorMsg = new YErrorMsg();
if (await YAPI.RegisterHub('127.0.0.1', errmsg) != YAPI.SUCCESS) {
console.log('Cannot contact VirtualHub on 127.0.0.1: '+errmsg.msg);
return;
}
// Select the device to use
let module: YModule = YModule.FindModule(args[0]);
if(await module.isOnline()) {
if(args.length > 1) {
if(args[1] == 'ON') {
await module.set_beacon(YModule.BEACON_ON);
} else {
await module.set_beacon(YModule.BEACON_OFF);
}
}
console.log('serial: '+await module.get_serialNumber());
console.log('logical name: '+await module.get_logicalName());
console.log('luminosity: '+await module.get_luminosity()+'%');
console.log('beacon: '+
(await module.get_beacon() == YModule.BEACON_ON ? 'ON' : 'OFF'));
console.log('upTime: '+
((await module.get_upTime()/1000)>>0) +' sec');
console.log('USB current: '+await module.get_usbCurrent()+' mA');
console.log('logs:');
console.log(await module.get_lastLogs());
} else {
console.log("Module not connected (check identification and USB cable)\n");
}
await YAPI.FreeAPI();
}
if(process.argv.length < 3) {
console.log("usage: npm run demo <serial or logicalname> [ ON | OFF ]");
} else {
startDemo(process.argv.slice(2));
}
Each property xxx of the module can be read thanks to a method of type get_xxxx(), and properties which are not read-only can be modified with the help of the set_xxx() method. For more details regarding the used methods, refer to the API chapters.
Changing the module settings
When you want to modify the settings of a module, you only need to call the corresponding set_xxx() method. However, this modification is performed only in the random access memory (RAM) of the module: if the module is restarted, the modifications are lost. To memorize them persistently, it is necessary to ask the module to save its current configuration in its permanent memory. To do so, use the saveToFlash() method. Inversely, it is possible to force the module to forget its current settings by using the revertFromFlash() method. The short example below allows you to modify the logical name of a module.
async function startDemo(args: string[]): Promise<void>
{
await YAPI.LogUnhandledPromiseRejections();
// Setup the API to use the VirtualHub on local machine
let errmsg: YErrorMsg = new YErrorMsg();
if (await YAPI.RegisterHub('127.0.0.1', errmsg) != YAPI.SUCCESS) {
console.log('Cannot contact VirtualHub on 127.0.0.1: '+errmsg.msg);
return;
}
// Select the device to use
let module: YModule = YModule.FindModule(args[0]);
if(await module.isOnline()) {
if(args.length > 1) {
let newname: string = args[1];
if (!await YAPI.CheckLogicalName(newname)) {
console.log("Invalid name (" + newname + ")");
process.exit(1);
}
await module.set_logicalName(newname);
await module.saveToFlash();
}
console.log('Current name: '+await module.get_logicalName());
} else {
console.log("Module not connected (check identification and USB cable)\n");
}
await YAPI.FreeAPI();
}
if(process.argv.length < 3) {
console.log("usage: npm run demo <serial> [newLogicalName]");
} else {
startDemo(process.argv.slice(2));
}
Warning: the number of write cycles of the nonvolatile memory of the module is limited. When this limit is reached, nothing guaranties that the saving process is performed correctly. This limit, linked to the technology employed by the module micro-processor, is located at about 100000 cycles. In short, you can use the saveToFlash() method only 100000 times in the life of the module. Make sure you do not call this method within a loop.
Listing the modules
Obtaining the list of the connected modules is performed with the YModule.FirstModule() method which returns the first module found. Then, you only need to call the nextModule() method of this object to find the following modules, and this as long as the returned value is not null. Below a short example listing the connected modules.
async function startDemo(): Promise<void>
{
await YAPI.LogUnhandledPromiseRejections();
// Setup the API to use the VirtualHub on local machine
let errmsg = new YErrorMsg();
if (await YAPI.RegisterHub('127.0.0.1', errmsg) != YAPI.SUCCESS) {
console.log('Cannot contact VirtualHub on 127.0.0.1');
return;
}
refresh();
}
async function refresh(): Promise<void>
{
try {
let errmsg: YErrorMsg = new YErrorMsg();
await YAPI.UpdateDeviceList(errmsg);
let module = YModule.FirstModule();
while(module) {
let line: string = await module.get_serialNumber();
line += '(' + (await module.get_productName()) + ')';
console.log(line);
module = module.nextModule();
}
setTimeout(refresh, 500);
} catch(e) {
console.log(e);
}
}
startDemo();
14.5. Error handling
When you implement a program which must interact with USB modules, you cannot disregard error handling. Inevitably, there will be a time when a user will have unplugged the device, either before running the software, or even while the software is running. The Yoctopuce library is designed to help you support this kind of behavior, but your code must nevertheless be conceived to interpret in the best possible way the errors indicated by the library.
The simplest way to work around the problem is the one used in the short examples provided in this chapter: before accessing a module, check that it is online with the isOnline function, and then hope that it will stay so during the fraction of a second necessary for the following code lines to run. This method is not perfect, but it can be sufficient in some cases. You must however be aware that you cannot completely exclude an error which would occur after the call to isOnline and which could crash the software. The only way to prevent this is to implement one of the two error handling techniques described below.
The method recommended by most programming languages for unpredictable error handling is the use of exceptions. By default, it is the behavior of the Yoctopuce library. If an error happens while you try to access a module, the library throws an exception. In this case, there are three possibilities:
- If your code catches the exception and handles it, everything goes well.
- If your program is running in debug mode, you can relatively easily determine where the problem happened and view the explanatory message linked to the exception.
- Otherwise... the exception makes your program crash, bang!
As this latest situation is not the most desirable, the Yoctopuce library offers another possibility for error handling, allowing you to create a robust program without needing to catch exceptions at every line of code. You simply need to call the YAPI.DisableExceptions() function to commute the library to a mode where exceptions for all the functions are systematically replaced by specific return values, which can be tested by the caller when necessary. For each function, the name of each return value in case of error is systematically documented in the library reference. The name always follows the same logic: a get_state() method returns a ClassName.STATE_INVALID value, a get_currentValue method returns a ClassName.CURRENTVALUE_INVALID value, and so on. In any case, the returned value is of the expected type and is not a null pointer which would risk crashing your program. At worst, if you display the value without testing it, it will be outside the expected bounds for the returned value. In the case of functions which do not normally return information, the return value is YAPI_SUCCESS if everything went well, and a different error code in case of failure.
When you work without exceptions, you can obtain an error code and an error message explaining the source of the error. You can request them from the object which returned the error, calling the errType() and errMessage() methods. Their returned values contain the same information as in the exceptions when they are active.
15. Using Yocto-Thermocouple with JavaScript / EcmaScript
EcmaScript is the official name of the standardized version of the web-oriented programming language commonly referred to as JavaScript. This Yoctopuce library take advantages of advanced features introduced in EcmaScript 2017. It has therefore been named Library for JavaScript / EcmaScript 2017 to differentiate it from the previous Library for JavaScript, now deprecated in favor of this new version.
This library provides access to Yoctopuce devices for modern JavaScript engines. It can be used within a browser as well as with Node.js. The library will automatically detect upon initialization whether the runtime environment is a browser or a Node.js virtual machine, and use the most appropriate system libraries accordingly.
Asynchronous communication with the devices is handled across the whole library using Promise objects, leveraging the new EcmaScript 2017 async / await non-blocking syntax for asynchronous I/O (see below). This syntax is now available out-of-the-box in most Javascript engines. No transpilation is needed: no Babel, no jspm, just plain Javascript. Here is your favorite engines minimum version needed to run this code. All of them are officially released at the time we write this document.
- Node.js v7.6 and later
- Firefox 52
- Opera 42 (incl. Android version)
- Chrome 55 (incl. Android version)
- Safari 10.1 (incl. iOS version)
- Android WebView 55
- Google V8 Javascript engine v5.5
If you need backward-compatibility with older releases, you can always run Babel to transpile your code and the library to older standards, as described a few paragraphs below.
We don't suggest using jspm anymore now that async / await are part of the standard.
15.1. Blocking I/O versus Asynchronous I/O in JavaScript
JavaScript is single-threaded by design. That means, if a program is actively waiting for the result of a network-based operation such as reading from a sensor, the whole program is blocked. In browser environments, this can even completely freeze the user interface. For this reason, the use of blocking I/O in JavaScript is strongly discouraged nowadays, and blocking network APIs are getting deprecated everywhere.
Instead of using parallel threads, JavaScript relies on asynchronous I/O to handle operations with a possible long timeout: whenever a long I/O call needs to be performed, it is only triggered and but then the code execution flow is terminated. The JavaScript engine is therefore free to handle other pending tasks, such as UI. Whenever the pending I/O call is completed, the system invokes a callback function with the result of the I/O call to resume execution of the original execution flow.
When used with plain callback functions, as pervasive in Node.js libraries, asynchronous I/O tend to produce code with poor readability, as the execution flow is broken into many disconnected callback functions. Fortunately, new methods have emerged recently to improve that situation. In particular, the use of Promise objects to abstract and work with asynchronous tasks helps a lot. Any function that makes a long I/O operation can return a Promise, which can be used by the caller to chain subsequent operations in the same flow. Promises are part of EcmaScript 2015 standard.
Promise objects are good, but what makes them even better is the new async / await keywords to handle asynchronous I/O:
- a function declared async will automatically encapsulate its result as a Promise
- within an async function, any function call prefixed with by await will chain the Promise returned by the function with a promise to resume execution of the caller
- any exception during the execution of an async function will automatically invoke the Promise failure continuation
Long story made short, async and await make it possible to write EcmaScript code with all benefits of asynchronous I/O, but without breaking the code flow. It is almost like multi-threaded execution, except that control switch between pending tasks only happens at places where the await keyword appears.
We have therefore chosen to write our new EcmaScript library using Promises and async functions, so that you can use the friendly await syntax. To keep it easy to remember, all public methods of the EcmaScript library are async, i.e. return a Promise object, except:
- GetTickCount(), because returning a time stamp asynchronously does not make sense...
- FindModule(), FirstModule(), nextModule(), ... because device detection and enumeration always work on internal device lists handled in background, and does not require immediate asynchronous I/O.
15.2. Using Yoctopuce library for JavaScript / EcmaScript 2017
JavaScript is one of those languages which do not generally allow you to directly access the hardware layers of your computer. Therefore the library can only be used to access network-enabled devices (connected through a YoctoHub), or USB devices accessible through Yoctopuce TCP/IP to USB gateway, named VirtualHub.
Go to the Yoctopuce web site and download the following items:
- The Javascript / EcmaScript 2017 programming library35
- VirtualHub36 for Windows, macOS or Linux, depending on your OS
Extract the library files in a folder of your choice, you will find many of examples in it. Connect your modules and start the VirtualHub software. You do not need to install any driver.
Using the official Yoctopuce library for node.js
Start by installing the latest Node.js version (v7.6 or later) on your system. It is very easy. You can download it from the official web site: http://nodejs.org. Make sure to install it fully, including npm, and add it to the system path.
To give it a try, go into one of the example directory (for instance example_nodejs/Doc-Inventory). You will see that it include an application description file (package.json) and a source file (demo.js). To download and setup the libraries needed by this example, just run:
npm install
Once done, you can start the example file using:
node demo.js
Using a local copy of the Yoctopuce library with node.js
If for some reason you need to make changes to the Yoctopuce library, you can easily configure your project to use the local copy in the lib/ subdirectory rather than the official npm package. In order to do so, simply type the following command in your project directory:
npm link ../../lib
Using the Yoctopuce library within a browser (HTML)
For HTML examples, it is even simpler: there is nothing to install. Each example is a single HTML file that you can open in a browser to try it. In this context, loading the Yoctopuce library is no different from any standard HTML script include tag.
Using the Yoctoluce library on older JavaScript engines
If you need to run this library on older JavaScript engines, you can use Babel37 to transpile your code and the library into older JavaScript standards. To install Babel with typical settings, simply use:
npm instal -g babel-cli
npm instal babel-preset-env
You would typically ask Babel to put the transpiled files in another directory, named compat for instance. Your files and all files of the Yoctopuce library should be transpiled, as follow:
babel --presets env demo.js --out-dir compat/
babel --presets env ../../lib --out-dir compat/
Although this approach is based on node.js toolchain, it actually works as well for transpiling JavaScript files for use in a browser. The only thing that you cannot do so easily is transpiling JavaScript code embedded directly in an HTML page. You have to use an external script file for using EcmaScript 2017 syntax with Babel.
Babel has many smart features, such as a watch mode that will automatically refresh transpiled files whenever the source file is changed, but this is beyond the scope of this note. You will find more in Babel documentation.
Backward-compatibility with the old JavaScript library
This new library is not fully backward-compatible with the old JavaScript library, because there is no way to transparently map the old blocking API to the new asynchronous API. The method names however are the same, and old synchronous code can easily be made asynchronous just by adding the proper await keywords before the method calls. For instance, simply replace:
beaconState = module.get_beacon();
by
beaconState = await module.get_beacon();
Apart from a few exceptions, most XXX_async redundant methods have been removed as well, as they would have introduced confusion on the proper way of handling asynchronous behaviors. It is however very simple to get an async method to invoke a callback upon completion, using the returned Promise object. For instance, you can replace:
module.get_beacon_async(callback, myContext);
by
module.get_beacon().then(function(res) { callback(myContext, module, res); });
In some cases, it might be desirable to get a sensor value using a method identical to the old synchronous methods (without using Promises), even if it returns a slightly outdated cached value since I/O is not possible. For this purpose, the EcmaScript library introduce new classes called synchronous proxies. A synchronous proxy is an object that mirrors the most recent state of the connected class, but can be read using regular synchronous function calls. For instance, instead of writing:
async function logInfo(module)
{
console.log('Name: '+await module.get_logicalName());
console.log('Beacon: '+await module.get_beacon());
}
...
logInfo(myModule);
...
you can use:
function logInfoProxy(moduleSyncProxy)
{
console.log('Name: '+moduleProxy.get_logicalName());
console.log('Beacon: '+moduleProxy.get_beacon());
}
logInfoSync(await myModule.get_syncProxy());
You can also rewrite this last asynchronous call as:
myModule.get_syncProxy().then(logInfoProxy);
15.3. Control of the Temperature function
A few lines of code are enough to use a Yocto-Thermocouple. Here is the skeleton of a JavaScript code snippet to use the Temperature function.
// For Node.js, we use function require()
// For HTML, we would use <script src="...">
require('yoctolib-es2017/yocto_api.js');
require('yoctolib-es2017/yocto_temperature.js');
[...]
// Get access to your device, through the VirtualHub running locally
await YAPI.RegisterHub('127.0.0.1');
[...]
// Retrieve the object used to interact with the device
var temperature = YTemperature.FindTemperature("THRMCPL1-123456.temperature");
// Check that the module is online to handle hot-plug
if(await temperature.isOnline())
{
// Use temperature.get_currentValue()
[...]
}
Let us look at these lines in more details.
yocto_api and yocto_temperature import
These two import provide access to functions allowing you to manage Yoctopuce modules. yocto_api is always needed, yocto_temperature is necessary to manage modules containing a temperature sensor, such as Yocto-Thermocouple. Other imports can be useful in other cases, such as YModule which can let you enumerate any type of Yoctopuce device.
YAPI.RegisterHub
The RegisterHub method allows you to indicate on which machine the Yoctopuce modules are located, more precisely on which machine the VirtualHub software is running. In our case, the 127.0.0.1:4444 address indicates the local machine, port 4444 (the standard port used by Yoctopuce). You can very well modify this address, and enter the address of another machine on which the VirtualHub software is running, or of a YoctoHub. If the host cannot be reached, this function will trigger an exception.
YTemperature.FindTemperature
The FindTemperature method allows you to find a temperature sensor from the serial number of the module on which it resides and from its function name. You can also use logical names, as long as you have initialized them. Let us imagine a Yocto-Thermocouple module with serial number THRMCPL1-123456 which you have named "MyModule", and for which you have given the temperature function the name "MyFunction". The following five calls are strictly equivalent, as long as "MyFunction" is defined only once.
temperature = YTemperature.FindTemperature("THRMCPL1-123456.temperature")
temperature = YTemperature.FindTemperature("THRMCPL1-123456.MaFonction")
temperature = YTemperature.FindTemperature("MonModule.temperature")
temperature = YTemperature.FindTemperature("MonModule.MaFonction")
temperature = YTemperature.FindTemperature("MaFonction")
YTemperature.FindTemperature returns an object which you can then use at will to control the temperature sensor.
isOnline
The isOnline() method of the object returned by FindTemperature allows you to know if the corresponding module is present and in working order.
get_currentValue
The get_currentValue() method of the object returned by YTemperature.FindTemperature provides the temperature currently measured by the sensor. The value returned is a floating number, equal to the current number of Celsius degrees.
A real example, for Node.js
Open a command window (a terminal, a shell...) and go into the directory example_nodejs/Doc-GettingStarted-Yocto-Thermocouple within Yoctopuce library for JavaScript / EcmaScript 2017. In there, you will find a file named demo.js with the sample code below, which uses the functions explained above, but this time used with all side materials needed to make it work nicely as a small demo.
If your Yocto-Thermocouple is not connected on the host running the browser, replace in the example the address 127.0.0.1 with the IP address of the host on which the Yocto-Thermocouple is connected and where you run the VirtualHub.
require('yoctolib-es2017/yocto_api.js');
require('yoctolib-es2017/yocto_temperature.js');
let temp1, temp2;
async function startDemo()
{
await YAPI.LogUnhandledPromiseRejections();
await YAPI.DisableExceptions();
// Setup the API to use the VirtualHub on local machine
let errmsg = new YErrorMsg();
if(await YAPI.RegisterHub('127.0.0.1', errmsg) != YAPI.SUCCESS) {
console.log('Cannot contact VirtualHub on 127.0.0.1: '+errmsg.msg);
return;
}
// Select specified device, or use first available one
let serial = process.argv[process.argv.length-1];
if(serial[8] != '-') {
// by default use any connected module suitable for the demo
let anysensor = YTemperature.FirstTemperature();
if(anysensor) {
let module = await anysensor.module();
serial = await module.get_serialNumber();
} else {
console.log('No matching sensor connected, check cable !');
return;
}
}
console.log('Using device '+serial);
temp1 = YTemperature.FindTemperature(serial+".temperature1");
temp2 = YTemperature.FindTemperature(serial+".temperature2");
refresh();
}
async function refresh()
{
if (await temp1.isOnline()) {
console.log('Temperature 1 : '+(await temp1.get_currentValue()) + (await temp1.get_unit()));
console.log('Temperature 2 : '+(await temp2.get_currentValue()) + (await temp2.get_unit()));
} else {
console.log('Module not connected');
}
setTimeout(refresh, 500);
}
startDemo();
As explained at the beginning of this chapter, you need to have Node.js v7.6 or later installed to try this example. When done, you can type the following two commands to automatically download and install the dependencies for building this example:
npm install
node demo.js [...]
Same example, but this time running in a browser
If you want to see how to use the library within a browser rather than with Node.js, switch to the directory example_html/Doc-GettingStarted-Yocto-Thermocouple. You will find there a single HTML file, with a JavaScript section similar to the code above, but with a few changes since it has to interact through an HTML page rather than through the JavaScript console.
<html>
<head>
<meta charset="UTF-8">
<title>Hello World</title>
<script src="../../lib/yocto_api.js"></script>
<script src="../../lib/yocto_temperature.js"></script>
<script>
async function startDemo()
{
await YAPI.LogUnhandledPromiseRejections();
await YAPI.DisableExceptions();
// Setup the API to use the VirtualHub on local machine
let errmsg = new YErrorMsg();
if(await YAPI.RegisterHub('127.0.0.1', errmsg) != YAPI.SUCCESS) {
alert('Cannot contact VirtualHub on 127.0.0.1: '+errmsg.msg);
}
refresh();
}
async function refresh()
{
let serial = document.getElementById('serial').value;
if(serial == '') {
// by default use any connected module suitable for the demo
let anysensor = YTemperature.FirstTemperature();
if(anysensor) {
let module = await anysensor.module();
serial = await module.get_serialNumber();
document.getElementById('serial').value = serial;
}
}
let temp1 = YTemperature.FindTemperature(serial+".temperature1");
let temp2 = YTemperature.FindTemperature(serial+".temperature2");
if (await temp1.isOnline()) {
document.getElementById('msg').value = '';
document.getElementById("temp1").value = (await temp1.get_currentValue()) + (await temp1.get_unit());
document.getElementById("temp2").value = (await temp2.get_currentValue()) + (await temp2.get_unit());
} else {
document.getElementById('msg').value = 'Module not connected';
}
setTimeout(refresh, 500);
}
startDemo();
</script>
</head>
<body>
Module to use: <input id='serial'>
<input id='msg' style='color:red;border:none;' readonly><br>
temperature 1 : <input id='temp1' readonly><br>
temperature 2 : <input id='temp2' readonly><br>
</body>
</html>
No installation is needed to run this example, all you have to do is open the HTML file using a web browser,
15.4. Control of the module part
Each module can be controlled in a similar manner, you can find below a simple sample program displaying the main parameters of the module and enabling you to activate the localization beacon.
require('yoctolib-es2017/yocto_api.js');
async function startDemo(args)
{
await YAPI.LogUnhandledPromiseRejections();
// Setup the API to use the VirtualHub on local machine
let errmsg = new YErrorMsg();
if(await YAPI.RegisterHub('127.0.0.1', errmsg) != YAPI.SUCCESS) {
console.log('Cannot contact VirtualHub on 127.0.0.1: '+errmsg.msg);
return;
}
// Select the relay to use
let module = YModule.FindModule(args[0]);
if(await module.isOnline()) {
if(args.length > 1) {
if(args[1] == 'ON') {
await module.set_beacon(YModule.BEACON_ON);
} else {
await module.set_beacon(YModule.BEACON_OFF);
}
}
console.log('serial: '+await module.get_serialNumber());
console.log('logical name: '+await module.get_logicalName());
console.log('luminosity: '+await module.get_luminosity()+'%');
console.log('beacon: '+(await module.get_beacon()==YModule.BEACON_ON?'ON':'OFF'));
console.log('upTime: '+parseInt(await module.get_upTime()/1000)+' sec');
console.log('USB current: '+await module.get_usbCurrent()+' mA');
console.log('logs:');
console.log(await module.get_lastLogs());
} else {
console.log("Module not connected (check identification and USB cable)\n");
}
await YAPI.FreeAPI();
}
if(process.argv.length < 2) {
console.log("usage: node demo.js <serial or logicalname> [ ON | OFF ]");
} else {
startDemo(process.argv.slice(2));
}
Each property xxx of the module can be read thanks to a method of type get_xxxx(), and properties which are not read-only can be modified with the help of the set_xxx() method. For more details regarding the used functions, refer to the API chapters.
Changing the module settings
When you want to modify the settings of a module, you only need to call the corresponding set_xxx() function. However, this modification is performed only in the random access memory (RAM) of the module: if the module is restarted, the modifications are lost. To memorize them persistently, it is necessary to ask the module to save its current configuration in its permanent memory. To do so, use the saveToFlash() method. Inversely, it is possible to force the module to forget its current settings by using the revertFromFlash() method. The short example below allows you to modify the logical name of a module.
require('yoctolib-es2017/yocto_api.js');
async function startDemo(args)
{
await YAPI.LogUnhandledPromiseRejections();
// Setup the API to use the VirtualHub on local machine
let errmsg = new YErrorMsg();
if(await YAPI.RegisterHub('127.0.0.1', errmsg) != YAPI.SUCCESS) {
console.log('Cannot contact VirtualHub on 127.0.0.1: '+errmsg.msg);
return;
}
// Select the relay to use
let module = YModule.FindModule(args[0]);
if(await module.isOnline()) {
if(args.length > 1) {
let newname = args[1];
if (!await YAPI.CheckLogicalName(newname)) {
console.log("Invalid name (" + newname + ")");
process.exit(1);
}
await module.set_logicalName(newname);
await module.saveToFlash();
}
console.log('Current name: '+await module.get_logicalName());
} else {
console.log("Module not connected (check identification and USB cable)\n");
}
await YAPI.FreeAPI();
}
if(process.argv.length < 2) {
console.log("usage: node demo.js <serial> [newLogicalName]");
} else {
startDemo(process.argv.slice(2));
}
Warning: the number of write cycles of the nonvolatile memory of the module is limited. When this limit is reached, nothing guaranties that the saving process is performed correctly. This limit, linked to the technology employed by the module micro-processor, is located at about 100000 cycles. In short, you can use the saveToFlash() function only 100000 times in the life of the module. Make sure you do not call this function within a loop.
Listing the modules
Obtaining the list of the connected modules is performed with the YModule.FirstModule() function which returns the first module found. Then, you only need to call the nextModule() function of this object to find the following modules, and this as long as the returned value is not null. Below a short example listing the connected modules.
require('yoctolib-es2017/yocto_api.js');
async function startDemo()
{
await YAPI.LogUnhandledPromiseRejections();
await YAPI.DisableExceptions();
// Setup the API to use the VirtualHub on local machine
let errmsg = new YErrorMsg();
if (await YAPI.RegisterHub('127.0.0.1', errmsg) != YAPI.SUCCESS) {
console.log('Cannot contact VirtualHub on 127.0.0.1');
return;
}
refresh();
}
async function refresh()
{
try {
let errmsg = new YErrorMsg();
await YAPI.UpdateDeviceList(errmsg);
let module = YModule.FirstModule();
while(module) {
let line = await module.get_serialNumber();
line += '(' + (await module.get_productName()) + ')';
console.log(line);
module = module.nextModule();
}
setTimeout(refresh, 500);
} catch(e) {
console.log(e);
}
}
try {
startDemo();
} catch(e) {
console.log(e);
}
15.5. Error handling
When you implement a program which must interact with USB modules, you cannot disregard error handling. Inevitably, there will be a time when a user will have unplugged the device, either before running the software, or even while the software is running. The Yoctopuce library is designed to help you support this kind of behavior, but your code must nevertheless be conceived to interpret in the best possible way the errors indicated by the library.
The simplest way to work around the problem is the one used in the short examples provided in this chapter: before accessing a module, check that it is online with the isOnline function, and then hope that it will stay so during the fraction of a second necessary for the following code lines to run. This method is not perfect, but it can be sufficient in some cases. You must however be aware that you cannot completely exclude an error which would occur after the call to isOnline and which could crash the software. The only way to prevent this is to implement one of the two error handling techniques described below.
The method recommended by most programming languages for unpredictable error handling is the use of exceptions. By default, it is the behavior of the Yoctopuce library. If an error happens while you try to access a module, the library throws an exception. In this case, there are three possibilities:
- If your code catches the exception and handles it, everything goes well.
- If your program is running in debug mode, you can relatively easily determine where the problem happened and view the explanatory message linked to the exception.
- Otherwise... the exception makes your program crash, bang!
As this latest situation is not the most desirable, the Yoctopuce library offers another possibility for error handling, allowing you to create a robust program without needing to catch exceptions at every line of code. You simply need to call the YAPI.DisableExceptions() function to commute the library to a mode where exceptions for all the functions are systematically replaced by specific return values, which can be tested by the caller when necessary. For each function, the name of each return value in case of error is systematically documented in the library reference. The name always follows the same logic: a get_state() method returns a ClassName.STATE_INVALID value, a get_currentValue method returns a ClassName.CURRENTVALUE_INVALID value, and so on. In any case, the returned value is of the expected type and is not a null pointer which would risk crashing your program. At worst, if you display the value without testing it, it will be outside the expected bounds for the returned value. In the case of functions which do not normally return information, the return value is YAPI_SUCCESS if everything went well, and a different error code in case of failure.
When you work without exceptions, you can obtain an error code and an error message explaining the source of the error. You can request them from the object which returned the error, calling the errType() and errMessage() methods. Their returned values contain the same information as in the exceptions when they are active.
16. Using Yocto-Thermocouple with PHP
PHP is, like Javascript, an atypical language when interfacing with hardware is at stakes. Nevertheless, using PHP with Yoctopuce modules provides you with the opportunity to very easily create web sites which are able to interact with their physical environment, and this is not available to every web server. This technique has a direct application in home automation: a few Yoctopuce modules, a PHP server, and you can interact with your home from anywhere on the planet, as long as you have an internet connection.
PHP is one of those languages which do not allow you to directly access the hardware layers of your computer. Therefore you need to run VirtualHub on the machine on which your modules are connected.
To start your tests with PHP, you need a PHP 7.1 (or more recent) server38, preferably locally on you machine. If you wish to use the PHP server of your internet provider, it is possible, but you will probably need to configure your ADSL router for it to accept and forward TCP request on the 4444 port.
16.1. Getting ready
Go to the Yoctopuce web site and download the following items:
Our PHP library is based on PHP 8.x. In other words, our library works perfectly with any version of PHP currently still supported. However, in order not to abandon our customers with older installations, we maintain a version compatible with PHP 7.1. which dates back to 2016.
We also offer a version of the library that follows PSR's recommendations. For simplicity's sake, this version uses the same code as the php8 version, but each class is stored in a separate file. In addition, this version uses a Yoctopuce\YoctoAPI namespace. These changes make our library much easier to use with autoload installations.
Note that the examples in the documentation do not use the PSR version.
In the library archive, there are thus three subdirectories:
- php7
- php8
- phpPSR
Choose the right directory according to the version of the library you wish to use, unzip the files of this directory into a directory of your choice accessible to your web server, plug in your modules, launch VirtualHub, and you are ready to start testing. You do not need to install any driver.
16.2. Control of the Temperature function
A few lines of code are enough to use a Yocto-Thermocouple. Here is the skeleton of a PHP code snipplet to use the Temperature function.
include('yocto_api.php');
include('yocto_temperature.php');
[...]
// Get access to your device, through the VirtualHub running locally
YAPI::RegisterHub('http://127.0.0.1:4444/',$errmsg);
[...]
// Retrieve the object used to interact with the device
$temperature = YTemperature::FindTemperature("THRMCPL1-123456.temperature");
// Check that the module is online to handle hot-plug
if($temperature->isOnline())
{
// Use $temperature->get_currentValue()
[...]
}
Let's look at these lines in more details.
yocto_api.php and yocto_temperature.php
These two PHP includes provides access to the functions allowing you to manage Yoctopuce modules. yocto_api.php must always be included, yocto_temperature.php is necessary to manage modules containing a temperature sensor, such as Yocto-Thermocouple.
YAPI::RegisterHub
The YAPI::RegisterHub function allows you to indicate on which machine the Yoctopuce modules are located, more precisely on which machine the VirtualHub software is running. In our case, the 127.0.0.1:4444 address indicates the local machine, port 4444 (the standard port used by Yoctopuce). You can very well modify this address, and enter the address of another machine on which the VirtualHub software is running.
YTemperature::FindTemperature
The YTemperature::FindTemperature function allows you to find a temperature sensor from the serial number of the module on which it resides and from its function name. You can use logical names as well, as long as you have initialized them. Let us imagine a Yocto-Thermocouple module with serial number THRMCPL1-123456 which you have named "MyModule", and for which you have given the temperature function the name "MyFunction". The following five calls are strictly equivalent, as long as "MyFunction" is defined only once.
$temperature = YTemperature::FindTemperature("THRMCPL1-123456.temperature");
$temperature = YTemperature::FindTemperature("THRMCPL1-123456.MyFunction");
$temperature = YTemperature::FindTemperature("MyModule.temperature");
$temperature = YTemperature::FindTemperature("MyModule.MyFunction");
$temperature = YTemperature::FindTemperature("MyFunction");
YTemperature::FindTemperature returns an object which you can then use at will to control the temperature sensor.
isOnline
The isOnline() method of the object returned by YTemperature::FindTemperature allows you to know if the corresponding module is present and in working order.
get_currentValue
The get_currentValue() method of the object returned by yFindTemperature provides the temperature currently measured by the sensor. The value returned is a floating number, equal to the current number of Celsius degrees.
A real example
Open your preferred text editor41, copy the code sample below, save it with the Yoctopuce library files in a location which is accessible to you web server, then use your preferred web browser to access this page. The code is also provided in the directory Examples/Doc-GettingStarted-Yocto-Thermocouple of the Yoctopuce library.
In this example, you will recognize the functions explained above, but this time used with all side materials needed to make it work nicely as a small demo.
<HEAD>
<TITLE>Hello World</TITLE>
</HEAD>
<BODY>
<?php
include('../../php8/yocto_api.php');
include('../../php8/yocto_temperature.php');
// Use explicit error handling rather than exceptions
YAPI::DisableExceptions();
// Setup the API to use the VirtualHub on local machine
if(YAPI::RegisterHub('http://127.0.0.1:4444/',$errmsg) != YAPI::SUCCESS) {
die("Cannot contact VirtualHub on 127.0.0.1");
}
@$serial = $_GET['serial'];
if ($serial != '') {
// Check if a specified module is available online
$temp = YTemperature::FindTemperature("$serial.temperature1");
if (!$temp->isOnline()) {
die("Module not connected (check serial and USB cable)");
}
} else {
// or use any connected module suitable for the demo
$temp = YTemperature::FirstTemperature();
if(is_null($temp)) {
die("No module connected (check USB cable)");
} else {
$serial = $temp->module()->get_serialnumber();
}
}
Print("Module to use: <input name='serial' value='$serial'><br>");
$temp1 = YTemperature::FindTemperature("$serial.temperature1");
Printf("Temperature channel 1: %.1f °C<br>",$temp1->get_currentValue());
$temp2 = YTemperature::FindTemperature("$serial.temperature2");
Printf("Temperature channel 2: %.1f °C<br>",$temp2->get_currentValue());
YAPI::FreeAPI();
// trigger auto-refresh after one second
Print("<script language='javascript1.5' type='text/JavaScript'>\n");
Print("setTimeout('window.location.reload()',1000);");
Print("</script>\n");
?>
</BODY>
</HTML>
16.3. Control of the module part
Each module can be controlled in a similar manner, you can find below a simple sample program displaying the main parameters of the module and enabling you to activate the localization beacon.
<HEAD>
<TITLE>Module Control</TITLE>
</HEAD>
<BODY>
<FORM method='get'>
<?php
include('../../php8/yocto_api.php');
// Use explicit error handling rather than exceptions
YAPI::DisableExceptions();
// Setup the API to use the VirtualHub on local machine
if(YAPI::RegisterHub('http://127.0.0.1:4444/',$errmsg) != YAPI::SUCCESS) {
die("Cannot contact VirtualHub on 127.0.0.1 : ".$errmsg);
}
@$serial = $_GET['serial'];
if ($serial != '') {
// Check if a specified module is available online
$module = YModule::FindModule("$serial");
if (!$module->isOnline()) {
die("Module not connected (check serial and USB cable)");
}
} else {
// or use any connected module suitable for the demo
$module = YModule::FirstModule();
if($module) { // skip VirtualHub
$module = $module->nextModule();
}
if(is_null($module)) {
die("No module connected (check USB cable)");
} else {
$serial = $module->get_serialnumber();
}
}
Print("Module to use: <input name='serial' value='$serial'><br>");
if (isset($_GET['beacon'])) {
if ($_GET['beacon']=='ON')
$module->set_beacon(Y_BEACON_ON);
else
$module->set_beacon(Y_BEACON_OFF);
}
printf('serial: %s<br>',$module->get_serialNumber());
printf('logical name: %s<br>',$module->get_logicalName());
printf('luminosity: %s<br>',$module->get_luminosity());
print('beacon: ');
if($module->get_beacon() == Y_BEACON_ON) {
printf("<input type='radio' name='beacon' value='ON' checked>ON ");
printf("<input type='radio' name='beacon' value='OFF'>OFF<br>");
} else {
printf("<input type='radio' name='beacon' value='ON'>ON ");
printf("<input type='radio' name='beacon' value='OFF' checked>OFF<br>");
}
printf('upTime: %s sec<br>',intVal($module->get_upTime()/1000));
printf('USB current: %smA<br>',$module->get_usbCurrent());
printf('logs:<br><pre>%s</pre>',$module->get_lastLogs());
YAPI::FreeAPI();
?>
<input type='submit' value='refresh'>
</FORM>
</BODY>
</HTML>
Each property xxx of the module can be read thanks to a method of type get_xxxx(), and properties which are not read-only can be modified with the help of the set_xxx() method. For more details regarding the used functions, refer to the API chapters.
Changing the module settings
When you want to modify the settings of a module, you only need to call the corresponding set_xxx() function. However, this modification is performed only in the random access memory (RAM) of the module: if the module is restarted, the modifications are lost. To memorize them persistently, it is necessary to ask the module to save its current configuration in its permanent memory. To do so, use the saveToFlash() method. Inversely, it is possible to force the module to forget its current settings by using the revertFromFlash() method. The short example below allows you to modify the logical name of a module.
<HEAD>
<TITLE>save settings</TITLE>
<BODY>
<FORM method='get'>
<?php
include('../../php8/yocto_api.php');
// Use explicit error handling rather than exceptions
YAPI::DisableExceptions();
// Setup the API to use the VirtualHub on local machine
if(YAPI::RegisterHub('http://127.0.0.1:4444/',$errmsg) != YAPI::SUCCESS) {
die("Cannot contact VirtualHub on 127.0.0.1");
}
@$serial = $_GET['serial'];
if ($serial != '') {
// Check if a specified module is available online
$module = YModule::FindModule("$serial");
if (!$module->isOnline()) {
die("Module not connected (check serial and USB cable)");
}
} else {
// or use any connected module suitable for the demo
$module = YModule::FirstModule();
if($module) { // skip VirtualHub
$module = $module->nextModule();
}
if(is_null($module)) {
die("No module connected (check USB cable)");
} else {
$serial = $module->get_serialnumber();
}
}
Print("Module to use: <input name='serial' value='$serial'><br>");
if (isset($_GET['newname'])){
$newname = $_GET['newname'];
if (!yCheckLogicalName($newname))
die('Invalid name');
$module->set_logicalName($newname);
$module->saveToFlash();
}
printf("Current name: %s<br>", $module->get_logicalName());
print("New name: <input name='newname' value='' maxlength=19><br>");
YAPI::FreeAPI();
?>
<input type='submit'>
</FORM>
</BODY>
</HTML>
Warning: the number of write cycles of the nonvolatile memory of the module is limited. When this limit is reached, nothing guaranties that the saving process is performed correctly. This limit, linked to the technology employed by the module micro-processor, is located at about 100000 cycles. In short, you can use the saveToFlash() function only 100000 times in the life of the module. Make sure you do not call this function within a loop.
Listing the modules
Obtaining the list of the connected modules is performed with the yFirstModule() function which returns the first module found. Then, you only need to call the nextModule() function of this object to find the following modules, and this as long as the returned value is not NULL. Below a short example listing the connected modules.
<HEAD>
<TITLE>inventory</TITLE>
</HEAD>
<BODY>
<H1>Device list</H1>
<TT>
<?php
include('../../php8/yocto_api.php');
YAPI::RegisterHub("http://127.0.0.1:4444/");
$module = YModule::FirstModule();
while (!is_null($module)) {
printf("%s (%s)<br>\n", $module->get_serialNumber(),
$module->get_productName());
$module=$module->nextModule();
}
YAPI::FreeAPI();
?>
</TT>
</BODY>
</HTML>
16.4. HTTP callback API and NAT filters
The PHP library is able to work in a specific mode called HTTP callback Yocto-API. With this mode, you can control Yoctopuce devices installed behind a NAT filter, such as a DSL router for example, and this without needing to open a port. The typical application is to control Yoctopuce devices, located on a private network, from a public web site.
The NAT filter: advantages and disadvantages
A DSL router which translates network addresses (NAT) works somewhat like a private phone switchboard (a PBX): internal extensions can call each other and call the outside; but seen from the outside, there is only one official phone number, that of the switchboard itself. You cannot reach the internal extensions from the outside.

Typical DSL configuration: LAN machines are isolated from
the outside by the DSL router
Transposed to the network, we have the following: appliances connected to your home automation network can communicate with one another using a local IP address (of the 192.168.xxx.yyy type), and contact Internet servers through their public address. However, seen from the outside, you have only one official IP address, assigned to the DSL router only, and you cannot reach your network appliances directly from the outside. It is rather restrictive, but it is a relatively efficient protection against intrusions.
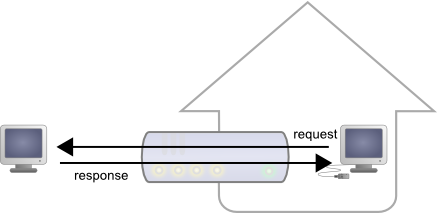
Responses from request from LAN machines are routed.
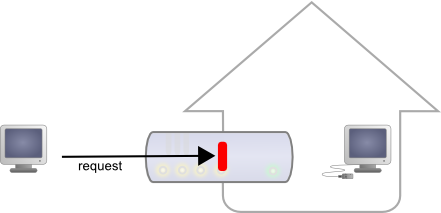
But requests from the outside are blocked.
Seeing Internet without being seen provides an enormous security advantage. However, this signifies that you cannot, a priori, set up your own web server at home to control a home automation installation from the outside. A solution to this problem, advised by numerous home automation system dealers, consists in providing outside visibility to your home automation server itself, by adding a routing rule in the NAT configuration of the DSL router. The issue of this solution is that it exposes the home automation server to external attacks.
The HTTP callback API solves this issue without having to modify the DSL router configuration. The module control script is located on an external site, and it is the VirtualHub which is in charge of calling it a regular intervals.
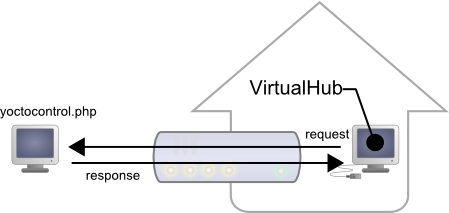
The HTTP callback API uses the VirtualHub which initiates the requests.
Configuration
The callback API thus uses the VirtualHub as a gateway. All the communications are initiated by the VirtualHub. They are thus outgoing communications and therefore perfectly authorized by the DSL router.
You must configure the VirtualHub so that it calls the PHP script on a regular basis. To do so:
- Launch a VirtualHub
- Access its interface, usually 127.0.0.1:4444
- Click on the configure button of the line corresponding to the VirtualHub itself
- Click on the edit button of the Outgoing callbacks section
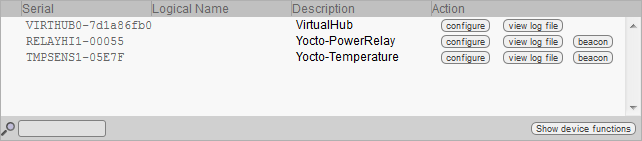
Click on the "configure" button on the first line
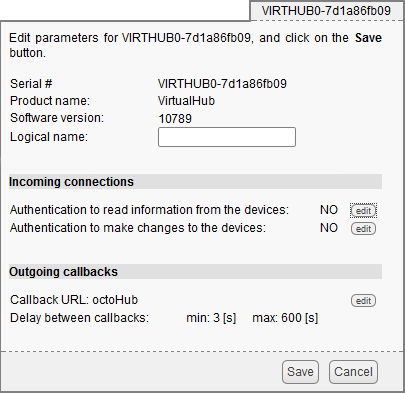
Click on the "edit" button of the "Outgoing callbacks" section
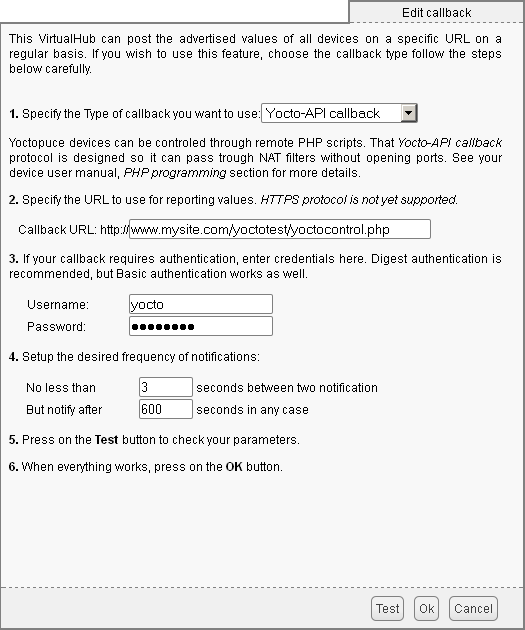
And select "Yocto-API callback".
You then only need to define the URL of the PHP script and, if need be, the user name and password to access this URL. Supported authentication methods are basic and digest. The second method is safer than the first one because it does not allow transfer of the password on the network.
Usage
From the programmer standpoint, the only difference is at the level of the yRegisterHub function call. Instead of using an IP address, you must use the callback string (or http://callback which is equivalent).
include("yocto_api.php");
yRegisterHub("callback");
The remainder of the code stays strictly identical. On the VirtualHub interface, at the bottom of the configuration window for the HTTP callback API , there is a button allowing you to test the call to the PHP script.
Be aware that the PHP script controlling the modules remotely through the HTTP callback API can be called only by the VirtualHub. Indeed, it requires the information posted by the VirtualHub to function. To code a web site which controls Yoctopuce modules interactively, you must create a user interface which stores in a file or in a database the actions to be performed on the Yoctopuce modules. These actions are then read and run by the control script.
Common issues
For the HTTP callback API to work, the PHP option allow_url_fopen
must be set. Some web site hosts do not set it by default.
The problem then manifests itself with the following error:
error: URL file-access is disabled in the server configuration
To set this option, you must create, in the repertory where the
control PHP script is located, an .htaccess file containing the
following line:
php_flag "allow_url_fopen" "On"
Depending on the security policies of the host, it is sometimes impossible
to authorize this option at the root of the web site, or even to
install PHP scripts receiving data from a POST HTTP. In this case, place
the PHP script in a subdirectory.
Limitations
This method that allows you to go through NAT filters cheaply has nevertheless a price. Communications being initiated by the VirtualHub at a more or less regular interval, reaction time to an event is clearly longer than if the Yoctopuce modules were driven directly. You can configure the reaction time in the specific window of the VirtualHub, but it is at least of a few seconds in the best case.
The HTTP callback Yocto-API mode is currently available in PHP, EcmaScript (Node.JS) and Java only.
16.5. Error handling
When you implement a program which must interact with USB modules, you cannot disregard error handling. Inevitably, there will be a time when a user will have unplugged the device, either before running the software, or even while the software is running. The Yoctopuce library is designed to help you support this kind of behavior, but your code must nevertheless be conceived to interpret in the best possible way the errors indicated by the library.
The simplest way to work around the problem is the one used in the short examples provided in this chapter: before accessing a module, check that it is online with the isOnline function, and then hope that it will stay so during the fraction of a second necessary for the following code lines to run. This method is not perfect, but it can be sufficient in some cases. You must however be aware that you cannot completely exclude an error which would occur after the call to isOnline and which could crash the software. The only way to prevent this is to implement one of the two error handling techniques described below.
The method recommended by most programming languages for unpredictable error handling is the use of exceptions. By default, it is the behavior of the Yoctopuce library. If an error happens while you try to access a module, the library throws an exception. In this case, there are three possibilities:
- If your code catches the exception and handles it, everything goes well.
- If your program is running in debug mode, you can relatively easily determine where the problem happened and view the explanatory message linked to the exception.
- Otherwise... the exception makes your program crash, bang!
As this latest situation is not the most desirable, the Yoctopuce library offers another possibility for error handling, allowing you to create a robust program without needing to catch exceptions at every line of code. You simply need to call the YAPI.DisableExceptions() function to commute the library to a mode where exceptions for all the functions are systematically replaced by specific return values, which can be tested by the caller when necessary. For each function, the name of each return value in case of error is systematically documented in the library reference. The name always follows the same logic: a get_state() method returns a ClassName.STATE_INVALID value, a get_currentValue method returns a ClassName.CURRENTVALUE_INVALID value, and so on. In any case, the returned value is of the expected type and is not a null pointer which would risk crashing your program. At worst, if you display the value without testing it, it will be outside the expected bounds for the returned value. In the case of functions which do not normally return information, the return value is YAPI_SUCCESS if everything went well, and a different error code in case of failure.
When you work without exceptions, you can obtain an error code and an error message explaining the source of the error. You can request them from the object which returned the error, calling the errType() and errMessage() methods. Their returned values contain the same information as in the exceptions when they are active.
17. Using Yocto-Thermocouple with Visual Basic .NET
VisualBasic has long been the most favored entrance path to the Microsoft world. Therefore, we had to provide our library for this language, even if the new trend is shifting to C#. We support Visual Studio 2017 and its more recent versions.
17.1. Installation
Download the Visual Basic Yoctopuce library from the Yoctopuce web site42. There is no setup program, simply copy the content of the zip file into the directory of your choice. You mostly need the content of the Sources directory. The other directories contain the documentation and a few sample programs. All sample projects are Visual Basic 2010, projects, if you are using a previous version, you may have to recreate the projects structure from scratch.
17.2. Using the Yoctopuce API in a Visual Basic project
The Visual Basic.NET Yoctopuce library is composed of a DLL and of source files in Visual Basic. The DLL is not a .NET DLL, but a classic DLL, written in C, which manages the low level communications with the modules43. The source files in Visual Basic manage the high level part of the API. Therefore, your need both this DLL and the .vb files of the sources directory to create a project managing Yoctopuce modules.
Configuring a Visual Basic project
The following indications are provided for Visual Studio Express 2010, but the process is similar for other versions. Start by creating your project. Then, on the Solution Explorer panel, right click on your project, and select "Add" and then "Add an existing item".
A file selection window opens. Select the yocto_api.vb file and the files corresponding to the functions of the Yoctopuce modules that your project is going to manage. If in doubt, select all the files.
You then have the choice between simply adding these files to your project, or to add them as links (the Add button is in fact a scroll-down menu). In the first case, Visual Studio copies the selected files into your project. In the second case, Visual Studio simply keeps a link on the original files. We recommend you to use links, which makes updates of the library much easier.
Then add in the same manner the yapi.dll DLL, located in the Sources/dll directory44. Then, from the Solution Explorer window, right click on the DLL, select Properties and in the Properties panel, set the Copy to output folder to always. You are now ready to use your Yoctopuce modules from Visual Studio.
In order to keep them simple, all the examples provided in this documentation are console applications. Naturally, the libraries function in a strictly identical manner if you integrate them in an application with a graphical interface.
17.3. Control of the Temperature function
A few lines of code are enough to use a Yocto-Thermocouple. Here is the skeleton of a Visual Basic code snipplet to use the Temperature function.
[...]
' Enable detection of USB devices
Dim errmsg As String errmsg
YAPI.RegisterHub("usb", errmsg)
[...]
' Retrieve the object used to interact with the device
Dim temperature As YTemperature
temperature = YTemperature.FindTemperature("THRMCPL1-123456.temperature")
' Hot-plug is easy: just check that the device is online
If (temperature.isOnline()) Then
' Use temperature.get_currentValue()
[...]
End If
[...]
Let's look at these lines in more details.
YAPI.RegisterHub
The YAPI.RegisterHub function initializes the Yoctopuce API and indicates where the modules should be looked for. When used with the parameter "usb", it will use the modules locally connected to the computer running the library. If the initialization does not succeed, this function returns a value different from YAPI_SUCCESS and errmsg contains the error message.
YTemperature.FindTemperature
The YTemperature.FindTemperature function allows you to find a temperature sensor from the serial number of the module on which it resides and from its function name. You can use logical names as well, as long as you have initialized them. Let us imagine a Yocto-Thermocouple module with serial number THRMCPL1-123456 which you have named "MyModule", and for which you have given the temperature function the name "MyFunction". The following five calls are strictly equivalent, as long as "MyFunction" is defined only once.
temperature = YTemperature.FindTemperature("THRMCPL1-123456.temperature")
temperature = YTemperature.FindTemperature("THRMCPL1-123456.MyFunction")
temperature = YTemperature.FindTemperature("MyModule.temperature")
temperature = YTemperature.FindTemperature("MyModule.MyFunction")
temperature = YTemperature.FindTemperature("MyFunction")
YTemperature.FindTemperature returns an object which you can then use at will to control the temperature sensor.
isOnline
The isOnline() method of the object returned by YTemperature.FindTemperature allows you to know if the corresponding module is present and in working order.
get_currentValue
The get_currentValue() method of the object returned by yFindTemperature provides the temperature currently measured by the sensor. The value returned is a floating number, equal to the current number of Celsius degrees.
A real example
Launch Microsoft VisualBasic and open the corresponding sample project provided in the directory Examples/Doc-GettingStarted-Yocto-Thermocouple of the Yoctopuce library.
In this example, you will recognize the functions explained above, but this time used with all side materials needed to make it work nicely as a small demo.
Private Sub Usage()
Dim execname = System.AppDomain.CurrentDomain.FriendlyName
Console.WriteLine("Usage:")
Console.WriteLine(execname + " <serial_number>")
Console.WriteLine(execname + " <logical_name>")
Console.WriteLine(execname + " any ")
System.Threading.Thread.Sleep(2500)
End
End Sub
Sub Main()
Dim argv() As String = System.Environment.GetCommandLineArgs()
Dim errmsg As String = ""
Dim target, serial As String
Dim tsensor, ch1, ch2 As YTemperature
If argv.Length < 2 Then Usage()
target = argv(1)
REM Setup the API to use local USB devices
If (YAPI.RegisterHub("usb", errmsg) <> YAPI_SUCCESS) Then
Console.WriteLine("RegisterHub error: " + errmsg)
End
End If
If target = "any" Then
tsensor = YTemperature.FirstTemperature()
If tsensor Is Nothing Then
Console.WriteLine("No module connected (check USB cable) ")
End
End If
Console.WriteLine("using:" + tsensor.get_module().get_serialNumber())
Else
tsensor = YTemperature.FindTemperature(target + ".temperature1")
End If
REM retreive module serial number
serial = tsensor.get_module().get_serialNumber()
REM retreive both channels
ch1 = YTemperature.FindTemperature(serial + ".temperature1")
ch2 = YTemperature.FindTemperature(serial + ".temperature2")
While (True)
If Not (tsensor.isOnline()) Then
Console.WriteLine("Module not connected (check identification and USB cable)")
End
End If
Console.Write("channel 1: " + Str(ch1.get_currentValue()) + " °C ")
Console.Write("channel 2: " + Str(ch2.get_currentValue()) + " °C ")
Console.WriteLine(" (press Ctrl-C to exit)")
YAPI.Sleep(1000, errmsg)
End While
YAPI.FreeAPI()
End Sub
End Module
17.4. Control of the module part
Each module can be controlled in a similar manner, you can find below a simple sample program displaying the main parameters of the module and enabling you to activate the localization beacon.
Imports System.IO
Imports System.Environment
Module Module1
Sub usage()
Console.WriteLine("usage: demo <serial or logical name> [ON/OFF]")
End
End Sub
Sub Main()
Dim argv() As String = System.Environment.GetCommandLineArgs()
Dim errmsg As String = ""
Dim m As ymodule
If (YAPI.RegisterHub("usb", errmsg) <> YAPI_SUCCESS) Then
Console.WriteLine("RegisterHub error:" + errmsg)
End
End If
If argv.Length < 2 Then usage()
m = YModule.FindModule(argv(1)) REM use serial or logical name
If (m.isOnline()) Then
If argv.Length > 2 Then
If argv(2) = "ON" Then m.set_beacon(Y_BEACON_ON)
If argv(2) = "OFF" Then m.set_beacon(Y_BEACON_OFF)
End If
Console.WriteLine("serial: " + m.get_serialNumber())
Console.WriteLine("logical name: " + m.get_logicalName())
Console.WriteLine("luminosity: " + Str(m.get_luminosity()))
Console.Write("beacon: ")
If (m.get_beacon() = Y_BEACON_ON) Then
Console.WriteLine("ON")
Else
Console.WriteLine("OFF")
End If
Console.WriteLine("upTime: " + Str(m.get_upTime() / 1000) + " sec")
Console.WriteLine("USB current: " + Str(m.get_usbCurrent()) + " mA")
Console.WriteLine("Logs:")
Console.WriteLine(m.get_lastLogs())
Else
Console.WriteLine(argv(1) + " not connected (check identification and USB cable)")
End If
YAPI.FreeAPI()
End Sub
End Module
Each property xxx of the module can be read thanks to a method of type get_xxxx(), and properties which are not read-only can be modified with the help of the set_xxx() method. For more details regarding the used functions, refer to the API chapters.
Changing the module settings
When you want to modify the settings of a module, you only need to call the corresponding set_xxx() function. However, this modification is performed only in the random access memory (RAM) of the module: if the module is restarted, the modifications are lost. To memorize them persistently, it is necessary to ask the module to save its current configuration in its permanent memory. To do so, use the saveToFlash() method. Inversely, it is possible to force the module to forget its current settings by using the revertFromFlash() method. The short example below allows you to modify the logical name of a module.
Sub usage()
Console.WriteLine("usage: demo <serial or logical name> <new logical name>")
End
End Sub
Sub Main()
Dim argv() As String = System.Environment.GetCommandLineArgs()
Dim errmsg As String = ""
Dim newname As String
Dim m As YModule
If (argv.Length <> 3) Then usage()
REM Setup the API to use local USB devices
If YAPI.RegisterHub("usb", errmsg) <> YAPI_SUCCESS Then
Console.WriteLine("RegisterHub error: " + errmsg)
End
End If
m = YModule.FindModule(argv(1)) REM use serial or logical name
If m.isOnline() Then
newname = argv(2)
If (Not YAPI.CheckLogicalName(newname)) Then
Console.WriteLine("Invalid name (" + newname + ")")
End
End If
m.set_logicalName(newname)
m.saveToFlash() REM do not forget this
Console.Write("Module: serial= " + m.get_serialNumber)
Console.Write(" / name= " + m.get_logicalName())
Else
Console.Write("not connected (check identification and USB cable")
End If
YAPI.FreeAPI()
End Sub
End Module
Warning: the number of write cycles of the nonvolatile memory of the module is limited. When this limit is reached, nothing guaranties that the saving process is performed correctly. This limit, linked to the technology employed by the module micro-processor, is located at about 100000 cycles. In short, you can use the saveToFlash() function only 100000 times in the life of the module. Make sure you do not call this function within a loop.
Listing the modules
Obtaining the list of the connected modules is performed with the yFirstModule() function which returns the first module found. Then, you only need to call the nextModule() function of this object to find the following modules, and this as long as the returned value is not Nothing. Below a short example listing the connected modules.
Sub Main()
Dim M As ymodule
Dim errmsg As String = ""
REM Setup the API to use local USB devices
If YAPI.RegisterHub("usb", errmsg) <> YAPI_SUCCESS Then
Console.WriteLine("RegisterHub error: " + errmsg)
End
End If
Console.WriteLine("Device list")
M = YModule.FirstModule()
While M IsNot Nothing
Console.WriteLine(M.get_serialNumber() + " (" + M.get_productName() + ")")
M = M.nextModule()
End While
YAPI.FreeAPI()
End Sub
End Module
17.5. Error handling
When you implement a program which must interact with USB modules, you cannot disregard error handling. Inevitably, there will be a time when a user will have unplugged the device, either before running the software, or even while the software is running. The Yoctopuce library is designed to help you support this kind of behavior, but your code must nevertheless be conceived to interpret in the best possible way the errors indicated by the library.
The simplest way to work around the problem is the one used in the short examples provided in this chapter: before accessing a module, check that it is online with the isOnline function, and then hope that it will stay so during the fraction of a second necessary for the following code lines to run. This method is not perfect, but it can be sufficient in some cases. You must however be aware that you cannot completely exclude an error which would occur after the call to isOnline and which could crash the software. The only way to prevent this is to implement one of the two error handling techniques described below.
The method recommended by most programming languages for unpredictable error handling is the use of exceptions. By default, it is the behavior of the Yoctopuce library. If an error happens while you try to access a module, the library throws an exception. In this case, there are three possibilities:
- If your code catches the exception and handles it, everything goes well.
- If your program is running in debug mode, you can relatively easily determine where the problem happened and view the explanatory message linked to the exception.
- Otherwise... the exception makes your program crash, bang!
As this latest situation is not the most desirable, the Yoctopuce library offers another possibility for error handling, allowing you to create a robust program without needing to catch exceptions at every line of code. You simply need to call the YAPI.DisableExceptions() function to commute the library to a mode where exceptions for all the functions are systematically replaced by specific return values, which can be tested by the caller when necessary. For each function, the name of each return value in case of error is systematically documented in the library reference. The name always follows the same logic: a get_state() method returns a ClassName.STATE_INVALID value, a get_currentValue method returns a ClassName.CURRENTVALUE_INVALID value, and so on. In any case, the returned value is of the expected type and is not a null pointer which would risk crashing your program. At worst, if you display the value without testing it, it will be outside the expected bounds for the returned value. In the case of functions which do not normally return information, the return value is YAPI_SUCCESS if everything went well, and a different error code in case of failure.
When you work without exceptions, you can obtain an error code and an error message explaining the source of the error. You can request them from the object which returned the error, calling the errType() and errMessage() methods. Their returned values contain the same information as in the exceptions when they are active.
18. Using Yocto-Thermocouple with Delphi or Lazarus
Delphi is a descendent of Turbo-Pascal. Originally, Delphi was produced by Borland, Embarcadero now edits it. The strength of this language resides in its ease of use, as anyone with some notions of the Pascal language can develop a Windows application in next to no time. Its only disadvantage is to cost something45.
Lazarus46 is a free IDE based on Free-Pascal, it has nothing to envy to Delphi and is available for both Windows and Linux. The Yoctopuce Delphi library is compatible with both Windows and Linux versions of Lazarus
Delphi libraries are provided not as VCL components, but directly as source files. These files are compatible with most Delphi and Lazarus versions. 47
18.1. Preparation
Go to the Yoctopuce web site and download the Yoctopuce Delphi libraries48. Uncompress everything in a directory of your choice.
- With Delphi, add the subdirectory sources in the list of directories of Delphi libraries.49
- With Lazarus, open your project options and add the sources folder to your "other unit files" path. 50.
Windows
With Windows, the Yoctopuce Delphi / Lazarus library uses two dlls yapi.dll (32-bit version) and yapi64.dll (64-bit version). All the applications that you create with Delphi or Lazarus must have access to these DLL. The simplest way to ensure this is to make sure that they are located in the same directory as the executable file of your application. You can find these dlls in the sources/dll folder.
Linux
Under Linux, the Delphi / Lazarus library uses the following lib files:
- libyapi-i386.so for Intel 32-bit systems
- libyapi-amd64.so for Intel 64-bit systems
- libyapi-armhf.so for ARM 32-bit systems
- libyapi-aarch64.so for ARM 64-bit systems
You will find these lib files in the sources/dll folder. You have to make sure that
- Lazarus can find the right .so file at compilation time.
- The executable can find it at execution time.
The simplest way to ensure this is to copy all four .so files into the /usr/lib folder. Alternatively, you can copy them next to your main source file and adjust your LD_LIBRARY_PATH environment variable accordingly.
18.2. About examples
To keep them simple, all the examples provided in this documentation are console applications. Obviously, the libraries work in a strictly identical way with VCL applications.
Note that most of these examples use command line parameters 51.
You will soon notice that the Delphi API defines many functions which return objects. You do not need to deallocate these objects yourself, the API does it automatically at the end of the application.
18.3. Control of the Temperature function
A few lines of code are enough to use a Yocto-Thermocouple. Here is the skeleton of a Delphi code snipplet to use the Temperature function.
uses yocto_api, yocto_temperature;
var errmsg: string;
temperature: TYTemperature;
[...]
// Enable detection of USB devices
yRegisterHub('usb',errmsg)
[...]
// Retrieve the object used to interact with the device
temperature = yFindTemperature("THRMCPL1-123456.temperature")
// Hot-plug is easy: just check that the device is online
if temperature.isOnline() then
begin
// Use temperature.get_currentValue()
[...]
end;
[...]
Let's look at these lines in more details.
yocto_api and yocto_temperature
These two units provide access to the functions allowing you to manage Yoctopuce modules. yocto_api must always be used, yocto_temperature is necessary to manage modules containing a temperature sensor, such as Yocto-Thermocouple.
yRegisterHub
The yRegisterHub function initializes the Yoctopuce API and specifies where the modules should be looked for. When used with the parameter 'usb', it will use the modules locally connected to the computer running the library. If the initialization does not succeed, this function returns a value different from YAPI_SUCCESS and errmsg contains the error message.
yFindTemperature
The yFindTemperature function allows you to find a temperature sensor from the serial number of the module on which it resides and from its function name. You can also use logical names, as long as you have initialized them. Let us imagine a Yocto-Thermocouple module with serial number THRMCPL1-123456 which you have named "MyModule", and for which you have given the temperature function the name "MyFunction". The following five calls are strictly equivalent, as long as "MyFunction" is defined only once.
temperature := yFindTemperature("THRMCPL1-123456.temperature");
temperature := yFindTemperature("THRMCPL1-123456.MyFunction");
temperature := yFindTemperature("MyModule.temperature");
temperature := yFindTemperature("MyModule.MyFunction");
temperature := yFindTemperature("MyFunction");
yFindTemperature returns an object which you can then use at will to control the temperature sensor.
isOnline
The isOnline() method of the object returned by yFindTemperature allows you to know if the corresponding module is present and in working order.
get_currentValue
The get_currentValue() method of the object returned by yFindTemperature provides the temperature currently measured by the sensor. The value returned is a floating number, equal to the current number of Celsius degrees.
A real example
Launch your Delphi environment, copy the yapi.dll DLL in a directory, create a new console application in the same directory, and copy-paste the piece of code below:
In this example, you will recognize the functions explained above, but this time used with all side materials needed to make it work nicely as a small demo.
{$APPTYPE CONSOLE}
uses
SysUtils,
{$IFNDEF UNIX}
windows,
{$ENDIF UNIX}
yocto_api,
yocto_temperature;
Procedure Usage();
var
exe : string;
begin
exe:= ExtractFileName(paramstr(0));
WriteLn(exe+' <serial_number>');
WriteLn(exe+' <logical_name>');
WriteLn(exe+' any');
sleep(3000);
halt;
End;
var
sensor,ch1,ch2 : TYTemperature;
module : TYModule;
errmsg,serial : string;
done : boolean;
begin
if (paramcount<1) then usage();
// Setup the API to use local USB devices
if yRegisterHub('usb', errmsg)<>YAPI_SUCCESS then
begin
Write('RegisterHub error: '+errmsg);
sleep(3000);
halt;
end;
if paramstr(1)='any' then
begin
sensor := yFirstTemperature();
if sensor=nil then
begin
writeln('No module connected (check USB cable)');
sleep(3000);
halt;
end
end
else
sensor:= YFindTemperature(paramstr(1)+'.temperature1');
module:=sensor.get_module();
serial:=module.get_serialNumber();
ch1:=YFindTemperature(serial+'.temperature1');
ch2:=YFindTemperature(serial+'.temperature2');
done:= false;
repeat
if (sensor.isOnline()) then
begin
Write('Channel 1: '+FloatToStr(ch1.get_currentValue())+' C ');
Write('Channel 2: '+FloatToStr(ch2.get_currentValue())+' C ');
Writeln(' (press Ctrl-C to exit)');
Sleep(1000);
end
else
begin
Writeln('Module not connected (check identification and USB cable)');
done := true;
end;
until done;
yFreeAPI();
end.
18.4. Control of the module part
Each module can be controlled in a similar manner, you can find below a simple sample program displaying the main parameters of the module and enabling you to activate the localization beacon.
{$APPTYPE CONSOLE}
uses
SysUtils,
yocto_api;
const
serial = 'THRMCPL1-123456'; // use serial number or logical name
procedure refresh(module:Tymodule) ;
begin
if (module.isOnline()) then
begin
Writeln('');
Writeln('Serial : ' + module.get_serialNumber());
Writeln('Logical name : ' + module.get_logicalName());
Writeln('Luminosity : ' + intToStr(module.get_luminosity()));
Write('Beacon :');
if (module.get_beacon()=Y_BEACON_ON) then Writeln('on')
else Writeln('off');
Writeln('uptime : ' + intToStr(module.get_upTime() div 1000)+'s');
Writeln('USB current : ' + intToStr(module.get_usbCurrent())+'mA');
Writeln('Logs : ');
Writeln(module.get_lastlogs());
Writeln('');
Writeln('r : refresh / b:beacon ON / space : beacon off');
end
else Writeln('Module not connected (check identification and USB cable)');
end;
procedure beacon(module:Tymodule;state:integer);
begin
module.set_beacon(state);
refresh(module);
end;
var
module : TYModule;
c : char;
errmsg : string;
begin
// Setup the API to use local USB devices
if yRegisterHub('usb', errmsg)<>YAPI_SUCCESS then
begin
Write('RegisterHub error: '+errmsg);
exit;
end;
module := yFindModule(serial);
refresh(module);
repeat
read(c);
case c of
'r': refresh(module);
'b': beacon(module,Y_BEACON_ON);
' ': beacon(module,Y_BEACON_OFF);
end;
until c = 'x';
yFreeAPI();
end.
Each property xxx of the module can be read thanks to a method of type get_xxxx(), and properties which are not read-only can be modified with the help of the set_xxx() method. For more details regarding the used functions, refer to the API chapters.
Changing the module settings
When you want to modify the settings of a module, you only need to call the corresponding set_xxx() function. However, this modification is performed only in the random access memory (RAM) of the module: if the module is restarted, the modifications are lost. To memorize them persistently, it is necessary to ask the module to save its current configuration in its permanent memory. To do so, use the saveToFlash() method. Inversely, it is possible to force the module to forget its current settings by using the revertFromFlash() method. The short example below allows you to modify the logical name of a module.
{$APPTYPE CONSOLE}
uses
SysUtils,
yocto_api;
const
serial = 'THRMCPL1-123456'; // use serial number or logical name
var
module : TYModule;
errmsg : string;
newname : string;
begin
// Setup the API to use local USB devices
if yRegisterHub('usb', errmsg)<>YAPI_SUCCESS then
begin
Write('RegisterHub error: '+errmsg);
exit;
end;
module := yFindModule(serial);
if (not(module.isOnline)) then
begin
writeln('Module not connected (check identification and USB cable)');
exit;
end;
Writeln('Current logical name : '+module.get_logicalName());
Write('Enter new name : ');
Readln(newname);
if (not(yCheckLogicalName(newname))) then
begin
Writeln('invalid logical name');
exit;
end;
module.set_logicalName(newname);
module.saveToFlash();
yFreeAPI();
Writeln('logical name is now : '+module.get_logicalName());
end.
Warning: the number of write cycles of the nonvolatile memory of the module is limited. When this limit is reached, nothing guaranties that the saving process is performed correctly. This limit, linked to the technology employed by the module micro-processor, is located at about 100000 cycles. In short, you can use the saveToFlash() function only 100000 times in the life of the module. Make sure you do not call this function within a loop.
Listing the modules
Obtaining the list of the connected modules is performed with the yFirstModule() function which returns the first module found. Then, you only need to call the nextModule() function of this object to find the following modules, and this as long as the returned value is not nil. Below a short example listing the connected modules.
{$APPTYPE CONSOLE}
uses
SysUtils,
yocto_api;
var
module : TYModule;
errmsg : string;
begin
// Setup the API to use local USB devices
if yRegisterHub('usb', errmsg)<>YAPI_SUCCESS then
begin
Write('RegisterHub error: '+errmsg);
exit;
end;
Writeln('Device list');
module := yFirstModule();
while module<>nil do
begin
Writeln( module.get_serialNumber()+' ('+module.get_productName()+')');
module := module.nextModule();
end;
yFreeAPI();
end.
18.5. Error handling
When you implement a program which must interact with USB modules, you cannot disregard error handling. Inevitably, there will be a time when a user will have unplugged the device, either before running the software, or even while the software is running. The Yoctopuce library is designed to help you support this kind of behavior, but your code must nevertheless be conceived to interpret in the best possible way the errors indicated by the library.
The simplest way to work around the problem is the one used in the short examples provided in this chapter: before accessing a module, check that it is online with the isOnline function, and then hope that it will stay so during the fraction of a second necessary for the following code lines to run. This method is not perfect, but it can be sufficient in some cases. You must however be aware that you cannot completely exclude an error which would occur after the call to isOnline and which could crash the software. The only way to prevent this is to implement one of the two error handling techniques described below.
The method recommended by most programming languages for unpredictable error handling is the use of exceptions. By default, it is the behavior of the Yoctopuce library. If an error happens while you try to access a module, the library throws an exception. In this case, there are three possibilities:
- If your code catches the exception and handles it, everything goes well.
- If your program is running in debug mode, you can relatively easily determine where the problem happened and view the explanatory message linked to the exception.
- Otherwise... the exception makes your program crash, bang!
As this latest situation is not the most desirable, the Yoctopuce library offers another possibility for error handling, allowing you to create a robust program without needing to catch exceptions at every line of code. You simply need to call the YAPI.DisableExceptions() function to commute the library to a mode where exceptions for all the functions are systematically replaced by specific return values, which can be tested by the caller when necessary. For each function, the name of each return value in case of error is systematically documented in the library reference. The name always follows the same logic: a get_state() method returns a ClassName.STATE_INVALID value, a get_currentValue method returns a ClassName.CURRENTVALUE_INVALID value, and so on. In any case, the returned value is of the expected type and is not a null pointer which would risk crashing your program. At worst, if you display the value without testing it, it will be outside the expected bounds for the returned value. In the case of functions which do not normally return information, the return value is YAPI_SUCCESS if everything went well, and a different error code in case of failure.
When you work without exceptions, you can obtain an error code and an error message explaining the source of the error. You can request them from the object which returned the error, calling the errType() and errMessage() methods. Their returned values contain the same information as in the exceptions when they are active.
19. Using the Yocto-Thermocouple with Universal Windows Platform
Universal Windows Platform (UWP) is not a language per say, but a software platform created by Microsoft. This platform allows you to run a new type of applications: the universal Windows applications. These applications can work on all machines running under Windows 10. This includes computers, tablets, smart phones, XBox One, and also Windows IoT Core.
The Yoctopuce UWP library allows you to use Yoctopuce modules in a universal Windows application and is written in C# in its entirety. You can add it to a Visual Studio 201752 project.
19.1. Blocking and asynchronous functions
The Universal Windows Platform does not use the Win32 API but only the Windows Runtime API which is available on all the versions of Windows 10 and for any architecture. Thanks to this library, you can use UWP on all the Windows 10 versions, including Windows 10 IoT Core.
However, using the new UWP API has some consequences: the Windows Runtime API to access the USB ports is asynchronous, and therefore the Yoctopuce library must be asynchronous as well. Concretely, the asynchronous methods do not return a result directly but a Task or Task<> object and the result can be obtained later. Fortunately, the C# language, version 6, supports the async and await keywords, which simplifies using these functions enormously. You can thus use asynchronous functions in the same way as traditional functions as long as you respect the following two rules:
- The method is declared as asynchronous with the async keyword
- The await keyword is added when calling an asynchronous function
async Task<int> MyFunction(int val)
{
// do some long computation
...
return result;
}
int res = await MyFunction(1234);
For you not to have to wonder wether a function is asynchronous or not, there is the following convention: all the public methods of the UWP library are asynchronous, that is that you must call them with the await keyword, except:
- GetTickCount(), because measuring time in an asynchronous manner does not make a lot of sense...
- FindModule(), FirstModule(), nextModule(), ... because detecting and enumerating modules is performed as a background task on internal structures which are managed transparently. It is therefore not necessary to use blocking functions while going though the lists of modules.
19.2. Installation
Download the Yoctopuce library for Universal Windows Platform from the Yoctopuce web site53. There is no installation software, simply copy the content of the zip file in a directory of your choice. You essentially need the content of the Sources directory. The other directories contain documentation and a few sample programs. Sample projects are Visual Studio 2017 projects. Visual Studio 2017 is available on the Microsoft web site54.
19.3. Using the Yoctopuce API in a Visual Studio project
Start by creating your project. Then, from the Solution Explorer panel right click on your project and select Add then Existing element .
A file chooser opens: select all the files in the library Sources directory.
You then have the choice between simply adding the files to your project or adding them as a link (the Add button is actually a drop-down menu). In the first case, Visual Studio copies the selected files into your project. In the second case, Visual Studio simply creates a link to the original files. We recommend to use links, as a potential library update is thus much easier.
The Package.appxmanifest file
By default a Universal Windows application doesn't have access rights to the USB ports. If you want to access USB devices, you must imperatively declare it in the Package.appxmanifest file.
Unfortunately, the edition window of this file doesn't allow this operation and you must modify the Package.appxmanifest file by hand. In the "Solution Explorer" panel, right click on the Package.appxmanifest and select "View Code".
In this XML file, we must add a DeviceCapability node in the Capabilities node. This node must have a "Name" attribute with a "humaninterfacedevice" value.
Inside this node, you must declare all the modules that can be used. Concretely, for each module, you must add a "Device" node with an "Id" attribute, which has for value a character string "vidpid:USB_VENDORID USB_DEVICE_ID". The Yoctopuce USB_VENDORID is 24e0 and you can find the USB_DEVICE_ID of each Yoctopuce device in the documentation in the "Characteristics" section. Finally, the "Device" node must contain a "Function" node with the "Type" attribute with a value of "usage:ff00 0001".
For the Yocto-Thermocouple, here is what you must add in the "Capabilities" node:
<DeviceCapability Name="humaninterfacedevice">
<!-- Yocto-Thermocouple -->
<Device Id="vidpid:24e0 0028">
<Function Type="usage:ff00 0001" />
</Device>
</DeviceCapability>
Unfortunately, it's not possible to write a rule authorizing all Yoctopuce modules. Therefore, you must imperatively add each module that you want to use.
19.4. Control of the Temperature function
A few lines of code are enough to use a Yocto-Thermocouple. Here is the skeleton of a C# code snippet to use the Temperature function.
[...]
// Enable detection of USB devices
await YAPI.RegisterHub("usb");
[...]
// Retrieve the object used to interact with the device
YTemperature temperature = YTemperature.FindTemperature("THRMCPL1-123456.temperature");
// Hot-plug is easy: just check that the device is online
if (await temperature.isOnline())
{
// Use temperature.get_currentValue()
[...]
}
[...]
Let us look at these lines in more details.
YAPI.RegisterHub
The YAPI.RegisterHub function initializes the Yoctopuce API and indicates where the modules should be looked for. The parameter is the address of the virtual hub able to see the devices. If the string "usb" is passed as parameter, the API works with modules locally connected to the machine. If the initialization does not succeed, an exception is thrown.
YTemperature.FindTemperature
The YTemperature.FindTemperature function allows you to find a temperature sensor from the serial number of the module on which it resides and from its function name. You can use logical names as well, as long as you have initialized them. Let us imagine a Yocto-Thermocouple module with serial number THRMCPL1-123456 which you have named "MyModule", and for which you have given the temperature function the name "MyFunction". The following five calls are strictly equivalent, as long as "MyFunction" is defined only once.
temperature = YTemperature.FindTemperature("THRMCPL1-123456.temperature");
temperature = YTemperature.FindTemperature("THRMCPL1-123456.MaFonction");
temperature = YTemperature.FindTemperature("MonModule.temperature");
temperature = YTemperature.FindTemperature("MonModule.MaFonction");
temperature = YTemperature.FindTemperature("MaFonction");
YTemperature.FindTemperature returns an object which you can then use at will to control the temperature sensor.
isOnline
The isOnline() method of the object returned by YTemperature.FindTemperature allows you to know if the corresponding module is present and in working order.
get_currentValue
The get_currentValue() method of the object returned by YTemperature.FindTemperature provides the temperature currently measured by the sensor. The value returned is a floating number, equal to the current number of Celsius degrees.
19.5. A real example
Launch Visual Studio and open the corresponding project provided in the directory Examples/Doc-GettingStarted-Yocto-Thermocouple of the Yoctopuce library.
Visual Studio projects contain numerous files, and most of them are not linked to the use of the Yoctopuce library. To simplify reading the code, we regrouped all the code that uses the library in the Demo class, located in the demo.cs file. Properties of this class correspond to the different fields displayed on the screen, and the Run() method contains the code which is run when the "Start" button is pushed.
In this example, you can recognize the functions explained above, but this time used with all the side materials needed to make it work nicely as a small demo.
using System.Diagnostics;
using System.Threading.Tasks;
using Windows.UI.Xaml.Controls;
using com.yoctopuce.YoctoAPI;
namespace Demo
{
public class Demo : DemoBase
{
public string HubURL { get; set; }
public string Target { get; set; }
public override async Task<int> Run()
{
try {
await YAPI.RegisterHub(HubURL);
YTemperature tsensor;
if (Target.ToLower() == "any") {
tsensor = YTemperature.FirstTemperature();
if (tsensor == null) {
WriteLine("No module connected (check USB cable) ");
return -1;
}
Target = await (await tsensor.get_module()).get_serialNumber();
}
WriteLine("Using: " + Target);
// retreive both channels
YTemperature ch1 = YTemperature.FindTemperature(Target + ".temperature1");
YTemperature ch2 = YTemperature.FindTemperature(Target + ".temperature2");
while (await ch2.isOnline()) {
Write("Channel 1 : " + await ch1.get_currentValue() + " °C ");
WriteLine("Channel 2 : " + await ch2.get_currentValue() + " °C ");
await YAPI.Sleep(1000);
}
WriteLine("Module not connected (check identification and USB cable)");
} catch (YAPI_Exception ex) {
WriteLine("error: " + ex.Message);
}
await YAPI.FreeAPI();
return 0;
}
}
}
19.6. Control of the module part
Each module can be controlled in a similar manner, you can find below a simple sample program displaying the main parameters of the module and enabling you to activate the localization beacon.
using System.Diagnostics;
using System.Threading.Tasks;
using Windows.UI.Xaml.Controls;
using com.yoctopuce.YoctoAPI;
namespace Demo
{
public class Demo : DemoBase
{
public string HubURL { get; set; }
public string Target { get; set; }
public bool Beacon { get; set; }
public override async Task<int> Run()
{
YModule m;
string errmsg = "";
if (await YAPI.RegisterHub(HubURL) != YAPI.SUCCESS) {
WriteLine("RegisterHub error: " + errmsg);
return -1;
}
m = YModule.FindModule(Target + ".module"); // use serial or logical name
if (await m.isOnline()) {
if (Beacon) {
await m.set_beacon(YModule.BEACON_ON);
} else {
await m.set_beacon(YModule.BEACON_OFF);
}
WriteLine("serial: " + await m.get_serialNumber());
WriteLine("logical name: " + await m.get_logicalName());
WriteLine("luminosity: " + await m.get_luminosity());
Write("beacon: ");
if (await m.get_beacon() == YModule.BEACON_ON)
WriteLine("ON");
else
WriteLine("OFF");
WriteLine("upTime: " + (await m.get_upTime() / 1000) + " sec");
WriteLine("USB current: " + await m.get_usbCurrent() + " mA");
WriteLine("Logs:\r\n" + await m.get_lastLogs());
} else {
WriteLine(Target + " not connected on" + HubURL +
"(check identification and USB cable)");
}
await YAPI.FreeAPI();
return 0;
}
}
}
Each property xxx of the module can be read thanks to a method of type YModule.get_xxxx(), and properties which are not read-only can be modified with the help of the YModule.set_xxx() method. For more details regarding the used functions, refer to the API chapters.
Changing the module settings
When you want to modify the settings of a module, you only need to call the corresponding YModule.set_xxx() function. However, this modification is performed only in the random access memory (RAM) of the module: if the module is restarted, the modifications are lost. To memorize them persistently, it is necessary to ask the module to save its current configuration in its permanent memory. To do so, use the YModule.saveToFlash() method. Inversely, it is possible to force the module to forget its current settings by using the YModule.revertFromFlash() method. The short example below allows you to modify the logical name of a module.
using System.Diagnostics;
using System.Threading.Tasks;
using Windows.UI.Xaml.Controls;
using com.yoctopuce.YoctoAPI;
namespace Demo
{
public class Demo : DemoBase
{
public string HubURL { get; set; }
public string Target { get; set; }
public string LogicalName { get; set; }
public override async Task<int> Run()
{
try {
YModule m;
await YAPI.RegisterHub(HubURL);
m = YModule.FindModule(Target); // use serial or logical name
if (await m.isOnline()) {
if (!YAPI.CheckLogicalName(LogicalName)) {
WriteLine("Invalid name (" + LogicalName + ")");
return -1;
}
await m.set_logicalName(LogicalName);
await m.saveToFlash(); // do not forget this
Write("Module: serial= " + await m.get_serialNumber());
WriteLine(" / name= " + await m.get_logicalName());
} else {
Write("not connected (check identification and USB cable");
}
} catch (YAPI_Exception ex) {
WriteLine("RegisterHub error: " + ex.Message);
}
await YAPI.FreeAPI();
return 0;
}
}
}
Warning: the number of write cycles of the nonvolatile memory of the module is limited. When this limit is reached, nothing guaranties that the saving process is performed correctly. This limit, linked to the technology employed by the module micro-processor, is located at about 100000 cycles. In short, you can use the YModule.saveToFlash() function only 100000 times in the life of the module. Make sure you do not call this function within a loop.
Listing the modules
Obtaining the list of the connected modules is performed with the YModule.yFirstModule() function which returns the first module found. Then, you only need to call the nextModule() function of this object to find the following modules, and this as long as the returned value is not null. Below a short example listing the connected modules.
using System.Diagnostics;
using System.Threading.Tasks;
using Windows.UI.Xaml.Controls;
using com.yoctopuce.YoctoAPI;
namespace Demo
{
public class Demo : DemoBase
{
public string HubURL { get; set; }
public override async Task<int> Run()
{
YModule m;
try {
await YAPI.RegisterHub(HubURL);
WriteLine("Device list");
m = YModule.FirstModule();
while (m != null) {
WriteLine(await m.get_serialNumber()
+ " (" + await m.get_productName() + ")");
m = m.nextModule();
}
} catch (YAPI_Exception ex) {
WriteLine("Error:" + ex.Message);
}
await YAPI.FreeAPI();
return 0;
}
}
}
19.7. Error handling
When you implement a program which must interact with USB modules, you cannot disregard error handling. Inevitably, there will be a time when a user will have unplugged the device, either before running the software, or even while the software is running. The Yoctopuce library is designed to help you support this kind of behavior, but your code must nevertheless be conceived to interpret in the best possible way the errors indicated by the library.
The simplest way to work around the problem is the one used in the short examples provided in this chapter: before accessing a module, check that it is online with the isOnline function, and then hope that it will stay so during the fraction of a second necessary for the following code lines to run. This method is not perfect, but it can be sufficient in some cases. You must however be aware that you cannot completely exclude an error which would occur after the call to isOnline and which could crash the software.
In the Universal Windows Platform library, error handling is implemented with exceptions. You must therefore intercept and correctly handle these exceptions if you want to have a reliable project which does not crash as soon as you disconnect a module.
Library thrown exceptions are always of the YAPI_Exception type, so you can easily separate them from other exceptions in a try{...} catch{...} block.
Example:
try {
....
} catch (YAPI_Exception ex) {
Debug.WriteLine("Exception from Yoctopuce lib:" + ex.Message);
} catch (Exception ex) {
Debug.WriteLine("Other exceptions :" + ex.Message);
}
20. Using Yocto-Thermocouple with Objective-C
Objective-C is language of choice for programming on macOS, due to its integration with the Cocoa framework. Yoctopuce supports the XCode versions supported by Apple. The Yoctopuce library is ARC compatible. You can therefore implement your projects either using the traditional retain / release method, or using the Automatic Reference Counting.
Yoctopuce Objective-C libraries55 are integrally provided as source files. A section of the low-level library is written in pure C, but you should not need to interact directly with it: everything was done to ensure the simplest possible interaction from Objective-C.
You will soon notice that the Objective-C API defines many functions which return objects. You do not need to deallocate these objects yourself, the API does it automatically at the end of the application.
In order to keep them simple, all the examples provided in this documentation are console applications. Naturally, the libraries function in a strictly identical manner if you integrate them in an application with a graphical interface. You can find on Yoctopuce blog a detailed example56 with video shots showing how to integrate the library into your projects.
20.1. Control of the Temperature function
A few lines of code are enough to use a Yocto-Thermocouple. Here is the skeleton of a Objective-C code snipplet to use the Temperature function.
#import "yocto_api.h"
#import "yocto_temperature.h"
...
NSError *error;
[YAPI RegisterHub:@"usb": &error]
...
// On récupère l'objet représentant le module (ici connecté en local sur USB)
temperature = [YTemperature FindTemperature:@"THRMCPL1-123456.temperature"];
// Pour gérer le hot-plug, on vérifie que le module est là
if([temperature isOnline])
{
// Utiliser [temperature get_currentValue]
...
}
Let's look at these lines in more details.
yocto_api.h and yocto_temperature.h
These two import files provide access to the functions allowing you to manage Yoctopuce modules. yocto_api.h must always be used, yocto_temperature.h is necessary to manage modules containing a temperature sensor, such as Yocto-Thermocouple.
[YAPI RegisterHub]
The [YAPI RegisterHub] function initializes the Yoctopuce API and indicates where the modules should be looked for. When used with the parameter @"usb", it will use the modules locally connected to the computer running the library. If the initialization does not succeed, this function returns a value different from YAPI_SUCCESS and errmsg contains the error message.
[Temperature FindTemperature]
The [Temperature FindTemperature] function allows you to find a temperature sensor from the serial number of the module on which it resides and from its function name. You can use logical names as well, as long as you have initialized them. Let us imagine a Yocto-Thermocouple module with serial number THRMCPL1-123456 which you have named "MyModule", and for which you have given the temperature function the name "MyFunction". The following five calls are strictly equivalent, as long as "MyFunction" is defined only once.
YTemperature *temperature = [Temperature FindTemperature:@"THRMCPL1-123456.temperature"];
YTemperature *temperature = [Temperature FindTemperature:@"THRMCPL1-123456.MyFunction"];
YTemperature *temperature = [Temperature FindTemperature:@"MyModule.temperature"];
YTemperature *temperature = [Temperature FindTemperature:@"MyModule.MyFunction"];
YTemperature *temperature = [Temperature FindTemperature:@"MyFunction"];
[Temperature FindTemperature] returns an object which you can then use at will to control the temperature sensor.
isOnline
The isOnline method of the object returned by [Temperature FindTemperature] allows you to know if the corresponding module is present and in working order.
get_currentValue
The get_currentValue() method of the object returned by YTemperature.FindTemperature provides the temperature currently measured by the sensor. The value returned is a floating number, equal to the current number of Celsius degrees.
A real example
Launch Xcode 4.2 and open the corresponding sample project provided in the directory Examples/Doc-GettingStarted-Yocto-Thermocouple of the Yoctopuce library.
In this example, you will recognize the functions explained above, but this time used with all side materials needed to make it work nicely as a small demo.
#import "yocto_api.h"
#import "yocto_temperature.h"
static void usage(void)
{
NSLog(@"usage: demo <serial_number> ");
NSLog(@" demo <logical_name>");
NSLog(@" demo any (use any discovered device)");
exit(1);
}
int main(int argc, const char * argv[])
{
NSError *error;
if (argc < 2) {
usage();
}
@autoreleasepool {
// Setup the API to use local USB devices
if([YAPI RegisterHub:@"usb": &error] != YAPI_SUCCESS) {
NSLog(@"RegisterHub error: %@", [error localizedDescription]);
return 1;
}
NSString *target = [NSString stringWithUTF8String:argv[1]];
YTemperature *tsensor;
if ([target isEqualToString:@"any"]) {
tsensor = [YTemperature FirstTemperature];
if (tsensor == NULL) {
NSLog(@"No module connected (check USB cable)");
return 1;
}
} else {
tsensor = [YTemperature FindTemperature:[target stringByAppendingString:
@".temperature1"]];
}
while(1) {
if(![tsensor isOnline]) {
NSLog(@"Module not connected (check identification and USB cable)\n");
break;
}
NSLog(@"Channel 1 temperature: %f C\n", [tsensor get_currentValue]);
NSLog(@" (press Ctrl-C to exit)\n");
[YAPI Sleep:1000:NULL];
}
[YAPI FreeAPI];
}
return 0;
}
20.2. Control of the module part
Each module can be controlled in a similar manner, you can find below a simple sample program displaying the main parameters of the module and enabling you to activate the localization beacon.
#import "yocto_api.h"
static void usage(const char *exe)
{
NSLog(@"usage: %s <serial or logical name> [ON/OFF]\n", exe);
exit(1);
}
int main (int argc, const char * argv[])
{
NSError *error;
@autoreleasepool {
// Setup the API to use local USB devices
if([YAPI RegisterHub:@"usb": &error] != YAPI_SUCCESS) {
NSLog(@"RegisterHub error: %@", [error localizedDescription]);
return 1;
}
if(argc < 2)
usage(argv[0]);
NSString *serial_or_name = [NSString stringWithUTF8String:argv[1]];
// use serial or logical name
YModule *module = [YModule FindModule:serial_or_name];
if ([module isOnline]) {
if (argc > 2) {
if (strcmp(argv[2], "ON") == 0)
[module setBeacon:Y_BEACON_ON];
else
[module setBeacon:Y_BEACON_OFF];
}
NSLog(@"serial: %@\n", [module serialNumber]);
NSLog(@"logical name: %@\n", [module logicalName]);
NSLog(@"luminosity: %d\n", [module luminosity]);
NSLog(@"beacon: ");
if ([module beacon] == Y_BEACON_ON)
NSLog(@"ON\n");
else
NSLog(@"OFF\n");
NSLog(@"upTime: %ld sec\n", [module upTime] / 1000);
NSLog(@"USB current: %d mA\n", [module usbCurrent]);
NSLog(@"logs: %@\n", [module get_lastLogs]);
} else {
NSLog(@"%@ not connected (check identification and USB cable)\n",
serial_or_name);
}
[YAPI FreeAPI];
}
return 0;
}
Each property xxx of the module can be read thanks to a method of type get_xxxx, and properties which are not read-only can be modified with the help of the set_xxx: method. For more details regarding the used functions, refer to the API chapters.
Changing the module settings
When you want to modify the settings of a module, you only need to call the corresponding set_xxx: function. However, this modification is performed only in the random access memory (RAM) of the module: if the module is restarted, the modifications are lost. To memorize them persistently, it is necessary to ask the module to save its current configuration in its permanent memory. To do so, use the saveToFlash method. Inversely, it is possible to force the module to forget its current settings by using the revertFromFlash method. The short example below allows you to modify the logical name of a module.
#import "yocto_api.h"
static void usage(const char *exe)
{
NSLog(@"usage: %s <serial> <newLogicalName>\n", exe);
exit(1);
}
int main (int argc, const char * argv[])
{
NSError *error;
@autoreleasepool {
// Setup the API to use local USB devices
if([YAPI RegisterHub:@"usb" :&error] != YAPI_SUCCESS) {
NSLog(@"RegisterHub error: %@", [error localizedDescription]);
return 1;
}
if(argc < 2)
usage(argv[0]);
NSString *serial_or_name = [NSString stringWithUTF8String:argv[1]];
// use serial or logical name
YModule *module = [YModule FindModule:serial_or_name];
if (module.isOnline) {
if (argc >= 3) {
NSString *newname = [NSString stringWithUTF8String:argv[2]];
if (![YAPI CheckLogicalName:newname]) {
NSLog(@"Invalid name (%@)\n", newname);
usage(argv[0]);
}
module.logicalName = newname;
[module saveToFlash];
}
NSLog(@"Current name: %@\n", module.logicalName);
} else {
NSLog(@"%@ not connected (check identification and USB cable)\n",
serial_or_name);
}
[YAPI FreeAPI];
}
return 0;
}
Warning: the number of write cycles of the nonvolatile memory of the module is limited. When this limit is reached, nothing guaranties that the saving process is performed correctly. This limit, linked to the technology employed by the module micro-processor, is located at about 100000 cycles. In short, you can use the saveToFlash function only 100000 times in the life of the module. Make sure you do not call this function within a loop.
Listing the modules
Obtaining the list of the connected modules is performed with the yFirstModule() function which returns the first module found. Then, you only need to call the nextModule() function of this object to find the following modules, and this as long as the returned value is not NULL. Below a short example listing the connected modules.
#import "yocto_api.h"
int main (int argc, const char * argv[])
{
NSError *error;
@autoreleasepool {
// Setup the API to use local USB devices
if([YAPI RegisterHub:@"usb" :&error] != YAPI_SUCCESS) {
NSLog(@"RegisterHub error: %@\n", [error localizedDescription]);
return 1;
}
NSLog(@"Device list:\n");
YModule *module = [YModule FirstModule];
while (module != nil) {
NSLog(@"%@ %@", module.serialNumber, module.productName);
module = [module nextModule];
}
[YAPI FreeAPI];
}
return 0;
}
20.3. Error handling
When you implement a program which must interact with USB modules, you cannot disregard error handling. Inevitably, there will be a time when a user will have unplugged the device, either before running the software, or even while the software is running. The Yoctopuce library is designed to help you support this kind of behavior, but your code must nevertheless be conceived to interpret in the best possible way the errors indicated by the library.
The simplest way to work around the problem is the one used in the short examples provided in this chapter: before accessing a module, check that it is online with the isOnline function, and then hope that it will stay so during the fraction of a second necessary for the following code lines to run. This method is not perfect, but it can be sufficient in some cases. You must however be aware that you cannot completely exclude an error which would occur after the call to isOnline and which could crash the software. The only way to prevent this is to implement one of the two error handling techniques described below.
The method recommended by most programming languages for unpredictable error handling is the use of exceptions. By default, it is the behavior of the Yoctopuce library. If an error happens while you try to access a module, the library throws an exception. In this case, there are three possibilities:
- If your code catches the exception and handles it, everything goes well.
- If your program is running in debug mode, you can relatively easily determine where the problem happened and view the explanatory message linked to the exception.
- Otherwise... the exception makes your program crash, bang!
As this latest situation is not the most desirable, the Yoctopuce library offers another possibility for error handling, allowing you to create a robust program without needing to catch exceptions at every line of code. You simply need to call the YAPI.DisableExceptions() function to commute the library to a mode where exceptions for all the functions are systematically replaced by specific return values, which can be tested by the caller when necessary. For each function, the name of each return value in case of error is systematically documented in the library reference. The name always follows the same logic: a get_state() method returns a ClassName.STATE_INVALID value, a get_currentValue method returns a ClassName.CURRENTVALUE_INVALID value, and so on. In any case, the returned value is of the expected type and is not a null pointer which would risk crashing your program. At worst, if you display the value without testing it, it will be outside the expected bounds for the returned value. In the case of functions which do not normally return information, the return value is YAPI_SUCCESS if everything went well, and a different error code in case of failure.
When you work without exceptions, you can obtain an error code and an error message explaining the source of the error. You can request them from the object which returned the error, calling the errType() and errMessage() methods. Their returned values contain the same information as in the exceptions when they are active.
21. Using with unsupported languages
Yoctopuce modules can be driven from most common programming languages. New languages are regularly added, depending on the interest expressed by Yoctopuce product users. Nevertheless, some languages are not, and will never be, supported by Yoctopuce. There can be several reasons for this: compilers which are not available anymore, unadapted environments, and so on.
However, there are alternative methods to access Yoctopuce modules from an unsupported programming language.
21.1. Command line
The easiest method to drive Yoctopuce modules from an unsupported programming language is to use the command line API through system calls. The command line API is in fact made of a group of small executables which are easy to call. Their output is also easy to analyze. As most programming languages allow you to make system calls, the issue is solved with a few lines of code.
However, if the command line API is the easiest solution, it is neither the fastest nor the most efficient. For each call, the executable must initialize its own API and make an inventory of USB connected modules. This requires about one second per call.
21.2. .NET Assembly
A .NET Assembly enables you to share a set of pre-compiled classes to offer a service, by stating entry points which can be used by third-party applications. In our case, it's the whole Yoctopuce library which is available in the .NET Assembly, so that it can be used in any environment which supports .NET Assembly dynamic loading.
The Yoctopuce library as a .NET Assembly does not contain only the standard C# Yoctopuce library, as this would not have allowed an optimal use in all environments. Indeed, we cannot expect host applications to necessarily offer a thread system or a callback system, although they are very useful to manage plug-and-play events and sensors with a high refresh rate. Likewise, we cannot expect from external applications a transparent behavior in cases where a function call in Assembly creates a delay because of network communications.
Therefore, we added to it an additional layer, called .NET Proxy library. This additional layer offers an interface very similar to the standard library but somewhat simplified, as it internally manages all the callback mechanisms. Instead, this library offers mirror objects, called Proxys, which publish through Properties the main attributes of the Yoctopuce functions such as the current measure, configuration parameters, the state, and so on.
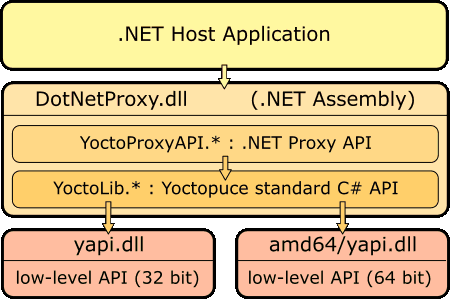
.NET Assembly Architecture
The callback mechanism automatically updates the properties of the Proxys objects, without the host application needing to care for it. The later can thus, at any time and without any risk of latency, display the value of all properties of Yoctopuce Proxy objects.
Pay attention to the fact that the yapi.dll low-level communication library is not included in the .NET Assembly. You must therefore keep it together with DotNetProxyLibrary.dll. The 32 bit version must be located in the same directory as DotNetProxyLibrary.dll, while the 64 bit version must be in a subdirectory amd64.
Example of use with MATLAB
Here is how to load our Proxy .NET Assembly in MATLAB and how to read the value of the first sensor connected by USB found on the machine:
NET.addAssembly("C:/Yoctopuce/DotNetProxyLibrary.dll");
import YoctoProxyAPI.*
errmsg = YAPIProxy.RegisterHub("usb");
sensor = YSensorProxy.FindSensor("");
measure = sprintf('%.3f %s', sensor.CurrentValue, sensor.Unit);
Example of use in PowerShell
PowerShell commands are a little stranger, but we can recognize the same structure:
Add-Type -Path "C:/Yoctopuce/DotNetProxyLibrary.dll"
$errmsg = [YoctoProxyAPI.YAPIProxy]::RegisterHub("usb")
$sensor = [YoctoProxyAPI.YSensorProxy]::FindSensor("")
$measure = "{0:n3} {1}" -f $sensor.CurrentValue, $sensor.Unit
Specificities of the .NET Proxy library
With regards to classic Yoctopuce libraries, the following differences in particular should be noted:
No FirstModule/nextModule method
To obtain an object referring to the first found module, we call YModuleProxy.FindModule(""). If there is no connected module, this method returns an object with its module.IsOnline property set to False. As soon as a module is connected, the property changes to True and the module hardware identifier is updated.
To list modules, you can call the module.GetSimilarFunctions() method which returns an array of character strings containing the identifiers of all the modules which were found.
No callback function
Callback functions are implemented internally and they update the object properties. You can therefore simply poll the properties, without significant performance penalties. Be aware that if you use one of the function that disables callbacks, the automatic refresh of object properties may not work anymore.
A new method YAPIProxy.GetLog makes it possible to retrieve low-level debug logs without using callbacks.
Enumerated types
In order to maximize compatibility with host applications, the .NET Proxy library does not use true .NET enumerated types, but simple integers. For each enumerated type, the library includes public constants named according to the possible values. Contrarily to standard Yoctopuce libraries, numeric values always start from 1, as the value 0 is reserved to return an invalid value, for instance when the device is disconnected.
Invalid numeric results
For all numeric results, rather than using an arbitrary constant, the invalid value returned in case of error is NaN. You should therefore use function isNaN() to detect this value.
Using .NET Assembly without the Proxy library
If for a reason or another you do not want to use the Proxy library, and if your environment allows it, you can use the standard C# API as it is located in the Assembly, under the YoctoLib namespace. Beware however not to mix both types of use: either you go through the Proxy library, or you use he YoctoLib version directly, but not both!
Compatibility
For the LabVIEW Yoctopuce library to work correctly with your Yoctopuce modules, these modules need to have firmware 37120, or higher.
In order to be compatible with as many versions of Windows as possible, including Windows XP, the DotNetProxyLibrary.dll library is compiled in .NET 3.5, which is available by default on all the Windows versions since XP. As of today, we have never met any non-Windows environment able to load a .NET Assembly, so we only ship the low-level communication dll for Windows together with the assembly.
21.3. VirtualHub and HTTP GET
VirtualHub is available on almost all current platforms. It is generally used as a gateway to provide access to Yoctopuce modules from languages which prevent direct access to hardware layers of a computer (JavaScript, PHP, Java, ...).
In fact, VirtualHub is a small web server able to route HTTP requests to Yoctopuce modules. This means that if you can make an HTTP request from your programming language, you can drive Yoctopuce modules, even if this language is not officially supported.
REST interface
At a low level, the modules are driven through a REST API. Thus, to control a module, you only need to perform appropriate requests on the VirtualHub. By default, the VirtualHub HTTP port is 4444.
An important advantage of this technique is that preliminary tests are very easy to implement. You only need a VirtualHub and a simple web browser. If you copy the following URL in your preferred browser, while VirtualHub is running, you obtain the list of the connected modules.
http://127.0.0.1:4444/api/services/whitePages.txt
Note that the result is displayed as text, but if you request whitePages.xml, you obtain an XML result. Likewise, whitePages.json allows you to obtain a JSON result. The html extension even allows you to display a rough interface where you can modify values in real time. The whole REST API is available in these different formats.
Driving a module through the REST interface
Each Yoctopuce module has its own REST interface, available in several variants. Let us imagine a Yocto-Thermocouple with the THRMCPL1-12345 serial number and the myModule logical name. The following URL allows you to know the state of the module.
http://127.0.0.1:4444/bySerial/THRMCPL1-12345/api/module.txt
You can naturally also use the module logical name rather than its serial number.
http://127.0.0.1:4444/byName/myModule/api/module.txt
To retrieve the value of a module property, simply add the name of the property below module. For example, if you want to know the signposting led luminosity, send the following request:
http://127.0.0.1:4444/bySerial/THRMCPL1-12345/api/module/luminosity
To change the value of a property, modify the corresponding attribute. Thus, to modify the luminosity, send the following request:
http://127.0.0.1:4444/bySerial/THRMCPL1-12345/api/module?luminosity=100
Driving the module functions through the REST interface
The module functions can be manipulated in the same way. To know the state of the temperature function, build the following URL:
http://127.0.0.1:4444/bySerial/THRMCPL1-12345/api/temperature.txt
Note that if you can use logical names for the modules instead of their serial number, you cannot use logical names for functions. Only hardware names are authorized to access functions.
You can retrieve a module function attribute in a way rather similar to that used with the modules. For example:
http://127.0.0.1:4444/bySerial/THRMCPL1-12345/api/temperature/logicalName
Rather logically, attributes can be modified in the same manner.
http://127.0.0.1:4444/bySerial/THRMCPL1-12345/api/temperature?logicalName=myFunction
You can find the list of available attributes for your Yocto-Thermocouple at the beginning of the Programming chapter.
Accessing Yoctopuce data logger through the REST interface
This section only applies to devices with a built-in data logger.
The preview of all recorded data streams can be retrieved in JSON format using the following URL:
http://127.0.0.1:4444/bySerial/THRMCPL1-12345/dataLogger.json
Individual measures for any given stream can be obtained by appending the desired function identifier as well as start time of the stream:
http://127.0.0.1:4444/bySerial/THRMCPL1-12345/dataLogger.json?id=temperature&utc=1389801080
21.4. Using dynamic libraries
The low level Yoctopuce API is available under several formats of dynamic libraries written in C. The sources are available with the C++ API. If you use one of these low level libraries, you do not need VirtualHub anymore.
| Filename | Platform |
|---|---|
| libyapi.dylib | Max OS X |
| libyapi-amd64.so | Linux Intel (64 bits) |
| libyapi-armel.so | Linux ARM EL (32 bits) |
| libyapi-armhf.so | Linux ARM HL (32 bits) |
| libyapi-aarch64.so | Linux ARM (64 bits) |
| libyapi-i386.so | Linux Intel (32 bits) |
| yapi64.dll | Windows (64 bits) |
| yapi.dll | Windows (32 bits) |
These dynamic libraries contain all the functions necessary to completely rebuild the whole high level API in any language able to integrate these libraries. This chapter nevertheless restrains itself to describing basic use of the modules.
Driving a module
The three essential functions of the low level API are the following:
int yapiInitAPI(int connection_type, char *errmsg);
int yapiUpdateDeviceList(int forceupdate, char *errmsg);
int yapiHTTPRequest(char *device, char *request, char* buffer,int buffsize,int *fullsize, char *errmsg);
The yapiInitAPI function initializes the API and must be called once at the beginning of the program. For a USB type connection, the connection_type parameter takes value 1. The errmsg parameter must point to a 255 character buffer to retrieve a potential error message. This pointer can also point to null. The function returns a negative integer in case of error, zero otherwise.
The yapiUpdateDeviceList manages the inventory of connected Yoctopuce modules. It must be called at least once. To manage hot plug and detect potential newly connected modules, this function must be called at regular intervals. The forceupdate parameter must take value 1 to force a hardware scan. The errmsg parameter must point to a 255 character buffer to retrieve a potential error message. This pointer can also point to null. The function returns a negative integer in case of error, zero otherwise.
Finally, the yapiHTTPRequest function sends HTTP requests to the module REST API. The device parameter contains the serial number or the logical name of the module which you want to reach. The request parameter contains the full HTTP request (including terminal line breaks). buffer points to a character buffer long enough to contain the answer. buffsize is the size of the buffer. fullsize is a pointer to an integer to which will be assigned the actual size of the answer. The errmsg parameter must point to a 255 character buffer to retrieve a potential error message. This pointer can also point to null. The function returns a negative integer in case of error, zero otherwise.
The format of the requests is the same as the one described in the VirtualHub et HTTP GET section. All the character strings used by the API are strings made of 8-bit characters: Unicode and UTF8 are not supported.
The resutlt returned in the buffer variable respects the HTTP protocol. It therefore includes an HTTP header. This header ends with two empty lines, that is a sequence of four ASCII characters 13, 10, 13, 10.
Here is a sample program written in pascal using the yapi.dll DLL to read and then update the luminosity of a module.
// Dll functions import
function yapiInitAPI(mode:integer;
errmsg : pansichar):integer;cdecl;
external 'yapi.dll' name 'yapiInitAPI';
function yapiUpdateDeviceList(force:integer;errmsg : pansichar):integer;cdecl;
external 'yapi.dll' name 'yapiUpdateDeviceList';
function yapiHTTPRequest(device:pansichar;url:pansichar; buffer:pansichar;
buffsize:integer;var fullsize:integer;
errmsg : pansichar):integer;cdecl;
external 'yapi.dll' name 'yapiHTTPRequest';
var
errmsgBuffer : array [0..256] of ansichar;
dataBuffer : array [0..1024] of ansichar;
errmsg,data : pansichar;
fullsize,p : integer;
const
serial = 'THRMCPL1-12345';
getValue = 'GET /api/module/luminosity HTTP/1.1'#13#10#13#10;
setValue = 'GET /api/module?luminosity=100 HTTP/1.1'#13#10#13#10;
begin
errmsg := @errmsgBuffer;
data := @dataBuffer;
// API initialization
if(yapiInitAPI(1,errmsg)<0) then
begin
writeln(errmsg);
halt;
end;
// forces a device inventory
if( yapiUpdateDeviceList(1,errmsg)<0) then
begin
writeln(errmsg);
halt;
end;
// requests the module luminosity
if (yapiHTTPRequest(serial,getValue,data,sizeof(dataBuffer),fullsize,errmsg)<0) then
begin
writeln(errmsg);
halt;
end;
// searches for the HTTP header end
p := pos(#13#10#13#10,data);
// displays the response minus the HTTP header
writeln(copy(data,p+4,length(data)-p-3));
// changes the luminosity
if (yapiHTTPRequest(serial,setValue,data,sizeof(dataBuffer),fullsize,errmsg)<0) then
begin
writeln(errmsg);
halt;
end;
end.
Module inventory
To perform an inventory of Yoctopuce modules, you need two functions from the dynamic library:
int yapiGetAllDevices(int *buffer,int maxsize,int *neededsize,char *errmsg);
int yapiGetDeviceInfo(int devdesc,yDeviceSt *infos, char *errmsg);
The yapiGetAllDevices function retrieves the list of all connected modules as a list of handles. buffer points to a 32-bit integer array which contains the returned handles. maxsize is the size in bytes of the buffer. To neededsize is assigned the necessary size to store all the handles. From this, you can deduce either the number of connected modules or that the input buffer is too small. The errmsg parameter must point to a 255 character buffer to retrieve a potential error message. This pointer can also point to null. The function returns a negative integer in case of error, zero otherwise.
The yapiGetDeviceInfo function retrieves the information related to a module from its handle. devdesc is a 32-bit integer representing the module and which was obtained through yapiGetAllDevices. infos points to a data structure in which the result is stored. This data structure has the following format:
| Name | Type | Size (bytes) | Description |
|---|---|---|---|
| vendorid | int | 4 | Yoctopuce USB ID |
| deviceid | int | 4 | Module USB ID |
| devrelease | int | 4 | Module version |
| nbinbterfaces | int | 4 | Number of USB interfaces used by the module |
| manufacturer | char[] | 20 | Yoctopuce (null terminated) |
| productname | char[] | 28 | Model (null terminated) |
| serial | char[] | 20 | Serial number (null terminated) |
| logicalname | char[] | 20 | Logical name (null terminated) |
| firmware | char[] | 22 | Firmware version (null terminated) |
| beacon | byte | 1 | Beacon state (0/1) |
The errmsg parameter must point to a 255 character buffer to retrieve a potential error message.
Here is a sample program written in pascal using the yapi.dll DLL to list the connected modules.
// device description structure
type yDeviceSt = packed record
vendorid : word;
deviceid : word;
devrelease : word;
nbinbterfaces : word;
manufacturer : array [0..19] of ansichar;
productname : array [0..27] of ansichar;
serial : array [0..19] of ansichar;
logicalname : array [0..19] of ansichar;
firmware : array [0..21] of ansichar;
beacon : byte;
end;
// Dll function import
function yapiInitAPI(mode:integer;
errmsg : pansichar):integer;cdecl;
external 'yapi.dll' name 'yapiInitAPI';
function yapiUpdateDeviceList(force:integer;errmsg : pansichar):integer;cdecl;
external 'yapi.dll' name 'yapiUpdateDeviceList';
function yapiGetAllDevices( buffer:pointer;
maxsize:integer;
var neededsize:integer;
errmsg : pansichar):integer; cdecl;
external 'yapi.dll' name 'yapiGetAllDevices';
function apiGetDeviceInfo(d:integer; var infos:yDeviceSt;
errmsg : pansichar):integer; cdecl;
external 'yapi.dll' name 'yapiGetDeviceInfo';
var
errmsgBuffer : array [0..256] of ansichar;
dataBuffer : array [0..127] of integer; // max of 128 USB devices
errmsg,data : pansichar;
neededsize,i : integer;
devinfos : yDeviceSt;
begin
errmsg := @errmsgBuffer;
// API initialization
if(yapiInitAPI(1,errmsg)<0) then
begin
writeln(errmsg);
halt;
end;
// forces a device inventory
if( yapiUpdateDeviceList(1,errmsg)<0) then
begin
writeln(errmsg);
halt;
end;
// loads all device handles into dataBuffer
if yapiGetAllDevices(@dataBuffer,sizeof(dataBuffer),neededsize,errmsg)<0 then
begin
writeln(errmsg);
halt;
end;
// gets device info from each handle
for i:=0 to neededsize div sizeof(integer)-1 do
begin
if (apiGetDeviceInfo(dataBuffer[i], devinfos, errmsg)<0) then
begin
writeln(errmsg);
halt;
end;
writeln(pansichar(@devinfos.serial)+' ('+pansichar(@devinfos.productname)+')');
end;
end.
VB6 and yapi.dll
Each entry point from the yapi.dll is duplicated. You will find one regular C-decl version and one Visual Basic 6 compatible version, prefixed with vb6_.
21.5. Porting the high level library
As all the sources of the Yoctopuce API are fully provided, you can very well port the whole API in the language of your choice. Note, however, that a large portion of the API source code is automatically generated.
Therefore, it is not necessary for you to port the complete API. You only need to port the yocto_api file and one file corresponding to a function, for example yocto_relay. After a little additional work, Yoctopuce is then able to generate all other files. Therefore, we highly recommend that you contact Yoctopuce support before undertaking to port the Yoctopuce library in another language. Collaborative work is advantageous to both parties.
22. Advanced programming
The preceding chapters have introduced, in each available language, the basic programming functions which can be used with your Yocto-Thermocouple module. This chapter presents in a more generic manner a more advanced use of your module. Examples are provided in the language which is the most popular among Yoctopuce customers, that is C#. Nevertheless, you can find complete examples illustrating the concepts presented here in the programming libraries of each language.
To remain as concise as possible, examples provided in this chapter do not perform any error handling. Do not copy them "as is" in a production application.
22.1. Event programming
The methods to manage Yoctopuce modules which we presented to you in preceding chapters were polling functions, consisting in permanently asking the API if something had changed. While easy to understand, this programming technique is not the most efficient, nor the most reactive. Therefore, the Yoctopuce programming API also provides an event programming model. This technique consists in asking the API to signal by itself the important changes as soon as they are detected. Each time a key parameter is modified, the API calls a callback function which you have defined in advance.
Detecting module arrival and departure
Hot-plug management is important when you work with USB modules because, sooner or later, you will have to connect or disconnect a module when your application is running. The API is designed to manage module unexpected arrival or departure in a transparent way. But your application must take this into account if it wants to avoid pretending to use a disconnected module.
Event programming is particularly useful to detect module connection/disconnection. Indeed, it is simpler to be told of new connections rather than to have to permanently list the connected modules to deduce which ones just arrived and which ones left. To be warned as soon as a module is connected, you need three pieces of code.
The callback
The callback is the function which is called each time a new Yoctopuce module is connected. It takes as parameter the relevant module.
static void deviceArrival(YModule m)
{
Console.WriteLine("New module : " + m.get_serialNumber());
}
Initialization
You must then tell the API that it must call the callback when a new module is connected.
YAPI.RegisterDeviceArrivalCallback(deviceArrival);
Note that if modules are already connected when the callback is registered, the callback is called for each of the already connected modules.
Triggering callbacks
A classis issue of callback programming is that these callbacks can be triggered at any time, including at times when the main program is not ready to receive them. This can have undesired side effects, such as dead-locks and other race conditions. Therefore, in the Yoctopuce API, module arrival/departure callbacks are called only when the UpdateDeviceList() function is running. You only need to call UpdateDeviceList() at regular intervals from a timer or from a specific thread to precisely control when the calls to these callbacks happen:
// waiting loop managing callbacks
while (true)
{
// module arrival / departure callback
YAPI.UpdateDeviceList(ref errmsg);
// non active waiting time managing other callbacks
YAPI.Sleep(500, ref errmsg);
}
In a similar way, it is possible to have a callback when a module is disconnected. You can find a complete example implemented in your favorite programming language in the Examples/Prog-EventBased directory of the corresponding library.
Be aware that in most programming languages, callbacks must be global procedures, and not methods. If you wish for the callback to call the method of an object, define your callback as a global procedure which then calls your method.
Detecting a modification in the value of a sensor
The Yoctopuce API also provides a callback system allowing you to be notified automatically with the value of any sensor, either when the value has changed in a significant way or periodically at a preset frequency. The code necessary to do so is rather similar to the code used to detect when a new module has been connected.
This technique is useful in particular if you want to detect very quick value changes (within a few milliseconds), as it is much more efficient than reading repeatedly the sensor value and therefore gives better performances.
Calliback invocation
To enable a better control, value change callbacks are only called when the YAPI.Sleep() and YAPI.HandleEvents() functions are running. Therefore, you must call one of these functions at a regular interval, either from a timer or from a parallel thread.
while (true)
{
// inactive waiting loop allowing you to trigger
// value change callbacks
YAPI.Sleep(500, ref errmsg);
}
In programming environments where only the interface thread is allowed to interact with the user, it is often appropriate to call YAPI.HandleEvents() from this thread.
The value change callback
This type of callback is called when a temperature sensor changes in a significant way. It takes as parameter the relevant function and the new value, as a character string. 57
static void valueChangeCallback(YTemperature fct, string value)
{
Console.WriteLine(fct.get_hardwareId() + "=" + value);
}
In most programming languages, callbacks are global procedures, not methods. If you wish for the callback to call a method of an object, define your callback as a global procedure which then calls your method. If you need to keep a reference to your object, you can store it directly in the YTemperature object using function set_userData. You can then retrieve it in the global callback procedure using get_userData.
Setting up a value change callback
The callback is set up for a given Temperature function with the help of the registerValueCallback method. The following example sets up a callback for the first available Temperature function.
YTemperature f = YTemperature.FirstTemperature();
f.registerValueCallback(temperatureChangeCallBack)
Note that each module function can thus have its own distinct callback. By the way, if you like to work with value change callbacks, you will appreciate the fact that value change callbacks are not limited to sensors, but are also available for all Yoctopuce devices (for instance, you can also receive a callback any time a relay state changes).
The timed report callback
This type of callback is automatically called at a predefined time interval. The callback frequency can be configured individually for each sensor, with frequencies going from hundred calls per seconds down to one call per hour. The callback takes as parameter the relevant function and the measured value, as an YMeasure object. Contrarily to the value change callback that only receives the latest value, an YMeasure object provides both minimal, maximal and average values since the timed report callback. Moreover, the measure includes precise timestamps, which makes it possible to use timed reports for a time-based graph even when not handled immediately.
static void periodicCallback(YTemperature fct, YMeasure measure)
{
Console.WriteLine(fct.get_hardwareId() + "=" +
measure.get_averageValue());
}
Setting up a timed report callback
The callback is set up for a given Temperature function with the help of the registerTimedReportCallback method. The callback will only be invoked once a callback frequency as been set using set_reportFrequency (which defaults to timed report callback turned off). The frequency is specified as a string (same as for the data logger), by specifying the number of calls per second (/s), per minute (/m) or per hour (/h). The maximal frequency is 100 times per second (i.e. "100/s"), and the minimal frequency is 1 time per hour (i.e. "1/h"). When the frequency is higher than or equal to 1/s, the measure represents an instant value. When the frequency is below, the measure will include distinct minimal, maximal and average values based on a sampling performed automatically by the device.
The following example sets up a timed report callback 4 times per minute for t he first available Temperature function.
YTemperature f = YTemperature.FirstTemperature();
f.set_reportFrequency("4/m");
f.registerTimedReportCallback(periodicCallback);
As for value change callbacks, each module function can thus have its own distinct timed report callback.
Generic callback functions
It is sometimes desirable to use the same callback function for various types of sensors (e.g. for a generic sensor graphing application). This is possible by defining the callback for an object of class YSensor rather than YTemperature. Thus, the same callback function will be usable with any subclass of YSensor (and in particular with YTemperature). With the callback function, you can use the method get_unt() to get the physical unit of the sensor, if you need to display it.
A complete example
You can find a complete example implemented in your favorite programming language in the Examples/Prog-EventBased directory of the corresponding library.
22.2. The data logger
Your Yocto-Thermocouple is equipped with a data logger able to store non-stop the measures performed by the module. The maximal frequency is 100 times per second (i.e. "100/s"), and the minimal frequency is 1 time per hour (i.e. "1/h"). When the frequency is higher than or equal to 1/s, the measure represents an instant value. When the frequency is below, the measure will include distinct minimal, maximal and average values based on a sampling performed automatically by the device.
Note that is useless and counter-productive to set a recording frequency higher than the native sampling frequency of the recorded sensor.
The data logger flash memory can store about 500'000 instant measures, or 125'000 averaged measures. When the memory is about to be saturated, the oldest measures are automatically erased.
Make sure not to leave the data logger running at high speed unless really needed: the flash memory can only stand a limited number of erase cycles (typically 100'000 cycles). When running at full speed, the datalogger can burn more than 100 cycles per day ! Also be aware that it is useless to record measures at a frequency higher than the refresh frequency of the physical sensor itself.
Starting/stopping the datalogger
The data logger can be started with the set_recording() method.
YDataLogger l = YDataLogger.FirstDataLogger();
l.set_recording(YDataLogger.RECORDING_ON);
It is possible to make the data recording start automatically as soon as the module is powered on.
YDataLogger l = YDataLogger.FirstDataLogger();
l.set_autoStart(YDataLogger.AUTOSTART_ON);
l.get_module().saveToFlash(); // do not forget to save the setting
Note: Yoctopuce modules do not need an active USB connection to work: they start working as soon as they are powered on. The Yocto-Thermocouple can store data without necessarily being connected to a computer: you only need to activate the automatic start of the data logger and to power on the module with a simple USB charger.
Erasing the memory
The memory of the data logger can be erased with the forgetAllDataStreams() function. Be aware that erasing cannot be undone.
YDataLogger l = YDataLogger.FirstDataLogger();
l.forgetAllDataStreams();
Choosing the logging frequency
The logging frequency can be set up individually for each sensor, using the method set_logFrequency(). The frequency is specified as a string (same as for timed report callbacks), by specifying the number of calls per second (/s), per minute (/m) or per hour (/h). The default value is "1/s".
The following example configures the logging frequency at 15 measures per minute for the first sensor found, whatever its type:
YSensor sensor = YSensor.FirstSensor();
sensor.set_logFrequency("15/m");
To avoid wasting flash memory, it is possible to disable logging for specified functions. In order to do so, simply use the value "OFF":
sensor.set_logFrequency("OFF");
Limitation: The Yocto-Thermocouple cannot use a different frequency for timed-report callbacks and for recording data into the datalogger. You can disable either of them individually, but if you enable both timed-report callbacks and logging for a given function, the two will work at the same frequency.
Retrieving the data
To load recorded measures from the Yocto-Thermocouple flash memory, you must call the get_recordedData() method of the desired sensor, and specify the time interval for which you want to retrieve measures. The time interval is given by the start and stop UNIX timestamp. You can also specify 0 if you don't want any start or stop limit.
The get_recordedData() method does not return directly am array of measured values, since in some cases it would cause a huge load that could affect the responsiveness of the application. Instead, this function will return an YDataSet object that can be used to retrieve immediately an overview of the measured data (summary), and then to load progressively the details when desired.
Here are the main methods used to retrieve recorded measures:
- dataset = sensor.get_recordedData(0,0): select the desired time interval
- dataset.loadMore(): load data from the device, progressively
- dataset.get_summary(): get a single measure summarizing the full time interval
- dataset.get_preview(): get an array of measures representing a condensed version of the whole set of measures on the selected time interval (reduced by a factor of approx. 200)
- dataset.get_measures(): get an array with all detailled measures (that grows while loadMore is being called repeteadly)
Measures are instances of YMeasure 58. They store simultaneously the minimal, average and maximal value at a given time, that you can retrieve using methods get_minValue(), get_averageValue() and get_maxValue() respectively. Here is a small example that uses the functions above:
// We will retrieve all measures, without time limit
YDataSet dataset = sensor.get_recordedData(0, 0);
// First call to loadMore() loads the summary/preview
dataset.loadMore();
YMeasure summary = dataset.get_summary();
string timeFmt = "dd MMM yyyy hh:mm:ss,fff";
string logFmt = "from {0} to {1} : average={2:0.00}{3}";
Console.WriteLine(String.Format(logFmt,
summary.get_startTimeUTC_asDateTime().ToString(timeFmt),
summary.get_endTimeUTC_asDateTime().ToString(timeFmt),
summary.get_averageValue(), sensor.get_unit()));
// Next calls to loadMore() will retrieve measures
Console.WriteLine("loading details");
int progress;
do {
Console.Write(".");
progress = dataset.loadMore();
} while(progress < 100);
// All measures have now been loaded
List<YMeasure> details = dataset.get_measures();
foreach (YMeasure m in details) {
Console.WriteLine(String.Format(logFmt,
m.get_startTimeUTC_asDateTime().ToString(timeFmt),
m.get_endTimeUTC_asDateTime().ToString(timeFmt),
m.get_averageValue(), sensor.get_unit()));
}
You will find a complete example demonstrating how to retrieve data from the logger for each programming language directly in the Yoctopuce library. The example can be found in directory Examples/Prog-DataLogger.
Timestamp
As the Yocto-Thermocouple does not have a battery, it cannot guess alone the current time when powered on. Nevertheless, the Yocto-Thermocouple will automatically try to adjust its real-time reference using the host to which it is connected, in order to properly attach a timestamp to each measure in the datalogger:
- When the Yocto-Thermocouple is connected to a computer running either the VirtualHub or any application using the Yoctopuce library, it will automatically receive the time from this computer.
- When the Yocto-Thermocouple is connected to a YoctoHub-Ethernet, it will get the time that the YoctoHub has obtained from the network (using a server from pool.ntp.org)
- When the Yocto-Thermocouple is connected to a YoctoHub-Wireless, it will get the time provided by the YoctoHub based on its internal battery-powered real-time clock, which was itself configured either from the network or from a computer
- When the Yocto-Thermocouple is connected to an Android mobile device, it will get the time from the mobile device as long as an app using the Yoctopuce library is launched.
When none of these conditions applies (for instance if the module is simply connected to an USB charger), the Yocto-Thermocouple will do its best effort to attach a reasonable timestamp to the measures, using the timestamp found on the latest recorded measures. It is therefore possible to "preset to the real time" an autonomous Yocto-Thermocouple by connecting it to an Android mobile phone, starting the data logger, then connecting the device alone on an USB charger. Nevertheless, be aware that without external time source, the internal clock of the Yocto-Thermocouple might be be subject to a clock skew (theoretically up to 2%).
22.3. Sensor calibration
Your Yocto-Thermocouple module is equipped with a digital sensor calibrated at the factory. The values it returns are supposed to be reasonably correct in most cases. There are, however, situations where external conditions can impact the measures.
The Yoctopuce API provides the mean to re-caliber the values measured by your Yocto-Thermocouple. You are not going to modify the hardware settings of the module, but rather to transform afterwards the measures taken by the sensor. This transformation is controlled by parameters stored in the flash memory of the module, making it specific for each module. This re-calibration is therefore a fully software matter and remains perfectly reversible.
Before deciding to re-calibrate your Yocto-Thermocouple module, make sure you have well understood the phenomena which impact the measures of your module, and that the differences between true values and measured values do not result from a incorrect use or an inadequate location of the module.
The Yoctopuce modules support two types of calibration. On the one hand, a linear interpolation based on 1 to 5 reference points, which can be performed directly inside the Yocto-Thermocouple. On the other hand, the API supports an external arbitrary calibration, implemented with callbacks.
1 to 5 point linear interpolation
These transformations are performed directly inside the Yocto-Thermocouple which means that you only have to store the calibration points in the module flash memory, and all the correction computations are done in a perfectly transparent manner: The function get_currentValue() returns the corrected value while the function get_currentRawValue() keeps returning the value before the correction.
Calibration points are simply (Raw_value, Corrected_value) couples. Let us look at the impact of the number of calibration points on the corrections.
1 point correction
The 1 point correction only adds a shift to the measures. For example, if you provide the calibration point (a, b), all the measured values are corrected by adding to them b-a, so that when the value read on the sensor is a, the temperature function returns b.
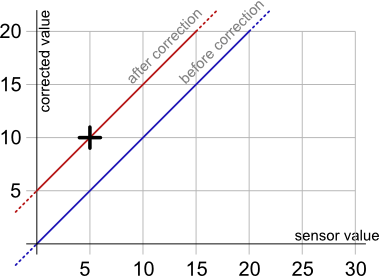
Measure correction with 1 calibration point, here (5,10)
The application is very simple: you only need to call the calibrateFromPoints() method of the function you wish to correct. The following code applies the correction illustrated on the graph above to the first temperature function found. Note the call to the saveToFlash method of the module hosting the function, so that the module does not forget the calibration as soon as it is disconnected.
Double[] ValuesBefore = {5};
Double[] ValuesAfter = {10};
YTemperature f = YTemperature.FirstTemperature();
f.calibrateFromPoints(ValuesBefore, ValuesAfter);
f.get_module().saveToFlash();
2 point correction
2 point correction allows you to perform both a shift and a multiplication by a given factor between two points. If you provide the two points (a, b) and (c, d), the function result is multiplied (d-b)/(c-a) in the [a, c] range and shifted, so that when the value read by the sensor is a or c, the temperature function returns respectively b and d. Outside of the [a, c] range, the values are simply shifted, so as to preserve the continuity of the measures: an increase of 1 on the value read by the sensor induces an increase of 1 on the returned value.
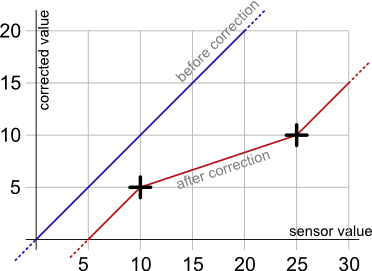
Measure correction with the two calibration points (10,5) and (25,10).
The code allowing you to program this calibration is very similar to the preceding code example.
Double[] ValuesBefore = {10,25};
Double[] ValuesAfter = {5,10};
YTemperature f = YTemperature.FirstTemperature();
f.calibrateFromPoints(ValuesBefore, ValuesAfter);
f.get_module().saveToFlash();
Note that the values before correction must be sorted in a strictly ascending order, otherwise they are simply ignored.
3 to 5 point correction
3 to 5 point corrections are only a generalization of the 2 point method, allowing you to create up to 4 correction ranges for an increased precision. These ranges cannot be disjoint.
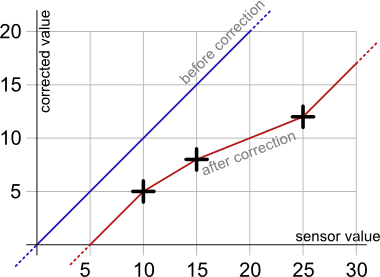
Correction example with 3 calibration points
Back to normal
To cancel the effect of a calibration on a function, call the calibrateFromPoints() method with two empty arrays.
Double[] ValuesBefore = {};
Double[] ValuesAfter = {};
YTemperature f = YTemperature.FirstTemperature();
f.calibrateFromPoints(ValuesBefore, ValuesAfter);
f.get_module().saveToFlash();
You will find, in the Examples\Prog-Calibration directory of the Delphi, VB, and C# libraries, an application allowing you to test the effects of the 1 to 5 point calibration.
Limitations
Due to storage and processing limitations of real values within Yoctopuce sensors, raw values and corrected values must conform to a few numeric consraints:
- Only 3 decimals are taken into account (i.e. resolution is 0.001)
- The lowest allowed value is -2'100'000
- The highest allowed value is +2'100'000
Arbitrary interpolation
It is also possible to compute the interpolation instead of letting the module do it, in order to calculate a spline interpolation, for instance. To do so, you only need to store a callback in the API. This callback must specify the number of calibration points it is expecting.
public static double CustomInterpolation3Points(double rawValue, int calibType,
int[] parameters, double[] beforeValues, double[] afterValues)
{ double result;
// the value to be corrected is rawValue
// calibration points are in beforeValues and afterValues
result = .... // interpolation of your choice
return result;
}
YAPI.RegisterCalibrationHandler(3, CustomInterpolation3Points);
Note that these interpolation callbacks are global, and not specific to each function. Thus, each time someone requests a value from a module which contains in its flash memory the correct number of calibration points, the corresponding callback is called to correct the value before returning it, enabling thus a perfectly transparent measure correction.
23. Firmware Update
There are multiples way to update the firmware of a Yoctopuce module.23.1. VirtualHub or the YoctoHub
It is possible to update the firmware directly from the web interface of VirtualHub or of a YoctoHub. The configuration panel of the module has an "upgrade" button to start a wizard that will guide you through the firmware update procedure.
In case the firmware update fails for any reason, and the module does no start anymore, simply unplug the module then plug it back while maintaining the Yocto-button down. The module will boot in "firmware update" mode and will appear in the VirtualHub interface below the module list.
23.2. The command line library
All the command line tools can update Yoctopuce modules thanks to the downloadAndUpdate command. The module selection mechanism works like for a traditional command. The [target] is the name of the module that you want to update. You can also use the "any" or "all" aliases, or even a name list, where the names are separated by commas, without spaces.
C:\>Executable [options] [target] command [parameters]
The following example updates all the Yoctopuce modules connected by USB.
C:\>YModule all downloadAndUpdate
ok: Yocto-PowerRelay RELAYHI1-266C8(rev=15430) is up to date.
ok: 0 / 0 hubs in 0.000000s.
ok: 0 / 0 shields in 0.000000s.
ok: 1 / 1 devices in 0.130000s 0.130000s per device.
ok: All devices are now up to date.
C:\>
23.3. The Android application Yocto-Firmware
You can update your module firmware from your Android phone or tablet with the Yocto-Firmware application. This application lists all the Yoctopuce modules connected by USB and checks if a more recent firmware is available on www.yoctopuce.com. If a more recent firmware is available, you can update the module. The application is responsible for downloading and installing the new firmware while preserving the module parameters.
Please note: while the firmware is being updated, the module restarts several times. Android interprets a USB device reboot as a disconnection and reconnection of the USB device and asks the authorization to use the USB port again. The user must click on OK for the update process to end successfully.
23.4. Updating the firmware with the programming library
If you need to integrate firmware updates in your application, the libraries offer you an API to update your modules.
Saving and restoring parameters
The get_allSettings() method returns a binary buffer enabling you to save a module persistent parameters. This function is very useful to save the network configuration of a YoctoHub for example.
YWireless wireless = YWireless.FindWireless("reference");
YModule m = wireless.get_module();
byte[] default_config = m.get_allSettings();
saveFile("default.bin", default_config);
...
You can then apply these parameters to other modules with the set_allSettings() method.
byte[] default_config = loadFile("default.bin");
YModule m = YModule.FirstModule();
while (m != null) {
if (m.get_productName() == "YoctoHub-Wireless") {
m.set_allSettings(default_config);
}
m = m.next();
}
Finding the correct firmware
The first step to update a Yoctopuce module is to find which firmware you must use. The checkFirmware(path, onlynew) method of the YModule object does exactly this. The method checks that the firmware given as argument (path) is compatible with the module. If the onlynew parameter is set, this method checks that the firmware is more recent than the version currently used by the module. When the file is not compatible (or if the file is older than the installed version), this method returns an empty string. In the opposite, if the file is valid, the method returns a file access path.
The following piece of code checks that the c:\tmp\METEOMK1.17328.byn is compatible with the module stored in the m variable .
YModule m = YModule.FirstModule();
...
...
string path = "c:\\tmp\METEOMK1.17328.byn";
string newfirm = m.checkFirmware(path, false);
if (newfirm != "") {
Console.WriteLine("firmware " + newfirm + " is compatible");
}
...
The argument can be a directory (instead of a file). In this case, the method checks all the files of the directory recursively and returns the most recent compatible firmware. The following piece of code checks whether there is a more recent firmware in the c:\tmp\ directory.
YModule m = YModule.FirstModule();
...
...
string path = "c:\\tmp";
string newfirm = m.checkFirmware(path, true);
if (newfirm != "") {
Console.WriteLine("firmware " + newfirm + " is compatible and newer");
}
...
You can also give the "www.yoctopuce.com" string as argument to check whether there is a more recent published firmware on Yoctopuce's web site. In this case, the method returns the firmware URL. You can use this URL to download the firmware on your disk or use this URL when updating the firmware (see below). Obviously, this possibility works only if your machine is connected to Internet.
YModule m = YModule.FirstModule();
...
...
string url = m.checkFirmware("www.yoctopuce.com", true);
if (url != "") {
Console.WriteLine("new firmware is available at " + url );
}
...
Updating the firmware
A firmware update can take several minutes. That is why the update process is run as a background task and is driven by the user code thanks to the YFirmwareUdpate class.
To update a Yoctopuce module, you must obtain an instance of the YFirmwareUdpate class with the updateFirmware method of a YModule object. The only parameter of this method is the path of the firmware that you want to install. This method does not immediately start the update, but returns a YFirmwareUdpate object configured to update the module.
string newfirm = m.checkFirmware("www.yoctopuce.com", true);
.....
YFirmwareUpdate fw_update = m.updateFirmware(newfirm);
The startUpdate() method starts the update as a background task. This background task automatically takes care of
- saving the module parameters
- restarting the module in "update" mode
- updating the firmware
- starting the module with the new firmware version
- restoring the parameters
The get_progress() and get_progressMessage() methods enable you to follow the progression of the update. get_progress() returns the progression as a percentage (100 = update complete). get_progressMessage() returns a character string describing the current operation (deleting, writing, rebooting, ...). If the get_progress method returns a negative value, the update process failed. In this case, the get_progressMessage() returns an error message.
The following piece of code starts the update and displays the progress on the standard output.
YFirmwareUpdate fw_update = m.updateFirmware(newfirm);
....
int status = fw_update.startUpdate();
while (status < 100 && status >= 0) {
int newstatus = fw_update.get_progress();
if (newstatus != status) {
Console.WriteLine(status + "% "
+ fw_update.get_progressMessage());
}
YAPI.Sleep(500, ref errmsg);
status = newstatus;
}
if (status < 0) {
Console.WriteLine("Firmware Update failed: "
+ fw_update.get_progressMessage());
} else {
Console.WriteLine("Firmware Updated Successfully!");
}
An Android characteristic
You can update a module firmware using the Android library. However, for modules connected by USB, Android asks the user to authorize the application to access the USB port.
During firmware update, the module restarts several times. Android interprets a USB device reboot as a disconnection and a reconnection to the USB port, and prevents all USB access as long as the user has not closed the pop-up window. The use has to click on OK for the update process to continue correctly. You cannot update a module connected by USB to an Android device without having the user interacting with the device.
23.5. The "update" mode
If you want to erase all the parameters of a module or if your module does not start correctly anymore, you can install a firmware from the "update" mode.
To force the module to work in "update" mode, disconnect it, wait a few seconds, and reconnect it while maintaining the Yocto-button down. This will restart the module in "update" mode. This update mode is protected against corruptions and is always available.
In this mode, the module is not detected by the YModule objects anymore. To obtain the list of connected modules in "update" mode, you must use the YAPI.GetAllBootLoaders() function. This function returns a character string array with the serial numbers of the modules in "update" mode.
List<string> allBootLoader = YAPI.GetAllBootLoaders();
The update process is identical to the standard case (see the preceding section), but you must manually instantiate the YFirmwareUpdate object instead of calling module.updateFirmware(). The constructor takes as argument three parameters: the module serial number, the path of the firmware to be installed, and a byte array with the parameters to be restored at the end of the update (or null to restore default parameters).
YFirmwareUpdateupdate fw_update;
fw_update = new YFirmwareUpdate(allBootLoader[0], newfirm, null);
int status = fw_update.startUpdate();
.....
24. High-level API Reference
This chapter summarizes the high-level API functions to drive your Yocto-Thermocouple. Syntax and exact type names may vary from one language to another, but, unless otherwise stated, all the functions are available in every language. For detailed information regarding the types of arguments and return values for a given language, refer to the definition file for this language (yocto_api.* as well as the other yocto_* files that define the function interfaces).
For languages which support exceptions, all of these functions throw exceptions in case of error by default, rather than returning the documented error value for each function. This is by design, to facilitate debugging. It is however possible to disable the use of exceptions using the yDisableExceptions() function, in case you prefer to work with functions that return error values.
This chapter does not repeat the programming concepts described earlier, in order to stay as concise as possible. In case of doubt, do not hesitate to go back to the chapter describing in details all configurable attributes.
24.1. Class YAPI
General functions
These general functions should be used to initialize and configure the Yoctopuce library. In most cases, a simple call to function yRegisterHub() should be enough. The module-specific functions yFind...() or yFirst...() should then be used to retrieve an object that provides interaction with the module.
In order to use the functions described here, you should include:
java | import com.yoctopuce.YoctoAPI.YAPI; |
dnp | import YoctoProxyAPI.YAPIProxy |
cp | #include "yocto_api_proxy.h" |
ml | import YoctoProxyAPI.YAPIProxy" |
js | <script type='text/javascript' src='yocto_api.js'></script> |
cpp | #include "yocto_api.h" |
m | #import "yocto_api.h" |
pas | uses yocto_api; |
vb | yocto_api.vb |
cs | yocto_api.cs |
uwp | import com.yoctopuce.YoctoAPI.YModule; |
py | from yocto_api import * |
php | require_once('yocto_api.php'); |
ts | in HTML: import { YAPI, YErrorMsg, YModule, YSensor } from '../../dist/esm/yocto_api_browser.js'; in Node.js: import { YAPI, YErrorMsg, YModule, YSensor } from 'yoctolib-cjs/yocto_api_nodejs.js'; |
es | in HTML: <script src="../../lib/yocto_api.js"></script> in node.js: require('yoctolib-es2017/yocto_api.js'); |
vi | YModule.vi |
| Global functions | ||||||||||||
|---|---|---|---|---|---|---|---|---|---|---|---|---|
| YAPI.AddUdevRule(force) | ||||||||||||
Adds a UDEV rule which authorizes all users to access Yoctopuce modules connected to the USB ports. | ||||||||||||
| ||||||||||||
| YAPI.CheckLogicalName(name) | ||||||||||||
Checks if a given string is valid as logical name for a module or a function. | ||||||||||||
| ||||||||||||
| YAPI.ClearHTTPCallbackCacheDir(removeFiles) | ||||||||||||
Disables the HTTP callback cache. | ||||||||||||
| ||||||||||||
| YAPI.DisableExceptions() | ||||||||||||
Disables the use of exceptions to report runtime errors. | ||||||||||||
| ||||||||||||
| YAPI.EnableExceptions() | ||||||||||||
Re-enables the use of exceptions for runtime error handling. | ||||||||||||
| ||||||||||||
| YAPI.EnableUSBHost(osContext) | ||||||||||||
This function is used only on Android. | ||||||||||||
| ||||||||||||
| YAPI.FreeAPI() | ||||||||||||
Waits for all pending communications with Yoctopuce devices to be completed then frees dynamically allocated resources used by the Yoctopuce library. | ||||||||||||
| ||||||||||||
| YAPI.GetAPIVersion() | ||||||||||||
Returns the version identifier for the Yoctopuce library in use. | ||||||||||||
| ||||||||||||
| YAPI.GetCacheValidity() | ||||||||||||
Returns the validity period of the data loaded by the library. | ||||||||||||
| ||||||||||||
| YAPI.GetDeviceListValidity() | ||||||||||||
Returns the delay between each forced enumeration of the used YoctoHubs. | ||||||||||||
| ||||||||||||
| YAPI.GetDllArchitecture() | ||||||||||||
Returns the system architecture for the Yoctopuce communication library in use. | ||||||||||||
| ||||||||||||
| YAPI.GetDllPath() | ||||||||||||
Returns the paths of the DLLs for the Yoctopuce library in use. | ||||||||||||
| ||||||||||||
| YAPI.GetLog(lastLogLine) | ||||||||||||
Retrieves Yoctopuce low-level library diagnostic logs. | ||||||||||||
| ||||||||||||
| YAPI.GetNetworkTimeout() | ||||||||||||
Returns the network connection delay for yRegisterHub() and yUpdateDeviceList(). | ||||||||||||
| ||||||||||||
| YAPI.GetTickCount() | ||||||||||||
Returns the current value of a monotone millisecond-based time counter. | ||||||||||||
| ||||||||||||
| YAPI.HandleEvents(errmsg) | ||||||||||||
Maintains the device-to-library communication channel. | ||||||||||||
| ||||||||||||
| YAPI.InitAPI(mode, errmsg) | ||||||||||||
Initializes the Yoctopuce programming library explicitly. | ||||||||||||
| ||||||||||||
| YAPI.PreregisterHub(url, errmsg) | ||||||||||||
Fault-tolerant alternative to yRegisterHub(). | ||||||||||||
| ||||||||||||
| YAPI.RegisterDeviceArrivalCallback(arrivalCallback) | ||||||||||||
Register a callback function, to be called each time a device is plugged. | ||||||||||||
| ||||||||||||
| YAPI.RegisterDeviceRemovalCallback(removalCallback) | ||||||||||||
Register a callback function, to be called each time a device is unplugged. | ||||||||||||
| ||||||||||||
| YAPI.RegisterHub(url, errmsg) | ||||||||||||
Setup the Yoctopuce library to use modules connected on a given machine. | ||||||||||||
| ||||||||||||
| YAPI.RegisterHubDiscoveryCallback(hubDiscoveryCallback) | ||||||||||||
Register a callback function, to be called each time an Network Hub send an SSDP message. | ||||||||||||
| ||||||||||||
| YAPI.RegisterHubWebsocketCallback(ws, errmsg, authpwd) | ||||||||||||
Variant to yRegisterHub() used to initialize Yoctopuce API on an existing Websocket session, as happens for incoming WebSocket callbacks. | ||||||||||||
|
| ||||||||||||
| YAPI.RegisterLogFunction(logfun) | ||||||||||||
Registers a log callback function. | ||||||||||||
| ||||||||||||
| YAPI.SelectArchitecture(arch) | ||||||||||||
Select the architecture or the library to be loaded to access to USB. | ||||||||||||
| ||||||||||||
| YAPI.SetCacheValidity(cacheValidityMs) | ||||||||||||
Change the validity period of the data loaded by the library. | ||||||||||||
| ||||||||||||
| YAPI.SetDelegate(object) | ||||||||||||
(Objective-C only) Register an object that must follow the protocol YDeviceHotPlug. | ||||||||||||
| ||||||||||||
| YAPI.SetDeviceListValidity(deviceListValidity) | ||||||||||||
Modifies the delay between each forced enumeration of the used YoctoHubs. | ||||||||||||
| ||||||||||||
| YAPI.SetHTTPCallbackCacheDir(directory) | ||||||||||||
Enables the HTTP callback cache. | ||||||||||||
| ||||||||||||
| YAPI.SetNetworkTimeout(networkMsTimeout) | ||||||||||||
Modifies the network connection delay for yRegisterHub() and yUpdateDeviceList(). | ||||||||||||
| ||||||||||||
| YAPI.SetTimeout(callback, ms_timeout, args) | ||||||||||||
Invoke the specified callback function after a given timeout. | ||||||||||||
| ||||||||||||
| YAPI.SetUSBPacketAckMs(pktAckDelay) | ||||||||||||
Enables the acknowledge of every USB packet received by the Yoctopuce library. | ||||||||||||
| ||||||||||||
| YAPI.Sleep(ms_duration, errmsg) | ||||||||||||
Pauses the execution flow for a specified duration. | ||||||||||||
| ||||||||||||
| YAPI.TestHub(url, mstimeout, errmsg) | ||||||||||||
Test if the hub is reachable. | ||||||||||||
| ||||||||||||
| YAPI.TriggerHubDiscovery(errmsg) | ||||||||||||
Force a hub discovery, if a callback as been registered with yRegisterHubDiscoveryCallback it will be called for each net work hub that will respond to the discovery. | ||||||||||||
| ||||||||||||
| YAPI.UnregisterHub(url) | ||||||||||||
Setup the Yoctopuce library to no more use modules connected on a previously registered machine with RegisterHub. | ||||||||||||
| ||||||||||||
| YAPI.UpdateDeviceList(errmsg) | ||||||||||||
Triggers a (re)detection of connected Yoctopuce modules. | ||||||||||||
| ||||||||||||
| YAPI.UpdateDeviceList_async(callback, context) | ||||||||||||
Triggers a (re)detection of connected Yoctopuce modules. | ||||||||||||
|
|
24.2. Class YModule
Global parameters control interface for all Yoctopuce devices
The YModule class can be used with all Yoctopuce USB devices. It can be used to control the module global parameters, and to enumerate the functions provided by each module.
In order to use the functions described here, you should include:
js | <script type='text/javascript' src='yocto_api.js'></script> |
cpp | #include "yocto_api.h" |
m | #import "yocto_api.h" |
pas | uses yocto_api; |
vb | yocto_api.vb |
cs | yocto_api.cs |
java | import com.yoctopuce.YoctoAPI.YModule; |
uwp | import com.yoctopuce.YoctoAPI.YModule; |
py | from yocto_api import * |
php | require_once('yocto_api.php'); |
ts | in HTML: import { YAPI, YErrorMsg, YModule, YSensor } from '../../dist/esm/yocto_api_browser.js'; in Node.js: import { YAPI, YErrorMsg, YModule, YSensor } from 'yoctolib-cjs/yocto_api_nodejs.js'; |
es | in HTML: <script src="../../lib/yocto_api.js"></script> in node.js: require('yoctolib-es2017/yocto_api.js'); |
dnp | import YoctoProxyAPI.YModuleProxy |
cp | #include "yocto_module_proxy.h" |
vi | YModule.vi |
ml | import YoctoProxyAPI.YModuleProxy" |
| Global functions | |||||||||||||
|---|---|---|---|---|---|---|---|---|---|---|---|---|---|
| YModule.FindModule(func) | |||||||||||||
Allows you to find a module from its serial number or from its logical name. | |||||||||||||
| |||||||||||||
| YModule.FindModuleInContext(yctx, func) | |||||||||||||
Retrieves a module for a given identifier in a YAPI context. | |||||||||||||
| |||||||||||||
| YModule.FirstModule() | |||||||||||||
Starts the enumeration of modules currently accessible. | |||||||||||||
| |||||||||||||
| YModule properties | |||||||||||||
| module→Beacon [writable] | |||||||||||||
State of the localization beacon. | |||||||||||||
| |||||||||||||
| module→FirmwareRelease [read-only] | |||||||||||||
Version of the firmware embedded in the module. | |||||||||||||
| |||||||||||||
| module→FunctionId [read-only] | |||||||||||||
Retrieves the hardware identifier of the nth function on the module. | |||||||||||||
| |||||||||||||
| module→HardwareId [read-only] | |||||||||||||
Unique hardware identifier of the module. | |||||||||||||
| |||||||||||||
| module→IsOnline [read-only] | |||||||||||||
Checks if the module is currently reachable. | |||||||||||||
| |||||||||||||
| module→LogicalName [writable] | |||||||||||||
Logical name of the module. | |||||||||||||
| |||||||||||||
| module→Luminosity [writable] | |||||||||||||
Luminosity of the module informative LEDs (from 0 to 100). | |||||||||||||
| |||||||||||||
| module→ProductId [read-only] | |||||||||||||
USB device identifier of the module. | |||||||||||||
| |||||||||||||
| module→ProductName [read-only] | |||||||||||||
Commercial name of the module, as set by the factory. | |||||||||||||
| |||||||||||||
| module→ProductRelease [read-only] | |||||||||||||
Release number of the module hardware, preprogrammed at the factory. | |||||||||||||
| |||||||||||||
| module→SerialNumber [read-only] | |||||||||||||
Serial number of the module, as set by the factory. | |||||||||||||
| |||||||||||||
| YModule methods | |||||||||||||
| module→addFileToHTTPCallback(filename) | |||||||||||||
Adds a file to the uploaded data at the next HTTP callback. | |||||||||||||
| |||||||||||||
| module→checkFirmware(path, onlynew) | |||||||||||||
Tests whether the byn file is valid for this module. | |||||||||||||
| |||||||||||||
| module→clearCache() | |||||||||||||
Invalidates the cache. | |||||||||||||
| |||||||||||||
| module→describe() | |||||||||||||
Returns a descriptive text that identifies the module. | |||||||||||||
| |||||||||||||
| module→download(pathname) | |||||||||||||
Downloads the specified built-in file and returns a binary buffer with its content. | |||||||||||||
| |||||||||||||
| module→functionBaseType(functionIndex) | |||||||||||||
Retrieves the base type of the nth function on the module. | |||||||||||||
| |||||||||||||
| module→functionCount() | |||||||||||||
Returns the number of functions (beside the "module" interface) available on the module. | |||||||||||||
| |||||||||||||
| module→functionId(functionIndex) | |||||||||||||
Retrieves the hardware identifier of the nth function on the module. | |||||||||||||
| |||||||||||||
| module→functionName(functionIndex) | |||||||||||||
Retrieves the logical name of the nth function on the module. | |||||||||||||
| |||||||||||||
| module→functionType(functionIndex) | |||||||||||||
Retrieves the type of the nth function on the module. | |||||||||||||
| |||||||||||||
| module→functionValue(functionIndex) | |||||||||||||
Retrieves the advertised value of the nth function on the module. | |||||||||||||
| |||||||||||||
| module→get_allSettings() | |||||||||||||
Returns all the settings and uploaded files of the module. | |||||||||||||
| |||||||||||||
| module→get_beacon() | |||||||||||||
Returns the state of the localization beacon. | |||||||||||||
| |||||||||||||
| module→get_errorMessage() | |||||||||||||
Returns the error message of the latest error with this module object. | |||||||||||||
| |||||||||||||
| module→get_errorType() | |||||||||||||
Returns the numerical error code of the latest error with this module object. | |||||||||||||
| |||||||||||||
| module→get_firmwareRelease() | |||||||||||||
Returns the version of the firmware embedded in the module. | |||||||||||||
| |||||||||||||
| module→get_functionIds(funType) | |||||||||||||
Retrieve all hardware identifier that match the type passed in argument. | |||||||||||||
| |||||||||||||
| module→get_hardwareId() | |||||||||||||
Returns the unique hardware identifier of the module. | |||||||||||||
| |||||||||||||
| module→get_icon2d() | |||||||||||||
Returns the icon of the module. | |||||||||||||
| |||||||||||||
| module→get_lastLogs() | |||||||||||||
Returns a string with last logs of the module. | |||||||||||||
| |||||||||||||
| module→get_logicalName() | |||||||||||||
Returns the logical name of the module. | |||||||||||||
| |||||||||||||
| module→get_luminosity() | |||||||||||||
Returns the luminosity of the module informative LEDs (from 0 to 100). | |||||||||||||
| |||||||||||||
| module→get_parentHub() | |||||||||||||
Returns the serial number of the YoctoHub on which this module is connected. | |||||||||||||
| |||||||||||||
| module→get_persistentSettings() | |||||||||||||
Returns the current state of persistent module settings. | |||||||||||||
| |||||||||||||
| module→get_productId() | |||||||||||||
Returns the USB device identifier of the module. | |||||||||||||
| |||||||||||||
| module→get_productName() | |||||||||||||
Returns the commercial name of the module, as set by the factory. | |||||||||||||
| |||||||||||||
| module→get_productRelease() | |||||||||||||
Returns the release number of the module hardware, preprogrammed at the factory. | |||||||||||||
| |||||||||||||
| module→get_rebootCountdown() | |||||||||||||
Returns the remaining number of seconds before the module restarts, or zero when no reboot has been scheduled. | |||||||||||||
| |||||||||||||
| module→get_serialNumber() | |||||||||||||
Returns the serial number of the module, as set by the factory. | |||||||||||||
| |||||||||||||
| module→get_subDevices() | |||||||||||||
Returns a list of all the modules that are plugged into the current module. | |||||||||||||
| |||||||||||||
| module→get_upTime() | |||||||||||||
Returns the number of milliseconds spent since the module was powered on. | |||||||||||||
| |||||||||||||
| module→get_url() | |||||||||||||
Returns the URL used to access the module. | |||||||||||||
| |||||||||||||
| module→get_usbCurrent() | |||||||||||||
Returns the current consumed by the module on the USB bus, in milli-amps. | |||||||||||||
| |||||||||||||
| module→get_userData() | |||||||||||||
Returns the value of the userData attribute, as previously stored using method set_userData. | |||||||||||||
| |||||||||||||
| module→get_userVar() | |||||||||||||
Returns the value previously stored in this attribute. | |||||||||||||
| |||||||||||||
| module→hasFunction(funcId) | |||||||||||||
Tests if the device includes a specific function. | |||||||||||||
| |||||||||||||
| module→isOnline() | |||||||||||||
Checks if the module is currently reachable, without raising any error. | |||||||||||||
| |||||||||||||
| module→isOnline_async(callback, context) | |||||||||||||
Checks if the module is currently reachable, without raising any error. | |||||||||||||
|
| |||||||||||||
| module→load(msValidity) | |||||||||||||
Preloads the module cache with a specified validity duration. | |||||||||||||
| |||||||||||||
| module→load_async(msValidity, callback, context) | |||||||||||||
Preloads the module cache with a specified validity duration (asynchronous version). | |||||||||||||
|
| |||||||||||||
| module→log(text) | |||||||||||||
Adds a text message to the device logs. | |||||||||||||
| |||||||||||||
| module→nextModule() | |||||||||||||
Continues the module enumeration started using yFirstModule(). | |||||||||||||
| |||||||||||||
| module→reboot(secBeforeReboot) | |||||||||||||
Schedules a simple module reboot after the given number of seconds. | |||||||||||||
| |||||||||||||
| module→registerBeaconCallback(callback) | |||||||||||||
Register a callback function, to be called when the localization beacon of the module has been changed. | |||||||||||||
| |||||||||||||
| module→registerConfigChangeCallback(callback) | |||||||||||||
Register a callback function, to be called when a persistent settings in a device configuration has been changed (e.g. | |||||||||||||
| |||||||||||||
| module→registerLogCallback(callback) | |||||||||||||
Registers a device log callback function. | |||||||||||||
| |||||||||||||
| module→revertFromFlash() | |||||||||||||
Reloads the settings stored in the nonvolatile memory, as when the module is powered on. | |||||||||||||
| |||||||||||||
| module→saveToFlash() | |||||||||||||
Saves current settings in the nonvolatile memory of the module. | |||||||||||||
| |||||||||||||
| module→set_allSettings(settings) | |||||||||||||
Restores all the settings of the device. | |||||||||||||
| |||||||||||||
| module→set_allSettingsAndFiles(settings) | |||||||||||||
Restores all the settings and uploaded files to the module. | |||||||||||||
| |||||||||||||
| module→set_beacon(newval) | |||||||||||||
Turns on or off the module localization beacon. | |||||||||||||
| |||||||||||||
| module→set_logicalName(newval) | |||||||||||||
Changes the logical name of the module. | |||||||||||||
| |||||||||||||
| module→set_luminosity(newval) | |||||||||||||
Changes the luminosity of the module informative leds. | |||||||||||||
| |||||||||||||
| module→set_userData(data) | |||||||||||||
Stores a user context provided as argument in the userData attribute of the function. | |||||||||||||
| |||||||||||||
| module→set_userVar(newval) | |||||||||||||
Stores a 32 bit value in the device RAM. | |||||||||||||
| |||||||||||||
| module→triggerConfigChangeCallback() | |||||||||||||
Triggers a configuration change callback, to check if they are supported or not. | |||||||||||||
| |||||||||||||
| module→triggerFirmwareUpdate(secBeforeReboot) | |||||||||||||
Schedules a module reboot into special firmware update mode. | |||||||||||||
| |||||||||||||
| module→updateFirmware(path) | |||||||||||||
Prepares a firmware update of the module. | |||||||||||||
| |||||||||||||
| module→updateFirmwareEx(path, force) | |||||||||||||
Prepares a firmware update of the module. | |||||||||||||
| |||||||||||||
| module→wait_async(callback, context) | |||||||||||||
Waits for all pending asynchronous commands on the module to complete, and invoke the user-provided callback function. | |||||||||||||
|
24.3. Class YTemperature
Temperature sensor control interface, available for instance in the Yocto-Meteo-V2, the Yocto-PT100, the Yocto-Temperature or the Yocto-Thermocouple
The YTemperature class allows you to read and configure Yoctopuce temperature sensors. It inherits from YSensor class the core functions to read measurements, to register callback functions, and to access the autonomous datalogger. This class adds the ability to configure some specific parameters for some sensors (connection type, temperature mapping table).
In order to use the functions described here, you should include:
js | <script type='text/javascript' src='yocto_temperature.js'></script> |
cpp | #include "yocto_temperature.h" |
m | #import "yocto_temperature.h" |
pas | uses yocto_temperature; |
vb | yocto_temperature.vb |
cs | yocto_temperature.cs |
java | import com.yoctopuce.YoctoAPI.YTemperature; |
uwp | import com.yoctopuce.YoctoAPI.YTemperature; |
py | from yocto_temperature import * |
php | require_once('yocto_temperature.php'); |
ts | in HTML: import { YTemperature } from '../../dist/esm/yocto_temperature.js'; in Node.js: import { YTemperature } from 'yoctolib-cjs/yocto_temperature.js'; |
es | in HTML: <script src="../../lib/yocto_temperature.js"></script> in node.js: require('yoctolib-es2017/yocto_temperature.js'); |
dnp | import YoctoProxyAPI.YTemperatureProxy |
cp | #include "yocto_temperature_proxy.h" |
vi | YTemperature.vi |
ml | import YoctoProxyAPI.YTemperatureProxy |
| Global functions | |||||||||||||
|---|---|---|---|---|---|---|---|---|---|---|---|---|---|
| YTemperature.FindTemperature(func) | |||||||||||||
Retrieves a temperature sensor for a given identifier. | |||||||||||||
| |||||||||||||
| YTemperature.FindTemperatureInContext(yctx, func) | |||||||||||||
Retrieves a temperature sensor for a given identifier in a YAPI context. | |||||||||||||
| |||||||||||||
| YTemperature.FirstTemperature() | |||||||||||||
Starts the enumeration of temperature sensors currently accessible. | |||||||||||||
| |||||||||||||
| YTemperature.FirstTemperatureInContext(yctx) | |||||||||||||
Starts the enumeration of temperature sensors currently accessible. | |||||||||||||
| |||||||||||||
| YTemperature.GetSimilarFunctions() | |||||||||||||
Enumerates all functions of type Temperature available on the devices currently reachable by the library, and returns their unique hardware ID. | |||||||||||||
| |||||||||||||
| YTemperature properties | |||||||||||||
| temperature→AdvMode [writable] | |||||||||||||
Measuring mode used for the advertised value pushed to the parent hub. | |||||||||||||
| |||||||||||||
| temperature→AdvertisedValue [read-only] | |||||||||||||
Short string representing the current state of the function. | |||||||||||||
| |||||||||||||
| temperature→FriendlyName [read-only] | |||||||||||||
Global identifier of the function in the format MODULE_NAME.FUNCTION_NAME. | |||||||||||||
| |||||||||||||
| temperature→FunctionId [read-only] | |||||||||||||
Hardware identifier of the sensor, without reference to the module. | |||||||||||||
| |||||||||||||
| temperature→HardwareId [read-only] | |||||||||||||
Unique hardware identifier of the function in the form SERIAL.FUNCTIONID. | |||||||||||||
| |||||||||||||
| temperature→IsOnline [read-only] | |||||||||||||
Checks if the function is currently reachable. | |||||||||||||
| |||||||||||||
| temperature→LogFrequency [writable] | |||||||||||||
Datalogger recording frequency for this function, or "OFF" when measures are not stored in the data logger flash memory. | |||||||||||||
| |||||||||||||
| temperature→LogicalName [writable] | |||||||||||||
Logical name of the function. | |||||||||||||
| |||||||||||||
| temperature→ReportFrequency [writable] | |||||||||||||
Timed value notification frequency, or "OFF" if timed value notifications are disabled for this function. | |||||||||||||
| |||||||||||||
| temperature→Resolution [writable] | |||||||||||||
Resolution of the measured values. | |||||||||||||
| |||||||||||||
| temperature→SensorType [writable] | |||||||||||||
Temperature sensor type. | |||||||||||||
| |||||||||||||
| temperature→SerialNumber [read-only] | |||||||||||||
Serial number of the module, as set by the factory. | |||||||||||||
| |||||||||||||
| temperature→SignalUnit [read-only] | |||||||||||||
Measuring unit of the electrical signal used by the sensor. | |||||||||||||
| |||||||||||||
| YTemperature methods | |||||||||||||
| temperature→calibrateFromPoints(rawValues, refValues) | |||||||||||||
Configures error correction data points, in particular to compensate for a possible perturbation of the measure caused by an enclosure. | |||||||||||||
| |||||||||||||
| temperature→clearCache() | |||||||||||||
Invalidates the cache. | |||||||||||||
| |||||||||||||
| temperature→describe() | |||||||||||||
Returns a short text that describes unambiguously the instance of the temperature sensor in the form TYPE(NAME)=SERIAL.FUNCTIONID. | |||||||||||||
| |||||||||||||
| temperature→get_advMode() | |||||||||||||
Returns the measuring mode used for the advertised value pushed to the parent hub. | |||||||||||||
| |||||||||||||
| temperature→get_advertisedValue() | |||||||||||||
Returns the current value of the temperature sensor (no more than 6 characters). | |||||||||||||
| |||||||||||||
| temperature→get_currentRawValue() | |||||||||||||
Returns the uncalibrated, unrounded raw value returned by the sensor, in Celsius, as a floating point number. | |||||||||||||
| |||||||||||||
| temperature→get_currentValue() | |||||||||||||
Returns the current value of the temperature, in Celsius, as a floating point number. | |||||||||||||
| |||||||||||||
| temperature→get_dataLogger() | |||||||||||||
Returns the YDatalogger object of the device hosting the sensor. | |||||||||||||
| |||||||||||||
| temperature→get_errorMessage() | |||||||||||||
Returns the error message of the latest error with the temperature sensor. | |||||||||||||
| |||||||||||||
| temperature→get_errorType() | |||||||||||||
Returns the numerical error code of the latest error with the temperature sensor. | |||||||||||||
| |||||||||||||
| temperature→get_friendlyName() | |||||||||||||
Returns a global identifier of the temperature sensor in the format MODULE_NAME.FUNCTION_NAME. | |||||||||||||
| |||||||||||||
| temperature→get_functionDescriptor() | |||||||||||||
Returns a unique identifier of type YFUN_DESCR corresponding to the function. | |||||||||||||
| |||||||||||||
| temperature→get_functionId() | |||||||||||||
Returns the hardware identifier of the temperature sensor, without reference to the module. | |||||||||||||
| |||||||||||||
| temperature→get_hardwareId() | |||||||||||||
Returns the unique hardware identifier of the temperature sensor in the form SERIAL.FUNCTIONID. | |||||||||||||
| |||||||||||||
| temperature→get_highestValue() | |||||||||||||
Returns the maximal value observed for the temperature since the device was started. | |||||||||||||
| |||||||||||||
| temperature→get_logFrequency() | |||||||||||||
Returns the datalogger recording frequency for this function, or "OFF" when measures are not stored in the data logger flash memory. | |||||||||||||
| |||||||||||||
| temperature→get_logicalName() | |||||||||||||
Returns the logical name of the temperature sensor. | |||||||||||||
| |||||||||||||
| temperature→get_lowestValue() | |||||||||||||
Returns the minimal value observed for the temperature since the device was started. | |||||||||||||
| |||||||||||||
| temperature→get_module() | |||||||||||||
Gets the YModule object for the device on which the function is located. | |||||||||||||
| |||||||||||||
| temperature→get_module_async(callback, context) | |||||||||||||
Gets the YModule object for the device on which the function is located (asynchronous version). | |||||||||||||
|
| |||||||||||||
| temperature→get_recordedData(startTime, endTime) | |||||||||||||
Retrieves a YDataSet object holding historical data for this sensor, for a specified time interval. | |||||||||||||
| |||||||||||||
| temperature→get_reportFrequency() | |||||||||||||
Returns the timed value notification frequency, or "OFF" if timed value notifications are disabled for this function. | |||||||||||||
| |||||||||||||
| temperature→get_resolution() | |||||||||||||
Returns the resolution of the measured values. | |||||||||||||
| |||||||||||||
| temperature→get_sensorState() | |||||||||||||
Returns the sensor state code, which is zero when there is an up-to-date measure available or a positive code if the sensor is not able to provide a measure right now. | |||||||||||||
| |||||||||||||
| temperature→get_sensorType() | |||||||||||||
Returns the temperature sensor type. | |||||||||||||
| |||||||||||||
| temperature→get_serialNumber() | |||||||||||||
Returns the serial number of the module, as set by the factory. | |||||||||||||
| |||||||||||||
| temperature→get_signalUnit() | |||||||||||||
Returns the measuring unit of the electrical signal used by the sensor. | |||||||||||||
| |||||||||||||
| temperature→get_signalValue() | |||||||||||||
Returns the current value of the electrical signal measured by the sensor. | |||||||||||||
| |||||||||||||
| temperature→get_unit() | |||||||||||||
Returns the measuring unit for the temperature. | |||||||||||||
| |||||||||||||
| temperature→get_userData() | |||||||||||||
Returns the value of the userData attribute, as previously stored using method set_userData. | |||||||||||||
| |||||||||||||
| temperature→isOnline() | |||||||||||||
Checks if the temperature sensor is currently reachable, without raising any error. | |||||||||||||
| |||||||||||||
| temperature→isOnline_async(callback, context) | |||||||||||||
Checks if the temperature sensor is currently reachable, without raising any error (asynchronous version). | |||||||||||||
|
| |||||||||||||
| temperature→isReadOnly() | |||||||||||||
Indicates whether changes to the function are prohibited or allowed. | |||||||||||||
| |||||||||||||
| temperature→isSensorReady() | |||||||||||||
Checks if the sensor is currently able to provide an up-to-date measure. | |||||||||||||
| |||||||||||||
| temperature→load(msValidity) | |||||||||||||
Preloads the temperature sensor cache with a specified validity duration. | |||||||||||||
| |||||||||||||
| temperature→loadAttribute(attrName) | |||||||||||||
Returns the current value of a single function attribute, as a text string, as quickly as possible but without using the cached value. | |||||||||||||
| |||||||||||||
| temperature→loadCalibrationPoints(rawValues, refValues) | |||||||||||||
Retrieves error correction data points previously entered using the method calibrateFromPoints. | |||||||||||||
| |||||||||||||
| temperature→loadThermistorResponseTable(tempValues, resValues) | |||||||||||||
Retrieves the thermistor response table previously configured using the set_thermistorResponseTable function. | |||||||||||||
| |||||||||||||
| temperature→load_async(msValidity, callback, context) | |||||||||||||
Preloads the temperature sensor cache with a specified validity duration (asynchronous version). | |||||||||||||
|
| |||||||||||||
| temperature→muteValueCallbacks() | |||||||||||||
Disables the propagation of every new advertised value to the parent hub. | |||||||||||||
| |||||||||||||
| temperature→nextTemperature() | |||||||||||||
Continues the enumeration of temperature sensors started using yFirstTemperature(). | |||||||||||||
| |||||||||||||
| temperature→registerTimedReportCallback(callback) | |||||||||||||
Registers the callback function that is invoked on every periodic timed notification. | |||||||||||||
| |||||||||||||
| temperature→registerValueCallback(callback) | |||||||||||||
Registers the callback function that is invoked on every change of advertised value. | |||||||||||||
| |||||||||||||
| temperature→set_advMode(newval) | |||||||||||||
Changes the measuring mode used for the advertised value pushed to the parent hub. | |||||||||||||
| |||||||||||||
| temperature→set_highestValue(newval) | |||||||||||||
Changes the recorded maximal value observed. | |||||||||||||
| |||||||||||||
| temperature→set_logFrequency(newval) | |||||||||||||
Changes the datalogger recording frequency for this function. | |||||||||||||
| |||||||||||||
| temperature→set_logicalName(newval) | |||||||||||||
Changes the logical name of the temperature sensor. | |||||||||||||
| |||||||||||||
| temperature→set_lowestValue(newval) | |||||||||||||
Changes the recorded minimal value observed. | |||||||||||||
| |||||||||||||
| temperature→set_ntcParameters(res25, beta) | |||||||||||||
Configures NTC thermistor parameters in order to properly compute the temperature from the measured resistance. | |||||||||||||
| |||||||||||||
| temperature→set_reportFrequency(newval) | |||||||||||||
Changes the timed value notification frequency for this function. | |||||||||||||
| |||||||||||||
| temperature→set_resolution(newval) | |||||||||||||
Changes the resolution of the measured physical values. | |||||||||||||
| |||||||||||||
| temperature→set_sensorType(newval) | |||||||||||||
Changes the temperature sensor type. | |||||||||||||
| |||||||||||||
| temperature→set_thermistorResponseTable(tempValues, resValues) | |||||||||||||
Records a thermistor response table, in order to interpolate the temperature from the measured resistance. | |||||||||||||
| |||||||||||||
| temperature→set_unit(newval) | |||||||||||||
Changes the measuring unit for the measured temperature. | |||||||||||||
| |||||||||||||
| temperature→set_userData(data) | |||||||||||||
Stores a user context provided as argument in the userData attribute of the function. | |||||||||||||
| |||||||||||||
| temperature→startDataLogger() | |||||||||||||
Starts the data logger on the device. | |||||||||||||
| |||||||||||||
| temperature→stopDataLogger() | |||||||||||||
Stops the datalogger on the device. | |||||||||||||
| |||||||||||||
| temperature→unmuteValueCallbacks() | |||||||||||||
Re-enables the propagation of every new advertised value to the parent hub. | |||||||||||||
| |||||||||||||
| temperature→wait_async(callback, context) | |||||||||||||
Waits for all pending asynchronous commands on the module to complete, and invoke the user-provided callback function. | |||||||||||||
|
24.4. Class YDataLogger
DataLogger control interface, available on most Yoctopuce sensors.
A non-volatile memory for storing ongoing measured data is available on most Yoctopuce sensors. Recording can happen automatically, without requiring a permanent connection to a computer. The YDataLogger class controls the global parameters of the internal data logger. Recording control (start/stop) as well as data retrieval is done at sensor objects level.
In order to use the functions described here, you should include:
js | <script type='text/javascript' src='yocto_module.js'></script> |
cpp | #include "yocto_module.h" |
m | #import "yocto_module.h" |
pas | uses yocto_module; |
vb | yocto_module.vb |
cs | yocto_module.cs |
java | import com.yoctopuce.YoctoAPI.YDataLogger; |
uwp | import com.yoctopuce.YoctoAPI.YDataLogger; |
py | from yocto_module import * |
php | require_once('yocto_module.php'); |
ts | in HTML: import { YDataLogger } from '../../dist/esm/yocto_module.js'; in Node.js: import { YDataLogger } from 'yoctolib-cjs/yocto_module.js'; |
es | in HTML: <script src="../../lib/yocto_module.js"></script> in node.js: require('yoctolib-es2017/yocto_module.js'); |
dnp | import YoctoProxyAPI.YDataLoggerProxy |
cp | #include "yocto_module_proxy.h" |
vi | YDataLogger.vi |
ml | import YoctoProxyAPI.YDataLoggerProxy |
| Global functions | |||||||||||||
|---|---|---|---|---|---|---|---|---|---|---|---|---|---|
| YDataLogger.FindDataLogger(func) | |||||||||||||
Retrieves a data logger for a given identifier. | |||||||||||||
| |||||||||||||
| YDataLogger.FindDataLoggerInContext(yctx, func) | |||||||||||||
Retrieves a data logger for a given identifier in a YAPI context. | |||||||||||||
| |||||||||||||
| YDataLogger.FirstDataLogger() | |||||||||||||
Starts the enumeration of data loggers currently accessible. | |||||||||||||
| |||||||||||||
| YDataLogger.FirstDataLoggerInContext(yctx) | |||||||||||||
Starts the enumeration of data loggers currently accessible. | |||||||||||||
| |||||||||||||
| YDataLogger.GetSimilarFunctions() | |||||||||||||
Enumerates all functions of type DataLogger available on the devices currently reachable by the library, and returns their unique hardware ID. | |||||||||||||
| |||||||||||||
| YDataLogger properties | |||||||||||||
| datalogger→AdvertisedValue [read-only] | |||||||||||||
Short string representing the current state of the function. | |||||||||||||
| |||||||||||||
| datalogger→AutoStart [writable] | |||||||||||||
Default activation state of the data logger on power up. | |||||||||||||
| |||||||||||||
| datalogger→BeaconDriven [writable] | |||||||||||||
True if the data logger is synchronised with the localization beacon. | |||||||||||||
| |||||||||||||
| datalogger→FriendlyName [read-only] | |||||||||||||
Global identifier of the function in the format MODULE_NAME.FUNCTION_NAME. | |||||||||||||
| |||||||||||||
| datalogger→FunctionId [read-only] | |||||||||||||
Hardware identifier of the data logger, without reference to the module. | |||||||||||||
| |||||||||||||
| datalogger→HardwareId [read-only] | |||||||||||||
Unique hardware identifier of the function in the form SERIAL.FUNCTIONID. | |||||||||||||
| |||||||||||||
| datalogger→IsOnline [read-only] | |||||||||||||
Checks if the function is currently reachable. | |||||||||||||
| |||||||||||||
| datalogger→LogicalName [writable] | |||||||||||||
Logical name of the function. | |||||||||||||
| |||||||||||||
| datalogger→Recording [writable] | |||||||||||||
Current activation state of the data logger. | |||||||||||||
| |||||||||||||
| datalogger→SerialNumber [read-only] | |||||||||||||
Serial number of the module, as set by the factory. | |||||||||||||
| |||||||||||||
| YDataLogger methods | |||||||||||||
| datalogger→clearCache() | |||||||||||||
Invalidates the cache. | |||||||||||||
| |||||||||||||
| datalogger→describe() | |||||||||||||
Returns a short text that describes unambiguously the instance of the data logger in the form TYPE(NAME)=SERIAL.FUNCTIONID. | |||||||||||||
| |||||||||||||
| datalogger→forgetAllDataStreams() | |||||||||||||
Clears the data logger memory and discards all recorded data streams. | |||||||||||||
| |||||||||||||
| datalogger→get_advertisedValue() | |||||||||||||
Returns the current value of the data logger (no more than 6 characters). | |||||||||||||
| |||||||||||||
| datalogger→get_autoStart() | |||||||||||||
Returns the default activation state of the data logger on power up. | |||||||||||||
| |||||||||||||
| datalogger→get_beaconDriven() | |||||||||||||
Returns true if the data logger is synchronised with the localization beacon. | |||||||||||||
| |||||||||||||
| datalogger→get_currentRunIndex() | |||||||||||||
Returns the current run number, corresponding to the number of times the module was powered on with the dataLogger enabled at some point. | |||||||||||||
| |||||||||||||
| datalogger→get_dataSets() | |||||||||||||
Returns a list of YDataSet objects that can be used to retrieve all measures stored by the data logger. | |||||||||||||
| |||||||||||||
| datalogger→get_dataStreams(v) | |||||||||||||
Builds a list of all data streams hold by the data logger (legacy method). | |||||||||||||
|
| |||||||||||||
| datalogger→get_errorMessage() | |||||||||||||
Returns the error message of the latest error with the data logger. | |||||||||||||
| |||||||||||||
| datalogger→get_errorType() | |||||||||||||
Returns the numerical error code of the latest error with the data logger. | |||||||||||||
| |||||||||||||
| datalogger→get_friendlyName() | |||||||||||||
Returns a global identifier of the data logger in the format MODULE_NAME.FUNCTION_NAME. | |||||||||||||
| |||||||||||||
| datalogger→get_functionDescriptor() | |||||||||||||
Returns a unique identifier of type YFUN_DESCR corresponding to the function. | |||||||||||||
| |||||||||||||
| datalogger→get_functionId() | |||||||||||||
Returns the hardware identifier of the data logger, without reference to the module. | |||||||||||||
| |||||||||||||
| datalogger→get_hardwareId() | |||||||||||||
Returns the unique hardware identifier of the data logger in the form SERIAL.FUNCTIONID. | |||||||||||||
| |||||||||||||
| datalogger→get_logicalName() | |||||||||||||
Returns the logical name of the data logger. | |||||||||||||
| |||||||||||||
| datalogger→get_module() | |||||||||||||
Gets the YModule object for the device on which the function is located. | |||||||||||||
| |||||||||||||
| datalogger→get_module_async(callback, context) | |||||||||||||
Gets the YModule object for the device on which the function is located (asynchronous version). | |||||||||||||
|
| |||||||||||||
| datalogger→get_recording() | |||||||||||||
Returns the current activation state of the data logger. | |||||||||||||
| |||||||||||||
| datalogger→get_serialNumber() | |||||||||||||
Returns the serial number of the module, as set by the factory. | |||||||||||||
| |||||||||||||
| datalogger→get_timeUTC() | |||||||||||||
Returns the Unix timestamp for current UTC time, if known. | |||||||||||||
| |||||||||||||
| datalogger→get_usage() | |||||||||||||
Returns the percentage of datalogger memory in use. | |||||||||||||
| |||||||||||||
| datalogger→get_userData() | |||||||||||||
Returns the value of the userData attribute, as previously stored using method set_userData. | |||||||||||||
| |||||||||||||
| datalogger→isOnline() | |||||||||||||
Checks if the data logger is currently reachable, without raising any error. | |||||||||||||
| |||||||||||||
| datalogger→isOnline_async(callback, context) | |||||||||||||
Checks if the data logger is currently reachable, without raising any error (asynchronous version). | |||||||||||||
|
| |||||||||||||
| datalogger→isReadOnly() | |||||||||||||
Indicates whether changes to the function are prohibited or allowed. | |||||||||||||
| |||||||||||||
| datalogger→load(msValidity) | |||||||||||||
Preloads the data logger cache with a specified validity duration. | |||||||||||||
| |||||||||||||
| datalogger→loadAttribute(attrName) | |||||||||||||
Returns the current value of a single function attribute, as a text string, as quickly as possible but without using the cached value. | |||||||||||||
| |||||||||||||
| datalogger→load_async(msValidity, callback, context) | |||||||||||||
Preloads the data logger cache with a specified validity duration (asynchronous version). | |||||||||||||
|
| |||||||||||||
| datalogger→muteValueCallbacks() | |||||||||||||
Disables the propagation of every new advertised value to the parent hub. | |||||||||||||
| |||||||||||||
| datalogger→nextDataLogger() | |||||||||||||
Continues the enumeration of data loggers started using yFirstDataLogger(). | |||||||||||||
| |||||||||||||
| datalogger→registerValueCallback(callback) | |||||||||||||
Registers the callback function that is invoked on every change of advertised value. | |||||||||||||
| |||||||||||||
| datalogger→set_autoStart(newval) | |||||||||||||
Changes the default activation state of the data logger on power up. | |||||||||||||
| |||||||||||||
| datalogger→set_beaconDriven(newval) | |||||||||||||
Changes the type of synchronisation of the data logger. | |||||||||||||
| |||||||||||||
| datalogger→set_logicalName(newval) | |||||||||||||
Changes the logical name of the data logger. | |||||||||||||
| |||||||||||||
| datalogger→set_recording(newval) | |||||||||||||
Changes the activation state of the data logger to start/stop recording data. | |||||||||||||
| |||||||||||||
| datalogger→set_timeUTC(newval) | |||||||||||||
Changes the current UTC time reference used for recorded data. | |||||||||||||
| |||||||||||||
| datalogger→set_userData(data) | |||||||||||||
Stores a user context provided as argument in the userData attribute of the function. | |||||||||||||
| |||||||||||||
| datalogger→unmuteValueCallbacks() | |||||||||||||
Re-enables the propagation of every new advertised value to the parent hub. | |||||||||||||
| |||||||||||||
| datalogger→wait_async(callback, context) | |||||||||||||
Waits for all pending asynchronous commands on the module to complete, and invoke the user-provided callback function. | |||||||||||||
|
24.5. Class YDataSet
Recorded data sequence, as returned by sensor.get_recordedData()
YDataSet objects make it possible to retrieve a set of recorded measures for a given sensor and a specified time interval. They can be used to load data points with a progress report. When the YDataSet object is instantiated by the sensor.get_recordedData() function, no data is yet loaded from the module. It is only when the loadMore() method is called over and over than data will be effectively loaded from the dataLogger.
A preview of available measures is available using the function get_preview() as soon as loadMore() has been called once. Measures themselves are available using function get_measures() when loaded by subsequent calls to loadMore().
This class can only be used on devices that use a relatively recent firmware, as YDataSet objects are not supported by firmwares older than version 13000.
In order to use the functions described here, you should include:
js | <script type='text/javascript' src='yocto_module.js'></script> |
cpp | #include "yocto_module.h" |
m | #import "yocto_module.h" |
pas | uses yocto_module; |
vb | yocto_module.vb |
cs | yocto_module.cs |
java | import com.yoctopuce.YoctoAPI.YDataSet; |
uwp | import com.yoctopuce.YoctoAPI.YDataSet; |
py | from yocto_module import * |
php | require_once('yocto_module.php'); |
ts | in HTML: import { YDataSet } from '../../dist/esm/yocto_module.js'; in Node.js: import { YDataSet } from 'yoctolib-cjs/yocto_module.js'; |
es | in HTML: <script src="../../lib/yocto_module.js"></script> in node.js: require('yoctolib-es2017/yocto_module.js'); |
dnp | import YoctoProxyAPI.YDataSetProxy |
cp | #include "yocto_module_proxy.h" |
ml | import YoctoProxyAPI.YDataSetProxy |
| Global functions | ||||||||||||
|---|---|---|---|---|---|---|---|---|---|---|---|---|
| YDataSet.Init(sensorName, startTime, endTime) | ||||||||||||
Retrieves a YDataSet object holding historical data for a sensor given by its name or hardware identifier, for a specified time interval. | ||||||||||||
|
| ||||||||||||
| YDataSet methods | ||||||||||||
| dataset→get_endTimeUTC() | ||||||||||||
Returns the end time of the dataset, relative to the Jan 1, 1970. | ||||||||||||
| ||||||||||||
| dataset→get_functionId() | ||||||||||||
Returns the hardware identifier of the function that performed the measure, without reference to the module. | ||||||||||||
| ||||||||||||
| dataset→get_hardwareId() | ||||||||||||
Returns the unique hardware identifier of the function who performed the measures, in the form SERIAL.FUNCTIONID. | ||||||||||||
| ||||||||||||
| dataset→get_measures() | ||||||||||||
Returns all measured values currently available for this DataSet, as a list of YMeasure objects. | ||||||||||||
| ||||||||||||
| dataset→get_measuresAt(measure) | ||||||||||||
Returns the detailed set of measures for the time interval corresponding to a given condensed measures previously returned by get_preview(). | ||||||||||||
| ||||||||||||
| dataset→get_measuresAvgAt(index) | ||||||||||||
Returns the average value observed during the time interval covered by the specified entry in the preview. | ||||||||||||
|
| ||||||||||||
| dataset→get_measuresEndTimeAt(index) | ||||||||||||
Returns the end time of the specified entry in the preview, relative to the Jan 1, 1970 UTC (Unix timestamp). | ||||||||||||
|
| ||||||||||||
| dataset→get_measuresMaxAt(index) | ||||||||||||
Returns the largest value observed during the time interval covered by the specified entry in the preview. | ||||||||||||
|
| ||||||||||||
| dataset→get_measuresMinAt(index) | ||||||||||||
Returns the smallest value observed during the time interval covered by the specified entry in the preview. | ||||||||||||
|
| ||||||||||||
| dataset→get_measuresRecordCount() | ||||||||||||
Returns the number of measurements currently loaded for this data set. | ||||||||||||
|
| ||||||||||||
| dataset→get_measuresStartTimeAt(index) | ||||||||||||
Returns the start time of the specified entry in the preview, relative to the Jan 1, 1970 UTC (Unix timestamp). | ||||||||||||
|
| ||||||||||||
| dataset→get_preview() | ||||||||||||
Returns a condensed version of the measures that can retrieved in this YDataSet, as a list of YMeasure objects. | ||||||||||||
| ||||||||||||
| dataset→get_previewAvgAt(index) | ||||||||||||
Returns the average value observed during the time interval covered by the specified entry in the preview. | ||||||||||||
|
| ||||||||||||
| dataset→get_previewEndTimeAt(index) | ||||||||||||
Returns the end time of the specified entry in the preview, relative to the Jan 1, 1970 UTC (Unix timestamp). | ||||||||||||
|
| ||||||||||||
| dataset→get_previewMaxAt(index) | ||||||||||||
Returns the largest value observed during the time interval covered by the specified entry in the preview. | ||||||||||||
|
| ||||||||||||
| dataset→get_previewMinAt(index) | ||||||||||||
Returns the smallest value observed during the time interval covered by the specified entry in the preview. | ||||||||||||
|
| ||||||||||||
| dataset→get_previewRecordCount() | ||||||||||||
Returns the number of entries in the preview summarizing this data set | ||||||||||||
|
| ||||||||||||
| dataset→get_previewStartTimeAt(index) | ||||||||||||
Returns the start time of the specified entry in the preview, relative to the Jan 1, 1970 UTC (Unix timestamp). | ||||||||||||
|
| ||||||||||||
| dataset→get_progress() | ||||||||||||
Returns the progress of the downloads of the measures from the data logger, on a scale from 0 to 100. | ||||||||||||
| ||||||||||||
| dataset→get_startTimeUTC() | ||||||||||||
Returns the start time of the dataset, relative to the Jan 1, 1970. | ||||||||||||
| ||||||||||||
| dataset→get_summary() | ||||||||||||
Returns an YMeasure object which summarizes the whole YDataSet. | ||||||||||||
| ||||||||||||
| dataset→get_summaryAvg() | ||||||||||||
Returns the average value observed during the time interval covered by this data set. | ||||||||||||
|
| ||||||||||||
| dataset→get_summaryEndTime() | ||||||||||||
Returns the end time of the last measure in the data set, relative to the Jan 1, 1970 UTC (Unix timestamp). | ||||||||||||
|
| ||||||||||||
| dataset→get_summaryMax() | ||||||||||||
Returns the largest value observed during the time interval covered by this data set. | ||||||||||||
|
| ||||||||||||
| dataset→get_summaryMin() | ||||||||||||
Returns the smallest value observed during the time interval covered by this data set. | ||||||||||||
|
| ||||||||||||
| dataset→get_summaryStartTime() | ||||||||||||
Returns the start time of the first measure in the data set, relative to the Jan 1, 1970 UTC (Unix timestamp). | ||||||||||||
|
| ||||||||||||
| dataset→get_unit() | ||||||||||||
Returns the measuring unit for the measured value. | ||||||||||||
| ||||||||||||
| dataset→loadMore() | ||||||||||||
Loads the next block of measures from the dataLogger, and updates the progress indicator. | ||||||||||||
| ||||||||||||
| dataset→loadMore_async(callback, context) | ||||||||||||
Loads the next block of measures from the dataLogger asynchronously. | ||||||||||||
|
|
24.6. Class YMeasure
Measured value, returned in particular by the methods of the YDataSet class.
YMeasure objects are used within the API to represent a value measured at a specified time. These objects are used in particular in conjunction with the YDataSet class, but also for sensors periodic timed reports (see sensor.registerTimedReportCallback).
In order to use the functions described here, you should include:
js | <script type='text/javascript' src='yocto_module.js'></script> |
cpp | #include "yocto_module.h" |
m | #import "yocto_module.h" |
pas | uses yocto_module; |
vb | yocto_module.vb |
cs | yocto_module.cs |
java | import com.yoctopuce.YoctoAPI.YMeasure; |
uwp | import com.yoctopuce.YoctoAPI.YMeasure; |
py | from yocto_module import * |
php | require_once('yocto_module.php'); |
ts | in HTML: import { YMeasure } from '../../dist/esm/yocto_module.js'; in Node.js: import { YMeasure } from 'yoctolib-cjs/yocto_module.js'; |
es | in HTML: <script src="../../lib/yocto_module.js"></script> in node.js: require('yoctolib-es2017/yocto_module.js'); |
| YMeasure methods | |||||||||||
|---|---|---|---|---|---|---|---|---|---|---|---|
| measure→get_averageValue() | |||||||||||
Returns the average value observed during the time interval covered by this measure. | |||||||||||
| |||||||||||
| measure→get_endTimeUTC() | |||||||||||
Returns the end time of the measure, relative to the Jan 1, 1970 UTC (Unix timestamp). | |||||||||||
| |||||||||||
| measure→get_maxValue() | |||||||||||
Returns the largest value observed during the time interval covered by this measure. | |||||||||||
| |||||||||||
| measure→get_minValue() | |||||||||||
Returns the smallest value observed during the time interval covered by this measure. | |||||||||||
| |||||||||||
| measure→get_startTimeUTC() | |||||||||||
Returns the start time of the measure, relative to the Jan 1, 1970 UTC (Unix timestamp). | |||||||||||
|
25. Troubleshooting
25.1. Where to start?
If it is the first time that you use a Yoctopuce module and you do not really know where to start, have a look at the Yoctopuce blog. There is a section dedicated to beginners 59.
25.2. Programming examples don't seem to work
Most of Yoctopuce API programming examples are command line programs and require some parameters to work properly. You have to start them from your operating system command prompt, or configure your IDE to run them with the proper parameters. 60.
25.3. Linux and USB
To work correctly under Linux, the library needs to have write access to all the Yoctopuce USB peripherals. However, by default under Linux, USB privileges of the non-root users are limited to read access. To avoid having to run the library as root, you need to create a new udev rule to authorize one or several users to have write access to the Yoctopuce peripherals.
To add a new udev rule to your installation, you must add a file with a name following the "##-arbitraryName.rules" format, in the "/etc/udev/rules.d" directory. When the system is starting, udev reads all the files with a ".rules" extension in this directory, respecting the alphabetical order (for example, the "51-custom.rules" file is interpreted AFTER the "50-udev-default.rules" file).
The "50-udev-default" file contains the system default udev rules. To modify the default behavior, you therefore need to create a file with a name that starts with a number larger than 50, that will override the system default rules. Note that to add a rule, you need a root access on the system.
In the udev_conf directory of the VirtualHub for Linux61 archive, there are two rule examples which you can use as a basis.
Example 1: 51-yoctopuce.rules
This rule provides all the users with read and write access to the Yoctopuce USB devices. Access rights for all other devices are not modified. If this scenario suits you, you only need to copy the "51-yoctopuce_all.rules" file into the "/etc/udev/rules.d" directory and to restart your system.
# udev rules to allow write access to all users # for Yoctopuce USB devices SUBSYSTEM=="usb", ATTR{idVendor}=="24e0", MODE="0666"
Example 2: 51-yoctopuce_group.rules
This rule authorizes the "yoctogroup" group to have read and write access to Yoctopuce USB peripherals. Access rights for all other peripherals are not modified. If this scenario suits you, you only need to copy the "51-yoctopuce_group.rules" file into the "/etc/udev/rules.d" directory and restart your system.
# udev rules to allow write access to all users of "yoctogroup" # for Yoctopuce USB devices SUBSYSTEM=="usb", ATTR{idVendor}=="24e0", MODE="0664", GROUP="yoctogroup"
25.4. ARM Platforms: HF and EL
There are two main flavors of executable on ARM: HF (Hard Float) binaries, and EL (EABI Little Endian) binaries. These two families are not compatible at all. The compatibility of a given ARM platform with of one of these two families depends on the hardware and on the OS build. ArmHL and ArmEL compatibility problems are quite difficult to detect. Most of the time, the OS itself is unable to make a difference between an HF and an EL executable and will return meaningless messages when you try to use the wrong type of binary.
All pre-compiled Yoctopuce binaries are provided in both formats, as two separate ArmHF et ArmEL executables. If you do not know what family your ARM platform belongs to, just try one executable from each family.
25.5. Powered module but invisible for the OS
If your Yocto-Thermocouple is connected by USB, if its blue led is on, but if the operating system cannot see the module, check that you are using a true USB cable with data wires, and not a charging cable. Charging cables have only power wires.
25.6. Another process named xxx is already using yAPI
If when initializing the Yoctopuce API, you obtain the "Another process named xxx is already using yAPI" error message, it means that another application is already using Yoctopuce USB modules. On a single machine only one process can access Yoctopuce modules by USB at a time. You can easily work around this limitation by using VirtualHub and the network mode 62.
25.7. Disconnections, erratic behavior
If your Yocto-Thermocouple behaves erratically and/or disconnects itself from the USB bus without apparent reason, check that it is correctly powered. Avoid cables with a length above 2 meters. If needed, insert a powered USB hub 63 64.
25.8. After a failed firmware update, the device stopped working
If a firmware update of your Yocto-Thermocouple fails, it is possible that the module is no longer working. If this is the case, plug in your module while holding down the Yocto-Button. The Yocto-LED should light up brightly and remain steady. Release the button. Your Yocto-Thermocouple should then appear at the bottom of the VirtualHub user interface as a module waiting to be flashed. This operation also reverts the module to its factory configuration.
25.9. Registering VirtualHub disconnects another instance
If, when performing a call to RegisterHub() with a VirtualHub address, another previously registered VirtualHub disconnects, make sure the machine running these VirtualHubs do not have the same Hostname. Same Hostname can happen very easily when the operating system is installed from a monolithic image, Raspberry Pi are the best example. The Yoctopuce API uses serial numbers to communicate with devices and VirtualHub serial numbers are created on the fly based the hostname of the machine running VirtualHub.
25.10. Dropped commands
If, after sending a bunch of commands to a Yoctopuce device, you are under the impression that the last ones have been ignored, a typical example is a quick and dirty program meant to configure a device, make sure you used a YAPI.FreeAPI() at the end of the program. Commands are sent to Yoctopuce modules asynchronously thanks to a background thread. When the main program terminates, that thread is killed no matter if some command are left to be sent. However API.FreeAPI() waits until there is no more command to send before freeing the API resources and returning.
25.11. Noisy readings
If you get noisy temperature readings, check for ground loops: regular thermocouple tips are conductive, make sure they are not in contact with grounded conductive material 65.25.12. Damaged device
Yoctopuce strives to reduce the production of electronic waste. If you believe that your Yocto-Thermocouple is not working anymore, start by contacting Yoctopuce support by e-mail to diagnose the failure. Even if you know that the device was damaged by mistake, Yoctopuce engineers might be able to repair it, and thus avoid creating electronic waste.
 Waste Electrical and Electronic Equipment (WEEE)
If you really want to get rid of your Yocto-Thermocouple, do not throw it
away in a trash bin but bring it to your local WEEE recycling point. In this
way, it will be disposed properly by a specialized WEEE recycling center.
Waste Electrical and Electronic Equipment (WEEE)
If you really want to get rid of your Yocto-Thermocouple, do not throw it
away in a trash bin but bring it to your local WEEE recycling point. In this
way, it will be disposed properly by a specialized WEEE recycling center.
26. Characteristics
You can find below a summary of the main technical characteristics of your Yocto-Thermocouple module.
| Product ID | THRMCPL1 |
| Hardware release† | Rev. E |
| USB connector | micro-B |
| Width | 20 mm |
| Length | 45 mm |
| Weight | 4.5 g |
| Sensor | Type K,E,J,N,R,S,T |
| Channels | 2 |
| Refresh rate | 5 Hz |
| Accuracy | 1°C 1% |
| Sensitivity | 0.1°C |
| Protection class, according to IEC 61140 | class III |
| Normal operating temperature | 5...40 °C |
| Extended operating temperature‡ | -30...85 °C |
| Max. temperature | 1768 °C |
| Min. temperature | -200 °C |
| RoHS compliance | RoHS III (2011/65/UE+2015/863) |
| USB Vendor ID | 0x24E0 |
| USB Device ID | 0x0028 |
| Suggested enclosure | YoctoBox-Short-Thick-Black |
| Harmonized tariff code | 9032.9000 |
| Made in | Switzerland |
† These specifications are for the current hardware revision. Specifications for earlier revisions may differ.
‡ The extended temperature range is defined based on components specifications and has been tested during a limited duration (1h). When using the device in harsh environments for a long period of time, we strongly advise to run extensive tests before going to production.
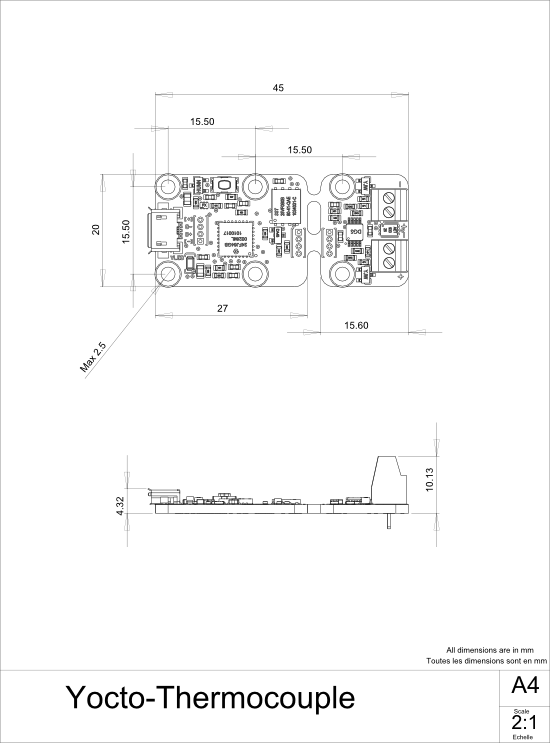
27. Index
AadvertisedValue advMode API autoStart B
beacon beaconDriven C
calibrationParam clearHistory command currentRawValue currentRunIndex currentValue D
DataLogger F
firmwareRelease H
highestValue L
logFrequency logicalName lowestValue luminosity M
Module P
persistentSettings productId productName productRelease R
rebootCountdown recording reportFrequency resolution S
sensorState sensorType serialNumber signalUnit signalValue T
techspec Temperature timeUTC U
unit upTime usage usbcurrent usbCurrent userVar W
wiring Y
YAPI YDataLogger YDataSet YMeasure YModule YTemperature
- short-short-short long-long-long short-short-short ←
- su
pport @yoct opuce .com ← - http://www.yoctopuce.com/EN/products/category/enclosures ←
- The HID driver is manages peripheral devices such as mouse, keyboard, and so on. ←
- www.yoctopuce.com/EN/virtualhub.php ←
- The interface is tested on Chrome, FireFox, Safari, Edge et IE 11. ←
- www.yoctopuce.com/EN/virtualhub.php ←
- More information available in the VirtualHub documentation ←
- Use the VirtualHub for this task. ←
- www.yoctopuce.com/EN/article/usb-cables-size-matters ←
- www.yoctopuce.com/EN/virtualhub.php ←
- http://www.yoctopuce.com/EN/libraries.php ←
- If you want to recompile the command line API, you also need the C++ API. ←
- http://www.yoctopuce.com/EN/libraries.php ←
- http://www.yoctopuce.com/EN/virtualhub.php ←
- http://www.python.org/download/ ←
- www.yoctopuce.com/EN/libraries.php ←
- www.yoctopuce.com/EN/libraries.php ←
- www.yoctopuce.com/EN/libraries.php ←
- The sources of this DLL are available in the C++ API ←
- Remember to change the filter of the selection window, otherwise the DLL will not show. ←
- http://www.yoctopuce.com/EN/libraries.php ←
- https://knowledge.ni.com/KnowledgeArticleDetails?id=kA00Z000000P8XnSAK ←
- https://forums.ni.com/t5/Developer-Center-Resources/Creating-a-LabVIEW-Palette/ta-p/3520557 ←
- www.yoctopuce.com/EN/products/category/extensions-and-networking ←
- http://www.yoctopuce.com/EN/virtualhub.php ←
- see section Using Proxy objects ←
- https://www.yoctopuce.com/EN/products/category/extensions-and-networking ←
- www.yoctopuce.com/EN/virtualhub.php ←
- www.yoctopuce.com/EN/libraries.php ←
- www.yoctopuce.com/EN/virtualhub.php ←
- www.yoctopuce.com/EN/libraries.php ←
- www.yoctopuce.com/EN/libraries.php ←
- www.yoctopuce.com/EN/virtualhub.php ←
- www.yoctopuce.com/EN/libraries.php ←
- www.yoctopuce.com/EN/virtualhub.php ←
- http://babeljs.io ←
- A couple of free PHP servers: easyPHP for Windows, MAMP for macOS. ←
- www.yoctopuce.com/EN/libraries.php ←
- www.yoctopuce.com/EN/virtualhub.php ←
- If you do not have a text editor, use Notepad rather than Microsoft Word. ←
- www.yoctopuce.com/EN/libraries.php ←
- The sources of this DLL are available in the C++ API ←
- Remember to change the filter of the selection window, otherwise the DLL will not show. ←
- Actually, Borland provided free versions (for personal use) of Delphi 2006 and 2007. Look for them on the Internet, you may still be able to download them. ←
- www.lazarus-ide.org ←
- Delphi libraries are regularly tested with Delphi 5, Delphi XE2, and the latest version of Lazarus. ←
- www.yoctopuce.com/EN/libraries.php ←
- Use the
Tools / Environment options menu. ← - Use the Menu
Project / Project options/ Compiler options / Paths ← - See https://www.yoctopuce.com/EN/article/about-programming-examples ←
- https://www.visualstudio.com/vs/cordova/vs/ ←
- www.yoctopuce.com/EN/libraries.php ←
- https://www.visualstudio.com/downloads/ ←
- www.yoctopuce.com/EN/libraries.php ←
- www.yoctopuce.com/EN/article/new-objective-c-library-for-mac-os-x ←
- The value passed as parameter is the same as the value returned by the get_advertisedValue() method. ←
- The YMeasure objects used by the data logger are exactly the same kind as those passed as argument to the timed report callbacks. ←
- see: http://www.yoctopuce.com/EN/blog_by_categories/for-the-beginners ←
- see: http://www.yoctopuce.com/EN/article/about-programming-examples ←
- http://www.yoctopuce.com/FR/virtualhub.php ←
- see: http://www.yoctopuce.com/EN/article/error-message-another-process-is-already-using-yapi ←
- see: http://www.yoctopuce.com/EN/article/usb-cables-size-matters ←
- see: http://www.yoctopuce.com/EN/article/how-many-usb-devices-can-you-connect ←
- http://www.yoctopuce.com/EN/article/the-yocto-thermocouple-and-ground-loops ←
