![]() From time to time, Yoctopuce support receives emails from customers who complain that the examples provided with the Yoctopuce programming libraries don't work. We don't pretend to believe that our code is 100% error free, but it is clear that, most of the time, the problem comes from a misunderstanding about how these examples work. This week, we are going to clarify this issue.
From time to time, Yoctopuce support receives emails from customers who complain that the examples provided with the Yoctopuce programming libraries don't work. We don't pretend to believe that our code is 100% error free, but it is clear that, most of the time, the problem comes from a misunderstanding about how these examples work. This week, we are going to clarify this issue.
Command line
The majority of the provided examples are command line programs, which means that they don't have a graphical interface and that you must run them from a command window, also known as a terminal in the Linux world. We choose this presentation not because we were too lazy to write graphical interfaces, but because this avoids drowning the relatively short code managing the Yoctopuce modules into the usually lengthy code managing the user interface.
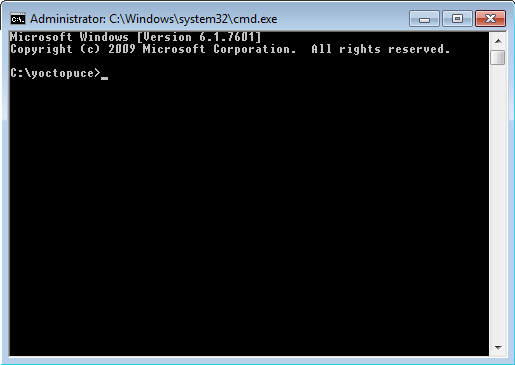
To quickly obtain a command window under Windows, you can simultaneously press the Windows and R keys, which gives you a small window with a command field. You must then type cmd into the field and hit ENTER to make the command window appear.

The Windows command window
If you don't know what to do with this window, it's never too late to learn something new. You can surely catch up by Googling "ms-dos tutorial".
Command line parameters
At Yoctopuce, when we were thinking of writing the first examples, there were rather lively discussions about which functions we had to show in these examples. The challenge was to find a compromise between the number of functions and the code simplicity. We finally agreed that a basic example should:
- Show the base function, typically read the value of a sensor or activate an actuator
- Show how to access a module by logical name or by serial number
- Show how to access a module though enumeration
Therefore all the command line examples expect at least a parameter on the command line, typically a serial number, a logical name, or the any keyword. Let's look closely to the C# example for the Yocto-Relay, the main part looks like this:
{ string errmsg = "";
string target;
YRelay relay;
string state;
if (args.Length < 2) usage();
target = args[0].ToUpper();
state = args[1].ToUpper();
if (YAPI.RegisterHub("usb", ref errmsg) != YAPI.SUCCESS) {
Console.WriteLine("RegisterHub error: " + errmsg);
Environment.Exit(0);
}
if (target == "ANY") {
relay = YRelay.FirstRelay();
if (relay == null) {
Console.WriteLine("No module connected (check USB cable) ");
Environment.Exit(0);
}
} else relay = YRelay.FindRelay(target + ".relay1");
if (relay.isOnline()) {
if (state == "A") relay.set_state(YRelay.STATE_A);
else relay.set_state(YRelay.STATE_B);
} else {
Console.WriteLine("Module not connected (check identification and cable)");
}
YAPI.FreeAPI();
}
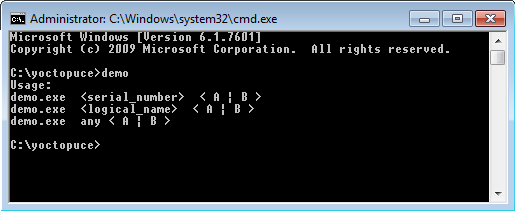
The code first checks with args.Length whether there are at least two parameters on the command line. If it's not the case, it calls the usage() function which then displays the example user's guide and closes the program.
{
string execname = System.AppDomain.CurrentDomain.FriendlyName;
Console.WriteLine("Usage:");
Console.WriteLine(execname + " <serial_number> < A | B >");
Console.WriteLine(execname + " <logical_name> < A | B >");
Console.WriteLine(execname + " any < A | B >");
System.Threading.Thread.Sleep(2500);
Environment.Exit(0);
}

The result of the usage() function
If there is the correct number of parameters, the code uses the first one (args[0]) as identifier of the module to be used and the second one (args[1]) as the state into which it must switch the relay. If the module name is "ANY", it then uses the YRelay.FirstRelay() function to obtain the first available relay. Otherwise, it uses the YRelay.FindRelay() function to find the relay, assuming that the parameter corresponds to the serial number or to the logical name of the module. If you find this paragraph somewhat confusing, carefully reading this post should help you to better understand.
When the program has identified the relay, it switches the relay state according to the value of the second parameter on the command line.

Usage example of the command line
The IDE case
This command line based approach has a small inconvenient when these examples are used in an integrated development environment (IDE). In an IDE, it's not always simple to pass parameters to the program you are running. Moreover, when the programs are launched in some environments, the window where they run closes as soon as the programs end, not giving you time to see what happened. The workaround is to add a waiting time or even and infinite loop at the end of the code, to give you time to debug.
This being said, all development environments allow you, one way or another, to pass arguments to the program being developed. For example:
VisualStudio
Go to Project/ Properties / Debug and fill in the field "Command line arguments".

Command line parameters in VisualStudio
Useful tip: in VisualStudio, if you run your program with Ctr-F5 instead of F5, the execution window doesn't automatically close at the end of the program.
PyCharm
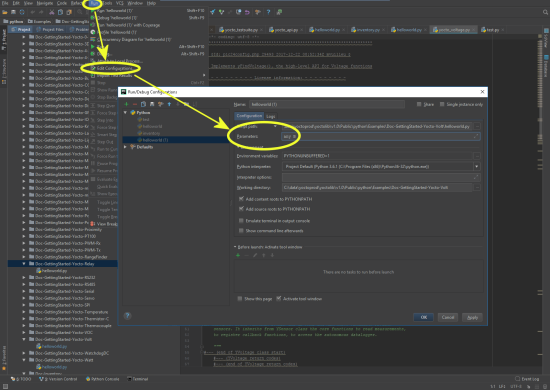
Go to Run / Edit Configurations and fill in the field "Script parameters"

Command line parameters in PyCharm
Delphi
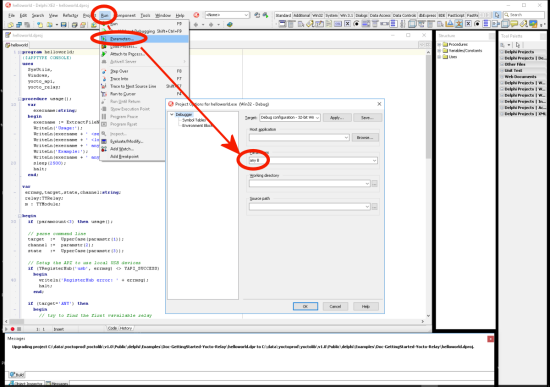
Go to Run / Parameters and fill in the field "Parameters".

Command line parameters in Delphi XE2
One last thing
If you obtain the mysterious message "RegisterHub error: Another process named VirtualHub.exe (pid xxxx) is already using yAPI" and don't quite know what to do, the answer is located here.


