 We just realized that we never really talked about the animation system integrated into Yoctopuce displays. There is a short note about it in the documentation, required functions are documented, there is a example in every Yoctopuce programming library. But we never explained how it works. This week, after only 7 seven years, we make up for it.
The animations
The idea behind the animation system in Yoctopuce displays is to record actions done on the display, save the result on the device file system and replay it at will. Doing so has a big upside: such animations are autonomous. Once the control host has started them, it doesn't have handle their execution anymore.
An example
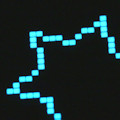
to illustrate the concept, we will use a simplified version of the double-buffering programming example that can be found in all Yoctopuce programming libraries. It draws a rotating Koch snowflake.

The Koch snowflake, a rite of passage for every computer science student.
We chose to use that recursive drawing example for this post because it is very easy to increase the drawing complexity, we'll give it a try later on.


The same Koch snowflake, different recursion levels.
Here is some python code that draws a rotating Koch snowflake from the control computer:
from yocto_api import *
from yocto_display import *
# this is the recusive function to draw 1/3nd of the Von Koch flake
def recursiveLine(layer, x0, y0, x1, y1, deep):
if deep <= 0:
layer.moveTo(int(x0 + 0.5), int(y0 + 0.5))
layer.lineTo(int(x1 + 0.5), int(y1 + 0.5))
else:
dx = (x1 - x0) / 3
dy = (y1 - y0) / 3
mx = ((x0 + x1) / 2) + (0.87 * (y1 - y0) / 3)
my = ((y0 + y1) / 2) - (0.87 * (x1 - x0) / 3)
recursiveLine(layer, x0, y0, x0 + dx, y0 + dy, deep - 1)
recursiveLine(layer, x0 + dx, y0 + dy, mx, my, deep - 1)
recursiveLine(layer, mx, my, x1 - dx, y1 - dy, deep - 1)
recursiveLine(layer, x1 - dx, y1 - dy, x1, y1, deep - 1)
# Setup the API to use local USB devices
errmsg = YRefParam()
if YAPI.RegisterHub("usb", errmsg) != YAPI.SUCCESS:
sys.exit("init error" + errmsg.value)
disp = YDisplay.FirstDisplay()
if disp is None:
sys.exit('No display connected')
# display clean up
disp.resetAll()
l1 = disp.get_displayLayer(1)
l2 = disp.get_displayLayer(2)
centerX = disp.get_displayWidth() / 2
centerY = disp.get_displayHeight() / 2
radius = disp.get_displayHeight() / 2
a = 0
framesCount =15
l1.hide() # double buffering L1 is hidden, l2 stays visible
while True:
# we draw in the hidden layer
l1.clear()
# change the snowflake angle
a = a + (2 * math.pi) / (3 * framesCount)
# Draws 3 thirds of the snowflake
for i in range(0, 3):
recursiveLine(l1, centerX + radius * math.cos(a + i * 2.094),
centerY + radius * math.sin(a + i * 2.094),
centerX + radius * math.cos(a + (i + 1) * 2.094),
centerY + radius * math.sin(a + (i + 1) * 2.094), 2)
# then we swap contents with the visible layer
disp.swapLayerContent(1, 2)
If you launch this code, you'll get the following animation:

Host controlled animation
But as soon you stop the execution, the animation will stop. To convert this code and make it build an autonomous animation we'll need a few calls:
- Ydisplay.newSequence(): To start the animation recording.
- Ydisplay.pauseSequence(): To insert a pause in the animation execution.
- Ydisplay.saveSequence(): To stop the recording and save the animation in the device's file system
- Ydisplay.playSequence(): The start a pre-recorded animation. It can also be used inside a sequence.
- Ydisplay.stopSequence(): Stops an animation execution.
The bare minimum is adding a call the newSequence() just before the rendering code and a call to disp.saveSequence() at the end. We also converted the never-ending loop into a "for" loop that will draw only a third of the snowflake revolution. The base geometry is a equilateral triangle. The 360° revolution is made of three identical parts, so we just need to draw one.
a = 0
framesCount =15
#start recording
disp.newSequence()
l1.hide() # double buffering L1 is hidden, l2 stays visible
for j in range(0,framesCount) :
# we draw in the hidden layer
l1.clear()
# change the snowflake angle
a = j* (2 * math.pi) / (3 * framesCount)
# Draws 3 thirds of the snowflake
for i in range(0, 3):
recursiveLine(l1, centerX + radius * math.cos(a + i * 2.094),
centerY + radius * math.sin(a + i * 2.094),
centerX + radius * math.cos(a + (i + 1) * 2.094),
centerY + radius * math.sin(a + (i + 1) * 2.094), 2)
# then we swap contents with the visible layer
disp.swapLayerContent(1, 2)
#stop recording and save
disp.saveSequence("vonkoch.seq")
There is an important detail: while recording, graphical functions have no effect on the display. But with a VirtualHub , we can notice a new "vonkoch.seq" file in the device file-system.

The new animation appears on the file system
We can also use the Virtualhub to start that animation

The new animation in a but incomplete
The animation make the snowflake rotate for a third of a turn, but it's way to fast. That's why we need to improve our capture code. We insert a 50ms pause and we force a never-ending loop by adding a call to disp.playSequence("vonkoch.seq") just before the call to disp.saveSequence("vonkoch.seq"). At this time, the device is still recording, so it remembers it has to start the vonkoch.seq sequence at the end of the vonkoch.seq sequence, this causes an never ending loop. While we are at it, we add a second call to playSequence() right after the saveSequence call, so we don't have to start it manually with the VirtualHub. Just like the graphical functions, playSequence doesn't behave the same way when recording is on.
...
a = 0
framesCount =15
#start recording
disp.newSequence()
l1.hide() # double buffering L1 is hidden, l2 stays visible
for j in range(0,framesCount) :
# we draw in the hidden layer
l1.clear()
# change the snowflake angle
a = j* (2 * math.pi) / (3 * framesCount)
# Draws 3 thirds of the snowflake
for i in range(0, 3):
recursiveLine(l1, centerX + radius * math.cos(a + i * 2.094),
centerY + radius * math.sin(a + i * 2.094),
centerX + radius * math.cos(a + (i + 1) * 2.094),
centerY + radius * math.sin(a + (i + 1) * 2.094), 2)
# then we swap contents with the visible layer
disp.swapLayerContent(1, 2)
# pause playback for 50ms
disp.pauseSequence(50)
#creates a endless loop
disp.playSequence("vonkoch.seq")
#stop recording and save
disp.saveSequence("vonkoch.seq")
#launch the animation
disp.playSequence("vonkoch.seq")
The final animate, It the same than the first one, but it's autonomous.
Increasing the last parameter of the recursiveLine call increase the recursion depth and the drawing complexity. This show how autonomous animation are faster than their API-controlled counterparts. The communication volume increase exponentially with depth. With a depth set to 3, the API version starts to struggle while the autonomous version still requires a call to pauseSequence() to slow it down.

The autonomous version is much faster than the API version
Limitations
Autonomous animations have some limitation you should know about:
- By design, these animation are pre-computed, you cannot change them dynamicaly. You might be tempted to create them on the fly, but don't forget the limited write cycle count of the device flash memory.
- You can use then to display a gif image stored on the device file system (displaylayer.drawImage()), but you cannot use them to display a binary blob (displaylayer.drawBitmap()).
- Unlike other displays, the Yocto-MiniDisplay's file system is not persistent. Saved animations will be erased as soon as the power is off.
Applications
The typical application for autonomous animations is splash-screens. The short animation shown on Yoctopuce displays power on is made that way. Actually you can use the VirtualHub to replace it with your own.

Actually, this is a pre-recorded autonomous animation
This is not the only application. While the animation is running the display is still perfectly functional. You still can display stuff in layers not used by the animation, nothing prevent you from "sub-contracting" some of the rendering and make the result faster.

