 Last year, Apple presented its new programming language for iOS and OSX: Swift. This language is easier to use (and to learn) than Objective-C and its syntax is radically different. To ensure a smooth transition to this new language, you can create "hybrid" applications which have a part written in Swift and a part written in Objective-C. Theoretically, our Objective-C library should work as-is in a Swift project. In practice, it's somewhat more complex...
Before trying to integrate the Yoctopuce library into a Swift project, you must download the latest version of our Objective-C library. Libraries before version 19716 won't compile if your Xcode project contains Swift files. Xcode doesn't use the same compilation options if your project is a "Swift" or an "Objective-C" project. More precisely, the LLVM compiler is much more restrictive on ARC pointer management and generates errors if some variable assignments are not typed. If you use an old version of our library, updating the library is without risk because we always maintain downward compatibility with the library and the modules.
How to compile the Objective-C library in a Swift project
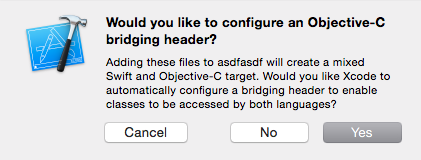
To include Objective-C files in a Swift project, you must add the .m and .h files to the Xcode project and create a "bridging header" which is then included in the compilation of the .swift files. Apple wrote a page explaining in details all the possibilities. In the case of our library, the simplest is to drag-n-drop all the files of the Sources directory of the Objective-C library directly in the Xcode project Navigator. Xcode launches an assistant that adds the files to the project and that creates the "bridging header" which is used by the .swift files.

Select Yes when Xcode offers to create the bridging header. Otherwise, your files are compiled but remain unusable in your Swift file.
A few comments:
- Don't forget to select you application in the "add to target" field of this assistant, otherwise Xcode adds the files to the project but doesn't compile them.
- Select "Yes" when Xcode offers to create the "Bridging header", otherwise the files are compiled but unusable in your Swift file.
- Select all the files of the Source directory and not the Source directory itself. Otherwise, Xcode doesn't offer to create the "bridging header".
The last step is to include the necessary Objective-C file headers in the bridging header. For example, if you want to use a Yocto-Meteo in a swift program, you must include the yocto_api.h, yocto_humidity.h, yocto_temperature.h, and yocto_pressure.h files.
// Use this file to import your target's public headers that
// you would like to expose to Swift.
//
#import "yocto_api.h"
#import "yocto_humidity.h"
#import "yocto_temperature.h"
#import "yocto_pressure.h"
If everything went well, Xcode compiles without error all the Swift files, all the Objective-C files, and some C files.
Using the Yoctopuce library in Swift
Now that the Objective-C files are compiled, we must write the Swift code that uses the Yoctopuce library. We are going to translate the "Doc-Inventory" example into Swift. Explanations on this example are detailed in the Objective-C library and in the documentation of all the Yoctopuce modules.
The original "Doc-Inventory" example, written in Objective-C.
#import "yocto_api.h"
int main (int argc, const char * argv[])
{
NSError *error;
@autoreleasepool {
// Setup the API to use local USB devices
if([YAPI RegisterHub:@"usb" :&error] != YAPI_SUCCESS) {
NSLog(@"RegisterHub error: %@\n", [error localizedDescription]);
return 1;
}
NSLog(@"Device list:\n");
YModule *module = [YModule FirstModule];
while (module != nil) {
NSLog(@"%@ %@",[module get_serialNumber],
[module get_productName]µ);
module = [module nextModule];
}
}
return 0;
}
And here is the same example written in Swift.
var error: NSError?
// Sets up the API to use local USB devices
let res = YAPI.RegisterHub("usb", &error)
if res.rawValue != YAPI_SUCCESS.rawValue {
println("Error: \(error?.localizedDescription)")
exit(1)
}
println("Device list:")
var module = YModule.FirstModule()
while module != nil {
println("\(module.get_serialNumber()) \(module.get_productName())")
module = module.nextModule()
}
As you can see, the same methods are called and the code keeps the same structure. There are, however, a few subtleties that need mentioning.
You don't have to include the .h files in the Swift code because they are already added in the "bridging header".
The Swift syntax to pass a pointer to the NSError to a method is quite puzzling. When declaring variables, you must specify the type and add a "?" for the compiler to know that it is a pointer to an object. Passage by reference is done by adding a "&" (as in Objective-C). But when used, the same variable requires to be followed by a "?".
The last particularity concerns the use of enumerations. Many methods in our library use enumerations (as return values or as parameters). For historical reasons, these enumerations are defined in the C syntax. Unfortunately, Swift is not able to automatically convert these enumerations. To use an enumeration in a test, you must add ".value" to the variable and to the enumeration value, otherwise the compiler generates an error.
Here is an example with the beacon attribute which uses an enumeration "Y_BEACON_enum" (Y_BEACON_ON,Y_BEACON_OFF,Y_BEACON_ON,Y_BEACON_INVALID).
if beaconState.value == Y_BEACON_ON.value {
println("beacon is on")
}
module.set_beacon(Y_BEACON_OFF)
Conclusion
The latest version of our Objective-C library can also be used in an Xcode Swift project. Currently, we don't intend to create a library written in Swift. The main reason is that it wouldn't bring anything more as there would always remain a part written in pure C that would need to be integrated into the project. The second reason is that until now, our customers don't seem to be very interested in a Yoctopuce Swift API.


