 A few weeks ago, in our post on .NET Core and NuGet, we promised you a post on how to use these two technologies on a Raspberry Pi. So we keep our promise and this week we look at how to write a .NET Core application under Windows and how to deploy it on a Raspberry Pi.
The application we are implementing is rather simple. We display the current value of a Yoctopuce sensor on a Yocto-MaxiDisplay. We start by developing and testing this application under Windows, and then we install this application on a Raspberry Pi.
Visual Studio 2019
As Microsoft has just released version 2019 of Visual Studio, we are using this version, but the process in the same for versions 2017 and 2015.
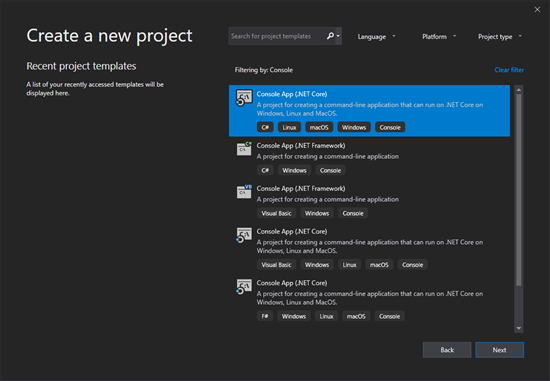
So we start by creating a new Console APP (.NET Core) project.

We must create a Console APP (.NET Core) project
Then, we must add a dependency to our NuGet package.

We must add a dependency to our Nuget package
The code
We are not going to linger on the application code as it is trivial, and we already have several posts explaining in details the functions that we use.
When starting, the code checks that there is a Yoctopuce sensor. The code checks for the presence of a Yocto-Display, a Yocto-MaxiDisplay, or a Yocto-MiniDisplay as well. Then, as long as these two modules are connected, we retrieve the value and the name of the sensor, and we display these two pieces of information on the Yocto-MaxiDisplay.
{
Console.WriteLine("Using Yoctopuce lib " + YAPI.GetAPIVersion());
string errsmg = "";
if (YAPI.RegisterHub("usb", ref errsmg) != YAPI.SUCCESS)
{
Console.WriteLine("Unable to register the USB port :" + errsmg);
return;
}
YSensor sensor = YSensor.FirstSensor();
if (sensor == null)
{
Console.WriteLine("No Yoctopuce sensor find on USB.");
return;
}
YDisplay display = YDisplay.FirstDisplay();
if (display == null)
{
Console.WriteLine("No Yoctopuce display find on USB.");
return;
}
// display clean up
display.resetAll();
YDisplayLayer l1 = display.get_displayLayer(1);
l1.hide(); // L1 is hidden, l2 stay visible
int w = display.get_displayWidth();
int h = display.get_displayHeight();
while (sensor.isOnline() && display.isOnline())
{
string value = sensor.get_currentValue() + " " + sensor.get_unit();
string name = sensor.get_friendlyName();
// display a text in the middle of the screen
l1.clear();
l1.selectFont("Large.yfm");
l1.drawText(w / 2, h / 2, YDisplayLayer.ALIGN.CENTER, value);
l1.selectFont("Small.yfm");
l1.drawText(w - 1, h - 1, YDisplayLayer.ALIGN.BOTTOM_RIGHT, name);
display.swapLayerContent(0, 1);
Console.WriteLine(name + " ->" + value);
YAPI.Sleep(500,ref errsmg);
}
YAPI.FreeAPI();
}
This example is rather primitive but it illustrates quite well how to use our library. The complete project is available on GitHub: https://github.com/yoctopuce-examples/YoctoDotNetCore
Now that our project is ready, we can test our application under Windows. To do so, we naturally need to connect a Yocto-Display and a Yoctopuce sensor. In this instance, we used a Yocto-Light-V3 and a Yocto-MaxiDisplay-G.
Now that we tested that our code works under Windows, let's see how to run the same application on a Raspberry Pi.
Generating a version for Raspberry Pi
Since version 2.1 of .NET Core, we can generate an "executable" which works under Linux ARM. We can even generate a "self-contained" executable containing our application and the .NET virtual machine.
The advantage of this latter option is that it allows us to include everything that is required for the application to work, which makes its installation easier.
To generate the "Raspberry Pi" version, we must "publish" our application. We can access the wizard from the "build" menu in Visual Studio.

The build menu enables us to publish the application
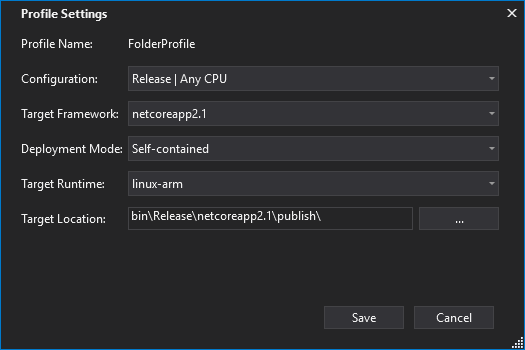
This menu allows us to configure the type of package that we are publishing. In our case, we must create a profile of type "Folder". Then, we must edit this profile to select the following options:
- Target Framework: minimally netcoreapp2.1
- Deployment Mode: Self-contained
- Target Runtime: linux-arm

The publication parameters of the application
We then only need to click on the Publish button for Visual Studio to compile the application and copy all the required files in the output directory.
When the compilation is done, we can copy the whole content of the directory on the Raspberry Pi 3. We can use SSH, FTP, or a simple USB key.
Running the application on Raspberry Pi
When the directory has been copied on the Raspberry Pi, there is one last operation which needs to be performed: adding execution privileges to the application. We must perform this last operation directly on the Raspberry Pi.
We simply use the chmod command with +x and the executable as parameter.
pi@raspberrypi:~/publish $ chmod +x YoctoCoreDemo
Then, we can directly run the application without having the install anything else.
pi@raspberrypi:~/publish $ sudo ./YoctoCoreDemo ....
We don't need a Mono package or Runtime .NET, everything is included in the application. We can use the application directly on a Raspbian image.
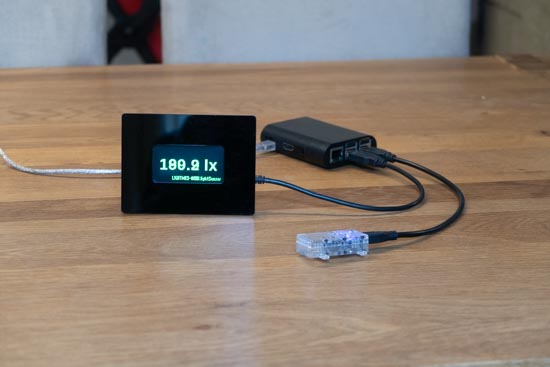
Here we are, we have our application working under Raspberry Pi.

The same application running on a Raspberry Pi
Conclusion
As we just saw it, it is very easy to port a .NET Core application on Raspberry Pi. To be able to develop the application under Windows and then to deploy it on Raspberry Pi standard image is very convenient. It makes it as easy, if not easier, than to write a Python script.
We must however remember a few things.
Only Raspberry Pi 2, 3, and 3+ are supported by .NET Core. Currently, using a Raspberry Pi Zero is not possible.
At the time of writing, you can't create portable graphical application with .NET Core. If you need to implement a graphical application, it's possible but you must necessarily use Mono. By the way, we have a post on this topic: Using the C# library on Linux and macOS with Mono.
We used Visual Studio to implement this example, but you could also create and compile the same application under Linux and macOS by installing the .NET Core SDK on these OSes. You must then use the dotnet tool.
Finally, if you are not familiar with Linux, we published a few posts which might interest you:


