The Yocto-SPI documentation contains an example to interface the AlphaSense OPC-N2 particle counter. Since then, Alphasense has released a new model, the OPC-N3, and the commands to query it are slightly different. This week, by popular request, we explain how to make the OPC-N3 work with a Yocto-SPI and we take this opportunity to introduce a small innovation.
At first sight, nothing tells the OPC-N2 apart from the OPC-N3, except for the identification sticker under the sensor.

An OPC-N3 next to an OPC-N2
However, the SPI control interface is just different enough from the previous version so that if you use the old version protocol, it literally crashes the sensor. By the way, it's something to remember if, during your trials with an OPC-N3, one of your SPI commands doesn't work as you expected it to, you better perform a power-cycle on the sensor to start again on a sound basis.
Electric connection
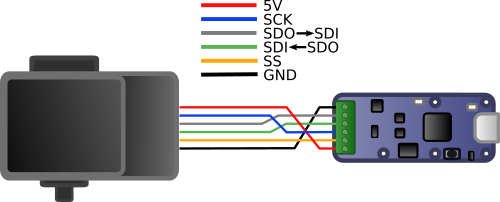
The SPI physical connection doesn't change from the previous version. Facing the sensor, the wires are, from left to right GND, SS, SDI, SDO, SCK, and +5V. Don't forget that you must invert SDI and SDO between the sensor and the Yocto-SPI.

Electric connection, top view
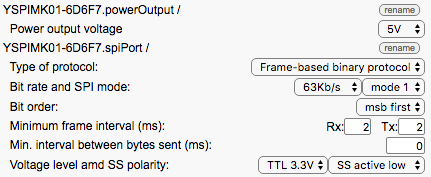
The Yocto-SPI SPI port configuration stays also the same: the OPC-N3 is powered in 5V, but SPI communication is performed in 3.3V. You can see all of the settings in the screen capture of the VirtualHub below:

SPI port configuration
Querying the sensor
That's where things get tricky. Thanks to its job system, the Yocto-SPI can automatically query the sensor. But Alphasense has modified its SPI protocol between versions N2 and N3. In particular, the fan and the laser must be driven independently in the N3 version. To drive the OPC-N3, you must create a job containing three tasks:
- An initialization periodic task which waits a little for the sensor to start, then turns on the fan and the laser:
- wait 3000
- writeHex 03
- wait 10
- writeHex 0307
- wait 10
- writeHex 03
- wait 10
- writeHex 0303
Naturally, this task must be run only once.
- A second periodic task, which waits 150ms, to be sure to cause a timeout on a potential previous command which would not have ended correctly, and then tries to read the sensor by sending the 0x32 16 times in a row, but waiting 10ms after the first byte.
- wait 150
- writeHex 32
- wait 10
- writeHex 323232323232323232323232323232
This tasks must be repeated at a regular interval, typically 2.5 seconds. If you try to go too fast, sometimes the sensor crashes after working for a few minutes only.
- Finally a third task, that is reactive, which detects an answer starting with 0xF3 and interprets the three values and the CRC which follow it, and assigns them to generic sensors 1, 2 and 3 of the Yocto-SPI. These values, corresponding to PM1, PM2.5, and PM10 particles, are expressed in µg/m³.
- expect F3($1:FLOAT32)($2:FLOAT32)($3:FLOAT32)(WORD)
This job works very well on the OPC-N3. But knowing that the tasks of a job run in parallel, it is likely that the Yocto-SPI is going to try to query the sensor before having turned on the fan and the laser, which lacks elegance. It so happens that all the modules which feature the job system have just now been issued a new instruction: assert .
Querying the sensor: variant
This assert instruction evaluates a Boolean expression and stops the execution of the task if the expression evaluates to False, or if the expression contains a syntax error, or if it makes reference to an undefined variable. It doesn't look like much presented like this, but combined with the variables of the Compute instruction, it allows you to create state machines, and this opens new perspectives :-). For example, you can slightly modify the previous protocol to make sure that the query happens only after the initialization.
- Task 1 (periodic, only once)
- assert !isset($state)
- wait 3000
- writeHex 03
- wait 10
- writeHex 0307
- wait 10
- writeHex 03
- wait 10
- writeHex 0303
- compute $state=1
- Task 2 (periodic, every ~2.5s)
- assert $state==1
- wait 150
- writeHex 32
- wait 10
- writeHex 323232323232323232323232323232
- Task 3 (reactive)
- expect F3($1:FLOAT32)($2:FLOAT32)($3:FLOAT32)(WORD)
If you update the firmware of your Yocto-SPI to version 37101 at least, you gain access to this new magical instruction.
Conclusion
The OPC-N3 is a touchy sensor which is hard to query. But when your protocol is well developed, it works remarkably well. To save you from having to define these protocols by hand, we put them in this ZIP file and you only need to upload them on your module file system.


