 Today we present a new tool which you'll find very useful if you use Yoctopuce modules in a protected network environment, such as behind a NAT filter or a firewall. If you have ever wished to remotely connect to your devices for an interactive session, for instance to modify the configuration, you will be glad to know that this is now possible... even for YoctoHub-GSM!
The problem
NAT filters and firewalls are essential to secure automation installations. By completely hiding these systems from the public, they avoid all the snoops and other robots looking all day long for potential security breaches on all connected objects. This is why Yoctopuce has always recommended the HTTP callback and WebSocket callback solutions for interactions between Yoctopuce modules and public servers: the connected objects stay mostly unreachable and it is the object that knows when and where it connect itself on a third party server.
But sometimes you may want some more freedom to remotely control Yoctopuce modules, without having to explicitly write code for each task to be performed in a callback server. Up till now, there were only two possibilities:
- Opening a port on the firewall to allow direct access from outside. To be avoided! It's the most dangerous approach, and even if Yoctopuce modules are reasonably robust, you are very likely to be the target at least of denial of service attacks. Moreover, this option is not always possible.
- Using a VPN or an SSH tunnel to remotely access the local network. It's a generic solution that works, but it requires some hardware or some specific software at both ends of the secure tunnel, so it's not very practical. In case of a GSM network, using a network of nodes with VPN is usually an expensive service.
The solution
The solution that we present is a tiny secure connection gateway to access your modules, written in Node.js, that you can easily host on the public server of your choice. The principle is simple:
- The YoctoHubs that you need to access connect themselves to the gateway using a WebSocket callback, and stay there waiting.
- From anywhere, you can authenticate yourself on the gateway and open a web interface to the YoctoHub of your choice. When authenticated, the gateway simply puts together the WebSockets of the YoctoHub and of the web interface to provide you with a complete access to the YoctoHub.
- The same principle will be applicable to connect an application designed to work with Yoctopuce local modules (for example written in C#) to a YoctoHub behind a NAT filter: you will be able to connect the application to the gateway secure WebSocket tunnel, and provided access credentials are correct, your application will have full access to the YoctoHub. Note that this extra functionality will require a small change to our library, which has for now only been implemented in the JavaScript/EcmaScript library, but it will be released for the other programming languages shortly.

Working principle of the secure connection gateway
Principle
The gateway allows you to define inter-connection subdomains. Each subdomain enables you to connect a YoctoHub or a VirtualHub to a user present in the list of authorized users for the subdomain.
To avoid connection attempts on the subdomains, only the login page (root page) is a priori available.

The secure login page
Links to the subdomains identifying the WebSocket channels are provided only to the users duly authenticated on the login page. In any case, establishing a new incoming WebSocket connection requires an additional implicit access control, based on the same user list.
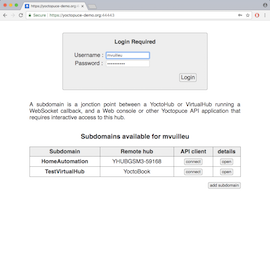
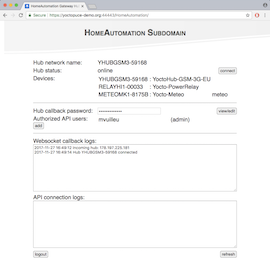
The subdomain list and the details of a subdomain configuration
By clicking on the link corresponding to the name of a subdomain, you connect yourself directly to the web interface of the corresponding YoctoHub. Users with administrator privileges have also a link enabling them to configure the domains and the users.
Installation
This small gateway is based on standard Node.js solutions to offer a simple (http://) and secure (https://) web service, with simple (ws://) and secure (wss://) WebSocket service.
This code requires a recent version of Node.js. Often, hosts allow you to select the Node.js version with the nvm version manager. If it is the case, you can use the following commands to enable the latest version:
nvm use node
Copy the gateway files on your Node.js server, and run the following command to automatically install all the dependencies:
In order to enable the secure interface https, you will also have to put in the same directory the certificates to be used: two files named cert.pem and key.pem, which are usually provided by our SSL certificate provider or hosting provider. In case you just want to make a test, you can also use self-signed certificates created using OpenSSL, by typing the following command (on a single line):
You then only have to manually run the application, indicating the ports to be used respectively for the http and https protocols:
For your application to run and run again automatically, you can use the forever package, or another solution recommended by your provider.
You will probably also have to open these two incoming TCP ports in your hosting configuration (44080 and 44443) as in most cases the default setting for node.js is to have all ports blocked by default.
To connect a YoctoHub or a VirtualHub to a HomeAutomation subdomain, for example, and supposing that you installed the gateway on a server named yoctohost.org with HTTP port 38088, you must configure the hub callback as follows:
- Callback type: Yocto-API callback
- Callback URL: ws://yoctohost.org:44080/HomeAutomation/callback
- Security type: WebSocket
- Websocket callback password: of your own making...
- Connection delay: 3 seconds

Remote console on a YoctoHub-GSM-3G-EU
If you want to connect yourself to this hub remotely from an application using the Yoctopuce library, you can use, for example:
This works as long as the tintin user has indeed access to the HomeAutomation subdomain with this password.
Conclusion
We already have in plan several enhancements to this tool. For now, it is not possible to combine the websocket callback required to interact with the hub with another HTTP callback for instance. This will be added later on, to make this tool even more useful.
Nevertheless we are already offering this solution today "as is", on our Web site and on GitHub, including full source code. If you want to make an extensive use of it, we recommend that you adapt the source code to your needs. The program uses only very standard Node.js packages and the source code is only a few hundred lines long, essentially used to configure user privileges. You could for example increase security if need be by allowing only connections identified by a specific client certificate.
In any case, don't forget to regularly update the Node.js and Express.js packages version to install potential security fixes on the embedded web server.

