![]() There is no magical sensor able to measure air quality in any circumstance: for each environment, you must select the appropriate sensor. We have already presented in this blog some ways to evaluate inside air quality, in particular to detect stale air because of CO2. We also talked about sensors that you can use to detect toxic or foul smelling gases, used in particular in the industry. Today, we address how to measure the quality of outside air, that is, the air that everyone breathes daily.
There is no magical sensor able to measure air quality in any circumstance: for each environment, you must select the appropriate sensor. We have already presented in this blog some ways to evaluate inside air quality, in particular to detect stale air because of CO2. We also talked about sensors that you can use to detect toxic or foul smelling gases, used in particular in the industry. Today, we address how to measure the quality of outside air, that is, the air that everyone breathes daily.
When you speak of the quality of the air that you breathe outside, it's mostly about measuring the impact of pollution which could be harmful to health. The main pollutants that are usually monitored are:
- Particulate matter (PM10, PM2.5, PM1), or particulates, suspended in the atmosphere, and which are carcinogenic for the humans and a factor of cardiovascular risks.
- Nitrogen dioxide (NO2), which is very irritant to respiratory tracts as it produces nitric acid when it combines with water in the lungs.
- Ozone (O3), which is a secondary pollutant produced by the action of the sun on nitrogen oxides and can transform back into NO2. Its effects are similar to the nitrogen dioxide.
- Carbon monoxide (CO), poisonous even at a low dose because it prevents tissue oxygenation.
- Sulfur dioxide (SO2), irritant for the respiratory tracts and the mucous membranes, but for which emissions are less of an issue in developed countries thanks to the improvements of heating systems and fuels.
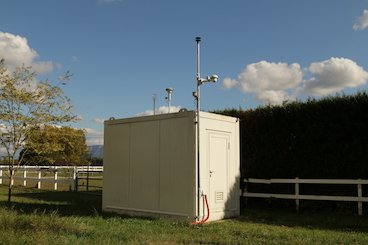
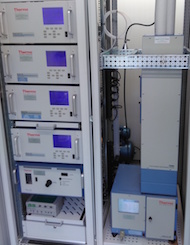
An installation for measuring the quality of the outside air
Measuring air pollutants
One could think that sensors to measure these pollutants in the outside air are similar to toxic gas sensors, of which we already talked. But there is an additional difficulty: as we are not trying to detect an accidental exposure to gas, but a continuous and permanent exposure to the air that we breathe, danger thresholds are much lower. We therefore need much more sensitive sensors, thus much more difficult to build.
Official measuring stations designed to perform these measures cost several hundreds of thousands Dollars. They require a lot of maintenance, because periodical calibrations must be performed. So naturally, there aren't that many of them. To better identify the pollution sources, initiatives have been launched in many countries to create networks of secondary indicative sensors, qualitatively less accurate than official stations, but much denser and therefore geographically more accurate. These indicative sensors are our center of interest today.
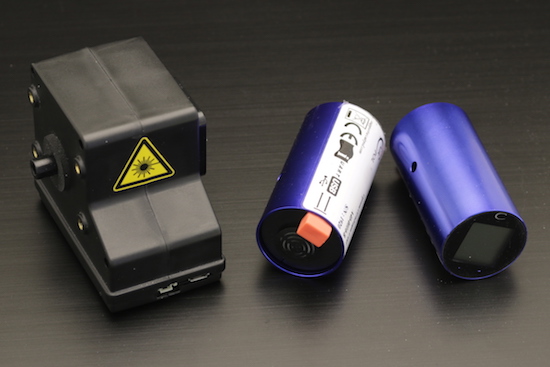
Three indicative sensors to measure air pollutants: PM, NO2, and CO
For these indicative sensors to be useful, they must provide physical measures. They must therefore return their measures in a real physical unit, and not only an abstract quality factor. It is also required that they correlate reasonably well with official instruments. A California governmental institute is performing systematic tests on distinct sensors with this aim in mind, in lab as well as in real conditions, to check which sensors were reliable as secondary indicators.
If you are interested in installing your own indicative measures of air quality, we show you here how to set up, with the help of Yoctopuce interface modules, three sensors allowing you to measure particulates, nitrogen dioxide, and carbon monoxide.
The Alphasense OPC-N2 particulate sensor
We selected this model because it is today the only sensor costing below USD 500 that is recognized to provide credible estimates for PM2.5 and PM10, without calibration. To obtain measures, you must power it in 5V and use a 3.3V SPI communication interface. You can connect it to a Yocto-SPI, by following the connection diagram:

Connecting the Alphasense OPC-N2 sensor
Note that for communication to work, it is imperative to connect the output Serial Data Out (SDO) of the sensor with the input Serial Data In (SDI) of the Yocto-SPI, and vice-versa. Because if you connect the two SDO outputs one to the other, no data goes on the SDI inputs...
To read the measures, you must also configure the communication parameters of the Yocto-SPI:
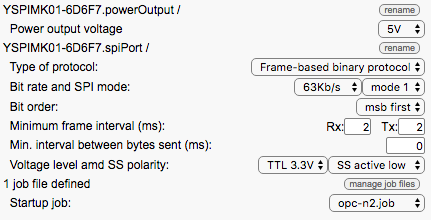
SPI communication parameters for the Alphasense OPC-N2 sensor
Now, you only have to define an automatic job which starts the sensor automatically and reads the PM1, PM2.5 et PM10 estimates at a regular interval. We therefore define two tasks:
- a task performed only once, to start the sensor:
wait 2000 writeHex 03 wait 10 writeHex 00 wait 1000
- a periodic task to read the measures:
writeHex 32 wait 10 writeHex 323232323232323232323232 expect ($1:FLOAT32)($2:FLOAT32)($3:FLOAT32)
Note that for this script to work, the OPC-N2 sensor must imperatively have firmware 18 or a later version.
The Cairpol Cairsens CO UART sensor
We selected this sensor because it requires neither calibration nor additional analog circuit to be read, and has a good sensitivity: 0.05 mg/m3, while the legal alert threshold is at 8 mg/m3. It's an electrochemical sensor, with a one-year working warranty, but it can be easily replaced when out-of-date. To obtain measures, you must power it in 5V and use a serial interface at 3.3V TTL levels. You can therefore connect it to a Yocto-Serial as follows:

Connecting Cairsens UART sensors
Note that this sensor uses a USB mini-B connection but that, in the UART version, it is indeed 3.3V serial signals that transit on the wires. You must therefore cut a USB mini-B cable, strip the wires, and connect each wire according to its color.
To read the measures, you must configure the electric levels and the communication parameters of the Yocto-Serial:
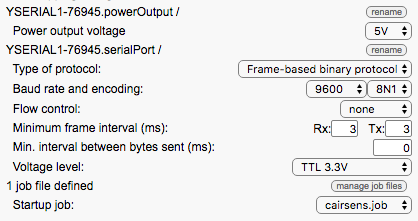
Communication parameters of the Cairsens UART sensors
The communication job must simply request the latest measure at a regular interval:
writeHex FF021330010203040506FFFFFFFFFFFFFFFF12AF8803 expect FF02172C010203040506................13($1:WORDL)..FF....03
Note that this script requires a Yocto-Serial with firmware 25599 or later, as little-endian decoding from the hex word was introduced only lately. The value returned by the sensor is measured in ppb, so we are going to convert it into mg/m3 in the parameters of the genericSensor1 with a simple linear transform:
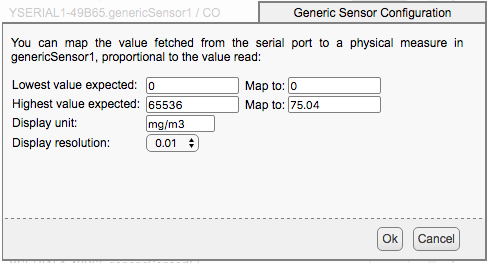
Conversion from ppb CO into mg/m3
The Cairpol Cairsens NO2 UART sensor
We selected this sensor for the same reasons as the previous one. Its sensitivity is of 13 ug/m3, while the legal alert threshold is at 80ug/m3. The diagram to connect it to the Yocto-Serial and the communication parameters are the same as for the Cairsens CO UART. However, the communication job is slightly different, because this sensor returns a value on a single byte.
writeHex FF021330010203040506FFFFFFFFFFFFFFFF12AF8803 expect FF02162C010203040506................13($1:BYTE)..FF....03
The value returned by the sensor is given in ppb, so we must also convert it into ug/m3 in the parameters of the genericSensor1 with a simple linear transform:
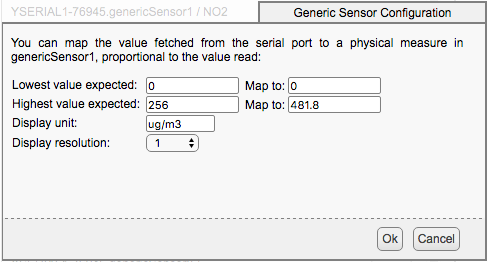
Conversion from ppb NO2 into ug/m3
Sending air quality measures through a GSM network
If our final goal was to read these sensors over USB only, we could have simply used the USB version of CairSens sensors. But thanks to the fact that these three sensors are connected using Yoctopuce interface modules, we are not limited to using them with a USB connection. We can connect them directly to a YoctoHub-GSM-3G-EU so that the measures are automatically sent to the server of our choice through a 3G cellular network.
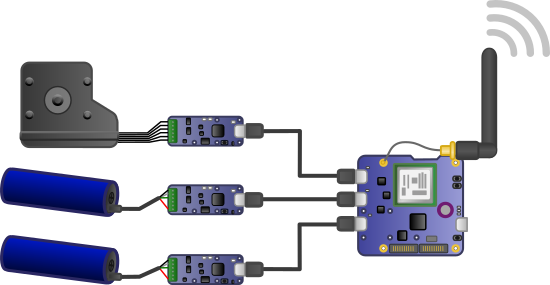
Sending air quality measures through a 3G cellular network
Everything fits in a small metallic enclosure, coming from Caipol as well, in which we only had to drill a few additional assembly holes:
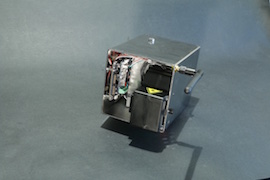
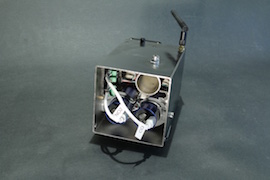
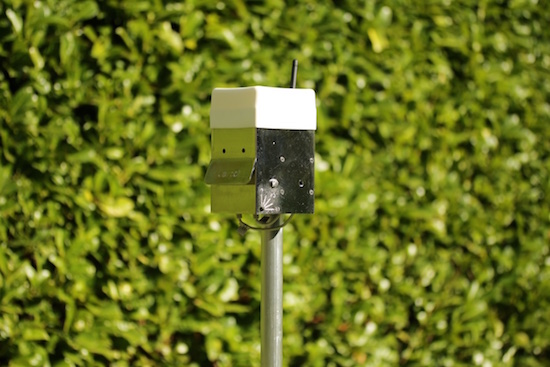
Our tiny station for indicative measures of air quality, with embedded GSM transmission
Now we will have to place our tiny measure station close to an official reference station to check by ourselves the quality of the estimates...


