![]() Customers sometimes ask us how to measure the electrical resistance of a circuit by USB using a Yoctopuce module, as we didn't implement a Yocto-Ohm module. Therefore, we are going to explain today how to use other existing Yoctopuce modules to easily measure resistors. You'll see that it's not only possible, but also that you can obtain an excellent accuracy.
Customers sometimes ask us how to measure the electrical resistance of a circuit by USB using a Yoctopuce module, as we didn't implement a Yocto-Ohm module. Therefore, we are going to explain today how to use other existing Yoctopuce modules to easily measure resistors. You'll see that it's not only possible, but also that you can obtain an excellent accuracy.
Yoctopuce products measuring the electric resistance
There are two Yoctopuce products which are implemented based on a resistance measure.
The first one is the Yocto-MaxiThermistor, which has six independent inputs to measure resistances. The module is mostly intended to measure thermosensitive resistances, because it is able to deduce the temperature thanks to a conversion table, but you can use it to measure simple resistances as well and to return a value in Ohms, as long as the measuring range corresponds: between 1 KΩ and 10 KΩ we obtain measures with an accuracy of about 2‰, and more generally between 100Ω et 500 KΩ we obtain resistance measures with a 1% accuracy.
Between 10Ω and 350Ω, you can obtain a much higher accuracy with a Yocto-PT100. Thanks to using more accurate reference components, it can reach a 1‰ accuracy on this range, and even 0.1‰ around 100Ω, that is an error under 0.01Ω. To reach this kind of accuracy, you must use 4 wire cable, as described in the Yocto-PT100 user's guide, because otherwise the wire resistance itself influences the measure beyond the required accuracy. Note that the Yocto-PT100 is not designed to directly return a value in Ohm, but only a temperature. To read the measured resistance, you must therefore use the get_signalValue() method and not the get_currentValue() one.
Measuring the resistance with high precision on a larger range
A simple and efficient way to measure a resistor consists in circulating a direct current through it and in measuring the voltage at each end of the resistor. From there, Ohm's law makes it possible to compute the electrical resistance. This is what the two products discussed above do.
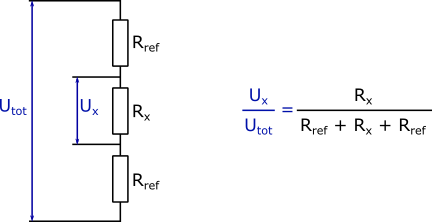
A variant to this method consists in applying a voltage to the ends of a set of resistors with accurately known values, except for one, and to measure the ratio between the tension at the ends of the unknown resistor Rx with regards to the total voltage.

Measure of the relative resistance
To do so, the ideal is to use a ratiometric converter, that is which accurately measures a voltage ratio. This is exactly what the Yocto-Bridge does, thanks to a 32 bit ratiometric converter. By using precision resistors as reference, you can thus obtain very high quality measures:

Connecting the Yocto-Bridge for a measure of electrical resistance
The Yocto-Bridge provides the voltage source, which it can even alternate to avoid errors caused by temperature variations inside the circuit. Digital filters embedded in he ratiometric converter thus allow you to accurately measure voltages below a 0.1µV/V. This means that even by using 1MΩ reference resistors for example, we are going to measure resistors up to 1Ω. And as the measure is ratiometric, a 1‰ accuracy on the reference resistors allows you to obtain an equivalent accuracy on the measure, almost independently from the size of the measured resistor.
In real life, it's naturally better to use 1‰ reference resistors if you want to measure the resistance of electric wires for example, to obtain a maximum of accuracy, and to keep the 1MΩ value for measures between 5Ω and 1MΩ. If you need a larger range, for example from 0.001Ω to 10MΩ, you can add a Yocto-Relay to automatically select which reference resistor to use.
Practical case
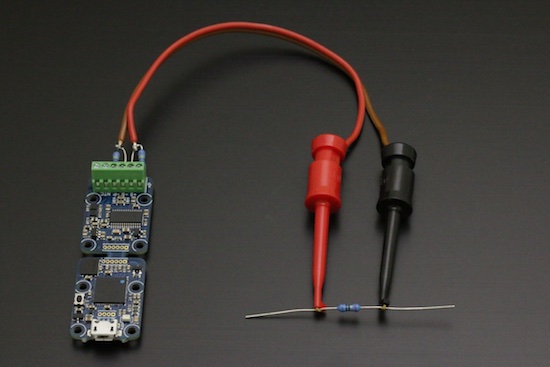
Here is what our USB Ohmmeter looks like:

Our USB Ohmmeter, created in 10 minutes
Software-wise, to obtain the electrical resistance value, we use the following relationship:

Resistance computing formula for ratiometric measures
You can obtain the ratiometric measure in µV/V by calling the get_signalValue() method of genericSensor1 available on the Yocto-Bridge. To obtain the maximum accuracy, we recommend on top of this to
- configure the desired measuring range, in order for the Yocto-Bridge to configure the input signal amplifier in the optimal way
- recalibrate the zero from time to time, by shorting the ratiometric input as close to the Yocto-Bridge as possible
- disable the zero-tracking function so that the ohmmeter doesn't try to tare itself when you measure very weak resistances.
To measure electrical resistance below 10Ω, there is an additional necessary precaution: you must subtract the measuring wire resistance. Indeed, the trick to use four wires as we do it for the Pt100 doesn't work for a ratiometric measure, because the reference voltage is necessarily measured at the origin. So the simplest way consists in connecting the two probe wires together to measure the resistance of the probe wires themselves, store this value, and to then subtract it from the measures.

Canceling the electrical resistance of the probe itself
As an example, we created a short HTML/JavaScript page which implements these few functions to create a digital Ohmmeter. Here is the result:

Complete interface for our precision USB Ohmmeter
You can find the source file, built on the model of our small tutorial from last week, on Github.


