![]() Not long ago, we came across this post explaining how to launch a model rocket from a smartphone by using a Raspberry Pi, a WiFi dongle, a relay board, and a pocket WiFi router. We wondered if we could make it simpler by using Yoctopuce modules. Moreover, we couldn't pass a reason to play with model rockets :-)
Not long ago, we came across this post explaining how to launch a model rocket from a smartphone by using a Raspberry Pi, a WiFi dongle, a relay board, and a pocket WiFi router. We wondered if we could make it simpler by using Yoctopuce modules. Moreover, we couldn't pass a reason to play with model rockets :-)
Model rocket architecture
A model rocket is make of a tube with thins, a nose cone, a parachute and an engine. The engine is a cardboard tube containing the exhaust nozzle, a propellant, a delay charge, and a small ejection charge. During launching, the propellant burns in a few tenths of a second, which propels the rocket. Then the delay charge burns slowly while the rocket continues its ballistic flight from its momentum. After a few seconds, the delay ignites the ejection charge. This ejects the content of the tube, that is the parachute, the cone nose, and sometimes the engine when it is not properly fixed. If everything was carefully attached together, the rocket and its nose cone then fall down quietly, sustained by the parachute.

Structure of a model rocket and of its engine
Stage rockets
You can improve a model rocket by adding stages. A model rocket stage is nothing more than a tube, also equipped with thins, which fits on the rocket basis. This stage works with a simpler engine containing neither delay charge nor ejection charge. When the stage is done burning, inflamed powder residues penetrate the exhaust nozzle of the top engine, and this fires it. The resulting overpressure ejects the lower stage while the remainder of the rocket accelerates.

Workings of a stage rocket

A two-stage hand-made model rocket

The same, dismantled
Firing
You fire a model rocket with electric igniters. An electric igniter is made of two electric wires connected by a filament embedded in black powder. To launch a rocket, you must simply put the igniter inside the exhaust nozzle and send current in it. The filament then heats, which sets fire to the black powder which in turn ignites the engine.

An electric igniter
Launching a rocket from a smartphone
Usually, to launch a rocket, you draw a very long electric wire from the launcher to a console. Setting up a model rocket launcher is therefore always somewhat tedious. Here lies the interest in using a smartphone for launching.
The idea was to use Yocto-PowerRelay to trigger the igniter, and to drive the relay with a YoctoHub-Wireless. To save on space, we assembled the Yocto-PowerRelay directly on the hub. Thus, all the electronics fits into one enclosure. A small 12V battery provides power for the igniter and we used a USB battery to power the hub.
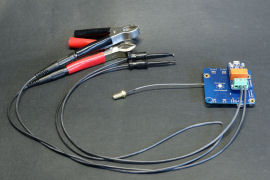
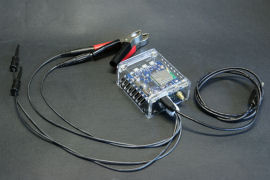
The electronic component of the project
For this project, the main interest of the YoctoHub-Wireless is its capacity to work in ad hoc mode, and therefore to generate its own WiFi network in the middle of nowhere. Moreover, the YoctoHub-Wireless behaves like a web server. You can therefore simply write a short HTML page with a large red button which triggers the relay, put this page on the hub file system, and it's ready.

Launching system diagram
To launch the rocket, you simply need to connect a smartphone to the hub WiFi network, to display the launching page with a simple web browser, and to hit the launching button.
The software part
The software component is therefore only a simple HTML page with some JavaScipt which connects itself to the hub API, finds the relay, and triggers it when you hit the button. Actually, most of the code is used to draw a large red button in the middle of the screen.
<html>
<head>
<META name="apple-mobile-web-app-capable" content="yes"/>
<meta name="viewport" content="width=100, user-scalable=no">
<script type='text/JavaScript' src='js/yocto_api.js'></script>
<script type='text/JavaScript' src='yocto_relay.js'></script>
<script type='text/JavaScript'>
var relay = null;
function init()
{ if(yRegisterHub(location.host) != YAPI_SUCCESS)
return alert("Cannot contact Hub");
relay = yFindRelay("fire");
}
function fire()
{ if (!relay || !relay.isOnline())
return alert("not connected");
relay.pulse(2000);
}
</script>
<style>
body
{ text-align:center; }
A
{ position:absolute;
top:30%;
font-family:Arial, Helvetica, sans-serif;
color: white;
background-color: #FF0000;
padding: 10px;
border-radius: 5px;
}
A:link
{ text-decoration: none; }
</style>
</head>
<body onload='init()'>
<a href='javascript:fire();'>LAUNCH</a>
</body>
</html>
And it works?
It works quite well, judge for yourself:


We tested our wireless launcher in our own Area 51 :-)
A few comments, however:
- Using plastic clamp-type test probes to connect the igniter is quite convenient, but it's a bad idea unless you want to replace them after each launch: the engine heat melts them instantaneously.
- You may have noticed that we used an iPod touch for launching. There is a reason: Android phones are not able to connect themselves to an ad hoc network. But a new version of the YoctoHub-Wireless with a soft-AccessPoint feature solving this issue should be available soon.
Conclusion
With only two Yoctopuce modules and half a page of HTML code, we were able to fire our model rocket from a smartphone an iPod touch, and this in the middle of nowhere. Not only is this project a complete success, but on top of it we had a lot of fun. On the downside, as it had rained the day before, we ended up with mud up to our ears.

