 Many houses were built before the Internet of Things and sometimes we need to convert old, but working, installations in order to monitor them remotely. It's the topic of this week's post. We are going to add a YoctoHub to a Straton furnace in order to receive an alert when the furnace goes out of order.
The furnace that we are going to modify is an oil-fired furnace of the Straton brand. This furnace is more than 10 years old and has no communication interface to enable us to monitor it remotely, but it works well. The disadvantage of this furnace is that nothing warns the inhabitants when it goes out of order, for example if a filter is clogged or if there is no more fuel oil. In these situations, the furnace stops working, displays an error message, lights a led, and waits for someone to deal with it. As the furnace is in the basement, the inhabitants notice the problem only when the house temperature becomes abnormally low, for example 15░.
The goal is to send a warning email as soon as the furnace is out of order and that the led is lighted. We must therefore find a way to monitor the state of the error signal. A possible solution is to permanently monitor whether the led is on or off with a Yocto-Light or a Yocto-Knob with a phototransistor. We had, by the way, already used this solutions in the post "Connecting that which cannot be connected". But when inspecting more closely the furnace wiring, we noticed that there is a terminal which outputs a 220V signal when the furnace is out of order.
The electric diagrams of the furnace indicate that the S3 terminal is powered in 220V when there is an error. The solution is thus to monitor the voltage of the S3 terminal. We could actively monitor the terminal with a Yocto-Volt, but there is an even smarter solution.
Instead of actively monitoring the S3 terminal, we are going to use it as power supply for a YoctoHub-Wireless-g.

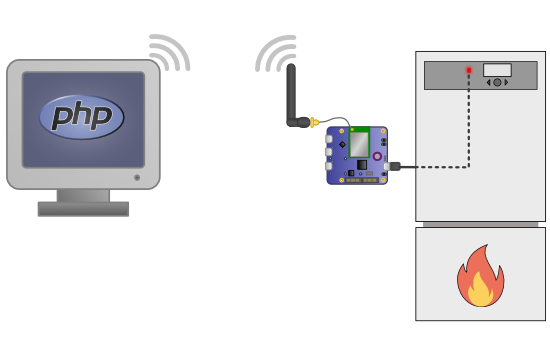
When there is a warning, the YoctoHub is powered and connect itself to our PHP script
When there is no warning, the S3 output is at 0V and thus the YoctoHub is off. If the furnace goes out of order, the S3 output is powered in 220V and the YoctoHub-Wireless-g is powered. When it starts, the YoctoHub connects to the local network and executes an HTTP callback. We thus only need to write a small PHP script which sends an email when it receives a connection from the YoctoHub and that's all there is to it.
The furnace
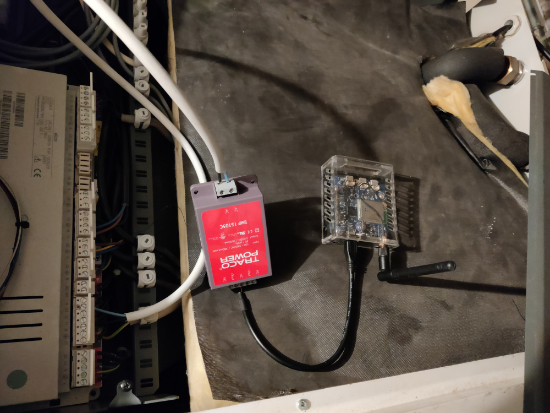
The first step is to wire the power supply of the YoctoHub. It is necessary to use a power block to convert the 220V of the S3 output into 5V usable by the YoctoHub. In our case, we used an industrial power block, but a simple USB charger with a cut extension cord can do the trick. Be careful however to work properly, because a hazardous connection can be very dangerous when working with 220V.

Connecting the power block on the furnace terminal
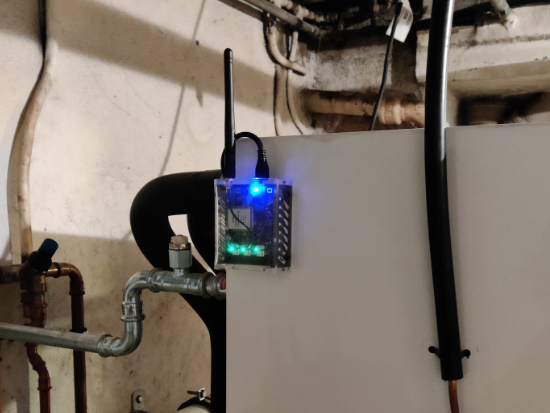
The YoctoHub is connected on the output of our industrial power block and is mounted on the back of the furnace.

The YoctoHub is mounted at the back of the furnace
The PHP script
We must then write a PHP script which is called by the HTTP callback. We used Composer to install the PHP Yoctopuce programming library. At the root of the project, we must create a composer.json file with a dependency on the library and run the "composer install" command.
The composer.json file:
"require": {
"yoctopuce/yoctolib_php": ">=1.10.42982"
}
}
For more details on Composer, you can read our previous post "Installing the PHP library with Composer".
The PHP code is very simple. As we don't need to interact with the YoctoHub, we simply need to call the YAPI::RegisterHub() method while giving it the URL with the callback password. If the call returns the YAPI::SUCCESS constant, this is indeed our YoctoHub and we send an email with the mail() PHP function.
define("MD5_PASSWD", "password");
define("DEST_EMAIL", "somebody@example.com");
define("SRC_EMAIL", "somebody@example.com");
if (YAPI::RegisterHub('md5:' . MD5_PASSWD . '@callback') == YAPI::SUCCESS) {
$subject = "Heater Alert!";
$message = "The Heater alert has been triggered. Please check it.";
mail(DEST_EMAIL, $subject, $message);
die("Alarm has been triggered");
}
As you can see, the code is really very simple. The complete project is available on GitHub:https://github.com/yoctopuce-examples/heater_alert.
YoctoHub configuration
The last piece of the puzzle is the configuration of the HTTP callback. You can modify these parameters from the YoctoHub web interface in the Callback URL section. The edit button enables you to open the configuration panel of the HTTP callbacks.
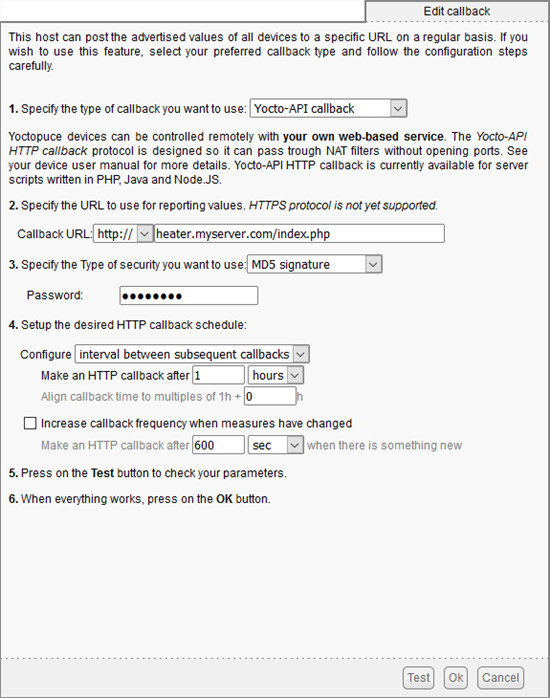
You must select a callback of type Yocto-API callback and enter the URL of our PHP script. For the security parameters, use the MD5 Signature option and enter the same password as used in the PHP script.
Then comes the callback timer setting. As the PHP script sends an email each time that the YoctoHub is connected, you must add a long enough timer so as to avoid being spammed by your own furnace. A value that seemed reasonable is a one hour delay between each callback and no change of frequency if the value of a sensor changes.

The HTTP callback parameters
In this configuration, when the furnace goes out of order, the YoctoHub is powered and immediately triggers an HTTP callback. Then, it waits an hour and triggers a new callback, and so on. This means that in the event of a problem, the user receives an email as soon as the furnace goes out of order, then an email every hour until the alarm is cleared.
Before saving the window, we can test the callback to make sure that everything works as intended. If it is not the case, either you made a typo in the parameters, or you have an error in your web server configuration. In the latter case, we recommend that you start by reading our post "Using the HTTP callback mode in PHP" or that you contact support.
Conclusion
There you are. We transformed a simple oil-fired furnace into a "smart" furnace. Next time a filter is clogged, the user can immediately act instead of waking up in the cold.


