![]() YoctoHubs cannot connect directly to the IFTTT cloud service, but you can still use our modules with this platform thanks to the Webhooks. We are going to see how to publish the values measured by a Yocto-Meteo-V2 on different services thanks to IFTTT and Webhooks.
YoctoHubs cannot connect directly to the IFTTT cloud service, but you can still use our modules with this platform thanks to the Webhooks. We are going to see how to publish the values measured by a Yocto-Meteo-V2 on different services thanks to IFTTT and Webhooks.
Before anything else, let's explain why IFTTT doesn't natively support the Yoctopuce modules. The IFTTT concept is to enable several cloud services to interact, for example tweeting the content of an Instagram post. IFTTT "only" passes information from one cloud to another.
The problem is that Yoctopuce modules don't require the use of a cloud service. You can configure the YoctoHubs or the VirtualHub to post measures directly on some web services, but IFTTT supports none of them.
The solution is to use IFTTT Webhooks which enable connected objects to post up to three values directly on IFTTT. Unfortunately, it's not possible to add support for the WebHooks directly in the YoctoHubs, because their processor is not powerful enough for that. You can however write a short Python script which takes the values of the Yoctopuce sensors and posts them on IFTTT thanks to the WebHooks.
An example
To illustrate the use of IFTTT WebHooks, we are going to create an IFTTT Applet which is going to add every hour a line in a Google Sheets spreadsheet with the measures of the Yocto-Meteo-V2 (temperature, humidity et atmospheric pressure).
To do so, we are going to write a short Python script which reads the values of the Yocto-Meteo-V2 and posts them on IFTTT thanks to the WebHooks. We also need to configure an IFTTT Applet which adds these measure to the Google Sheets spreadsheet.

The measures are transmitted to IFTTT thanks to the Webhooks and the values are then transferred to Google
Configuring the Applet
Before going into the Python code which is going to post the values of the Yocto-Meteo-V2 sensors on IFTTT, we must create an Applet.
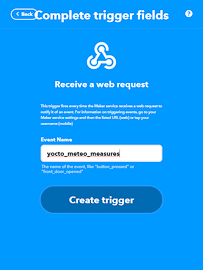
When we are logged in on the IFTTT site, we must choose "create" and select the Webhooks service as trigger (the If This part).


Then, we must name this trigger. This name enables us to differentiate the different WebHooks and we are going to use it later in our Python script. For our example, we are going to call it yocto_meteo_measures.
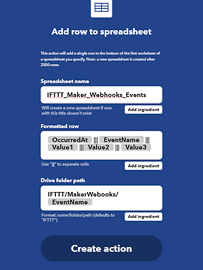
Then, we must configure the "Then That" part of the Applet. In our case, we select Google Sheets. The wizard takes care of authentication with Google and asks us what to do with the posted values. In our case, we simply want to add a line to a "IFTTT_Maker_Webhooks_Events" spreadsheet.

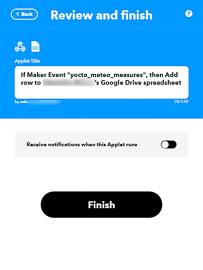
The last panel displays a summary of the Applet.
Testing the Webhook
The second step consists in finding the parameters of the WebHook and in testing them. To do so, we must go in the My services menu and then select WebHooks, or more simply go to the https://ifttt.com/maker_webhooks page.
This page lists all the Applets which use WebHooks. To test the WebHooks and find the parameters to be used in our Python script, we must click on the Documentation button.

This button opens a popup window which displays the key to use in a request for the WebHook.

You can also test the Applet directly by filling the event, value1, value2, and value3 fields. In our case, we are simply going to copy the key that we'll use in our Python script.
The Python application
Now we need to write the Python script. The code is very simple, we simply modified the example in the Yocto-Meteo-V2 documentation. Instead of displaying the values of the three sensors, it posts them on IFTTT thanks to the ifttt_webhook function.
def ifttt_webhook(webhook_key, ev_name, first, second, third):
report = {"value1": first, "value2": second, "value3": third}
res = requests.post("https://maker.ifttt.com/trigger/" + ev_name + "/with/key/" + webhook_key, data=report)
This function has 5 parameters: the WebHook key, the WebHook name, and the 3 values to be transmitted. With these 5 values, it creates an HTTP request which is sent to IFTTT.
Note: If you have never used the Yoctopuce API, we recommend that you start by reading our tutorial on "how to start in Python with Yoctopuce modules".
The remainder of the code is classic Yoctopuce: We use YAPI.RegisterHub to access the modules connected on the USB ports of the machine, and we list the available functions thanks to the FindXXX and FirstXXXX methods.
Note that we have installed the Yoctopuce library with PyPI and thus we use the from yoctopuce.yocto_XXX import * syntax for the imports.
from yoctopuce.yocto_temperature import *
from yoctopuce.yocto_humidity import *
from yoctopuce.yocto_pressure import *
def ifttt_webhook(webhook_key, ev_name, first, second, third):
report = {"value1": first, "value2": second, "value3": third}
res = requests.post("https://maker.ifttt.com/trigger/" + ev_name + "/with/key/" + webhook_key, data=report)
def main():
errmsg = YRefParam()
# Setup the API to use local USB devices
if YAPI.RegisterHub("usb", errmsg) != YAPI.SUCCESS:
sys.exit("init error" + errmsg.value)
humSensor = YHumidity.FirstHumidity()
if humSensor is None:
print('No Yocto-Meteo-V2 connected on USB')
return
m = humSensor.get_module()
serial = m.get_serialNumber()
pressSensor = YPressure.FindPressure(serial + '.pressure')
tempSensor = YTemperature.FindTemperature(serial + '.temperature')
while True:
ifttt_webhook("fxXXXXXXXXXXXXXXXXXXXXXXXXXXXXXXXXXXXXXXXXXGX",
"yocto_meteo_measures",
tempSensor.get_currentValue(),
pressSensor.get_currentValue(),
humSensor.get_currentValue())
msdelay = 60*60*1000
YAPI.Sleep(msdelay)
if __name__ == '__main__':
main()
When the script is running, we can check that IFTTT actually adds a line in our Google Sheets file:

The measures can actually be found in our Google Sheets file
Conclusion
As we just saw it, we can trigger IFTTT events from Yoctopuce modules by using a Python script. We used Python, but you can use any other programming language that we support or even a shell script and the command line.
Note that we spoke only about the way in which to trigger an event from a Yoctopuce module. Using a Yoctopuce module as output of an IFTTT Applet, for example modifying the color of a Yocto-Color-V2, is more complex. Indeed, we must implement a web server that IFTTT can contact directly. On top of the code which is more complex than our small example, the machine must have a public address or you must have configured the router to redirect HTTP traffic to the correct machine. We don't find this solution very elegant and we are thinking about an alternative...

