 Until now, it was possible to run the VirtualHub on a QNAP NAS, but only for the NAS servers using an ARM processor. Moreover, we didn't have a .qpkg file to make installation easier. We are putting this straight by providing you with a QNAP package to easily install the VirtualHub from the NAS web interface. This enables you to easily monitor the temperature of the room hosting your NAS using a simple Yocto-Temperature.
Let's imagine that your don't have an air-conditioned server room. Your NAS simply sits on a desk in the corner of an office. A live graph with the room temperature could be very handy to check that your NAS is going to survive the coming Summer. Thanks to this new package, you have a solution to do this without having to write a single line of code. You will be using:
- a Yocto-Temperature
- the VirtualHub
- Xively.com
Start by connecting a Yocto-Temperature directly on the NAS.

The Yocto-Temperature directly connected to the QNAP NAS USB port
Download the VirtualHub package corresponding to your QNAP from our web site. We provide two packages: one for NAS using an ARM processor and one for NAS using an Intel processor.
Compatibility list:
| Processor | Package | Series |
|---|---|---|
| ARM | VirtualHub.qnap_arm.XXX.zip | TS-421U / 420U
TS-x21 Series HS-x10 Series TS-x20 Series TS-x12 Series TS-x19 Series |
| Intel | VirtualHub.qnap_x86.XXX.zip | SS-x79U-SAS Series
TS-x79U-SAS Series TS-x79U Series TS-x79 Pro Series TS-x70U Series TS-x70 Series TS-x69U Series TS-x69 Pro Series TS-x70 Pro Series TS-x69L Series |
You then log into the QNAP web interface and access the APP Center to install the .pqkg file contained in the zip file that you just downloaded.
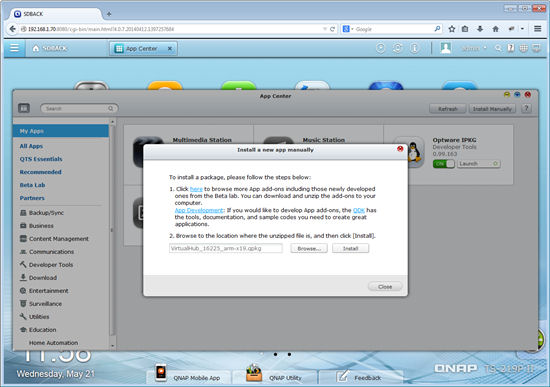
When done, the VirtualHub is installed on the machine and you can start it with the on/off button. You can directly access the VirtualHub web interface with the Start button or you can connect yourself to port 4444 of your NAS with a web browser.

The VirtualHub application installed on a QNAP NAS
Now that the VirtualHub is installed and the Yocto-Temperature connected, you only need to configure the HTTP callback for the VirtualHub to automatically post the temperature on Xively. To configure the the HTTP callback, open the VirtualHub configuration panel and edit the callback URL. The wizard asks you to provide the Feed ID and the API key of your Xively graph. When you have saved this data, your graph is automatically updated and you can consult it directly on Xively.

And here is the graph on Xively
Now that you have a live graph of the server room temperature, you can browse air-conditioner catalogs :-)

