![]() This week, we are going to show you how to implement, in Delphi, a Windows application using Yoctopuce modules. To make this topic somewhat interesting, we are going to apply this to temperature regulation, using a heater and a relay, with a practical example.
This week, we are going to show you how to implement, in Delphi, a Windows application using Yoctopuce modules. To make this topic somewhat interesting, we are going to apply this to temperature regulation, using a heater and a relay, with a practical example.
We assume that you already have some basic knowledge of Delphi and that you have already read our post on the logical structure of Yoctopuce modules.
Setting up
You must first download the Delphi Yoctopuce API. Unzip the file wherever you want, the essential directory is "sources". To tell the compiler where to find the API, launch Delphi and, in the "tools/options/delphi/options/library" menu, add a path to the "Sources" directory of the API. The screenshot below shows you the Delphi 10.2 interface, but the principle is the same for all Delphi versions.
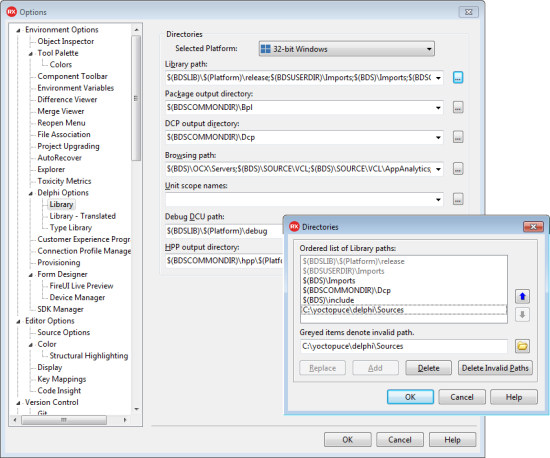
Delphi 10.2 configuration
Note that if you don't want to modify your Delphi environment configuration, you can also include the API files directly in your project. In this particular case, you need yjson.pas, yocto_api.pas, yocto_relay.pas, and yocto_temperature.pas.
Finally, note that the "sources" directory has a "dll" sub-directory, which itself contains the yapi.dll file, which you'll need later.
The project
The idea is to show you how to precisely monitor the temperature of a system thanks to a heater driven by a simple relay, that is either on or off. To illustrate this, we created a little test bench: a small metallic enclosure containing two 12V 50W halogen lamps. We drive the lamps with a Yocto-LatchedRelay and we power them with a big 12V power supply: the lamps on their own consume 8A. We measure the air temperature in the enclosure with a Yocto-Thermocouple.
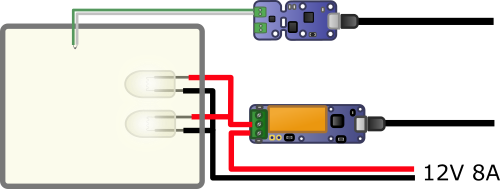
Our small test bench
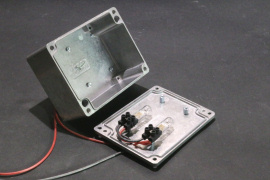
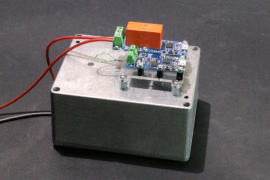
To make programming easier, we gave logical names to the relay and temperature1 functions of the two modules. With the VirtualHub, we called the relay "Box-Lamp" and the temperature probe "Box-Temp".
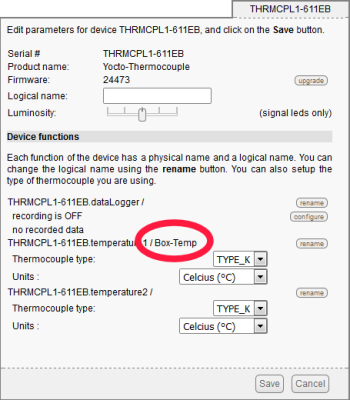
We assign a logical name to the functions we intend to use
A small test shows that this test bench is particularly efficient. In less than 75 seconds, the temperature in the enclosure goes from 30 to 120░C and the curve makes us believe that we could go much higher. However, as the enclosure cooling down is only passive, it takes much longer to go down.
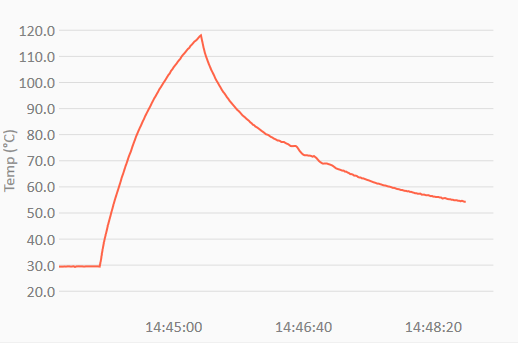
"Natural" performances of the enclosure
The question is therefore to know if we can maintain a constant arbitrary temperature in this enclosure. Let's see how to code a Delphi application to do that.
The application
The application initialization
We start by creating a new VCL forms application, that is a Windows application as standard as can be. We must first initialize the Yoctopuce API as soon as possible in the life of the application. To do so, in the Delphi "Project manager", right-click/View Source (or Ctrl-V) directly on the main node of your project. You obtain the source code of the entry point of the application. You only need to edit it to add a call to YRegisterHub.
uses
Vcl.Forms,dialogs,yocto_api,
Unit1 in 'Unit1.pas' {Form1};
{$R *.res}
var
errmsg:string;
begin
if (YRegisterHub('127.0.0.1',errmsg)<>YAPI_SUCCESS) then
messagedlg(errmsg,mtwarning,[mbok],0);
else
begin
Application.Initialize;
Application.MainFormOnTaskbar := True;
Application.CreateForm(TForm1, Form1);
Application.Run;
end;
end.
Note that we wrote "127.0.0.1" for the YRegisterHub parameter. Indeed, we intend to use the application through the VirtualHub, which allows us to run the Yocto-Visualization application at the same time and thus to easily obtain temperature graphs.
Before running the application for the first time, remember to copy the yapi.dll file in the same directory as the executable, otherwise nothing works at all.
Creating the form
In the application form, we put:
- A TEdit field in "read only" to display the current temperature
- A second TEdit field in "read only" to display the target temperature
- Two TButton buttons, "+" and "-", to adjust the target temperature
- Two TButton buttons, "run" and "stop", to run and stop the experiment
- A TTimer, set to 1000ms
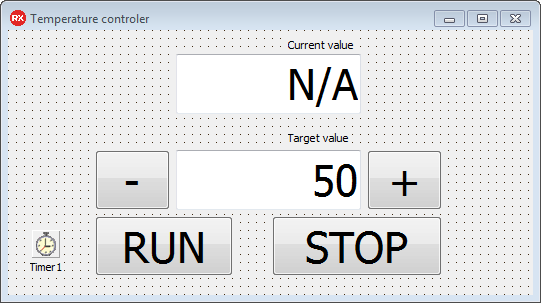
Creating the interface
Form initialization
When initializing the form, we retrieve the objects corresponding to our temperature probe and to our relay with the YFindTemperature and YFindrelay functions. We check that they are in working conditions with isOnline() and we store them in the Sensor and Relay form variables.
begin
Sensor := YFindTemperature('Box-Temp');
Relay := YFindrelay('Box-Lamp');
if not(Sensor.isOnline()) then
begin
MessageDlg('No temperature sensor named Box-Temp',mtwarning,[mbok],0);
RunButton.Enabled:=false;
end;
if not(Relay.isOnline()) then
begin
MessageDlg('No relay named Box-Lamp',mtwarning,[mbok],0);
RunButton.Enabled:=false;
end;
end;
The interface code
The code managing the interface is not very interesting. It simply allows you to change the target value and to run/stop the experiment.
begin
TargetValue.Text := inttoStr(strtoint(TargetValue.Text)+1);
end;
procedure TForm1.DecButtonClick(Sender: TObject);
begin
TargetValue.Text := inttoStr(strtoint(TargetValue.Text)-1);
end;
procedure TForm1.RunButtonClick(Sender: TObject);
begin
RunButton.Enabled :=false;
StopButton.Enabled:=true;
running:=true;
end;
procedure TForm1.StopButtonClick(Sender: TObject);
begin
RunButton.Enabled:=true;
StopButton.Enabled:=false;
running:=false;
end;
The control loop
We now come to the truly interesting part of the problem: how to maintain a constant temperature in the enclosure? We have a TTimer calling a callback once per second. It's in this callback that we put our control code, but there are several ways to do it.
Basic dumb algorithm
The simplest method consists in turning the lamps on when the temperature is too low and in turning them off when it is too high.
procedure TForm1.Timer1Timer(Sender: TObject);
var
temp : double ;
target : double ;
delay:integer;
begin
if Sensor.isOnline() then
begin
target := strtofloat(TargetValue.Text) ;
temp := Sensor.get_currentValue();
CurrentValue.Text := format('%.2f', [temp] )+ Sensor.get_unit();
if (running and relay.isOnline()) then
begin
if temp<target then relay.pulse(timer1.Interval+100)
else relay.set_state(0);
end;
end;
end;
Note that instead of simply switching the relay with set_state(1), we used the "Pulse()" method. Thus the relay automatically goes back to the idle state when the delay given as a parameter is over, and this even if the control application stops. This prevents the enclosure from overheating due to loss of control. The result of this algorithm is correct, no more: we see many oscillations on the temperature curve.
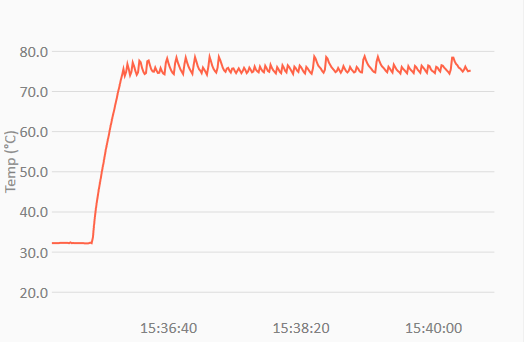
Simple on/off control, the curve oscillates a lot
We could probably decrease the amplitude of these oscillations by having a shorter timer period, but switching an electro-mechanical relay more than once per second isn't really reasonable.
Using a PID
In fact, there is a much more efficient method to control systems with inertia: the PID. It's an algorithm that we have used before in a previous post. In short, it consists in computing the error between the current temperature value and the wanted value. We compute the relay command as a combination of three factors, the first one Proportional to the error, the second one proportional to the error Integral, and the third one proportional to the error Derivative. Each of these factors are weighted by a constant, respectively A, B, and C. The difficulty consists in finding correct values for these constants. Google can help you find plenty of theories on this topic. For this experiment, we simply tried to adjust them until we obtained something reasonable. Here is the code of the said PID.
PID_Data : array[0..10] of double;
PID_Ptr : integer;
function PID(target,current:double):double;
var err,P,I,D : double;
n:integer;
const
PID_A = 150.0;
PID_B = 100.0;
PID_C = -50.0;
begin
err := target-current;
if PID_Ptr<length(PID_Data)-1 then
begin
PID_Data[PID_Ptr]:=err;
inc(PID_Ptr);
end
else
begin
move(PID_Data[1],PID_Data[0],(length(PID_Data)-1)*sizeof(double));
PID_Data[length(PID_Data)-1] := err;
end;
if PID_Ptr>2 then
begin
P := PID_Data[PID_Ptr-1];
I:=0;
for n:=0 to PID_Ptr-1 do i:=i+ PID_Data[n];
I := I / PID_Ptr;
D := ( PID_Data[PID_Ptr-1] - PID_Data[0] ) / PID_Ptr;
PID := PID_A * P + PID_B * I + PID_C * D;
end else PID:=0;
end;
This PID directly returns the value that one must use to drive the relay. Obviously, we can't "half" switch the relay, but we can however play on the time during which it stays closed, that is on the parameter of the pulse() function.
procedure TForm1.Timer1Timer(Sender: TObject);
var
temp : double ;
target : double ;
delay:integer;
begin
if Sensor.isOnline() then
begin
target := strtofloat(TargetValue.Text) ;
temp := Sensor.get_currentValue();
CurrentValue.Text := format('%.2f', [temp] )+ Sensor.get_unit();
if (running and relay.isOnline()) then
begin
delay:= round(PID(target,temp));
if (delay<0) then delay:=0;
if (delay>timer1.Interval+100) then delay:=timer1.Interval+100;
Relay.pulse(delay );
end;
end;
end;
We then obtain a better regulation. However, there is a rather blatant overshoot at the beginning. This comes from the fact that at full power, the system is able to increase the temperature faster than it can control it, a thermal skid off in a way.
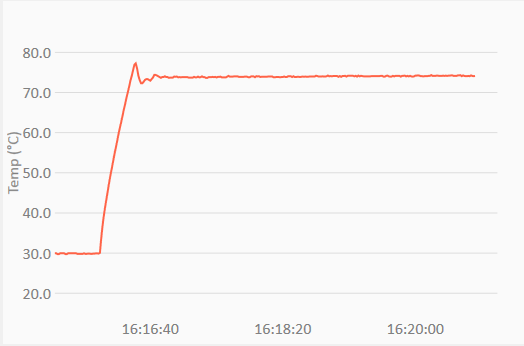
The PID provides a better result, but we have an overshoot at the beginning
The solution consists in preventing the temperature to vary too fast. Instead of directly using the target value to feed the PID, we use a "virtualTarget" variable which converges slowly towards the actual target value at the maximal speed of 1░C per second.
procedure TForm1.Timer1Timer(Sender: TObject);
var
temp : double ;
target : double ;
delay:integer;
begin
if Sensor.isOnline() then
begin
target := strtofloat(TargetValue.Text);
if abs(target-virtualTarget)>1 then
begin
if virtualTarget< target
then virtualTarget:=virtualTarget+1
else virtualTarget:=virtualTarget-1;
end else virtualTarget:=target;
temp := Sensor.get_currentValue();
CurrentValue.Text := format('%.2f', [temp] )+ Sensor.get_unit();
if (running and relay.isOnline()) then
begin
delay := round( PID(virtualTarget,temp) );
if (delay<0) then delay:=0;
if (delay>timer1.Interval+100) then delay:=timer1.Interval+100;
Relay.pulse(delay );
end;
end;
end;
We then obtain a very acceptable result with a temperature stable to a few tenths of a degree. Which is quite remarkable when you thing that we are dealing with a system controlled with a simple ON/OFF electro-magnetic relay.
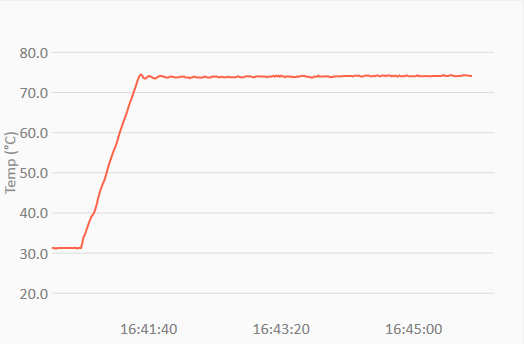
Controling the temperature rise prevents the overshoot
If you want to try yourself, you can find the full source code of the application in this zip file.


