 In our previous posts, we always used Android Studio to implement our applications. However, it's not the only available tool. Indeed, some of our customers use Xamarin and C# to implement their mobile applications. This week, we are going to see how to create an Android application using our modules with Xamarin.
Xamarin is a tool enabling you to write mobile applications in C#, among other things. Since 2016, when Microsoft bought Xamarin, this tool is directly embedded into Visual Studio. As most computer frameworks, Xamarin is supposed to help us save development time and to allow us to reuse the code on all the platforms.
To test this tool, we are going to write a short application which is simply going to display the list of connected Yoctopuce modules which are detected when pushing a button. We assume that you have at least some minimal knowledge of how our modules work. If it is not the case, we recommend that you start by reading the first posts of the "For the beginners" series, most particularly that on the logical structure of Yoctopuce devices. We also recommend that you read our tutorial on how to use our modules on Android.
In this post, we used Visual Studio Community 2019 under Windows 10, but the process is identical with all the versions of Visual Studio that support Xamarin.
Creating an "Android Bindings library" project
Xamarin uses C# as programming language, but our library is written in Java. The solution to use these languages in a single application is to create an "Android Bindings library" which is going to create a C# "wrapper" for our library.
This "wrapper" is in fact a .dll file containing C# code and the Java library. This .dll file can then be used directly in your Xamarin Android application.
So, we start by creating an "Android Bindings library" that we call "YoctoAPIBindings".
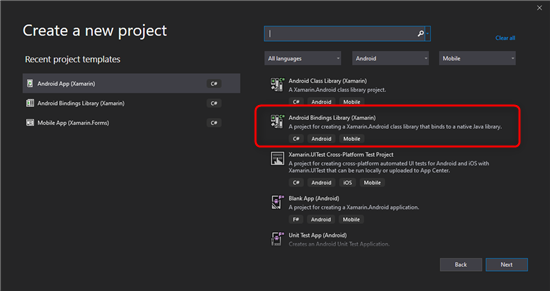
We must create an Android Bindings library project to convert our Java library into C#
This project contains a Jars subdirectory in which we must add all the Android libraries written in Java that we will use later on. In our case, we only need to add the YoctoAPI.aar file, which is the precompiled version of our Android library.
To do so, we must download our Android library from our web site and unzip the archive on our disk. The YoctoAPI.aar file is located in the "Binaries" subdirectory.
To add this YoctoAPI.aar file to the Visual Studio project, you must right-click on the Jars subdirectory and select "Add"->"Existing Item...".
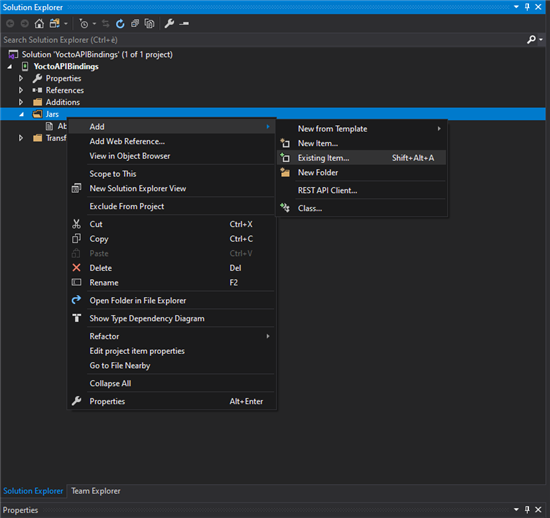
You must add the YoctoAPI.aar file to the project
The last step is to modify the "build action" property of the YoctoAPI.aar file and to select "LibraryProjectZip".
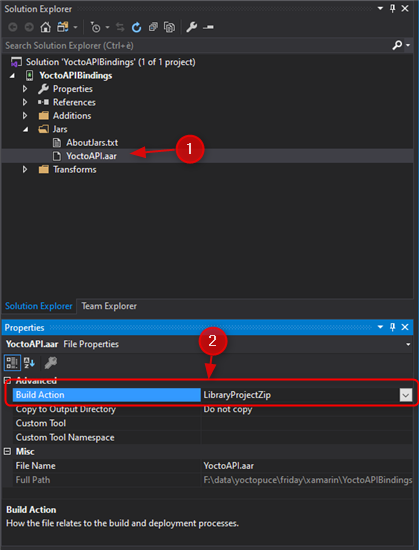
Make sure to set the build action property to LibraryProjectZip
There, the "Android Bindings library" is ready for compiling. Go in the "Build" menu and select "Build solution", or use the Ctrl+Shift+B keyboard shortcut. The generated YoctoAPIBindings.dll file is located in the /bin/Debug/ or /bin/Release sub-directory.
Using YoctoAPIBindings.dll
Now that we have"converted" our library into a library that can be used with Xamarin, we are going to see how to implement a very basic application which lists the detected Yoctopuce modules. Actually, it's the "Doc-Inventory" application that you can find in the documentation and that you can find in the Android (Java) Yoctopuce library.
To do so, we must create a second project of type "Android App (Xamarin)" with Visual Studio. In our case, we are going to call it "DemoApp" and we start from a simple project (Blank App).
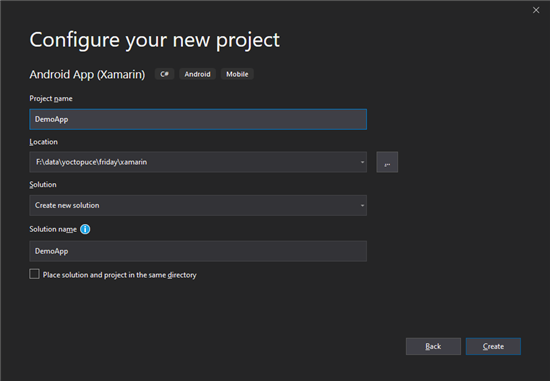
The second project is of type Android App (Xamarin)
Then, we must add a reference on the YoctoAPIBindings.dll file that we just now compiled. We can do so with a right-click on the "References" node in the "Solution Explorer" panel or with the menu "Project" -> "Add Reference...".
In the "Reference manager" window, use the "Browse..." button, select the YoctoAPIBindings.dll file, and click "OK".
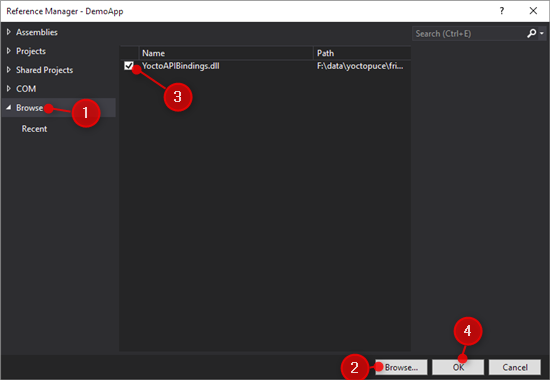
The Reference Manager window enables us to add the binding library
Then we can simply use the Yoctopuce library directly from the C# code.
C# conventions
When generating the binding library, Xamarin automatically renames some functions and some properties to adapt them to C# conventions.
First, the java packagename com.yoctopuce.YoctoAPI is transformed into the Com.Yoctopuce.YoctoAPI namespace. So, in all the files using the Yoctopuce library, we must add the following code:
Moreover, all the methods are converted into PascalCase and the Java setter/getter are converted into C# properties.
For example, the following Java code:
YRelay relay = YRelay.FirstRelay();
YModule module = relay.get_module();
if (module.isOnline())
{
String serial = module.get_serialNumber();
module.set_beacon(YModule.BEACON_ON);
module.reboot(3);
}
becomes:
YRelay relay = YRelay.FirstRelay();
YModule module = relay.Module;
if (module.IsOnline)
{
string serial = module.SerialNumber;
module.SetBeacon(YModule.BeaconOn);
module.Reboot(3);
}
It's a bit of a hassle when you are used to Yoctopuce conventions, but fortunately automatic completion works rather well in Visual Studio.
In the case of our application, the C# code is the following:
using Android.OS;
using Android.Support.V7.App;
using Android.Runtime;
using Android.Widget;
using Com.Yoctopuce.YoctoAPI;
namespace DemoApp
{
[Activity(Label = "@string/app_name", Theme = "@style/AppTheme", MainLauncher = true)]
public class MainActivity : AppCompatActivity
{
protected override void OnCreate(Bundle savedInstanceState)
{
base.OnCreate(savedInstanceState);
Xamarin.Essentials.Platform.Init(this, savedInstanceState);
// Set our view from the "main" layout resource
SetContentView(Resource.Layout.activity_main);
var button = FindViewById<Button>(Resource.Id.ButtonRefresh);
button.Click += (sender, e) => { this.RefreshInventory(); };
}
private void RefreshInventory()
{
LinearLayout layout =FindViewById<LinearLayout>(Resource.Id.InventoryList);
layout.RemoveAllViews();
YAPI.UpdateDeviceList();
YModule module = YModule.FirstModule();
while (module != null)
{
string line = module.SerialNumber + " (" + module.ProductName + ")";
TextView tx = new TextView(this);
tx.Text = line;
layout.AddView(tx);
module = module.NextModule();
}
}
protected override void OnStart()
{
base.OnStart();
YAPI.EnableUSBHost(this);
YAPI.RegisterHub("usb");
}
protected override void OnStop()
{
YAPI.FreeAPI();
base.OnStop();
}
public override void OnRequestPermissionsResult(int requestCode,
string[] permissions,
[GeneratedEnum] Android.Content.PM.Permission[] grantResults)
{
Xamarin.Essentials.Platform.OnRequestPermissionsResult(requestCode,
permissions, grantResults);
base.OnRequestPermissionsResult(requestCode, permissions, grantResults);
}
}
}
Apart from the C# syntax and the function renaming to follow C# conventions, the code is very similar to the Java version. For more details on the YAPI.XXX functions, you can read our post of how to use our modules with Android.
A major difference with the Java version of the same application: you don't have to declare the use of the USB port in the AndroidManifest.xml file. Clearly, Xamarin takes care on its own to authorize the application to use the USB port.
Here is a screenshot of the final application:

The Android Xamarin application with the Yoctopuce library
The two Visual Studio projects (the application and the binding library) are avalaible on GitHub: https://github.com/yoctopuce-examples/xamarin_demo
Conclusion
As we just saw it, you can use the library with Xamarin without too much trouble. However, we are not quite satisfied with the function and constant names conversion provided by the compiler. We are going to continue investigating Xamarin to see if there is a way to simplify things somewhat more...


