![]() The post of this week is dedicated to Android. We implemented Android projects a number of times already, but this week we are going to concentrate on the software part. We are going to write a short application displaying the value of a temperature sensor connected by USB.
The post of this week is dedicated to Android. We implemented Android projects a number of times already, but this week we are going to concentrate on the software part. We are going to write a short application displaying the value of a temperature sensor connected by USB.
Note: A newer version of this article is available:
How to start with Yoctopuce modules on Android in 2022.
Although this post is intended for beginners, we assume that you already have some knowledge of Java and of the Android architecture. If you have never written an Android application, we advise you to start with the Google tutorial. Likewise, if you have never used a Yoctopuce module, start with the first posts of the "For the beginners" series, and more particularly with the one on the logical structure of Yoctopuce devices.
What is supported
You can use the Yoctopuce library on any phone or tablet from Android 4.0. However, to access the USB port the phone or tablet must support the USB OTG (USB On The Go) mode. In this mode, the tablet or phone powers the connected device. Although this feature is more and more widely used, a large number of Android systems don't allow you to work in this mode. There is no software way to determine whether your system supports this mode. It's sometimes indicated in the specs of the manufacturer. If it's not the case, you must contact the manufacturer or search the forums to check.
Creating the project
In this post, we used Android Studio 2.3.3. If you use Eclipse or other editors, some steps will vary, but the principles and the code should remain close.
We are going to start by creating a new project containing an activity and a basic layout.

We start with the basic Android Studio activity
We take this opportunity to modify the layout: we assign the temperature ID to the text field and we chage its size to make is easier to read.
<TextView
android:id="@+id/temperature"
android:text="Temperature"
android:textSize="48sp"
android:layout_width="wrap_content"
android:layout_height="wrap_content"
app:layout_constraintBottom_toBottomOf="parent"
app:layout_constraintLeft_toLeftOf="parent"
app:layout_constraintRight_toRightOf="parent"
app:layout_constraintTop_toTopOf="parent"/>
...
Adding the Yoctopuce library
Before you can access Yoctopuce modules, you must add the Yoctopuce library for Android to the project. The simplest method is to add a reference to the library in the build.gradle file of the application. During the compilation phase, Android Studio automatically downloads and adds the latest version of the Yoctopuce library.
dependencies {
compile fileTree(dir: 'libs', include: ['*.jar'])
compile 'com.android.support:appcompat-v7:25.3.1'
compile 'com.android.support.constraint:constraint-layout:1.0.2'
compile 'com.android.support:design:25.3.1'
compile 'com.yoctopuce.android:YoctoLib:+'
testCompile 'junit:junit:4.12'
}
Modifying the AndroidManifest.xml file
For an Android application to be granted access to the USB port, you must declare this usage in the manifest. To do so, you must add the <uses-feature android:name="android.hardware.usb.host"/> line in the manifest section of the AndroidManifest.xml file.
You must also add an intent-filter "android.hardware.usb.action.USB_DEVICE_ATTACHED" for the main activity to be automatically started when a module is connected to the USB port. This intent-filter needs a meta-data section pointing to an xml file listing the USB devices which start this application.
By default, Android creates a new instance of the activity each time a Yoctopuce module is detected. This makes managing the API initialization much more complex. To avoid this behavior, you can simply add the android:launchMode="singleInstance" attribute to the activity which is automatically started.
You must therefore modify the AndroidManifest.xml file so that it looks like this:
<manifest package="com.yoctopuce.myapplication"
xmlns:android="http://schemas.android.com/apk/res/android">
<uses-feature android:name="android.hardware.usb.host"/>
<application
android:allowBackup="true"
android:icon="@mipmap/ic_launcher"
android:label="@string/app_name"
android:roundIcon="@mipmap/ic_launcher_round"
android:supportsRtl="true"
android:theme="@style/AppTheme">
<activity
android:name=".MainActivity"
android:label="@string/app_name"
android:launchMode="singleInstance"
android:theme="@style/AppTheme.NoActionBar">
<intent-filter>
<action android:name="android.intent.action.MAIN"/>
<category android:name="android.intent.category.LAUNCHER"/>
</intent-filter>
<intent-filter>
<action
android:name="android.hardware.usb.action.USB_DEVICE_ATTACHED"/>
</intent-filter>
<meta-data
android:name="android.hardware.usb.action.USB_DEVICE_ATTACHED"
android:resource="@xml/device_filter"/>
</activity>
</application>
</manifest>
And create a device_filter.xml file with the following content in the /src/main/res/xml directory of your project.
<resources>
<usb-device vendor-id="9440" />
</resources>
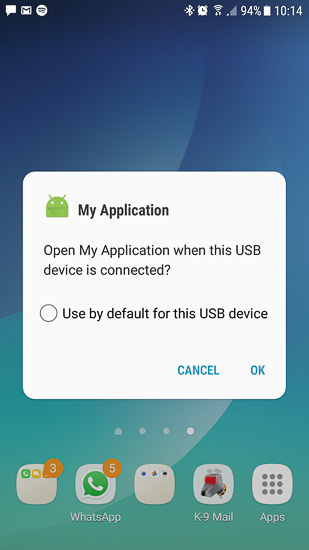
When these modifications are performed, Android automatically proposes to run the application when a Yoctopuce module is connected on the USB port of the phone.

When a Yoctopuce module is connected, Android offers to automatically start the application
Initializing the Yoctopuce API
You must implement the onStart() and onStop() methods of the activity to start and stop the library.
In the onStart() method, you must call the YAPI.EnableUSBHost() method and pass to this function an object inheriting from the Context class. You can use the current Activity directly because the Activity class inherits from the Context class.
Then you must call the RegisterHub("usb") method to start detecting modules on the USB port. Finally, you must programm a delayed execution of the _periodicUpdate object which is detailed below.
protected void onStart()
{
super.onStart();
try {
YAPI.EnableUSBHost(this);
YAPI.RegisterHub("usb");
} catch (YAPI_Exception e) {
Snackbar.make(_temperatureTextView,
"Error:" + e.getLocalizedMessage(),
Snackbar.LENGTH_INDEFINITE).show();
}
_handler.postDelayed(_periodicUpdate, 100);
}
In the onStop() method, you must suppress the programmed executions of the _periodicUpdate object and call the YAPI.FreeAPI() method to stop the library and free the resources which were locked by the library.
protected void onStop()
{
_handler.removeCallbacks(_periodicUpdate);
YAPI.FreeAPI();
super.onStop();
}
Updating the interface
To update the interface, you need to keep a reference on the text field of your layout and you also need a Handler which enables you to periodically call a Runnable object.
private Handler _handler;
@Override
protected void onCreate(Bundle savedInstanceState)
{
...
_temperatureTextView = (TextView) findViewById(R.id.temperature);
_handler = new Handler();
}
Now that everything is in place, you only have to write the _periodicUpdate object. The run method of this object must:
- Call YAPI.UpdateDeviceList every three seconds, which forces the API to enumerate the Yoctopuce modules. It's a heavy process and you must avoid doing too often.
- If no sensor is already in use, look for the first temperature sensor detected with the YTemperature.FirstTemperature() method.
- Update the text field with the current value of the temperature sensor. First, check that the module is still online with the isOnline() method, and if it is the case retrieve the current temperature with get_currentValue().
- Program the next run of this method with the postDelayed method.
Which translates into the following code:
private YTemperature _sensor;
private Runnable _periodicUpdate = new Runnable()
{
@Override
public void run()
{
try {
if (_hardwaredetect == 0) {
YAPI.UpdateDeviceList();
}
_hardwaredetect = (_hardwaredetect + 1) % 6;
if (_sensor == null) {
_sensor = YTemperature.FirstTemperature();
}
if (_sensor != null && _sensor.isOnline()) {
final String text = String.format(Locale.US, "%.2f %s",
_sensor.get_currentValue(), _sensor.get_unit());
_temperatureTextView.setText(text);
} else {
_temperatureTextView.setText("OFFLINE");
_sensor = null;
}
} catch (YAPI_Exception e) {
Snackbar.make(_temperatureTextView,
"Error:" + e.getLocalizedMessage(),
Snackbar.LENGTH_INDEFINITE).show();
}
_handler.postDelayed(_periodicUpdate, 500);
}
};
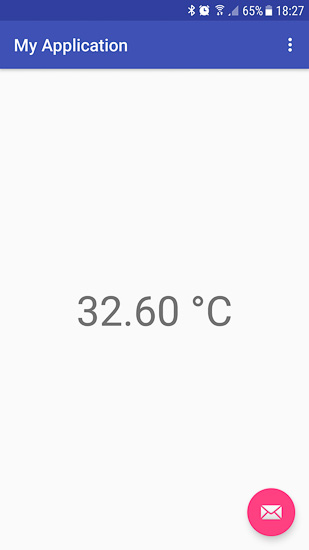
When you have done all these modifications, you can compile the application and use it on any phone or tablet with USB On The Go support.

And yes, it's hot in Yoctopuce premisses :-)
The source code of this application is available on GitHub: https://github.com/yoctopuce-examples/android_template.
A few comments
We deliberately kept this example very basic to keep the post at a reasonable length and to allow beginners to start easily. However, for a more complete application, it's better not to use the Yoctopuce library from the main thread. As we explained in details in this post, it's more efficient to move the code using the library in a background thread. It's even mandatory if you use a Yoctopuce module connected to a YoctoHub. Unfortunately, it's also much more complex, but you can get inspiration from the solution that we used in this same post.
Most phones have only one USB port. Therefore, you can't debug the application by USB while the Yoctopuce module is connected. Fortunately, there is a trick that most people don't know about: debugging the application through the wifi network. How to do so is explained on this page.
Of all the OS that we support, Android is clearly the most difficult one to handle. The limited size of the screen, the different Android versions, the limited resources, the management of the different states of the application, and the difficulty to debug it make developing an application a long and complex task. Plan from the start a way to display and export debug logs, this will make your life easier the day you are in the middle of nowhere and the application doesn't work anymore. Trust me, I know it first hand :-)


