How to build a rain sensor
By martinm, in DIY, july 04,2013.
 Most recent cars include a cool gadget: automatic windshield wipers, which start to wipe as soon as it rains. As we are curious by nature, we wondered how car rain sensors work and whether it was possible to build one ourselves, without needing to put a windshield in the middle of the garden.
Some theory
In fact, car rain sensors are based on an optical principle: refraction. When a light ray goes from a transparent medium to another, it is deflected. This deflection depends on the respective refraction index of the two media and is described in the following relationship:

Deflection of a light ray when changing medium
Note that if the ray is perpendicular to the transition surface, it is not deflected whatever the refraction indices. Moreover, this relationship highlights a critical angle beyond which the ray does not go through the interface between two media: it is reflected.
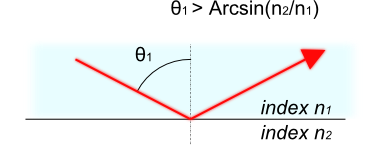
Light ray reflection when the incidence angle goes above a given threshold
It is this principle which is used in rain sensors: a light ray is sent into a glass block. The angle of the ray is computed so that it reflects itself inside the block and ends up into a light sensor. But if a drop of water lies on to of the glass, the water refraction index being relatively close to that of glass, part of the ray manages to go out of the block. Therefore, less light reaches the sensor. Important advantage: this system is relatively insensitive to surrounding light which simply goes through the block without reaching the sensor.

Rain sensor sketch, a drop allows light to escape
Here is an illustration of the phenomenon with a laser inside a block of epoxy resin.
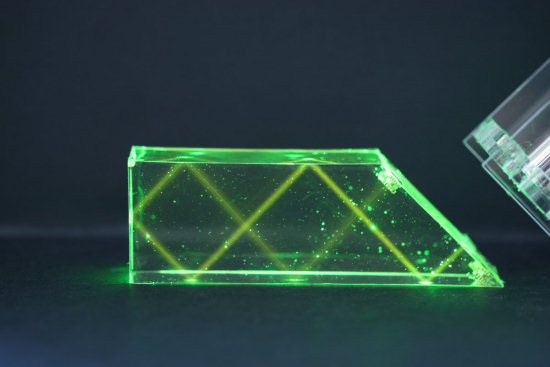
The ray is trapped in the optical block
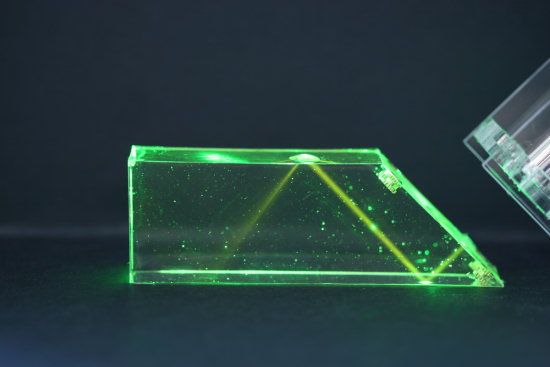
Most part of the light manages to go out of the block through the water drop
Application
The theory is relatively simple: you only need to light a powerful led at one end of a transparent block and to put a light sensor at the other end. We are not going to use a Yocto-Light which is a little too slow with only three measures per second. We are rather going to use a Yocto-Knob with a photo-transistor. It's a technique that we have often used: because the luminosity varies, the photo-transistor resistance varies. This can be detected by the Yocto-Knob.
Besides, the block in the shape of a truncated prism is not the most practical: it forces us to fix the led on one side and the photo-transistor at the other. There would therefore be a wire connecting both ends, which would not be very elegant. We have therefore selected a more practical shape allowing us to put the led and the sensor on the same side.
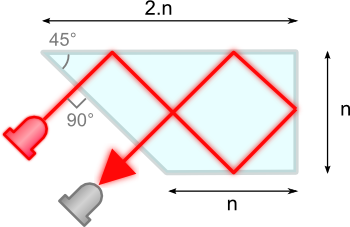
A more suitable shape for the optical block
The main difficulty of this project is to build the optical block. There are probably many alternative methods to reach this goal. We decided to mold epoxy resin in the desired shape: the cast is built with Plexiglass panels glued together with a hot glue gun. Epoxy resin doesn't stick to Plexiglass. Therefore, when the resin is solid, you only need to disassemble the cast to extract a perfectly smooth block: no polishing needed.
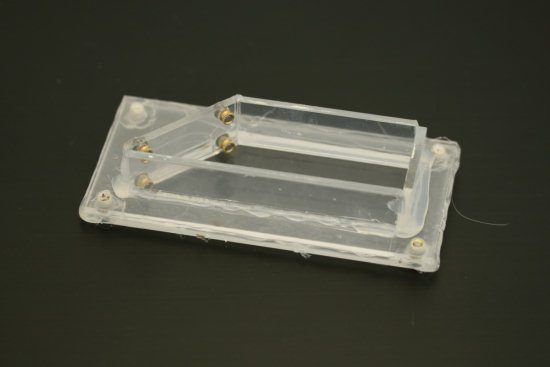
The Plexiglass cast
We took the opportunity to put threaded inserts into the resin to be able to fix the block on a support. In the absence of threaded inserts, you can use nuts.
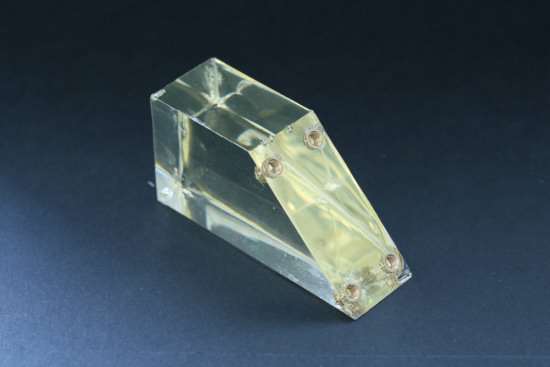
The final block, note the threaded inserts for assembly
The problem with Epoxy resin is its yellowish color. It's a lesser evil: we made some tests with completely transparent polyester resin. The result was disappointing: removing the cast was more difficult than with Epoxy and the block needed polishing.
It's difficult to make a block without (too many) bubbles. You need to mix the resin and the hardener very delicately to prevent the formation of these bubbles. Expect to make several blocks before reaching a satisfying result.
Note that you need to be particularly careful when building the cast: the slightest leak could make the cast permanently attached to your work table.
Once we have a nice and clear block, we only need to fix it on a support containing the led and the photo-transistor, and to connect the whole to a Yocto-Knob. We now have a very design rain sensor, we only need to code the detection application.
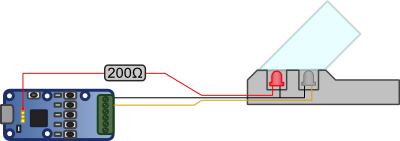
Wiring is trivial: only three wires are needed
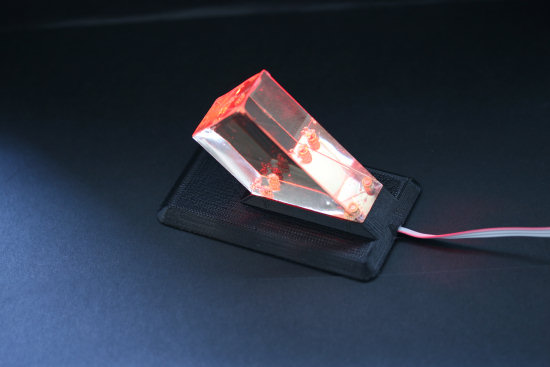
A very design rain sensor
Programming
Programming is very simple: we only need to interrogate the Yocto-Knob in a loop to obtain the luminosity detected by the photo-transistor and to compute the standard deviation of the latest read values. A large deviation means that the reception of light is very perturbed, therefore that it is raining. Here a Python example which computes this:
#!/usr/bin/python
# -*- coding: utf-8 -*-
import sys,math
from yocto_api import *
from yocto_anbutton import *
errmsg=YRefParam()
# Setup the API to use local USB devices
if YAPI.RegisterHub("usb", errmsg)!= YAPI.SUCCESS:
sys.exit("init error"+errmsg.value)
# find any AnButtom function
channel = YAnButton.FirstAnButton()
if channel is None : sys.exit('No module connected')
# then find the first channel of the matching module
serial=channel.get_module().get_serialNumber()
channel1 = YAnButton.FindAnButton(serial + '.anButton1')
historic = []
stdDev = 0
# you might need to adjust these thresholds
historicSize = 30
level = 2.0
while True:
value= channel1.get_rawValue()
historic.append(value)
if len(historic)>historicSize: historic.pop(0)
l = len(historic)
if (l==historicSize):
avg = 0
avg2 = 0
for v in historic:
avg+= v
avg2+= v*v
avg = avg / l
avg2 = avg2 / l
stdDev = math.sqrt(math.fabs(avg2 - avg*avg))
if (stdDev>level):
print("It's raining")
else:
print("It's not raining")
YAPI.Sleep(10)
And here is the sensor in action:
Conclusion
This sensor enables you to quasi-instantaneously detect the presence of rain, but not the quantity of water falling. For this, we would need a rain gauge or pluviometer. We have some ideas about this, we'll write about it again some other time.
| 1 - freds | Saturday,august 17,2013 11H45 |
I have read the article on the optical rain sensor with interest. I am also interested in your idea for a rain gauge. Are you able to elaborate on the principal's of this idea?
| 2 - martinm (Yocto-Team) | Saturday,august 17,2013 12H59 |
This is only a detector. If you're interested in a rain gauge, you should have a look here: http://www.yoctopuce.com/EN/article/how-to-build-an-usb-pluviometer
| 3 - andersos | Tuesday,february 14,2017 10H52 |
How well would this work as an actual car rain sensor?
| 4 - martinm (Yocto-Team) | Tuesday,february 14,2017 10H57 |
@andersos : I suspect it would not work very well, as the detector has to be integrated directly in the winshield glass.
| 5 - andersos | Tuesday,february 14,2017 11H00 |
I suspected that. Thanks for the very quick answer :)
| 6 - andersos | Thursday,february 16,2017 9H09 |
But apparently it's just as easy to make a working car rain sensor if you want to.
Leave out the transparent block and point the LED and phototransistor directly at the windshield at 45 degrees angle as shown here http://www.windshieldsurgeons.com/windshield-rain-sensor
| 7 - martinm (Yocto-Team) | Thursday,february 16,2017 9H22 |
@andersos: You can give it a try, but I'm pretty sure that the windshield has a prismatic protuberance to allow the whole thing to work. On the inside, the air/glass interface has to be perpendicular to the light path.
| 8 - andersos | Friday,february 17,2017 10H37 |
At least I'm going to try making your sensor at some point. Can you specify which LED and photo-transistor you used?
| 9 - martinm (Yocto-Team) | Friday,february 17,2017 10H51 |
sure,
led: L-7104SEC-J3 from Kingbright
photo-transistor : SFH 310-2/3 from Osram
| 10 - andersos | Tuesday,february 21,2017 9H18 |
@martinm
Thanks :)
| 11 - Jack Tam | Tuesday,august 15,2017 8H51 |
Hi, I have see the video of rain sensor and very interested on it. Would you mind to provide the size of the prism? Thanks!
| 12 - martinm (Yocto-Team) | Tuesday,august 15,2017 17H41 |
@Jack Tam: The big one with the green laser is 90x30x20mm , the one with the red LED is 60x30x20mm. Exact size is not very important, but proportions are.
| 13 - Jack Tam | Tuesday,august 22,2017 1H24 |
@martinm: Thanks!
| 14 - roddos | Saturday,may 12,2018 17H51 |
This is an excellent video that demonstrate the total light return system - may I use this video for student training?
| 15 - martinm (Yocto-Team) | Saturday,may 12,2018 17H54 |
@roddos: sure! no problem :-)
| 16 - hoangtruong | Monday,march 08,2021 1H26 |
Hi!
Can ordinary Chinese LEDs be used?
| 17 - martinm (Yocto-Team) | Monday,march 08,2021 5H54 |
@hoangtruong : as long as it is powerful enough to be detected by the photo-transistor, any LED can be used.
| 18 - hoangtruong | Monday,march 08,2021 8H25 |
hi i have honed the transparent Mica into a shape similar to yours, however likely not the same size, and i used 1 red LED and 1 optical sensor module, however it is not works, i don't see the streak of the LED light inside the Mica block like the video you described ?? I don't know why ??
Link:
LED : https://vi.aliexpress.com/item/32955544083.html
Module: https://iotmaker.vn/cam-bien-anh-sang-quang-tro.html
| 19 - martinm (Yocto-Team) | Monday,march 08,2021 9H11 |
@hoangtruong: The block geometry and reflective index are very important: angles must be respected, surfaces need to me polished and the reflective index must be similar to water's. On the video, the green light comes from a green laser pointer in order to make light rays easy to see, but the sensor version just uses a bright red led. Just contact Yoctopuce support if you need help.
| 20 - hoangtruong | Monday,march 08,2021 9H38 |
Thanks very much, Is it better to use lasers, because lasers are strong, have lenses that form rays, and light points are very small, and LEDs are not ?? But it is very difficult to find the laser where I live ... Again, I will try to sharpen the mica very polished ...
| 21 - hoangtruong | Monday,march 08,2021 14H25 |
I have tested, but only successfully indoors or in the room with the room light is not too bright, the difficult problem is how to distinguish between day and night .... because when I test in At home, the ambient light is not too strong, and when it is out in the sun, when a raindrop falls, the LED light comes out of the Mica block, but right now it is still exposed to natural light. impact, leading to the light does not change state from no rain to rain ??
| 22 - martinm (Yocto-Team) | Monday,march 08,2021 15H23 |
@hoangtruong : This apparatus does not give the Rain/No rain information directly. The idea is to measure light perturbations inside the block, for that we compute standard deviation of luminosity measured by the sensor. If standart deviation is high, then it's probably raining, since ambient light changes slowly, if won't affect the detection. Unfortunately, since your measuring device has only a digital 0/1 output, it's gonna be difficult to get useful values.
| 23 - hoangtruong | Monday,march 08,2021 23H54 |
Good morning, thanks for answering me. Can your programming code above be used for arduino? I only have arduino, don't know what board you use ??
| 24 - martinm (Yocto-Team) | Tuesday,march 09,2021 7H02 |
@hoangtruong : We used a regular PC and no, you cannot use the code directly on an Arduino because
- It's written in Python
- It is designed for a Yocto-Knob, and Yoctopuce USB devices don't work on Arduino (no proper USB Host port)
| 25 - hoangtruong | Tuesday,march 09,2021 8H07 |
oh .... what a pity ..... i have only arduino and ESP8266 available ...
| 26 - giuliano50 | Saturday,march 20,2021 12H11 |
Hi, the solution you have found to detect rain is very interesting, especially because it does not use components that deteriorate over time. I need to make a detector that quickly signals rain because I have to install it in an astronomical observatory. So I took your idea and used a small 3v 650nm 5mW red laser and a photoresistor. For the reflection of the laser beam I used a prism recovered from a binocular and your python program I rewrote it for arduino. I am still doing tests but it seems to be working very well. Thanks for the idea
| 27 - kirant400 | Sunday,june 23,2024 13H05 |
Hi,
I am looking for a solution that can measure the brightness of the light emitted in side the bulb itself. I have to measure the light that emitted out. There can be some dust or rain or some external factor that limit the light going out and seen from the out side.
The light is something similar to https://www.amazon.ae/Lighting-Security-Waterproof-Heavy-Duty-Driveway/dp/B0BLCRJFQX/ref=asc_df_B0BLCRJFQX/ Which is used in the road. A tire mark or a leaf can block the light emitted out. I wish to detect this external change. Is it possible?
| 28 - martinm (Yocto-Team) | Monday,june 24,2024 4H26 |
@kirant400: you could try to use a Yocto-Light-V4, but I doubt the light you are refering to can be hacked easily.
| 29 - kirant400 | Monday,june 24,2024 15H34 |
Hi,
Thank you for the response. My Idea is to manufacture this device. With inbuild sensing. The sensor has to be placed inside. This is for finding out if the light is truly visible outside.
| 30 - martinm (Yocto-Team) | Wednesday,june 26,2024 6H27 |
@kirant400 : I'm not sure we can help you on this, but you can contact Yoctopuce support by email.
![]() Most recent cars include a cool gadget: automatic windshield wipers, which start to wipe as soon as it rains. As we are curious by nature, we wondered how car rain sensors work and whether it was possible to build one ourselves, without needing to put a windshield in the middle of the garden.
Most recent cars include a cool gadget: automatic windshield wipers, which start to wipe as soon as it rains. As we are curious by nature, we wondered how car rain sensors work and whether it was possible to build one ourselves, without needing to put a windshield in the middle of the garden.


