![]() This week, our mission is to check, through temperature monitoring, that the heating system of a church is working as it should. We are going to show you how to set up the remote monitoring of the surrounding air temperature and of the heater temperature, without needing to write a single line of code. The specificity of the project is that the church (quite logically) doesn't have a wifi network. So we need to use a GSM or 3G connection.
This week, our mission is to check, through temperature monitoring, that the heating system of a church is working as it should. We are going to show you how to set up the remote monitoring of the surrounding air temperature and of the heater temperature, without needing to write a single line of code. The specificity of the project is that the church (quite logically) doesn't have a wifi network. So we need to use a GSM or 3G connection.
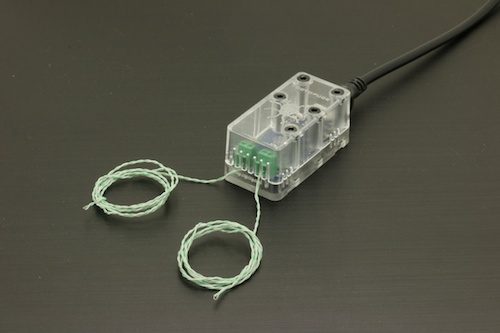
Regarding the measures themselves, we are spoiled for choice (see the sensor summary table at the end of a previous post). As the goal of our experiment is to follow temperature variations, we don't need a high absolute precision. We therefore decided to use a Yocto-Thermocouple enabling us to connect two probes. One probe is fixed on the heater, and the second one is somewhat farther away in the nave. If we needed more precise measures, we could have done exactly the same experiment but with two Yocto-PT100 to obtain measures with a precision of a few hundredths of degree. The equipment is then a little more expensive.

Our double temperature probe
To monitor and to record the measures through a GSM connection, we currently have two solutions which do not require any programming: using an Android phone with the Valarm app, or using a pocket wifi + GSM router. We are going to try both approaches and compare them.
Variant 1: With an Android phone
To reproduce this variant, you need:
- An Android phone or 3G tablet with full USB support (from $200)
- A USB-OTG-MicroB-MicroB-20 cable ($3) or a Y-cable ($7) if your phone/tablet doesn't have a power supply socket other than the USB socket
- A SIM card to transfer data (we used a prepaid SIM card costing $15)
- The Valarm Pro app ($10 from Google Play)
- A Valarm Cloud Visualization & Analysis package (paid $4.50 for 30 days)
Total: about $290

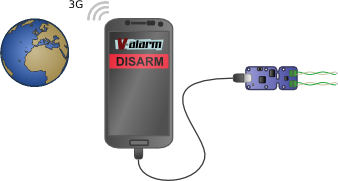
An installation for temperature monitoring by GSM using an Android phone
The set up is very simple: when the Valarm Pro app is installed, you connect the Yocto-Thermocouple to the phone. Android offers then to run Valarm Pro. In the configuration, under All Sensors, set the Interval Timer to the desired measure frequency. Then under Meteo and Light, enable the Ambient Temperature sensor. The alarm bounds for the temperature can be set to minimum/maximum, as we are going to use a timer to force sending the measures at a set interval. Finally, under Web Integration, enable alert synchronization to the Cloud service. But to do so, you must start by opening a tools.valarm.net account.
Basic registration on the Valarm Cloud service is free. You can quickly check that the measures are well synchronized on the web. But to obtain a measure graph, you must subscribe to the Visualization & Analysis service, for which you pay per appliance and per day you are connected. Beware, the graph is not (so far?) refreshed continuously. To update it, you must close it, and re-click on the appliance name to reload the latest measures in the graphical interface, then select again the sensor you want.

Data graph on Valarm.net
In the end, this solution is notably easy to set up. With regards to our initial objective, there are only two limitations: First, the Valarm app was designed to measure temperature with a Yocto-Meteo rather than a Yocto-Thermocouple, so only one of the two temperature inputs is available.
Second, in our case, GSM reception is possible only at some precise spots in the church (near the windows), and not where we must take the measures. The solution to this issue is precisely our second variant.
Variant 2: With a pocket GSM router
To reproduce this variant, you need:
- A YoctoHub-Wireless (~$128)
- A wifi + GSM router (or 3G), such as the D-Link DWR-730 (~$120)
- A Yocto-Thermocouple (~$50)
- A USB-OTG-MicroB-MicroB-20 cable ($3)
- A SIM card to transfer data (we used a prepaid SIM card costing $15)
- An account on Xively.com (free developer account, 30 days of data)
Total: about $320

An installation for temperature monitoring by GSM using a pocket router
First step: you must configure the wifi + 3G router. For the D-Link DWR-730 model that we used, it is very easily done by USB. When configured, you have a reliable Internet connection via wifi, and you don't have worry about it anymore.
Second step: You connect the Yocto-Thermocouple to the YoctoHub-Wireless, and you configure the YoctoHub-Wireless to connect itself to the wifi network of the 3G router. Then you add an HTTP callback towards the Xively service. To do so, you must have beforehand opened a free developer account on Xively, and created a Device (in the WEB TOOLS menu, DEVELOP, click on Add Device). You simply must copy the Feed ID (located at the top right of the page) and the API Key (in the right column) into the configuration of the YoctoHub-Wireless HTTP callback, in order for the YoctoHub-Wireless to send the data to Xively.

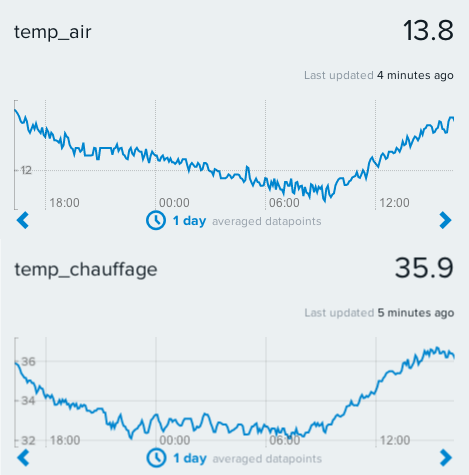
Measures over 24h of the surrounding air and heater temperatures
Sending the data to Xively by HTTP callback is done in the CSV format and therefore takes only a few hundreds of bytes per callback. It is therefore quite possible to work with a cheap prepaid SIM card over a long period of time. Note that other Cloud services can be used, but we'll come back to this topic in more details in the near future, with the arrival of new players in the market.
Conclusion
The objective is reached: thanks to these measures, we could prove that the electric heater of this church, which was supposed to maintain a minimal temperature (to preserve the organ) in the most efficient way, works mainly during the day, when electricity is the most expensive, instead of heating during the night. The few thousands of francs in electricity that are going to be saved per year will soon have reimbursed the price of the modules :-)
If you want to reproduce the second variant, here is a piece of advice: avoid so-called "3G" routers (such as the ASUS WL-330NG) which don't have an embedded GSM modem but use instead a 3G USB modem connected on a USB port: their performance is much more aleatory, and diagnosis possibilities are very poor. We could not get anything out of ours for use in an autonomous installation.


