![]() A customer recently contacted Yoctopuce support to ask why his DIY tachometer didn't work with a Yocto-PWM-Rx. We looked into it and, to our surprise, we discovered that generating a clean PWM signal with a magnet and a reed switch was not as easy as one could think.
A customer recently contacted Yoctopuce support to ask why his DIY tachometer didn't work with a Yocto-PWM-Rx. We looked into it and, to our surprise, we discovered that generating a clean PWM signal with a magnet and a reed switch was not as easy as one could think.
Reed switches
Reed switches are very frequently used in alarm systems to detect window and door openings. You may have used one at school in physics labs. They're little glass bulbs with two legs. Inside the bulb, there are two flexible strips, each one connected to a leg. In the presence of a strong enough magnetic field, the strips deform and come into contact, making electrical contact between the legs of the bulb.
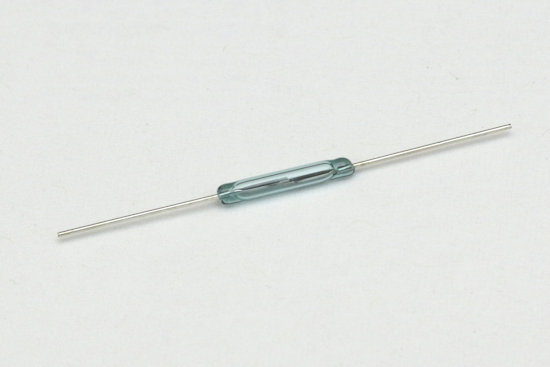
A reed switch, it's easy to see the two strips inside
And it's probably here that your physics teacher stopped the description of a reed switch. What the teacher probably didn't tell you is that the volume in which you need to set the magnet so that it closes the contact depends on the magnet orientation with regards to the switch and that this volume is not spherical, nor cylindrical, and not even convex.
Drawing the activation map
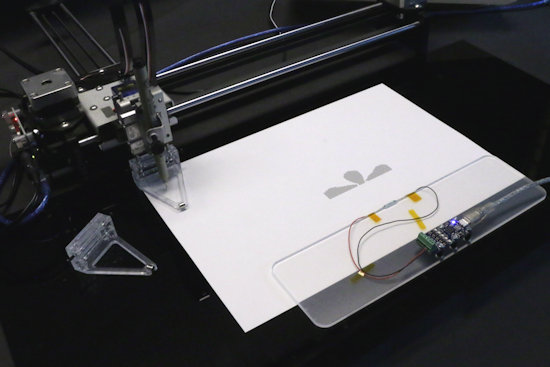
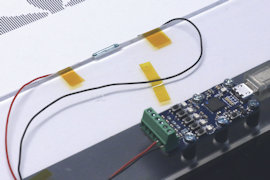
To show you this, we set up a small and simple experiment: we put a small cylindrical 5x5mm magnet at the business end of an AxiDraw and we scanned the plane near a reed switch. A Yocto-Knob detects the switch activation and we made sure that the AxiDraw leaves a mark on the paper for each detection. Only a few lines of python code are needed to make it work. We tested two orientations: the magnet perpendicular to the switch and the magnet parallel to the switch.

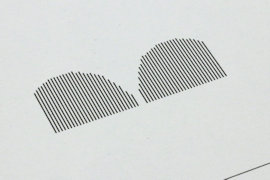

The results, although quite pretty, are edifying. The activation zones are lobe shaped and these lobes are very different depending on the orientation.
- When the magnet is perpendicular to the switch, we see two very distinct lobes of which the length is clearly limited by the size of the legs of the reed switch. Between the two lobes, there is a very visible dead zone. In other words, if you put a magnet in the symmetry plane of a reed switch, perpendicular to the contact, the switch won't be activated. This is a very counter-intuitive behavior, to say the least.
- When the magnet is parallel, the result is even more spectacular: we see three lobes, with the middle one larger than the other two.

Activation maps of a reed switch with the magnet perpendicular or parallel to the switch
In any case, the more powerful the magnet, the larger the lobes. We can deduce from this experiment a few essential rules to build a tachometer with a reed switch.
Building a tachometer
A tachometer, more commonly called a rev counter is used to count the number of revolutions by time unit performed by some device. To do so, we can put a small magnet on a disc which revolves close to a reed switch and count the activations. This technique is often used for example in water meters. It's relatively easy to build, as long as you know that the magnet cannot be put any way you want.
Another experiment
We built a small tachometer driven by a small motor itself powered by a Yocto-0-10V-Tx. We stuck two magnets on the disk for balancing reasons, but one would have been enough to demonstrate the principle. A Yocto-PWM-Rx counts the reed switch activations and the experiment is controlled with an oscilloscope connected to the prongs of the reed switch. The signal pull-up is performed by the Yocto-PWM-Rx through the yellow wire.
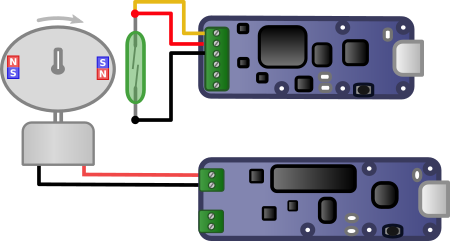
Diagram of our small experimental tachometer

The same, in real life, we can change the disk and modify the distance between the disk and the reed switch with washers
When the magnet is perpendicular to the contact, it creates two activations in passing, whatever the distance between the magnet and the switch. The generated signal is not a true PWM signal: on the oscilloscope we can see two activations per period.

Magnet perpendicular to the reed switch, the lowest level corresponds to the activations
When the magnet is parallel to the contact and passes as close as possible to the switch, we see three activations per period, it's still not a PWM signal.
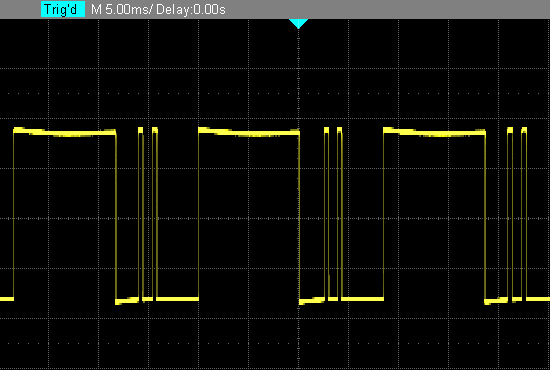
Magnet parallel, very close to the switch
However, if we put the magnet parallel to the switch and at a distance, the magnet goes through the central lobe only and we finally obtain a PWM signal that the Yocto-PWM-Rx can use.

Magnet parallel, far enough from the switch: we obtain a correct signal. Here at ~50Hz
Note that if we had had the idea from the start of googling "Reed contact magnetic field orientation", we would have obtained plenty of application notes from reed switch manufacturers which confirm these results.
Bounces
There is another subtlety to take into account: a reed switch is an electro-mechanical switch and, as all electro-mechanical switches, it tends to bounce at each activation. These rebounds are perfectly visible on the oscilloscope as long as we select a high enough temporal resolution.
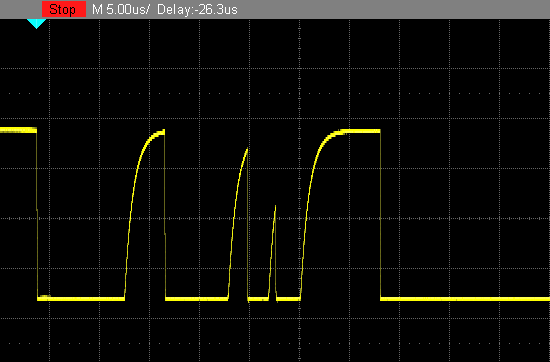
Bounces when a reed switch is activated, note the 5us/division resolution
As the Yocto-PWM-Rx is a sensor designed to detect very fast high/low changes in the signal, it won't fail to detect these edges, which could make the measure incorrect. It's for this same reason that we added to the Yocto-PWM-Rx the possibility to configure a bounce suppression interval, described in a previous post. But in the case of a tachometer where the revolution period varies greatly, a simple debounce interval is not necessarily enough.
Solution
In view of the results of these very instructive experiments, we decided to improve even more the firmware of the Yocto-PWM-Rx so that its measures become less dependent of the shape of the signal. With the new firmware that we just published, the Yocto-PWM-Rx can detect the fundamental frequency of a periodic signal even if it is not strictly a PWM, and to compute the high/low state ratio on a duration of one period. Rebounds and double/triple activations don't prevent the correct measure of the frequency anymore.
In case it helps, you can even identify a non-strictly PWM signal using the method get_edgesPerPeriod() which returns the number of edges detected during the last period. For a true PWM signal, the number of edges per period should always be two.
It is however important to understand that if this new firmware allows you to hide the faulty design of an electromagnetic tachometer, it can't avoid you some consequences. For example, if your reed switch is activated three times per revolution, it is likely that its lifespan will be reduced by as much.
Conclusion
The design of a tachometer based on a magnet and a reed switch is rather counter-intuitive, one shouldn't select the largest possible magnet and orient it perpendicularly as close to the switch as possible. One must choose a small magnet, orient it parallel to the switch and make it go far enough from the later. If you don't get the expected result, you may need an oscilloscope to understand what happens, any cheap model will do. This being said, if there is no risk of dust or dirt buildup in your tachometer, it may be better for you to fall back on a photo-transistor based design which will have much fewer constraints.


