 For many, the 2015 innovation in the smart watch world is the Apple Watch. However, another smart watch was talked about: the Pebble Time. This was caused in particular to the unprecedented success of its Kickstarter campaign. The new version just arrived to Yoctopuce, and to celebrate this, we wrote an application enabling you to drive a Roomba from your watch.
The aim of this post is not to review the Pebble Time, but to illustrate how to interact with our modules from a Pebble watch. This Pebble application must be able to launch a cleaning job, a spot cleaning, or to send the Roomba to its docking station.
To do so, we dug up what we had done in our previous article on the Roomba and rewrote in Java the PHP code which decoded the Roomba serial protocol. As a reminder, we had connected a Yocto-Serial and a YoctoHub-Wireless-g on the Roomba, to enable use to drive the Roomba from any application using one of our libraries.
As most smart watches, the Pebble cannot connect itself directly on a Wifi network, it communicates with a smart phone which runs the network connections. We therefore need a Pebble application but also an Android application. The Android application takes care of the connection with the YoctoHub which is connected to the Roomba. This application also takes care to format the instructions to be sent to the Roomba. The Pebble Time application simply displays the Roomba state (determined by the Android application) and transmits to the Android application the commands to be sent (clean, dock, ...) depending on the buttons pushed.

The communication between the Roomba and the Pebble goes through the phone
The Android application is the heart of the system: it implements the code sending the correct instructions to the Roomba. You can perfectly well use the Android application without a Pebble, but the Pebble application is useless if the Android application is not installed.
The Android application
This application is made of three parts:
- The application interface
- The service implementing the Roomba driving logic
- The communication interface with the Pebble
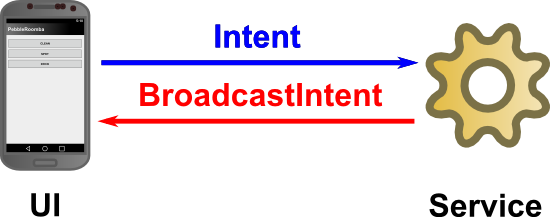
The application interface is very simple: there are three buttons, one for each of the three commands (clean, spot clean, dock) and a text field displaying the Roomba state. Each button sends the corresponding command to the Service which is responsible to send the correct instructions to the Roomba. To display the Roomba state, we listen to the BroadcastIntent sent by the Service.
The Service is the heart of the application: it's this part that receives commands from the application interface and from the Pebble. The interface transmits to the Service the commands to be run thanks to Intents.
intent.putExtra(RoombaService.INTENT_KEY_COMMAND, RoombaService.CLEAN);
startService(intent);
For each received command, the service determines whether it must send instructions to the Roomba. If it is the case, it sets up communication with the YoctoHub and sends the instructions to the Roomba. Then, it sends a BroadcastIntent with the new state of the Roomba so that the application and the Pebble can update their interfaces.

The interface communicates with the service that performs all the work
It's interesting to use a service for the logic as it allows us to run the code as a background task. This enables the Pebble to communicate with our application even if it is not running. This also enables us to make a direct HTTP connection with the YoctoHub without using another Thread (Android forbids network connections from the main thread).
Finally, this allows us to maintain a well structure code which follows the MVC. principle. Instructions sent to the Roomba are not detailed in this post, but you can read our previous post for more information.
As usual, all the code for the application is available on GitHub.
The Pebble Time application
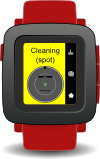
The Pebble time application is rather simple. The interface is greatly inspired by the UI Patterns example.

The watch interface is very simple
Communicating with the phone is done with a Dictionary. The dictionary's keys are integers and the corresponding value can be an integer or a character string. The watch sends to the phone a KEY_CMD message each time a button is pushed and when the application starts. Possible values are:
- CMD_CLEAN : Clean command
- CMD_SPOT : Spot clean command
- CMD_DOCK : Dock command
- CMD_GET_STATE : Pseudo-command to send the state of the Roomba
As answer, the Pebble can receive two messages: KEY_STATE and KEY_MESSAGE. The possible values for KEY_STATE are
- STATE_CLEANING : The Roomba is cleaning a room
- STATE_SPOTING : The Roomba is spot cleaning
- STATE_DOCKING : The Roomba is returning to its docking station
- STATE_DOCKED :The Roomba is on its docking station
- STATE_OFF : The Roomba is idle but not on its docking station
- STATE_OFFLINE : The Roomba is offline (error)
The KEY_MESSAGE contains a character string describing in details the state of the Roomba.
The source code of the application is available on GitHub and you can compile it directly in CloudPebble.
Communication between the Pebble and Android
Communication between the Pebble and the Android application uses Intents and BroadcastIntents.You can code everything yourself, but Pebble provides a library which makes the task easier. To include it, you must add a dependency on the PebbleKit library in the gradle build script.
compile 'com.getPebble:Pebblekit:3.0.0'
}
To send the state of the Roomba to the Pebble, we implement a BroadcastReceiver which receives the messages broadcasted by our service and transmits them to the Pebble thanks to the PebbleKit.sendDataToPebble method.
{
private static final int ROOMBA_MESSAGE = 1;
private static final int ROOMBA_STATE = 2;
private static final int ROOMBA_STATE_CLEANING = 0;
private static final int ROOMBA_STATE_SPOTING = 1;
private static final int ROOMBA_STATE_DOCKING = 2;
private static final int ROOMBA_STATE_OFF = 3;
private static final int ROOMBA_STATE_OFFLINE = 4;
private static final int ROOMBA_STATE_DOCKED = 5;
@Override
protected void onStateChange(Context context,
RoombaControler.State state,
String error)
{
String stateStr;
int pb_state = ROOMBA_STATE_OFF;
// Add a key of 1, and a string value.
switch (state) {
case CLEANING:
stateStr = context.getString(R.string.cleaning);
pb_state = ROOMBA_STATE_CLEANING;
break;
case DOCKING:
stateStr = context.getString(R.string.docking);
pb_state = ROOMBA_STATE_DOCKING;
break;
case SPOT:
stateStr = context.getString(R.string.spotting);
pb_state = ROOMBA_STATE_SPOTING;
break;
case OFF:
stateStr = context.getString(R.string.off);
pb_state = ROOMBA_STATE_OFF;
break;
case DOCKED:
stateStr = context.getString(R.string.docked);
pb_state = ROOMBA_STATE_DOCKED;
break;
default:
case DISCONNECTED:
stateStr = context.getString(R.string.disconnected);
pb_state = ROOMBA_STATE_OFFLINE;
break;
}
PebbleDictionary data = new PebbleDictionary();
data.addString(ROOMBA_MESSAGE, stateStr);
data.addInt16(ROOMBA_STATE, (short) pb_state);
PebbleKit.sendDataToPebble(context,
PebbleToRombaReceiver.PEBBLE_APP_UUID, data);
}
}
To receive Pebble messages, we use the same principle: a BroadcastReceiver receives packets sent by the Pebble. When the packet is decoded, we send an Intent to our service with the command corresponding to the button pushed.
{
private static final String TAG = "PebbleToRombaReceiver";
public final static UUID PEBBLE_APP_UUID =
UUID.fromString("3173b512-fe9c-4be9-98c6-db18daee5076");
private final static int ROOMBA_CMD = 0;
private final static int CLEAN = 0;
private final static int SPOT = 1;
private final static int DOCK = 2;
private final static int GET_STATE = 3;
@Override
public void onReceive(Context context, Intent intent)
{
final UUID receivedUuid =
(UUID) intent.getSerializableExtra(Constants.APP_UUID);
// Pebble-enabled apps are expected to be good citizens and
// only inspect broadcasts containing their UUID
if (!PEBBLE_APP_UUID.equals(receivedUuid)) {
return;
}
final int transactionId = intent.getIntExtra(Constants.TRANSACTION_ID, -1);
final String jsonData = intent.getStringExtra(Constants.MSG_DATA);
if (jsonData == null || jsonData.isEmpty()) {
return;
}
try {
final PebbleDictionary data = PebbleDictionary.fromJson(jsonData);
receiveData(context, transactionId, data);
} catch (JSONException e) {
e.printStackTrace();
}
}
private void receiveData(Context context,
int transactionId,
PebbleDictionary data)
{
int buttonIndex = data.getInteger(ROOMBA_CMD).intValue();
Intent intent = new Intent(context, RoombaService.class);
switch (buttonIndex) {
case CLEAN:
intent.putExtra(RoombaService.INTENT_KEY_COMMAND,
RoombaService.CLEAN);
break;
case SPOT:
intent.putExtra(RoombaService.INTENT_KEY_COMMAND,
RoombaService.SPOT);
break;
case DOCK:
intent.putExtra(RoombaService.INTENT_KEY_COMMAND,
RoombaService.DOCK);
break;
case GET_STATE:
intent.putExtra(RoombaService.INTENT_KEY_COMMAND,
RoombaService.GET_CURRENT_STATE);
break;
default:
return;
}
context.startService(intent);
}
}
As we have all the application complexity in the service, we can easily add a "second interface" on the Pebble Time with a few lines only.
The other advantage is that all these classes (the BroadcastReceivers and the service) are completely distinct from the graphical part of our application. This enables the application to treat events sent by the Pebble without stopping the current application. For example, if the phone is playing a video, it's still possible to drive the Roomba with your watch without perturbing the video.
If we wanted to add an App Widgets or allow an outside application to drive the Roomba, we could also reuse the service as is.
Conclusion
To conclude, the PebbleKit API is very user-friendly and it's easy to add Pebble support to an Android application if you use a service.
| A short demo | ||
The Pebble Time application running on the watch is somewhat more complex (particularly if you never coded in C). But this is offset by very good documentation and the many examples available. We were also convinced by their CloudPebble development environment which works perfectly well and is very easy to use. It's incredibly simpler and more effective than what was available in our first post.


