![]() Python has been among the most widely used programming languages for several years. This is probably due to its remarkable portability between different platforms, including mini-computers such as the Raspberry Pi. It is even possible to use Python to make applications with a real graphical interface, but there are a number of pitfalls, which we will help you avoid...
Python has been among the most widely used programming languages for several years. This is probably due to its remarkable portability between different platforms, including mini-computers such as the Raspberry Pi. It is even possible to use Python to make applications with a real graphical interface, but there are a number of pitfalls, which we will help you avoid...
The goal of this project is to write an application in Python with a graphical interface, and that can interact with Yoctopuce modules.
For this example, we chose the PyQt6 library, developed by Riverbank Computing, which allows you to make graphical applications portable from one platform to another. As the Python and Qt tools were originally developed on Unix and are therefore more portable there, we intentionally did the development on Windows, in order to make sure that the solution is directly usable on this platform as well. Please note that PyQt6 can be used for free under the GPLv3 license for application that are distributed under the same GPLv3 license, but if you make a commercial application, you need to buy a commercial license from Riverbank Computing.
First pitfall: don't confuse PyQt with PySide, which is a fork of PyQt with LGPL license, but is no more fully compatible for a few years. Also, if you reuse code found on the web, make sure that this code is really about PyQt6, because there are many examples still based on PyQt4 that are not always compatible with PyQt6.
Installation
Installing PyQt6 is very easy, even under Windows. Of course, you must have installed Python beforehand- we used the current version, Python 3.10 - and the pip tool. Then you just have to open a command window with administrator privileges and run:
Second pitfall: on Windows, if you install pyqt6 without having administrator rights, the installation fails with an error message about pylupdate6.exe file. For the same reason, installing PyQt6 directly via the control panel of an IDE like PyCharm is likely to fail. So do the installation in a command window with administrator rights, and your IDE will find the package when you will point it to the version of Python on which you installed the package.
If you did not follow this advice and ran an installation without administrator privileges, you need to cancel this partial installation first with the following commands:
pip uninstall PyQt6-Qt6
pip uninstall PyQt6-sip
and only then start the installation again in a command window with administrator privileges.
Structure of the application
When an application with a graphical interface has to communicate with the outside world, for example with Yoctopuce modules, it is imperative to separate the communication task and the task that manages the user interface. It is quite a bit of work, but it is really worth the effort. It is even the main reason why we chose to write this post:-)
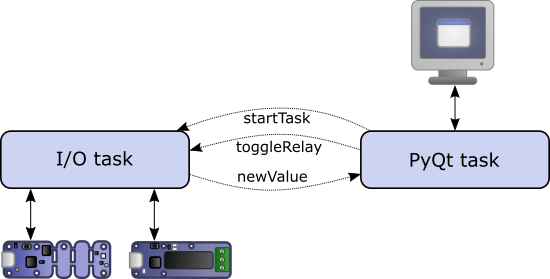
Separating the interface and the communication task requires to set up a communication mechanism between the two tasks. In Qt, this is done using signals, which allow you to transfer data from one task to the other in an asynchronous way. The idea is to create a communication task, with associated signals allowing it to communicate with the rest of the application, like this:

Proper structure of a graphical application
With PyQt6, the corresponding code looks like this:
startTask = pyqtSignal() # in: start the task
stopTask = pyqtSignal() # in: stop the task
toggleRelay = pyqtSignal(str) # in: toggle a relay
statusMsg = pyqtSignal(str) # out: publish the task status
newValue = pyqtSignal(str,str) # out: publish a new function value
def __init__(self):
super(YoctopuceTask, self).__init__()
# connect incoming signals
self.startTask.connect(self.initAPI)
self.toggleRelay.connect(self.toggleIt)
self.stopTask.connect(self.freeAPI)
@pyqtSlot()
def initAPI(self):
errmsg = YRefParam()
YAPI.RegisterLogFunction(self.logfun)
# Setup the API to use Yoctopuce devices on localhost
if YAPI.RegisterHub('127.0.0.1', errmsg) != YAPI.SUCCESS:
self.logMessage.emit('Failed to init Yoctopuce API: '+
errmsg.value)
return
# more init code as needed...
self.statusMsg.emit('Yoctopuce task ready')
The main task opens the interface, and launches the communication task in a dedicated thread:
def __init__(self):
super().__init__()
self.setWindowTitle('Sample PyQT6 application')
# ... add interface widgets
self.show()
def startIO(self):
# Start Yoctopuce I/O task in a separate thread
self.yoctoThread = QThread()
self.yoctoThread.start()
self.yoctoTask = YoctopuceTask()
self.yoctoTask.moveToThread(self.yoctoThread)
self.yoctoTask.statusMsg.connect(self.showMsg)
self.yoctoTask.newValue.connect(self.newValue)
self.yoctoTask.startSignal.emit()
Note that signals can be used as input or output: it is up to the task that wants to receive a signal to connect it to one of its own methods. It is recommended to decorate this method with @pyqtSlot(): this allows you to specify the type of the arguments, and it speeds up the execution of the calls.
Third pitfall: Qt signals only work when they are declared as attributes of a class descending from QObject. It is therefore imperative to make this class inherit from QObject, as we have done for the YoctopuceTask class.
It could be tempting to make the task inherit directly from QThread, which is itself a subclass of QObject, to avoid creating a thread object separately and then assigning it to the task. But beware, this is again a pitfall:
Fourth pitfall: only the run() method of QThread objects is implicitly run in the dedicated thread. All other methods, including methods called by signals, are launched against all expectations in the caller's thread. It is therefore generally not useful to derive a class from QThread, and it is in any case imperative to call the moveToThread method to ensure that the methods linked to signals are executed in the desired thread.
Managing plug-and-play and Yoctopuce callbacks
The two independent tasks that we have created allow the graphical interface to coexist without hindrance with the task that manages the Yoctopuce modules.
To fully exploit the possibilities of the Yoctopuce library, such as the detection of modules plugged in when the application is running and the transmission of measures by callback, it is still necessary to add to the Yoctopuce task a periodic call to the YAPI.UpdateDeviceList() and YAPI.HandleEvents() methods (or YAPI.Sleep()).
One might therefore be tempted to add the following lines to the initAPI method:
YAPI.UpdateDeviceList()
YAPI.Sleep(500)
But this is a bad idea: you have to realize that the asynchronous communication between the tasks works only because both the interface task and the Yoctopuce task spend most of their time in the Qt event handling loop:

The two event handling loops
Fifth pitfall: if one of the methods called by a signal remains in an endless loop, the event handling loop for that thread is never called again and no other incoming signal is processed.
The solution is to create a QTimer when initializing the Yoctopuce task, which calls the Yoctopuce event handling methods at regular intervals:
self.checkDevices = 0
self.timer = QTimer()
self.timer.timeout.connect(self.handleEvents)
self.timer.start(50) # every 50ms
The code called periodically takes care of invoking YAPI.UpdateDeviceList twice a second, and the rest of the time just YAPI.HandleEvents:
def handleEvents(self):
errmsg = YRefParam()
if self.checkDevices <= 0:
YAPI.UpdateDeviceList(errmsg)
self.checkDevices = 10
else:
self.checkDevices -= 1
YAPI.HandleEvents()
This completes the work necessary to fully use the Yoctopuce library in a PyQt6 application. You will need to add the signals corresponding to your specific needs to send information from the Yoctopuce task to the interface task, and conversely the signals to drive the actuators from the interface task.
The ultimate pitfall
As if all this was too simple, the PyQt developers have set us a final pitfall. Since PyQt v5.5, unexpected exceptions that occur in Python code are no longer propagated by the standard method. Instead, they simply call the Qt qFatal() function. In most IDEs like PyCharm, this does not trigger the debugger, nor does it produce any error message in the console: the application simply terminates by returning an error code, without any hint.
Sixth pitfall: at least during the development phase, you must add the following lines at the beginning of your program to allow tracing unexpected exceptions:
sys.__excepthook__(cls, exception, traceback)
sys.excepthook = except_hook
To tell you everything, we lost a lot of time because of this pitfall before understanding the problem...
A complete example
In order not to leave you with incomplete code fragments, we have added a simple but complete example in the Python library to demonstrate these principles. You can find it in the Prog-PyQt6 directory.
In order not to complicate the code, we have used a very primitive interface where the widgets are created directly in Python. But if you want to make a more complex application, you can design your interface with the QT Designer graphical tool and then automatically translate it into Python code.
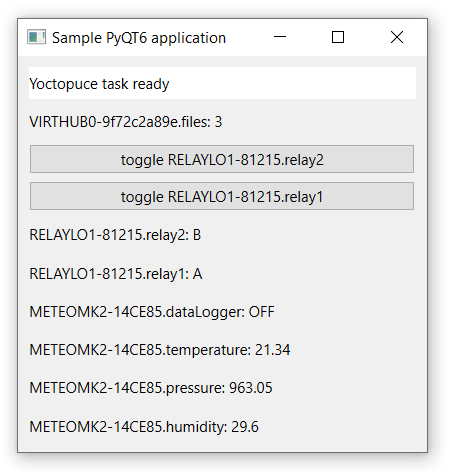
Here is the result you should get by running this example, if you have followed the installation steps of PyQt6:

An example of Yoctopuce graphic application with PyQt6
Conclusion
One would have hoped that the path to creating a Yoctopuce application with a PyQt6 GUI would be a little less rocky, but at least you have the recipes to get there. And to Python's and PyQt6's credit, the problem of decoupling communication tasks from GUIs is universal: there are almost as many solutions as there are development systems. To our knowledge, no system is both optimal for performance and very easy to use. In the end, it is up to the developer to find the solution that suits him or her best...


