 When we geek try to cook a nice chunk of meat, the tricky part is the cooking itself. Instead of sitting idle while the meat cooks, we go read something on the iPad, code some stuff or even to talk with the guests rather than watching a meat in the oven. And at the end, the meat is often overcooked. But this is gonna change. Our new recipe, using a Yocto-Thermocouple and Raspberry Pi, solves the issue. The Raspberry Pi will monitor the meat temperature for us, and send an e-mail as soon as the ideal temperature is reached. And long life to the smartphones !
Hardware
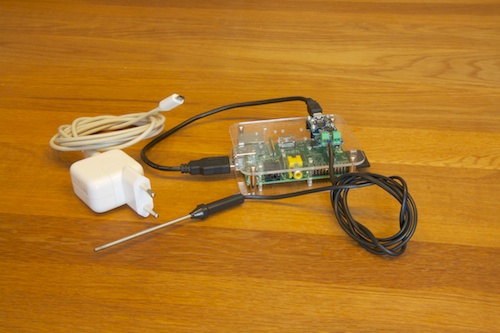
For the hardware part, we will use :
- a thermocouple hard tip, to be inserted into the meat (~ EUR 20.-, often provided with new ovens)
- a Raspberry Pi to run the monitoring script, written in Python (~ EUR 30.-)
- a Yocto-Thermocouple to read the thermocouple with the Raspberry Pi (~ EUR 38.-)
- a USB charger to power the Raspberry Pi (~ EUR 10.-, but you can reuse a mobile phone charger)
- a USB cable and misc screw (~ EUR 5.-)
- a RaspBox to mount all pieces together (~ EUR 12.-)
Since everything will end up hidden in a closet, we don't need to build a complex enclosure. We will simply screw the Yocto-Thermocouple on top of the RaspBox, using the designated holes.

The Raspberry Pi in a RaspBox, with a Yocto-Thermocouple on the top
The Raspberry Pi
Thee Raspberry Pi is a cheap and tiny credit-size mini PC, using an ARM processor and running under Linux. Installing the recommended image is well documented (http://elinux.org/RPi_Easy_SD_Card_Setup) and shows no issue.
There is one caveat on the Raspberry Pi : the USB support is still somewhat buggy perfectible, and we will need to configure it to make it work reliably. The problem is, the RasPi will occasionally drop USB packets for "full-speed" peripherals (such as keyboard, mouse, modems, as well as some audio devices) when working in standard "high-speed" mode. The problem is less acute with the most recent firmware, but it is not completely solved. The only reliable workaround for now is to force all peripherals to run in "full-speed" mode. This will have the negative side effect of limiting all peripherals (including the on-board network adapter) to 1.5 MBytes/s, but anyway, the Raspberry Pi is not designed to be a race horse...
To force USB to run in "full-speed" mode, simply add dwc_otg.speed=1 to the /boot/cmdline.txt file, as follows:
dwc_otg.lpm_enable=0 console=ttyAMA0,115200 kgdboc=ttyAMA0,115200 dwc_otg.speed=1 console=tty1 root=/dev/mmcblk0p2 rootfstype=ext4 elevator=deadline rootwait
Edit: The "dwc_otg.speed" option is no more needed on Raspberry Pi B+ and later models.
Configuring the Yocto-Thermocouple
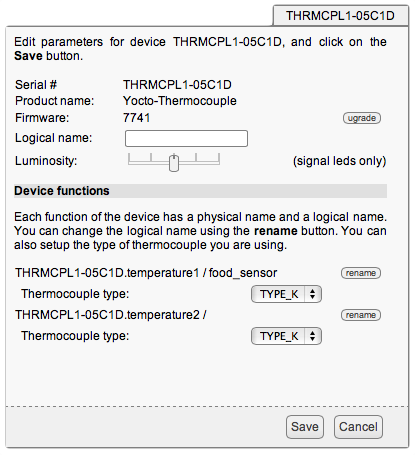
At this point, we check that the thermocouple is well configured. To do this we simply start the VirtualHub software (provided with the Yocto-Thermocouple) on the Raspberry Pi. and connect to its web interface (on port 4444 by default). The type of thermocouple can be changed if needed (type "K" is the most common). We give a logical name "food_sensor" to the module input on which we have connected our thermocouple.

The thermocouple input is configured
Software
Our monitoring software will have to send e-mails, handle HTTP requests (for the control UI) and draw temperature graphs. The Python language nicely fits the bill, since it can natively send mails and handle HTTP requests. It is pre-installed on Raspberry Pi standard image. To draw the graph, there is a library named Matplotlib, that can easily be installed using the command:
> sudo apt-get install python-matplotlib
Then you need to install Yoctopuce library [edit: now available on PyPI see this article].
The Python code is quite simple, you can download it here. Here are some explanations about parts that deal directly with our API:
First, we need to import yocto_api to use our library, and yocto_temperature to access the YTemperature class that knows how to deal with any kind of temperature sensor.
from yocto_api import *
from yocto_temperature import *
When starting the program, we have to setup the API to connect to the module using USB.
""" Main function, deals with arguments and launch program"""
....
errmsg=YRefParam()
if YAPI.RegisterHub("usb", errmsg) != YAPI.SUCCESS:
sys.exit("init error"+errmsg.value)
The core of the code is in function run, which runs in a separate thread and will check the meat temperature every second.
def run(self):
temp_sensor = YTemperature.FindTemperature("food_sensor")
....
while not self._mustStop :
# verify that our device is still connected
if not temp_sensor.isOnline():
sendResult('No temperature sensor connected !',0)
if options.verbose : print "Temperature sensor 'food_sensor' not found"
return
cur_temp = temp_sensor.get_currentValue()
if options.verbose : print "current value is %2.1f" % cur_temp
...
...
The bulk of the code handles HTTP queries and provide them with the last measured value.
Testing party
If you start the program as is, it is very likely that e-mails won't come through (unless you have configured an SMTP server on the Rasberry Pi). You need to pass the name of the SMTP server to use on the command line, as well as any credentials required to send mail. If you start the software with an argument --help, it will show the command line syntax.
For instance, here is a sample command line for using Gmail SMTP server:
> ./picooker.py --smtp_host=smtp.gmail.com --smtp_port=465 --smtp_user=myemail@gmail.com --smtp_pass=mypassword
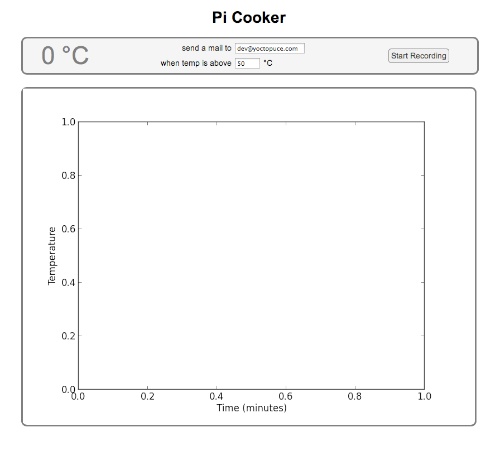
Connect to the program Web UI (by default on port 8888) to configure the temperature at which you want to get an alert e-mail, and the recipient e-mail address. Plug the thermocouple tip into the meat, and press Start Recording !

The web UI to setup the cooking parameters
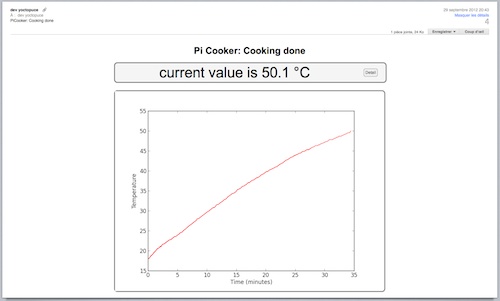
Once the meat will reach the desired temperature, an e-mail will be send with the graph of cooking temperature.

An e-mail is automatically sent when the meat is cooked
And here is a small video of our first real-life test:
This being said, I need to go back to my guests...
Update: 19 April 2013
We have improved the Pi Cooker to support multiples temperature sensors. Check this post : Yoctopuce libraries, GitHub, PyPI, and Raspberry Pi


