![]() Last week, we presented our brand new USB voltmeter, the Yocto-milliVolt-Rx enabling you to measure voltages with an accuracy of the order of a ten of µV. Obviously, some of you asked: "Can we have the same thing with an ammeter?". Good news: it's almost trivial to transform the Yocto-milliVolt-Rx into an ammeter.
Last week, we presented our brand new USB voltmeter, the Yocto-milliVolt-Rx enabling you to measure voltages with an accuracy of the order of a ten of µV. Obviously, some of you asked: "Can we have the same thing with an ammeter?". Good news: it's almost trivial to transform the Yocto-milliVolt-Rx into an ammeter.
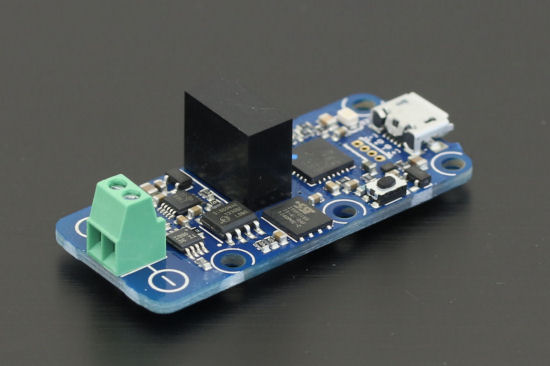
The Yocto-milliVolt-Rx, a potential ammeter
Some theory
At school, you certainly learned about Ohm's law. It's one of the basic principles in electronics which says that the voltage V in volts at the ends of a resistor equals the value R of this resistance in ohms times the current I, in amps, that goes through it. In short: V=R.I.

The voltage at the ends of a resistor equals the product of the resistance and the current going through it
We can rewrite this law in another shape: I=V/R. And now, everything is clear: if we insert a small resistor in a circuit and if we measure the voltage at its ends, we can deduct the current going through by dividing the measured voltage by the value of the resistance. Note that this doesn't say that your can use any resistor you have handy, you need to perform a few basic computations first...
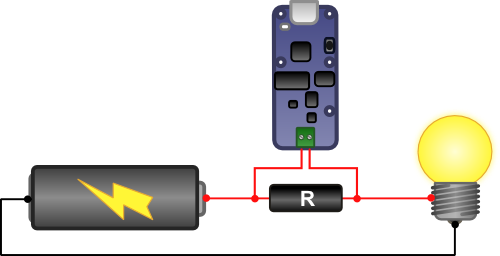
If we insert a resistor in a circuit, we can measure the current going through with a Yocto-milliVolt-Rx
Selecting the appropriate resistor
The only real difficulty is therefore to select the most appropriate resistor, taking into account all the constraints of the system.
- You must define the current range that you want to measure. The Yocto-milliVolt-Rx is based on a16bit analog/digital converter able to measure positive and negative currents. It can therefore report 216 / 2 = 32767 positive and 32767 negative distinct values. Therefore, the ratio between the greatest value and the smallest value that you want to measure must not exceed 32000. Working around this constraint is not possible.
- To obtain the best possible resolution, the voltage range obtained at the ends of the resistor must correspond as much as possible to one of the Yocto-milliVolt-Rx measuring ranges: [-250mV ... +250mV] , [-500mV ... +500mV] , [-1V ... +1V], or [-1V ... +2V].
- The resistor influences the circuit: the voltage you are measuring at the ends of the resistor is subtracted from the voltage available for the remainder of the circuit. Let's imagine that your circuit is designed to be powered with 3.7V, with peaks at 2 Amps. If you use a 1Ω resistor , when the circuit requests 2A, the voltage at the ends of the resistor is of 1Ω x 2A = 2V, and only 3.7 - 2 = 1.7V remain for the remainder of the circuit. It's then likely that the circuit won't work as planned. You must therefore select a resistor small enough so that it has a negligible influence, but large enough for the voltage at its ends to be measured by the Yocto-milliVolt-Rx.
- Some of the energy going through the circuit is dissipated by the resistor . This energy equals R.I2. We must therefore select a resistor able to dissipate this energy, and we better count large, to make sure the resistor doesn't heat up. A resistor that heats changes its value.
Implementation
We know that some of our customers use the Yocto-Amp to measure smartphone power consumption. The Yocto-Amp has a 2mA accuracy. Let's see if we can do better with a Yocto-milliVolt-Rx.
Let's say that we want to measure currents as low as 0.1 mA with peaks at 2A. Let's select the smallest measuring range of the Yocto-milliVolt-Rx: -250mV ... +250mV with a 0.01mV sensitivity. The smallest resistance value that we can select is then 0.01mV/0.1mA = 0.1 Ω. When 2A go through this resistor, the voltage at its ends is then 0.1Ω *2A =0.2V, which fits in the -250mv..250mV range that we selected. A 0.2V voltage drop during consumption peaks is a bit high, but still acceptable. Finally, the energy dissipated during consumption peaks is of 0.1Ω x 2A x 2A = 0.4W.
We therefore selected a 0.1Ω, 1%, 1W resistor. The 1% accuracy is not extraordinary, but 1‰ resistor are expensive and hard to find. Moreover, it is possible to improve this accuracy.
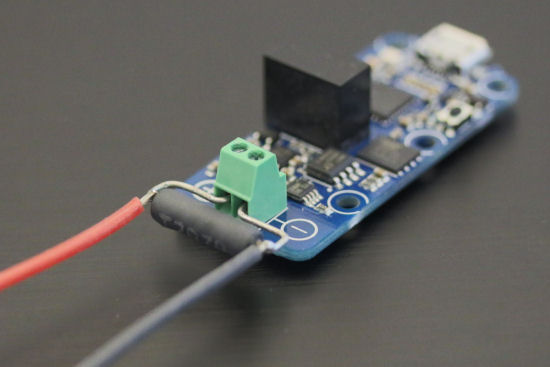
Yocto-milliVolt-Rx + resistor = USB ammeter
To build our USB ammeter, we must simply put the resistor in the screw terminal of the Yocto-milliVolt-Rx and power the circuit from there. However, we must keep the wires as short as possible: the phone was probably not designed to have its battery at the end of a long wire.
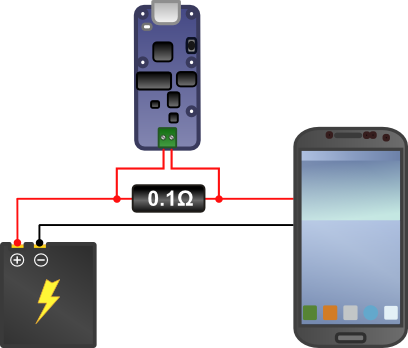
Wiring of the Yocto-milliVolt-Rx to measure a smartphone power consumption.
Configuration
We still need to configure the Yocto-milliVolt-Rx so that it directly translates into mA the voltage that it measures. We selected the -250..+250mV input range and a 0.1Ω resistance, this gives us a -2500..+2500mA output range. We simply need to configure the Yocto-milliVolt-Rx with these values and we obtain an ammeter. The configuration is saved in the module permanent memory, you have to do it only once.
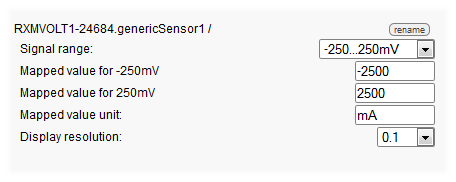
Configuring the Yocto-milliVolt-Rx with the VirtualHub
Test
To make the experiment easier, we printed a battery holder that fits in the phone and that enables us to interpose the Yocto-milliVolt-Rx in the power supply. Here is the result.
Conclusion
We transformed, without spending too much money, our Yocto-milliVolt-Rx into a ammeter with an accuracy of about 1%. The accuracy depends mainly on the resistor used, which was given at 1%. You can obviously better the accuracy by selecting a more precise, but more expensive, resistor. But you can also use a classic ammeter as a reference to fine-tune the Yocto-milliVolt-Rx configuration and thus obtain a USB ammeter with a data logger as precise as your reference.


