![]() Among the requests that we received in the past few weeks, one caught our attention more particularly: how to interface a Wiegand RFID badge reader via USB, using Yoctopuce modules. It's interesting because Wiegand readers are widely spread in access control systems, and they are readily and quite cheaply available on the net. The good news is that we now have a solution, using a simple Yocto-Serial.
Among the requests that we received in the past few weeks, one caught our attention more particularly: how to interface a Wiegand RFID badge reader via USB, using Yoctopuce modules. It's interesting because Wiegand readers are widely spread in access control systems, and they are readily and quite cheaply available on the net. The good news is that we now have a solution, using a simple Yocto-Serial.
The Wiegand interface
The aim of the Wiegand interface is to remotely transmit, for example from an access control door, the identity of a person presenting his/her RFID badge. Each time a badge is presented, a message is sent and the control computer can decide whether to open the door or not depending on the received identifier.

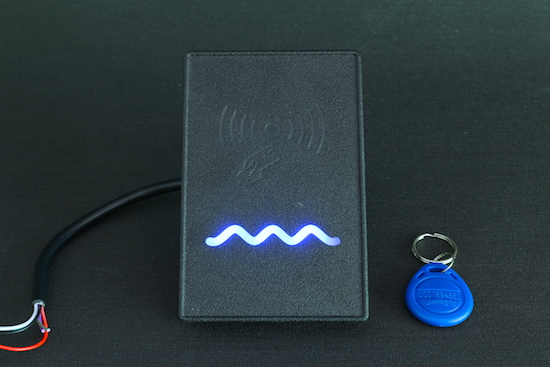
An RFID reader with a Wiegand interface bought for $16
A Wiegand interface requires only three wires: the ground, and two data lines called D0 and D1. The message is transmitted slowly enough so that we can use long cables without raising issues. A Wiegand message is nothing else than the access badge number, usually made of 24 bits (16 millions of possibilities) + two parity bits to detect potential transmission errors.
Naturally, you must also provide power to the RFID reader for it to work. The most frequent solution is that it has its own power supply, wherever it is set up. This power supply must necessarily be isolated, to have a common ground with the computer reading the data:

Wiegand RFID reader with its own power supply
The other possibility, when the reader needs only a little current, is to power it directly from the USB interface of the computer:

Wiegand RFID reader powered from the USB interface
Connections and configuration
For technical reasons, and even if this may seem a bit odd, you must connect the Wiegand D0 and D1 data lines on the Yocto-Serial inputs called TD and RTS:

Connecting a Wiegand reader to a Yocto-Serial
When configuring the Yocto-Serial, make sure to use a recent firmware, including Wiegand support. If you decided to power the Wiegand reader through USB, you must enable the 5V output in the module configuration:

Configuring the Yocto-Serial to enable the 5V output
To configure communications, you have two options, depending on the type of message decoding that you want. To receive Wiegand message in ASCII, as is, as a string of "0" and "1", use the following configuration:

Configuring the Yocto-Serial to receive Wiegand messages in ASCII
If you present a badge and call the serial.get_lastMessage() method, you obtain for example:
01101011001111011101110101
This very simple format allows you to determine the number of bits used by your Wiegand reader, in case it doesn't use the most standard 26 bit format.
If you prefer a more efficient version, you could ask the module to decode the received bits into bytes, which can then be more easily interpreted by a job on the Yocto-Serial or by your own code. But for a correct byte decoding, you must provide an additional piece of information: the number of parity bits preceding the message, which must therefore be coded in a separate byte. In the case of 26 bit Wiegand messages, there is one parity bit to the left, but in some variants you can have one more. If need be, you can find this information in the documentation of your Wiegand reader. Here is therefore the configuration you must apply for decoding 26 bit Wiegand messages:

Configuring the Yocto-Serial to receive decoded Wiegand messages
If you present a badge and call the serial.get_lastMessage(), method, you then obtain:
00D67BBA80
The first byte 00 contains only the first parity bit. The following byte D6 is the facility code, the following two bytes 7BBA represent the cardholder ID, and the last byte 80 contains the end parity bit. If you bought RFID badges in bulk with a $20 reader, expect your badges to have random facility codes and identifiers, but all different if you have any luck.


