 After the presentation of the design and prototyping of our products, here comes the production stage, with a new video!
In order to make the final printed board, we reuse the circuit of the last validated prototype and use panelization: the circuit is replicated a few dozens of times on a single larger board, in order to build as many modules as possible at once.
The production of the printed circuit board itself is outsourced, since it requires many chemical processes that require a dedicated factory. There are several qualities of printed circuit boards. The most common one is hot-air leveling (the dark green boards with tinned pads), but we chose the electroless nickel-gold (blue boards with golden pads). They contribute to better soldering, because the pads are flatter and suffer less from oxydation.

Panelized printed circuit board, for production
In order to put the solder paste on production boards, the dispensing method is not appropriate: it is not only too slow, but it does not produce a perfect pad coverage and requires solder pastes that can only melt at a quite high temperature, too close to the maximum tolerance of the components. The preferred method is solder paste printing, using a metallic stencil of 120um (used as a mask). We outsource to Germany the production of the stencil, since this also requires dedicated high-tech machines.

Stencil used to print solder paste
Once we have the printed circuit boards and the stencil, production can start. The first circuit board is fixed into the stencil printer, and the stencil is locked into a pneumatic tension frame. We align the circuit and the stencil using a laser and a camera system.

The stencil printing machine
Then we put some solder past at one end of the stencil, and here it goes: the stencil printer automatically applies the paste on the whole stencil using a motorized squeegee, at a controlled pressure and speed in order to ensure a homogeneous printing on all pads.

Solder paste, before printing
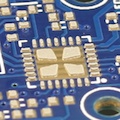
After a round-trip of the squeegee, the board is separated from the stencil at a controlled speed, to avoid removing solder paste from the pads. The printing process can then be replicated for multiple printed boards.

Result of solder printing: nothing to do with what we get from the dispensing method used for prototyping...
The component placing on the production boards is done using the same robot as for the prototypes. It takes around 20 minutes to build 30 modules, but everything is done automatically.

Fully assembled production panel
The final step is a quick dive in the reflow oven, and here you go with your production modules!

