 Some time ago, we presented a method for driving Yoctopuce modules with an Elgato Stream Deck. Today, we're showing you how to create a macro keyboard, inspired by the Stream Deck but based on a Yoctopuce module.
What is a macro keyboard?
A macro keyboard is a device that enables users to program sequences of actions, called macros, on specific keys. These macros are useful for automating repetitive or complex tasks, thus improving efficiency, particularly in the fields of video gaming and productivity. Modern gamer keyboards often incorporate a few keys dedicated to programmable macros.
The hardware
The purpose of our macro keyboard is to control volume, media in progress, as well as opening applications and websites. For volume control, we use a Bourns quadrature encoder. Other macros are assigned to keyboard keys. We're using buttons from Adafruit, made up of three parts: a base equipped with an RGB LED and a key holder (NeoKey), a mechanical keyboard key (Kailh Mechanical Key Switch - Clicky Blue) and a flat keycap (Relegendable Plastic Keycaps).
We can individually control these buttons, fitted with RGB LEDs, to change color as required. Finally, we use a Yocto-MaxiKnob, featuring 12 analog channels capable of reading different types of input, as well as a smart RGB LED driver and buzzer (removed to save space).
Wiring and mounting
Wiring the NeoKey button holders is straightforward: the S+ and S- wires of each holder are connected to the Yocto-MaxiKnob channels. For the encoder, one side is connected for pressure (functioning as a button), and on the other side, two positive poles and one negative pole are connected to the center to detect the direction of rotation. The LEDs are connected in series to be controlled individually by the Yocto-MaxiKnob. The buttons are powered in series via the VDD (5V) and G (GND) ports.
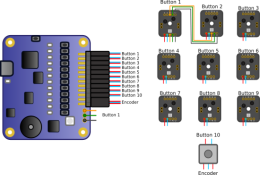

Macro keyboard wiring
For the enclosure, we opted for Plexiglas plates. A 3 mm plate serves as a base for mounting the Yocto-MaxiKnob, a 1.4 mm black-painted plate holds the mechanical keys and encoder, and a 2 mm plate holds the keys for stability. A part for the encoder is 3D printed, while the logos corresponding to the macros are printed on the key caps using a UV printer.
The macros
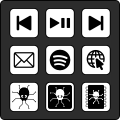
We've assigned 3 buttons for media control: previous media, play/pause, and next media. The next three buttons open applications: PostBox (mailbox), Spotify (audio streaming), Firefox (web browser). The last three buttons open the Yoctopuce website, launch VirtualHub, and open the Yoctopuce module flash software. The encoder controls the volume by turning it right or left, and pressing the encoder mutes or unmutes the volume.

The mechanics of the macro keyboard
And that's it, our macro keyboard is ready to be programmed!
The software
We chose to code in C# to create a simple executable. The program handles the detection of button presses or encoder position changes, executes macros, and controls LEDs.
Button and encoder management
Detection of button presses and encoder increment/decrement are managed by valueCallback callbacks. Two callbacks have been created, one for buttons and another for the encoder. For buttons, the callback simply reads the button pressed and executes the corresponding macro. For the encoder, the callback detects the direction of rotation by comparing new and previous values.
Macro execution
Volume and media control macros are executed using virtual key shortcuts.
For applications and web sites, the Process.Start() function is used with the location of the application or the web link to be opened.
LED management
By default, we've chosen a static color for LED buttons. We've implemented animations on the LEDs when a media macro is pressed. If the Spotify application is open, the macro is illuminated in green, similarly in blue for the VirtualHub macro, and in gray for the flash software macro button.
Additional features
We've added features such as notification of new unread e-mails with a flashing LED, and detection of new orders received with a flashing red LED. VirtualHub closes automatically when the flash software is launched.
Automatic execution at startup
To enable the program to start automatically with the computer, it is added to the startup executable files. To do this, simply open the folder containing the executable > press Windows + R > write shell:startup > OK > a folder opens and you only have to put the executable file in it.

The finished macro keyboard
Conclusion
This macro keyboard makes life much easier by automating a number of tasks. The LED animations make it easy to see what's going on. If you'd like to create your own macro keyboard, keep in mind the possibilities offered by the Yocto-MaxiKnob, with its 12 analog inputs and its ability to control up to 150 LEDs. You can find an example of the source code here.

