![]() This week, we decided to build a small gadget which will undoubtedly change the course of your life. It's a small cube able to print a different "Chuck Norris" fact each time you press a button. You can even take it everywhere with you, it's wireless.
This week, we decided to build a small gadget which will undoubtedly change the course of your life. It's a small cube able to print a different "Chuck Norris" fact each time you press a button. You can even take it everywhere with you, it's wireless.

A magic cube printing Chuck Norris facts, anyone?
Principle
The idea is to use a tiny thermal printer. You can drive this model through a TTL serial interface and it needs a 5V power supply. A Yocto-Serial is therefore the ideal tool to drive this printer.
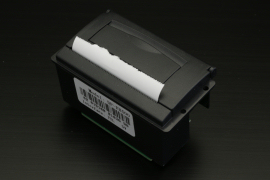
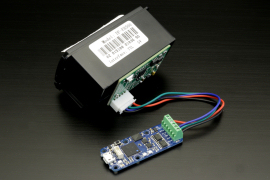
You can drive this tiny printer with a Yocto-Serial
The heart of the system is a YoctoHub-Wireless-SR driven from a PHP script thanks to the callback API. We selected the SR model for aesthetic reasons: no antenna poking out. The power supply is provided by 4 NiMH cells. In order for the battery to last as long as possible, the cube sleeps most of the time. You can wake it up by pushing a button connected to a Yocto-Knob. Finally, a Yocto-Color shows the state of the cube.
Managing power
The only part which required some deep thinking is power management. We wanted the cube to work on a battery. So we used the sleep feature of the hub. As you know, the YoctoHub-Wireless-SR can go into sleeping mode on its own and can be waken up at a regular interval or when a contact is closed. It's this contact that we use to wake the hub up when the user pushes the button.

You can wake the YoctoHub-Wireless up by closing a contact.
Minimal user interface
We wanted an intuitive and minimal user interface: there was no way we would accept to have one button to turn the cube on and a second one to print the fact. However, from the Yoctopuce API standpoint, it's impossible to always know the state of the contact used to wake the hub up. Therefore, we can't use it to know if the user pushes the cube's button again when the hub is awake. That's why we also need a Yocto-Knob to monitor the button state. And it's here that lies the true subtlety of this project: we would logically need a bipolar push button (DPST) to activate at the same time the hub wake up contact and a Yocto-Knob input. Here is the catch, it seems that it's very hard to find this type of button. We didn't manage to find one in the imparted delay to finish this project. Therefore, we rather used a uni-polar push button but which is also used as a commutator (SPDT). As the Yocto-Knob is not an isolated module, it shares the same ground as the YoctoHub-Wireless-SR. We only need to alternately put to the ground the hub wake up contact and the Yocto-Knob input.

How to wake up the hub and to act on the Yocto-Knob with a single push button
So, pushing the button wakes up the hub which immediately sends a PHP callback which takes a few seconds. To make sure the user knows that the cube is on, we use a Yocto-Color configured to light up in blue when powered on. The callback changes its color to green to indicate that everything is going well. As the cube button is also connected to a Yocto-Knob, once the cube is awake, each additional push on the button generates a new callback.

The cube electronics, obviously we used 1.27 cables rather than USB ones
Implementation
Hardware
We built the cube with acrylic glass. It is made of a transparent frame with threaded inserts to screw on the different modules. The whole is covered with black plexiglas panels for aesthetics. Assembly doesn't raise any difficulty, as long as the frame is designed so that all the assembly screws are readily available.


A plexiglas frame, a few modules, and that's it.
Software
The driving software is a simple small PHP script running on a web server. The main issue is to manage the printer warming up delay. It needs to warm up for a few seconds after it is initialized. It's an issue because the callback API doesn't allow you to make a pause. To solve this issue, we use a module->set/get_userVar() to store in the Yocto-Serial a state variable describing the time the printer started warming up. This variable is stored in the module RAM, it is therefore persistent from one callback to another but disappears as soon as the system is powered off. As soon as warming up starts, we lower the delay between two callbacks to 1 second for more reactivity and, during warming up, the script makes the Yocto-Color blink to make the user wait.
By default, the printer is configured to print as fast as possible, which consumes more power that the system can provide. To solve this, we configured the printer to print at a slower rate.
$button = YFindAnButton("PrintBtn");
$m = $serial->get_module();
$uptime = intVal($m->get_upTime() / 1000);
$stateVar = $m->get_userVar();
if ($stateVar<=0) // not warm yet
{ $stateVar = $uptime ;
$serial->writeHex('1B40'); // printer init
$serial->writeHex('1B3704FFA0'); // config for low consumption
$led1->resetBlinkSeq(); // makes the leds blink
$led2->resetBlinkSeq();
$led1->addRgbMoveToBlinkSeq(0x000000, 0);
$led1->addRgbMoveToBlinkSeq(0x000000, 250);
$led1->addRgbMoveToBlinkSeq(0x00FF00, 0);
$led1->addRgbMoveToBlinkSeq(0x00FF00, 250);
$led2->addRgbMoveToBlinkSeq(0x000000, 0);
$led2->addRgbMoveToBlinkSeq(0x000000, 250);
$led2->addRgbMoveToBlinkSeq(0x00FF00, 0);
$led2->addRgbMoveToBlinkSeq(0x00FF00, 250);
$led1->startBlinkSeq();
$led2->startBlinkSeq();
$m->set_userVar($stateVar); // save state
$network->set_callbackMinDelay(1); // more reactivity
die("waiting for printer to warm up");
}
$warmupduration = $uptime - $stateVar;
if ($warmupduration<6) // still not warm enough
{ die("still waiting for printer to warm up");
}
Note: It is probably possible to optimize the warm up time by defining a job in the Yocto-Serial which would then initialize the printer as soon as it is powered. Thus, both the warmup and the Wifi connection would be performed in parallel.
As soon as the printer is ready, the script downloads the fact from the Internet Chuck Norris Database, and prints it with the date. Managing printing itself is trivial: you only need to send the text to be printed on the serial port. Escape codes enable you to control the page layout.
{ $button->resetCounter();
// download a Chuck Norris joke.
$joke="**CANNOT CONNECT TO api.icndb.com**";
$json = file_get_contents('http://api.icndb.com/jokes/random/');
if (!($json===false))
{ $data = json_decode($json);
$joke = html_entity_decode($data->value->joke);
}
$serial->writeLine(''); // let's print
$serial->writeHex('1B2139'); // bold, dbl width, double line
$serial->writeHex('1B6149'); // centered
date_default_timezone_set('Europe/Paris');
$serial->writeLine(date('j M')); // date
$serial->writeHex('1B2100'); // regular text
$serial->writeLine(date('l')); // day
$serial->writeHex('1B6148'); // regular alignment
$serial->writeLine('');
$serial->writeLine($joke); // Chuck Norris power !
$serial->writeLine('');
$serial->writeLine('');
$serial->writeLine('');
} else print("No print needed");
$led1->set_rgbColor(0x0000FF, 0); // leds back to blue
$led2->set_rgbColor(0x0000FF, 0);
$network->set_callbackMinDelay(10); // a more reasonable callback delay
$wakeUpMonitor= yFirstWakeUpMonitor(); // back to sleep
if ($wakeUpMonitor->isOnline()) $wakeUpMonitor->sleep(9);
Note moreover that we use a state counter for the Yocto-Knob to know if the push button was pressed because, on the opposite to get_isPressed(), the value of this counter persists from one callback to another, as long as it isn't explicitly set to zero.
And here is the result. Nothing better than a Chuck Norris fact from time to time to maintain morale.

A Chuck Norris fact dispenser, pretty cool, eh?
Conclusion
With a tiny receipt printer and a few Yoctopuce modules, we built a tiny wireless printer. In the opposite to a traditional module, it doesn't need a local computer to work: it is driven remotely by a web site. Obviously, you may think that's a lot of work for a few jokes that only nerds find amusing. In fact, this is only the first part of a more ambitious, and perhaps less pointless, project. But to know more, you must come back next week.

