YoctoHub-Ethernet : User's guide
2. Presentation
2.1 The YoctoHub-Ethernet components 3. First steps
3.1 Fast use for the impatient users 3.2 Manual configuration 3.3 Automated configuration 3.4 Connections 4. Assembly
4.1 Fixing 4.2 Fixing a sub-module 5. Configuring and testing the modules
5.1 Locating the modules 5.2 Testing the modules 5.3 Configuring modules 5.4 Upgrading firmware 5.5 Accessing the sensor data logger 5.6 REST gateway 5.7 OpenMetrics gateway (Prometheus) 6. Access control
6.1 Admin access 6.2 User access 6.3 Access control and API 7. Outgoing connections
7.1 Configuration 7.2 HTTP Callbacks to 3rd-party services 7.3 Callbacks to an MQTT broker 7.4 Yocto-API callbacks 7.5 User defined HTTP callbacks 7.6 Names associated with posted values 7.7 Scheduling callbacks 7.8 Tests 7.9 Spontaneous connections 8. Personalizing the web interface
8.1 Using the file system 8.2 Limitations 9. Installing Yocto-Visualization (for web)
10. Programming
10.1 Accessing connected modules 10.2 Controlling the YoctoHub-Ethernet 11. High-level API Reference
11.1 Class YModule 11.2 Class YNetwork 11.3 Class YHub 11.4 Class YHubPort 11.5 Class YFiles 12. Troubleshooting
12.1 Where to start? 12.2 Programming examples don't seem to work 12.3 Linux and USB 12.4 ARM Platforms: HF and EL 12.5 Powered module but invisible for the OS 12.6 Another process named xxx is already using yAPI 12.7 Disconnections, erratic behavior 12.8 After a failed firmware update, the device stopped working 12.9 Registering VirtualHub disconnects another instance 12.10 Dropped commands 12.11 Some network cables don't work.. 12.12 Can't contact sub devices by USB 12.13 Network Readiness stuck at 3- LAN ready 12.14 Damaged device 13. Characteristics
14. Index
1. Introduction
The YoctoHub-Ethernet is a 60x58mm electronic module enabling you to control other Yoctopuce modules through Ethernet. From the outside, this module behaves exactly like a classic computer running VirtualHub1: same interface, same functionalities. The YoctoHub-Ethernet can be powered by a simple USB charger, but it can also be powered by Power over Ethernet.

The YoctoHub-Ethernet
The YoctoHub-Ethernet is designed to be easily deployed and to not require any specific maintenance. In the opposite to a mini-computer, it does not have a complex operating system. Some simple settings allow you to use it in many kinds of network environments. You can modify these settings manually or automatically through USB. Therefore, the YoctoHub-Ethernet is much more suited to industrialization than a mini-computer. However, you cannot run additional software written by the user on the YoctoHub-Ethernet.
The YoctoHub-Ethernet is not a standard USB hub with network access. Although it uses USB cables, its down ports use a proprietary protocol, much simpler than USB. It is therefore not possible to control, or even to power, standard USB devices with a YoctoHub-Ethernet.
Yoctopuce thanks you for buying this YoctoHub-Ethernet and sincerely hopes that you will be satisfied with it. The Yoctopuce engineers have put a large amount of effort to ensure that your YoctoHub-Ethernet is easy to install anywhere and easy to use in any circumstance. If you are nevertheless disappointed with this device, do not hesitate to contact Yoctopuce support2.
2. Presentation

| 1: | Control and power USB port | 7: | Down port 1 |
| 2: | Yocto-button | 8: | Down port 1 led |
| 3: | Yocto-led | 9: | Down port 2 |
| 4: | Network port (100Mb) | 10: | Down port 2 led |
| 5: | Overload led | 11: | Down port 3 |
| 6: | Back connection | 12: | Down port 3 led |
2.1. The YoctoHub-Ethernet components
Serial number
Each Yocto-module has a unique serial number assigned to it at the factory. For YoctoHub-Ethernet modules, this number starts with YHUBETH1. The module can be software driven using this serial number. The serial number cannot be modified.
Logical name
The logical name is similar to the serial number: it is a supposedly unique character string which allows you to reference your module by software. However, in the opposite of the serial number, the logical name can be modified at will. The advantage is to enable you to build several copies of the same project without needing to modify the driving software. You only need to program the same logical name in each copy. Warning: the behavior of a project becomes unpredictable when it contains several modules with the same logical name and when the driving software tries to access one of these modules through its logical name. When leaving the factory, modules do not have an assigned logical name. It is yours to define.
Yocto-button
The Yocto-button has two functionalities. First, it can activate the Yocto-beacon mode (see below under Yocto-led). Second, if you plug in a Yocto-module while keeping this button pressed, you can then reprogram its firmware with a new version. Note that there is a simpler UI-based method to update the firmware, but this one works even if the firmware on the module is incomplete or corrupted.
Yocto-led
Normally, the Yocto-led is used to indicate that the module is working smoothly. The Yocto-led then emits a low blue light which varies slowly, mimicking breathing. The Yocto-led stops breathing when the module is not communicating any more, as for instance when powered by a USB hub which is disconnected from any active computer.
When you press the Yocto-button, the Yocto-led switches to Yocto-beacon mode. It starts flashing faster with a stronger light, in order to facilitate the localization of a module when you have several identical ones. It is indeed possible to trigger off the Yocto-beacon by software, as it is possible to detect by software that a Yocto-beacon is on.
The Yocto-led has a third functionality, which is less pleasant: when the internal software which controls the module encounters a fatal error, the Yocto-led starts emitting an SOS in morse 3. If this happens, unplug and re-plug the module. If it happens again, check that the module contains the latest version of the firmware and, if it is the case, contact Yoctopuce support4.
Power / Control port
This port allows you to power the YoctoHub-Ethernet and the modules connected to it with a simple USB charger. This port also allows you to control the YoctoHub-Ethernet by USB, exactly like you can do it with a classic Yoctopuce module. It is particularly useful when you want to configure the YoctoHub-Ethernet without knowing its IP address.
Down ports
You can connect up to three Yoctopuce modules on these ports. They
will then be available as if they were connected to a computer running
VirtualHub. Note that the protocol used between the YoctoHub-Ethernet and
the USB modules is not USB but a lighter proprietary protocol. Therefore,
the YoctoHub-Ethernet cannot manage devices other than Yoctopuce devices.
A standard USB hub does not work either5. If you want to connect
more than three Yoctopuce modules, just connect one or more
Warning: the USB connectors are simply soldered in surface and can be pulled out if the USB plug acts as a lever. In this case, if the tracks stayed in position, the connector can be soldered back with a good iron and flux to avoid bridges. Alternatively, you can solder a USB cable directly in the 1.27mm-spaced holes near the connector.
The UTP connector (network port)
This connector allows you to connect the YoctoHub-Ethernet to your Ethernet network. The YoctoHub-Ethernet network connection works with 100Mb/s, but the hub can very well be connected to a Gigabit or a 10Mb/s network.
The YoctoHub-Ethernet can also be powered through it. You only need to have network equipment able to provide power by Power over Ethernet (PoE) to the 802.3af standard. It can be a network switch with PoE, or a simple injector, for example. Only available for the professionals for a long time, this type of equipment is now largely distributed at very affordable prices. By using PoE, you can move you YoctoHub-Ethernet away from any electric socket, by connecting it only to a simple network cable. Flat and thin network cables are usually compatible with the 802.3af PoE standard.
Current sensors
The YoctoHub-Ethernet is able to measure its own power consumption, distinguishing power supplied by the USB bus and power provided by Power over Ethernet. Current supply on a USB bus and on a PoE network being quite critical, this functionality can be of great help. The YoctoHub-Ethernet can manage a total of up to 2A (including its own consumption and consumption on the down ports).
Overload led
The YoctoHub-Ethernet permanently analyzes its own power consumption. If it detects a global consumption of more than 2A or a consumption above 1.8A on the PoE, resulting from an overload on one of the down ports, for example, it automatically disables all the down ports and lights the overload led. To isolate the source of the problem, you can enable the ports one after the other, monitoring the increase in power consumption. Alternatively, if you know the source of the current overload problem and know to have solved it, you can restart the YoctoHub-Ethernet to reactivate all its ports.
Note that the overload process is a protection measure which can prevent overheating, but it is not a protection guarantee against shorts.
3. First steps
The aim of this chapter is to help you connect and configure your YoctoHub-Ethernet for the first time.
3.1. Fast use for the impatient users
If you connect your YoctoHub-Ethernet directly on the network without configuring it, it works with the default configuration:
- The IP address is obtained by DHCP. If no DHCP server answers, the YoctoHub-Ethernet uses an auto-configuration address in the 169.254.x.y range, like most operating systems.
-
The YoctoHub-Ethernet indicates to the DHCP server its host name (serial number),
if the DHCP server supports it, in order to be located it more easily:
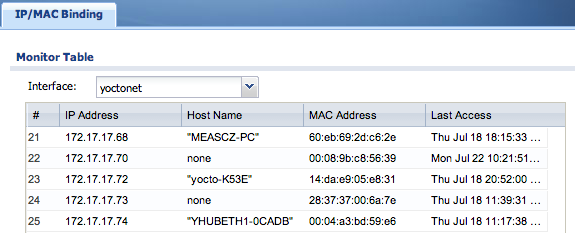
YoctoHub-Ethernet detected by the DHCP server of a small ZyXEL router -
The YoctoHub-Ethernet announces its presence on the local network with the
SSDP (uPNP) protocol, which makes it visible from Windows computers:

YoctoHub-Ethernet detected on the network by a computer under Windows -
The YoctoHub-Ethernet announces its presence on the local network with the
Bonjour protocol, which makes it visible from Mac OS X computers:
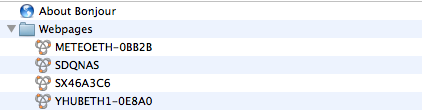
YoctoHub-Ethernet detected on the network by a Mac
3.2. Manual configuration
You can configure your YoctoHub-Ethernet through its USB control port, by using VirtualHub7.
Run VirtualHub on your preferred computer and connect it to the power / control port of the YoctoHub-Ethernet. You need a USB A-MicroB cable. Connect your YoctoHub-Ethernet to a working network cable as well.

Configuration: connecting your YoctoHub-Ethernet by USB to a computer
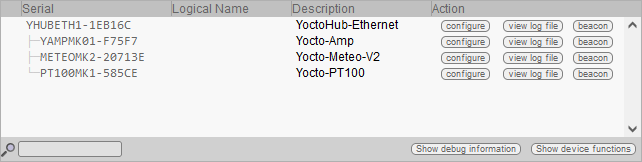
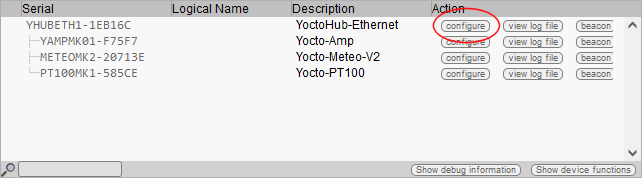
Launch your preferred browser on the URL of your VirtualHub. It usually is http://127.0.0.1:4444. You obtain the list of Yoctopuce modules connected by USB, among which your YoctoHub-Ethernet.
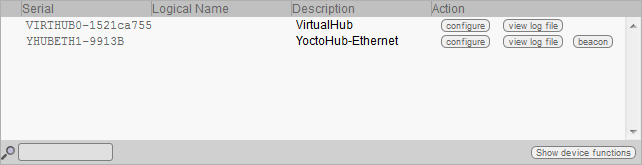
List of Yoctopuce modules connected by USB to your computer, among which your YoctoHub-Ethernet
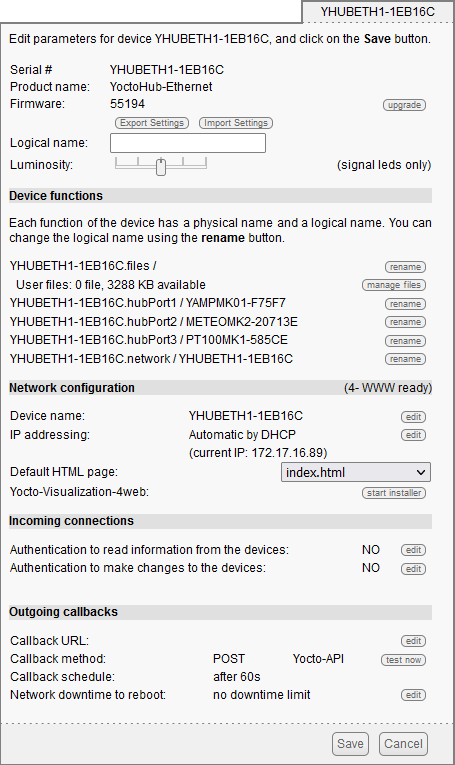
Click on the configure button corresponding to your YoctoHub-Ethernet. You obtain the module configuration window. This window contains a Network configuration section.

YoctoHub-Ethernet module configuration window
You can then choose between a DHCP assigned IP address or a fixed IP address for your YoctoHub-Ethernet module. The DHCP address is recommended in so much as this functionality is supported by most ADSL routers (its the default configuration). If you do not know what a DHCP server is but are used to connect machines on your network and to see them work without any problem, do not touch anything.
You can also choose the network name of your YoctoHub-Ethernet. You can then access your YoctoHub-Ethernet by using this name rather than its IP address. When the network part is configured, click on the Save button to save your changes and close the configuration window. These modifications are saved in the persistent memory of the YoctoHub-Ethernet, they are kept even after the module has been powered off.
Click on the serial number corresponding to your YoctoHub-Ethernet. This opens your module property window:
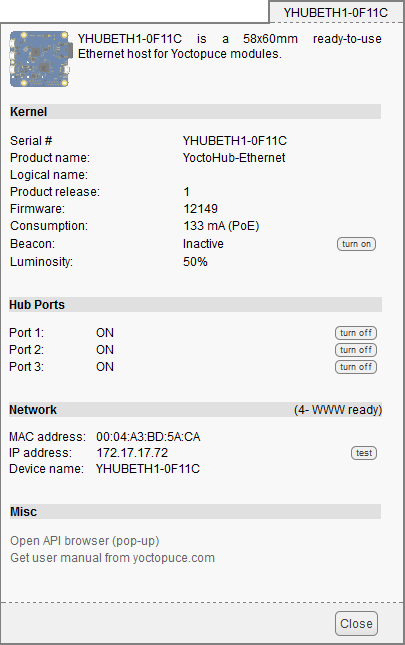
The YoctoHub-Ethernet properties
This window contains a section indicating the state of the YoctoHub-Ethernet network part. You can find there, among other things, the connection type and its current IP address. This section also provides the state of the network connection. Possible states are:
- 0- search for link: The module is searching for a connection with the network. If this state persists, the network cable is most likely not connected.
- 2- network linked: A connection was detected.
- 3- LAN ready: The local network is working.
- 4- WWW ready: The module has checked Internet connectivity by connecting itself to a time server (NTP).
When you have checked that your module does indeed have a valid IP address, you can close the property window, stop VirtualHub, and disconnect your USB cable. They are not needed anymore.
From now on, you can access your YoctoHub-Ethernet by typing its IP address directly in the address field of your preferred browser. The module answers to the standard HTTP port, but also to the 4444 port used by VirtualHub. If your module IP address is 192.168.0.10, you can therefore access it with the http://192.168.0.10 URL.
The YoctoHub-Ethernet interface is identical to that of VirtualHub.
If you have assigned a name to your YoctoHub-Ethernet, you can also use this name on the local network. For example, if your have used the yoctohub network name, you can contact the module with the http://yoctohub URL under Windows and the http://yoctohub.local URL under Mac OS X and Linux. Note that this technique is limited to the subnet of the YoctoHub-Ethernet. If you want to contact the module by name from another network, you must use a classic DNS infrastructure.
3.3. Automated configuration
You can industrialize the YoctoHub-Ethernet network configuration. You can find in the following chapters of this documentation the description of the programming functions enabling you to read the Ethernet address (MAC address) of a module, and to configure all of its network parameters.
The network configuration functions are also available as command lines, using the YNetwork utility software available in the command line programming library 8.
After having set some parameters by software, make sure to call the saveToFlash() function to ensure that the new settings are saved permanently in the module flash memory.
3.4. Connections
Power supply
You can power the YoctoHub-Ethernet in two different ways:
USB
Simply connect a USB charger in the power / control port port, but make sure that the charger provides enough electric power. The YoctoHub-Ethernet consumes about 130mA, to which you must add the power consumption of each submodule. The YoctoHub-Ethernet is designed to manage a maximum of 2A. Therefore, we recommend a USB charger able to deliver at least 2A. Moreover, you must make sure that the total power consumption of the set "hub + submodules" does not go above this limit.

The YoctoHub-Ethernet can be powered by a regular USB charger
Power over Ethernet (PoE)
Your YoctoHub-Ethernet is compatible with Power over Ethernet (PoE). This technology consists in having the power supply go through the network cable. To do this, you need a network equipment powering the Ethernet cable following the 802.3af norm9. The necessary equipment take usually the shape of a PoE switch, combining the functions "Ethernet switch" and "power injector", or of a simple PoE injector, enabling power injection on a single Ethernet cable. There are also ADSL routers with PoE, but they are rare. If you have an Ethernet cable connected to one of these devices, you only need to connect this cable to the YoctoHub-Ethernet for the later to be instantaneously operational.

The YoctoHub-Ethernet can be powered by an Ethernet cable (PoE)
For a long time reserved to professionals, these devices are now easily available for the general public at reasonable prices (a few tens of Euros for an injector, a little above 100 EUR for a PoE switch with several power supplied ports). Flat and thin network cables are usually compatible with the PoE 802.3af norm.
The PoE component of the YoctoHub-Ethernet can provide about 1.8A at 5V. If the YoctoHub-Ethernet detects an overload on the PoE, it automatically shuts down the power supply of its down ports to protect itself. These ports must be explicitly reactivated, either by software or through the YoctoHub-Ethernet web interface. Overload is physically signaled by the overload red led.
Beware, power distribution between PoE devices is the result of negotiations. The YoctoHub-Ethernet tries to negotiate 9W (1.8A) from the device providing power on the cable. Make sure not to go above the power available on the power providing device. Refer to the specific device documentation for more details.
We recommend that you do not connect at the same time a PoE cable and a USB charger to your YoctoHub-Ethernet. This should not raise a major issue for a very temporary use, but for normal use you must select one or the other power source.
We recommend that you do not connect at the same time a PoE cable and a USB charger to your YoctoHub-Ethernet. This should not raise a major issue for a very temporary use, but for normal use you must select one or the other power source.
Sub-modules
The YoctoHub-Ethernet is able to drive all the Yoctopuce modules of the Yocto range. These modules can be directly connected to the down ports. They are automatically detected. For this, you need Micro-B Micro-B USB cables. Whether you use OTG cables or not does not matter.

Connecting sub-modules with USB cables
Alternatively, you can connect your modules by directly soldering electric cables between the YoctoHub-Ethernet and its sub-modules. Indeed, all the Yoctopuce modules have contacts designed for direct cabling. We recommend you to use solid coper ribbon cables, with a 1.27mm pitch. Solid copper ribbon cable is less supple than threaded cable but easier to solder. Pay particular attention to polarity: the YoctoHub-Ethernet, like all modules in the Yoctopuce range, is not protected against polarity inversion. Such an inversion would likely destroy your devices. Make sure the positions of the square contacts on both sides of the cable correspond.

Sub-module connection with ribbon cable
The YoctoHub-Ethernet is designed so that you can fix a single width module directly on top of it. To do so, you need screws, spacers10, and a 1.27mm pitch connector11. You can thus transform your USB Yoctopuce module into a network module while keeping a very compact format.

Fixing a module directly on the hub
Beware, the YoctoHub-Ethernet is designed to drive only Yoctopuce modules. Indeed, the protocol used between the YoctoHub-Ethernet and the sub-modules is not USB but a much lighter proprietary protocol. If, by chance, you connect a device other than a Yoctopuce module on one of the YoctoHub-Ethernet down ports, this port is automatically disabled to prevent damages to the device.
4. Assembly
This chapter provides important information regarding the use of the YoctoHub-Ethernet module in real-world situations. Make sure to read it carefully before going too far into your project if you want to avoid pitfalls.
4.1. Fixing
While developing your project, you can simply let the hub hang at the end of its cable. Check only that it does not come in contact with any conducting material (such as your tools). When your project is almost at an end, you need to find a way for your modules to stop moving around.

Examples of assembly on supports
The YoctoHub-Ethernet module contains 3mm assembly holes. You can use these holes for screws. The screw head diameter must not be larger than 8mm or the heads will damage the module circuits.
Make sure that the lower surface of the module is not in contact with the support. We recommend using spacers. You can fix the module in any position that suits you: however be aware that the YoctoHub-Ethernet electronic components, in particular the network part, generate heat. You must not let this heat accumulate.
4.2. Fixing a sub-module
The YoctoHub-Ethernet is designed so that you can screw a single width module directly on top of it. By single width, we mean modules with a 20mm width. All the single width modules have their 5 assembly holes and the USB socket in the same position. The sub-module can be assembled with screws and spacers. At the back of the YoctoHub-Ethernet and sub-module USB connectors, there are a set of 4 contacts enabling you to easily perform an electrical connection between the hub and the sub-module. If you do not feel sufficiently at ease with a soldering iron, you can also use a simple Micro-B Micro-B USB cable, OTG or not.

Fixing a module directly on the hub
Make sure to mount your module on the designed side, as illustrated above. The module 5 holes must correspond to the YoctoHub-Ethernet 5 holes, and the square contact on the module must be connected to the square contact on the YoctoHub-Ethernet down port. If you assemble a module on the other side or in another way, the connector polarity will be inverted and you risk to permanently damage your equipment.
All the accessories necessary to fix a module on your YoctoHub-Ethernet are relatively usual. You can find them on the Yoctopuce web site, as on most web sites selling electronic equipment. However, beware: the head of the screws used to assemble the sub-module must have a maximum head diameter of 4.5mm, otherwise they could damage the electronic components.
5. Configuring and testing the modules
Once installed and configured, YoctoHub-Ethernet allows you to test and configure your Yoctopuce modules. To do so, open you preferred web browser12. Open the Web UI of the YoctoHub-Ethernet, as described in chapter "First steps". The list of all the modules connected on the hub should appear.
YoctoHub-Ethernet web interface
At the bottom of the page, there are two buttons. The first button, Show debug information, enables you to display and then save all the information required to debug an issue linked to the YoctoHub-Ethernet, that is:
- The list of all detected modules
- The value of all the parameters of all the modules (without passwords).
- The logs of all the modules.
- The list of all the files uploaded on the modules, but not their content.
- The content of potential YoctoHub-Ethernet core dumps.
The second button, Show device functions, shows all the functions of the YoctoHub-Ethernet and of each of the modules connected to the YoctoHub-Ethernet.
5.1. Locating the modules
The main interface displays a line per connected module; if you have several modules of the same model, you can locate a specific module by clicking on the corresponding beacon button: it makes the blue led of the module start blinking and displays a blue disk at the beginning of the corresponding line in the interface. Pressing the Yocto-button of a connected module has the same effect.

Yocto-button (1) and localization led (2) of the Yocto-Meteo-V2 module.
These two elements are always placed in the same location, whatever the module.
5.2. Testing the modules
To test a module, simply click on the serial number of a module in the interface, a window specific to the module opens. This window generally allows you to activate the main functions of the module. Refer to the User's guide of the corresponding module for more details.
Usually, you do not need to have a version of the YoctoHub-Ethernet more recent than the module that you want to test/configure: most elements specific to the module interfaces are stored in the firmware of the modules themselves. There are however a few exceptions, so if you encounter an error in the web interface of a module, check if an update of YoctoHub-Ethernet is available and, if need be, install it. You may then need to reload the page in the browser with Shift-Reload, or to empty your browser cache, in order to force the update of the JavaScript code.
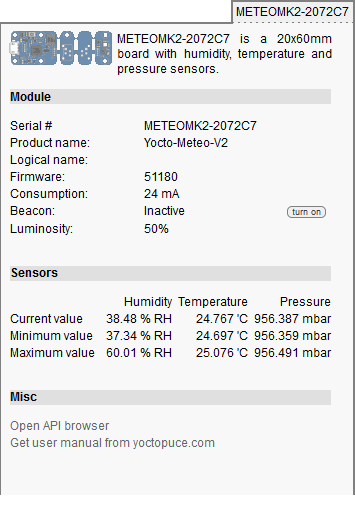
"Details" window of the Yocto-Meteo-V2 module
5.3. Configuring modules
You can configure a module by clicking on the corresponding configure button in the main interface. A window, specific to the module, then opens. This window allows you minimally to assign a logical name to the module and to update its firmware. Refer to the User's guide of the corresponding module for more details.
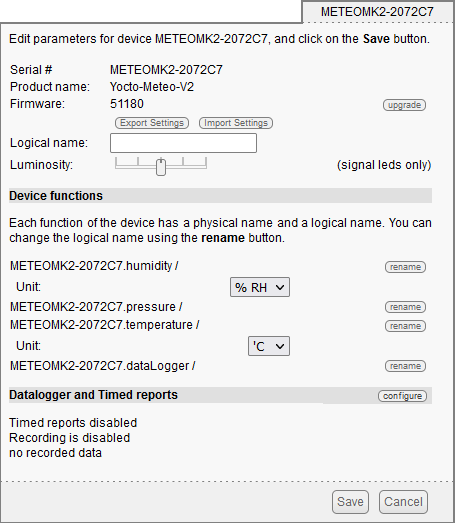
"Configuration" window of the Yocto-Meteo-V2 module
5.4. Upgrading firmware
The Yoctopuce modules are in fact real computers, they even contain a small web server. And, as all computers, it is possible to update their control software (firmware). New firmware for each module are regularly published, they generally allow you to add new features to the module, and/or to correct a hypothetical bug13.
Recommended method
To update a module firmware, in the YoctoHub-Ethernet interface, open the configuration window of the module that you want to update, then click on the upgrade button. If you simply click on the Update button, YoctoHub-Ethernet uses the most recent version of the firmware published on the Yoctopuce web site and installs it.
YoctoHub-Ethernet also allows you to chose a .byn file that you have downloaded previously from the Yoctopuce web site, for example to reinstall a previous version.
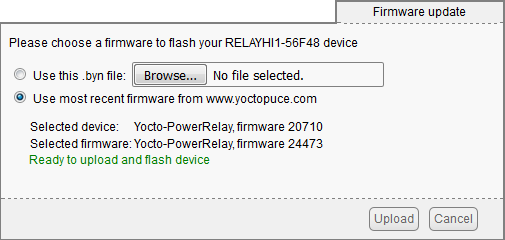
Firmware update window
When you have clicked on the Update button, everything is automatic. YoctoHub-Ethernet restarts the module in "update" mode, updates the firmware, then restarts the module in regular mode. The module configuration settings are preserved. Do not disconnect the module during the update process.
Alternative method
If a module update went wrong, in particular if the module was disconnected during the update process, there is a strong risk that it does not work anymore and that it does not appear in the module list. In this case, disconnect the module, wait a few seconds, and reconnect it while keeping the Yocto-button pressed. This starts the module in "update" mode. This working mode is protected against corruptions and should always be available. When the module is reconnected, request a refresh of the module list in the YoctoHub-Ethernet interface and your module should appear at the bottom of the interface. Click on it to update its firmware. This update method is a recovery method, it does not preserve the module settings.
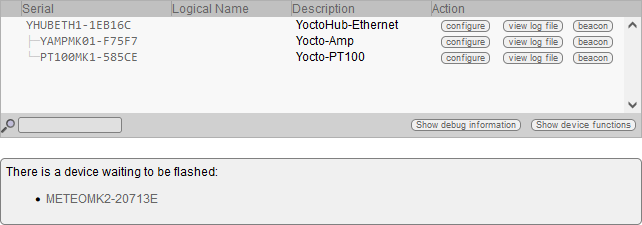
The modules in "update" mode are listed in the interface
A regular update preserves the module configuration, while the alternative method with the Yocto-button resets the module with its factory settings. This means that you can also use this method to completely reinitialize a module.
With a command line or by programming
All the command line tools can update Yoctopuce modules thanks to the downloadAndUpdate command. The module selection mechanism works like for a traditional command. The [target] is the name of the module that you want to update. You can also use the "any" or "all" aliases, or even a name list, where the names are separated by commas, without spaces.
The following example, using the Yoctopuce command line library, automatically downloads the latest available firmware files and updates all the Yoctopuce modules connected by USB:
C:\>YModule all downloadAndUpdate
ok: Yocto-PowerRelay RELAYHI1-266C8(rev=15430) is up to date.
ok: 0 / 0 hubs in 0.000000s.
ok: 0 / 0 shields in 0.000000s.
ok: 1 / 1 devices in 0.130000s 0.130000s per device.
ok: All devices are now up to date.
C:\>
The next example installs the LIGHTMK3.51180.byn firmware, locally stored in C:\tmp\yfirmware folder, on the module with serial number LIGHTMK3-23BBDF. Firmware files are available for manual download from Yoctopuce web server.14
C:\>ymodule LIGHTMK3-23BBDF updateFirmware C:\tmp\yfirmware\LIGHTMK3.51180.byn
OK: LIGHTMK3-23BBDF.module.updateFirmware = 36% Wait for device.
OK: LIGHTMK3-23BBDF.module.updateFirmware = 50% Flash zone.
OK: LIGHTMK3-23BBDF.module.updateFirmware = 57% Flash zone.
OK: LIGHTMK3-23BBDF.module.updateFirmware = 64% Flash zone.
OK: LIGHTMK3-23BBDF.module.updateFirmware = 72% Flash zone.
OK: LIGHTMK3-23BBDF.module.updateFirmware = 73% Device info retrieved.
OK: LIGHTMK3-23BBDF.module.updateFirmware = 90% Firmware updated.
OK: LIGHTMK3-23BBDF.module.updateFirmware = 100% success.
OK: LIGHTMK3-23BBDF.module.updateFirmware = 100% Firmware Updated Successfully in: 14.305s.
By default, downloadAndUpdate performs only upgrades to a newer firmware, as the default setting of the optional second parameter onlyNew is true. If you want to downgrade your firmware to an older version, you must provide the older firmware as the first parameter and set the second parameter to false.
It is also possible to update your modules' firmware using the Yoctopuce programming library, in particular using YModule.checkFirmware and YModule.updateFirmware methods. For more information, please refer to the advanced programming chapters in the documentation for each module.
5.5. Accessing the sensor data logger
For all Yoctopuce sensors including a data logger, the configuration window contains a specific section enabling you to configure the recording and to modify the raw data saved in the data logger, module per module.
Click on the configure button of the Datalogger and Timed reports section:
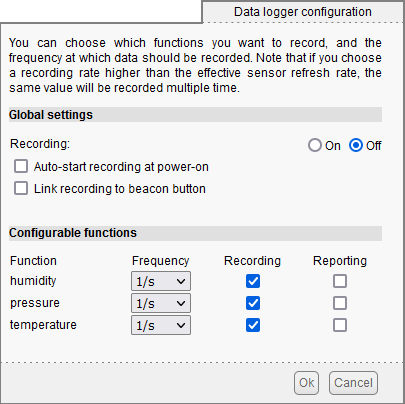
Data logger configuration window
You can also install as a YoctoHub-Ethernet plug-in the Yocto-Visualization (for Web) tool, which offers many more possibilities to visualize data as graphs, and to load a CSV file corresponding to all the connected sensors. For more details, read the section dedicated to the installation of Yocto-Visualization (for Web) at the end of this guide.
5.6. REST gateway
You can also use YoctoHub-Ethernet as a REST gateway. This consists in sending to the module HTTP requests through YoctoHub-Ethernet.
To test this feature, use the Open API Browser link available at the bottom of your module interface window, with a web browser:
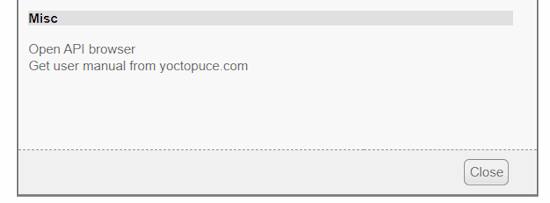
Link to open the REST interface
In the window that opens, you can modify each attribute of the module, using first the edit button and then the apply button to apply the changes:
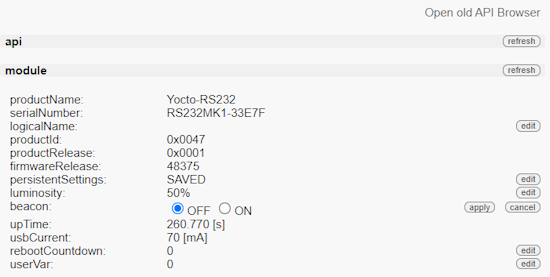
Manually changing an attribute
After you have performed a modification, if you go to the very bottom of the page, you can see the HTTP request which was sent to apply the requested modification:

Corresponding HTTP request
You can thus easily discover how to access the essential functions of our modules with HTTP requests: it is the whole interest of the REST interface. If the semantics of an attribute escapes you, you can always find explanations in the module user's guide.
5.7. OpenMetrics gateway (Prometheus)
You can also use YoctoHub-Ethernet as a data source for a Prometheus server, in order to centralize the measures from the Yoctopuce sensors in the same data base as the information on the state of IT infrastructures.
Prometheus data sources are called exporters: the idea is that each important system or service can make its vital data available to Prometheus, enabling the system administrator to collect and monitor them. Each exporter is an HTTP accessible URL, which provides data following the OpenMetrics standard: one measure per line, with conventions for naming and classifying, enabling system administrators to find their way among the hundreds of measures at disposal when configuring the dashboard.
YoctoHub-Ethernet has the capacity to be a native OpenMetrics exporter through the REST interface. To obtain data in the OpenMetrics format, you simply need to load the /api/services.om URL of your YoctoHub-Ethernet, that is http://127.0.0.1:4444/api/services.om. For example, if you access this URL when a few sensors are connected locally, you obtain something akin to this (we modified the presentation to make reading easier, but in reality each measure fits on a single line):
yocto_temperature_advertisedValue{
productName="Yocto-Thermocouple",
serialNumber="THRMCPL1-16397A",
deviceName="insideProbes",
functionId="temperature1"} 21.78
yocto_temperature_advertisedValue{
productName="Yocto-PT100",
serialNumber="PT100MK1-BA496",
functionId="temperature"} 28.57
yocto_temperature_advertisedValue{
productName="Yocto-RangeFinder",
serialNumber="YRNGFND1-1D1567",
deviceName="rf",
functionId="temperature1",
functionName="rfTemp"} 25.13
yocto_lightSensor_advertisedValue{
productName="Yocto-RangeFinder",
serialNumber="YRNGFND1-1D1567",
deviceName="rf",
functionId="lightSensor1"} 56
yocto_rangeFinder_advertisedValue{
productName="Yocto-RangeFinder",
serialNumber="YRNGFND1-1D1567",
deviceName="rf",
functionId="rangeFinder1"} 1456
# EOF
To tell Prometheus to collect these data directly from YoctoHub-Ethernet, you must add to your prometheus.yml a file section of this type:
- job_name: "yoctohub_sensors"
scrape_interval: 60s
metrics_path: "/api/services.om"
static_configs:
- targets: ['127.0.0.1:4444']
As our OpenMetrics exporter is embedded straight into the YoctoHub-Ethernet REST interface, you can use it to obtain more detailed information for each sensor, using a URL pointing to a specific sensor. For example, if you connect a
yocto_module_luminosity{...,functionId="module",functionName="tcProbes"} 50
yocto_module_beacon{...,functionId="module",functionName="tcProbes"} 0
yocto_module_usbCurrent_mA{...,functionId="module",functionName="tcProbes"} 23
yocto_module_rebootCountdown{...,functionId="module",functionName="tcProbes"} 0
yocto_module_userVar{...,functionId="module",functionName="tcProbes"} 0
yocto_temperature_currentValue_degC{[...],functionName="heatSink"} 21.99
yocto_temperature_lowestValue_degC{[...],functionName="heatSink"} 20.51
yocto_temperature_highestValue_degC{[...],functionName="heatSink"} 22.25
yocto_temperature_currentRawValue_degC{[...],functionName="heatSink"} 21.988
yocto_temperature_signalValue_mV{[...],functionName="heatSink"} -0.162
yocto_temperature_signalValue_mV{[...],functionId="temperature2"} 999.999
yocto_dataLogger_currentRunIndex{[...],functionId="dataLogger"} 0
yocto_dataLogger_autoStart{[...],functionId="dataLogger"} 0
yocto_dataLogger_beaconDriven{[...],functionId="dataLogger"} 0
yocto_dataLogger_usage{[...],functionId="dataLogger"} 0
# EOF
Thus, all the numerical attributes of the Yocto-Thermocouple are made available. You can therefore know the min/max values encountered, the voltage measured at the thermocouple terminal, and so on. Note also that in this case, the exported symbol includes the unit, as recommended by OpenMetrics. When the module detects that an input is not connected (like the temperature2 function above), metrics that cannot be computed are automatically deleted from the export so that Prometheus reports them as missing, rather than keeping the latest measured value.
To obtain these additional data per sensor, simply add to the prometheus.yml file a new section, referencing the sensor either by its serial number (bySerial) or by its logical name (byName):
- job_name: "thermocouple_probes"
scrape_interval: 60s
metrics_path: "/byName/tcProbes/api.om"
static_configs:
- targets: ['127.0.0.1:4444']
6. Access control
YoctoHub-Ethernet is able to perform access control to protect your Yoctopuce devices. Click on the Configure button on the line matching YoctoHub-Ethernet in the user interface.
Click on the configure button on the first line
This opens the configuration window for YoctoHub-Ethernet
YoctoHub-Ethernet configuration window
Access control can be configured from the Incoming connections section. There are two disctinct levels of access control
6.1. Admin access
The admin access locks write access to the Yoctopuce devices. When the admin password is set, only users using the admin login are allowed to configure the devices seen by YoctoHub-Ethernet as they want to.
6.2. User access
The user access locks all use of the Yoctopuce devices. When set, the user password prevents any user from consulting any device properties without the proper credentials.
If you configure a user password only, without configuring an admin password, all the user must give a password to access the modules, but once they are authenticated, they can also edit module configurations.
If you configure both user and admin passwords, users logging in with the user login are not able to modify the configurations of the modules seen by YoctoHub-Ethernet. user access enables access in read-only mode, that is only to consult the state of the modules. Only users using the admin login can change the configuration of the modules.
If you configure an admin access, without configuring a user access, users are still able to read your devices values without any password, but they wont be able to change any device setting. Only the users knowing the admin password can change module configurations.
6.3. Access control and API
Warning: access control has an impact on Yoctopuce API behavior when trying to connect to YoctoHub-Ethernet with access control enabled. With Yoctopuce API, access control is handled at the RegisterHub() level. You need to provide the YoctoHub-Ethernet address as follow: login:password@adresse:port, here is an exemple:
yRegisterHub("admin:mypass@127.0.0.1:4444",errmsg);
7. Outgoing connections
YoctoHub-Ethernet is able to connect to external services to communicate the status of the modules connected to it.
YoctoHub-Ethernet knows how to post its data in the format accepted by some third-party cloud services, such as
- Emoncms
- InfluxDB (versions 1.0 et 2.0)
- PRTG
- Valarm.net
YoctoHub-Ethernet can also connect to external services using advanced protocols that allow further interaction with the Yoctopuce devices, but which will require a little more knowledge to take advantage of them:
- MQTT
- Yocto-API
7.1. Configuration
To use this feature, just click on the configure button located on the line matching YoctoHub-Ethernet on the interface. Then look for the Outgoing calback section and click on the edit button.
Just click on the corresponding configure
Then edit the Outgoing callbacks section.
The callback configuration window shows up. This window allows you to define how YoctoHub-Ethernet interacts with an external web site. Several interaction types are at your disposal.
7.2. HTTP Callbacks to 3rd-party services
YoctoHub-Ethernet is able to post on external servers the values of the Yoctopuce sensors at regular intervals and/or whenever a value changes significantly. This feature allows you to store your measures and draw graphs without writing a single line of code.
Yoctopuce is in no way affiliated with these third-party services and can therefore neither guarantee their continuity nor propose improvements to these services.
Emoncms
Emoncms is an open-source Cloud service enabling you to post Yoctopuce sensor data and then to visualize them. You can also install your own local server.
The parameters that you must provide are the Emoncms API key, the node number that you want to use, as well as the address of the Emoncms server if you use a local server.
You can personalize the names linked to the measures posted on Emoncms. For more details, see the section "Names associated with posted values" below.
InfluxDB 1.0 and 2.0
InfluxDB is an open-source database specifically dedicated to storing temporal series of measures and events. Note that only local installations are supported. Indeed, the InfluxDB Cloud service is not supported as it requires an SSL connection.
Parameters for version 1.0 of InfluxDB are the address of the server and the name of the database.
Version 2.0 of InfluxDB uses a different API and Yoctopuce needs three parameters (organization, bucket, and token) as well as the server address.
You can personalize the names linked to the measures posted on InfluxDB. For more details, see the section "Names associated with posted values" below.
PRTG
PRTG is a commercial solution designed to supervise systems and applications. You can store measures and obtain graphs from your sensors with this service.
The required parameters are the address of the PRTG server and the token enabling the identification of YoctoHub-Ethernet.
You can personalize the names linked to the measures posted on PRTG. For more details, see the section "Names associated with posted values" below.
Valarm.net
Valarm is a professional cloud service that allows you to record data from Yoctopuce sensors but also allows you more elaborate functions such as the possibility to geolocate measures or to configure Yoctopuce modules remotely.
The only required parameter is a Routing code to identify YoctoHub-Ethernet.
7.3. Callbacks to an MQTT broker
MQTT is an Internet of Things protocol that allows sensors and actuators to communicate with each other via a central server called an MQTT broker. MQTT is particularly used in home automation, where it can federate many technologies to make them accessible to a central control system such as Home Assistant.
The basic parameters to provide for the MQTT callback configuration are the MQTT broker address, client ID, root_topic as well as authentication parameters. Note that encapsulation of the MQTT protocol in an SSL connection is not supported, which precludes its use with services like AWS IoT Core.
When an MQTT callback is active, YoctoHub-Ethernet is able to publish messages with the status of sensors and actuators, and receive command and configuration messages, allowing the central control system to fully interact with the devices.
The rest of this section describes in detail the supported MQTT messages. It will only be of interest to developers who want to build their own integration with Yoctopuce modules via MQTT. If you are just going to use Home Assistant, you can skip this section and thanks to the MQTT Discovery mechanism, your devices should automatically appear in Home Assistant.
Common format of all messages
The topic of all messages starts with a common part, which identifies the Yoctopuce module and the particular function of this module concerned by the message. It has the following structure:
root_topic/deviceName/functionName
The root_topic can be freely configured, for example to the yoctopuce value. If you connect several hubs to the same MQTT broker, you can either use the same root_topic for all of them or a different topic per hub. Using a separate root_topic is recommended if you send a lot of commands to a hub via MQTT.
deviceName is the logical name you gave to the designated Yoctopuce module. If no logical name has been configured, the serial number of the module is used instead of the logical name (e.g. METEOMK2-012345).
functionName is the logical name you gave to the designated function. If no logical name has been configured, the function identifier is used (for example genericSensor1).
The advantage of using logical names rather than hardware names in the topic root is that you can identify modules and functions by their role and you don't have to explicitly tell the hardware ID of each module to the MQTT client that has to interact with these modules. The disadvantage is that if you decide to change the logical name of your modules or functions without thinking about it, the MQTT topics used must be changed accordingly.
Topic /api: complete state of the function
Under root_topic/deviceName/functionName/api, each function publishes a JSON structure describing the complete state of the function, including all attributes. In this JSON encoding,
- booleans are represented by 0 and 1
- enumerated types are represented by numeric constants
- real numbers such as measures are represented as integers, after multiplication by 65536. They must therefore be divided by 65536.0 to obtain the actual value.
This message is issued when one of the following conditions occurs
- when the connection between the hub and the MQTT broker is established
- every five minutes
- after a change in the module configuration
- in response to the reception of a command by this function
- for the module function, when the beacon is activated or deactivated
Base topic: current state
Under root_topic/deviceName/functionName, each function publishes a textual summary of its status. This is not JSON but a simple string, corresponding to the value of the advertisedValue attribute of the function. For example, for a sensor, it corresponds to the current value of the sensor, while for a relay it corresponds to the letter A or B depending on the switching state.
This message is issued when one of the following conditions occurs
- when the connection between the hub and the MQTT broker is established
- every five minutes
- every time the advertisedValue attribute changes
To avoid overloading the MQTT broker with changes in the current values of the sensors, it is possible to globally disable the sending of current value messages for the sensors only, in the MQTT configuration.
Topics /avg, /min, /max: average and extreme values
Under root_topic/deviceName/functionName/avg, the sensor functions (subclasses of Sensor) periodically publish the average value observed during the previous time interval directly as a real number.
Under root_topic/deviceName/functionName/min, the minimum value observed during the previous time interval.
Under root_topic/deviceName/functionName/max, the maximum value observed during the previous time interval.
These messages are the direct equivalent of the timed reports documented in the user's guide of these modules. The time interval must have been previously configured in the reportFrequency attribute. Otherwise, these messages are not sent.
Topics /set/attributeName: command sending and configuration
Under root_topic/deviceName/functionName/set/attributeName, it is possible to send messages to modify the attributes of functions, in order to change a function state or configuration. The value of the message corresponds to the new desired value, as is. The format is identical to the one used for the REST gateway of YoctoHub-Ethernet (see the REST gateway section of this guide).
For example, we could switch a relay by sending a message to the topic
yoctopuce/PumpRelay/relay1/set/state
We could also trigger a 1500ms pulse on the same relay by sending a message to the topic
yoctopuce/PumpRelay/relay1/set/pulseTimer
To receive commands and configuration changes via MQTT, you must have explicitly enabled it in the MQTT configuration on the Yoctopuce hub. For safety, the basic behavior of the MQTT mode remains read-only.
Topic /rdy: availability status
Under root_topic/deviceName/module/rdy, the module function publishes a binary indication of the availability status of the device. The value is 1 when the module is online, and 0 when it is offline.
This message is published by the hub for its own module when one of the following conditions occurs
- when the hub establishes a connection with the MQTT broker
- when the hub disconnects from the MQTT broker
This message is published for devices other than the hub when one of the following conditions occurs
- when establishing the hub connection with the MQTT broker
- when a device is connected to the hub
- when a device is disconnected from the hub
To determine if a module is really reachable, it is therefore necessary to check its own /rdy topic, to know if it has been disconnected, and the /rdy topic of the hub, to know if the MQTT connection is active.
MQTT discovery
In addition, special messages are published under the topic homeassistant/ just after the connection of the hub with the MQTT broker is established, and repeated every 5 minutes, to allow the automatic detection of the proposed features, thanks to the MQTT discovery mechanism supported by Home Assistant and openHab.
7.4. Yocto-API callbacks
Yocto-API callbacks use a specific protocol defined by Yoctopuce, which allows a very advanced interaction with the Yoctopuce modules. Using languages such as PHP, TypeScript, JavaScript or Java, they allow the programmer of the web service to directly use the functions of the Yoctopuce programming library to interact with the modules that connect via HTTP callback. This allows you in particular to control from a public web site Yoctopuce modules installed behind a private ADSL router.You can for example switch the output of a relay depending on the value of a sensor, while keeping the complete control of the system on a web server.
Yoctopuce provides a free application that exploits to the maximum the possibilities of the Yocto-API callback on a PHP server: VirtualHub for Web. This web application allows you to interact remotely with modules that connect periodically via a Yocto-API callback. More information about VirtualHub for Web is available on the Yoctopuce blog 15.
In Yocto-API or Yocto-API-JZON callback mode, you can choose between the "HTTP" and "WebSocket" protocols.
Yocto-API callbacks in WebSocket mode
The communication flow in a standard HTTP request is extremely simple: the client sends a request, and then listens for the server reply. It is not a real conversation, rather just a question and an answer. The HTTP client cannot respond to what the server says without restarting a new separate communication.
However there is a provision in the HTTP 1.1 standard for the client to request an upgrade of the communication protocol. One such protocol upgrade widely supported is called WebSockets and is defined in RFC 6455. This upgrade transforms the simple text-based request/reply link into a bidirectional messaging link, that can send arbitrary data in both direction.
Upgrading an HTTP connection to WebSockets requires that both sides support the upgrade. YoctoHub-Ethernet and programming libraries do support it. But in order to upgrade an HTTP callback connection into a WebSocket callback, you also need to ensure that your web server supports WebSocket connection upgrade. This is well supported on Java and Node.JS. This is however not the case currently for PHP implementation on Apache.
WebSockets provide access to a number of advanced features of Yoctopuce API that were unavailable in HTTP callback mode:
- a WebSocket callback can browse and retrieve data from any Yoctopuce sensor built-in data logger.
- a WebSocket callback can use bidirectional communication functions with serial devices, for instance to execute MODBUS queries over a Yocto-RS485.
- a WebSocket callback can use value change callbacks and timed report callbacks to receive real-time and averaged measures from sensors.
- a WebSocket callback can keep long connections between a hub and a server, and handle interactive behaviors, since API calls are made in real time.
- a WebSocket callback can even perform a remote firmware upgrade.
7.5. User defined HTTP callbacks
If none of the other options for HTTP callback configuration suits your needs, you can try specifying how the data should be sent yourself. User defined callback allows you to customize the way YoctoHub-Ethernet sends information to the server. Note that only HTTP protocol is supported (no HTTPS).
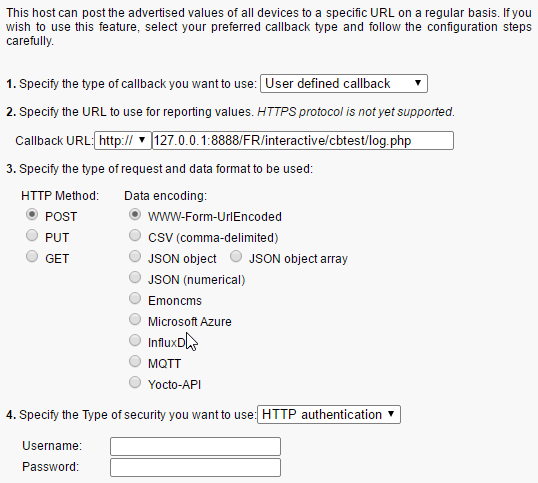
The callback configuration window
If you want to secure access to your callback script, you can setup a standard HTTP authentication on the web server. YoctoHub-Ethernet knows how to handle standard HTTP authentication schemes: simply provide the user and and password fields needed to access the URL. Both "Basic" and "Digest" authentication are supported. However, "Digest" authentication is highly recommended, since it uses a challenge mechanism that avoids sending the password itself over the Internet, and prevents replays.
As an example, here is a PHP script enabling you to visualize in the debug window the content of the data posted by a user-defined HTTP callback in POST and WWW-Form-UrlEncoded mode.
<?php
Print(Date('H:i:s')."\r\n");
foreach ($_POST as $key => $value) {
Print("$key=$value\r\n");
}
?>
You can personalize the names linked to the measures posted by a user-defined HTTP callback. For more details, see the section "Names associated with posted values" below.
7.6. Names associated with posted values
With the exception of Yocto-API callbacks which give access to all the information about the Yoctopuce modules, callbacks are designed to transmit only the most important information to the server, associating each value with a name that makes it easy to link it to its origin.
Basic behavior
Standard behavior is to transmit the value of the advertisedValue attribute for each function present on the Yoctopuce modules. The automatically associated name for each value follows this logic:
1. If the function has been given a logical name:
2. If the module has been given a logical name, but not the function:
3. If no logical name was set:
The easiest way to customize the names associated with the values is to configure the desired name as the logical name of the function, or otherwise as the logical name of the module itself.
Here is an example of data posted by a user-defined HTTP callback in POST mode and JSON (numerical) format for a system with a Yocto-Watt where each function has an explicit logical name (for example VoltageDC) and a Yocto-Meteo-V2 where the module itself was assigned the Ambient logical name:
{"timestamp":1678276738,
"CurrentAC":0
,"CurrentDC":0
,"VoltageAC":0
,"VoltageDC":0
,"Power":0
,"Ambient.temperature":22.17
,"Ambient.pressure":949.36
,"Ambient.humidity":30
}
Advanced customization with a file
If you wish to further customize the format of the transmitted data, to specifically select which attribute of which module should be sent under which name, or to add contextual information, it is also possible, but it is a little more complicated. To do so, you need to create a template file defining the exact format of the data to be sent. The content and the name of this file is specific to each type of HTTP callback, and each case is explained individually below.
The common point to all the template files is that their content is sent as is to the server, with the exception of expressions included between backquotes (or backticks, character `, ASCII code 96) which are evaluated by the REST gateway of YoctoHub-Ethernet (see the REST gateway section of this guide). For example, if the template file contains the text:
{ "origin": "`/api/module/productName`" }
then the content actually posted is
{ "origin": "YoctoHub-Ethernet" }
Customization file for Emoncms
The basic format used by YoctoHub-Ethernet for Emoncms has the form below. Note that the data is transmitted in the URL, therefore in a single line, but it has been put here on several lines to make it easier to read.
time=1678277614
&json={
"CurrentAC":0,
"CurrentDC":0,
"VoltageAC":0,
"VoltageDC":0,
"Power":0,
"Ambient.temperature":22.28,
"Ambient.pressure":949.54,
"Ambient.humidity":29.7
}
To customize the format of the data sent to Emoncms, you need to create a format template file on YoctoHub-Ethernet with the name EMONCMS_cb.fmt.
This file should be a single line, with no carriage returns, and start with a string of type &json=. For example, to post only the absolute and relative humidity, you could use (without carriage return!):
&json={
"absoluteHumidity"=`/byName/Ambient/api/humidity/absHum`,
"relativeHumidity"=`/byName/Ambient/api/humidity/relHum`
}
Customization file for InfluxDB
The basic format used by YoctoHub-Ethernet for InfluxDB has the format shown below. It associates all the values to a yoctopuce measure base and adds a name tag with the network name of YoctoHub-Ethernet and an ip tag with its IP address. Then each value is posted in a field whose name follows the basic convention described above. The data is transmitted by a CSV POST, in a single line, but it has been put here on several lines to facilitate reading.
yoctopuce,name=VIRTHUB0-12345678,ip=192.168.1.10
CurrentAC=0,CurrentDC=0,VoltageAC=0,VoltageDC=0,Power=0,
Ambient_temperature=22.5,Ambient_pressure=948.63,Ambient_humidity=29.4
1678281649
To customize the format of the data sent to InfluxDB, you must create on YoctoHub-Ethernet a format template file with the INFLUXDB_cb.fmt (version 1.0) or INFLUXDB_V2_cb.fmt (version 2.0) name.
This file can have several lines if you wish, which allows you to use different tags for different measures, or even to split measures over several databases.
For example, to post for absolute humidity and relative humidity , but with distinct tags, you could use the following format file:
humidity,type=relative,location=Library relHum=`/byName/Ambient/api/humidity/relHum`
humidity,type=absolute,location=Library absHum=`/byName/Ambient/api/humidity/absHum`
Note: InfluxDB servers accept carriage return only in the UNIX format (character \n, also called LF). If you edit the file on a Windows machine, take care to use a text editor able to not add the Windows carriage return (\r\n, also called CR LF).
Customization file for PRTG
The basic format used by YoctoHub-Ethernet for PRTG has the format below. It posts each value to a channel whose name follows the basic convention described earlier. The data is transmitted by a CSV POST, in a single line, but here they have been put on several lines to facilitate reading.
{"prtg":{"result":[
{"channel":"CurrentAC","value":"0","float":"1","DecimalMode":"All"}
,{"channel":"CurrentDC","value":"0","float":"1","DecimalMode":"All"}
,{"channel":"VoltageAC","value":"0","float":"1","DecimalMode":"All"}
,{"channel":"VoltageDC","value":"0","float":"1","DecimalMode":"All"}
,{"channel":"Power","value":"0","float":"1","DecimalMode":"All"}
,{"channel":"Ambient.temperature","value":"22.48","float":"1","DecimalMode":"All"}
,{"channel":"Ambient.pressure","value":"948.68","float":"1","DecimalMode":"All"}
,{"channel":"Ambient.humidity","value":"29.7","float":"1","DecimalMode":"All"}
]}}
To customize the format of the data sent to PRTG, you must create a format template file on YoctoHub-Ethernet with the PRTG_cb.fmt name.
This file must have at least the same first line and last line as the example above. However, the description of the channels can be completely customized.
For example, to post absolute humidity and relative humidity simultaneously, but in two distinct channels, you could use the following format file:
{"prtg":{"result":[
{"channel":"relHum","value":"`/byName/Ambient/api/humidity/relHum`",
"float":"1","DecimalMode":"All"},
{"channel":"absHum","value":"`/byName/Ambient/api/humidity/absHum`",
"float":"1","DecimalMode":"All"}
]}}
7.7. Scheduling callbacks
The callback scheduling section is present for all types of callbacks. It is the last section containing fields to be filled.
A first callback is always made just a few seconds after YoctoHub-Ethernet starts up. Subsequent callbacks are made according to the scheduling settings, which determine the callback frequency.
You can select between two planning methods: either by configuring the time interval between two subsequent callbacks, or by specifying an absolute periodicity, to obtain callbacks at fixed times. You can specify the interval between callbacks in seconds, minutes, or hours.
The interval between subsequent callbacks option allows you to specify the delay between each callback. That is, if you configure an interval of 5 minutes, YoctoHub-Ethernet waits 5 minutes before triggering the next callback. If the first callback is triggered at 12:03, the next one is executed at 12:08, and so on.
The absolute periodicity of callbacks option allows you to configure callbacks at a fixed time. That is, the callback is triggered every multiple of the configured delay. For example a delay of 5 minutes triggers callbacks at 8h00, 8h05, 8h10, and so on. Note that in this mode, it is also possible to specify an offset from the configured delay. For example with a 24 hour delay, it is possible to use an offset of 8h to trigger the callback every day at 8h in the morning.
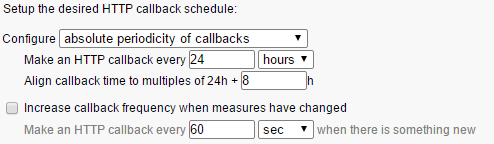
The callback scheduling parameters
You can explicitly select if you want the callback frequency to vary when no new measure is detected. This enables you to lower the minimal transmission frequency to lower the quantity of data sent over the network if nothing is happening.
Be aware that if you setup many hubs to each make an callback at the same time, you may create a load peak on your web server. So make sure to use an offset parameter to balance load over time.
7.8. Tests
In order to help you debug the process, YoctoHub-Ethernet can show you the answers to the callback sent by the web server. In the callback configuration window, click on the test button when all required fields are filled to open the test window.
The window shows you the actual state of the callback system to enable you to see, for example if a callback is currently running on the web server. In any case, while this window is open, no HTTP callback is automatically triggered. You can trigger callbacks manually by pressing on the Test button. Once triggered, the window displays the information returned by the web service, as in the example below:
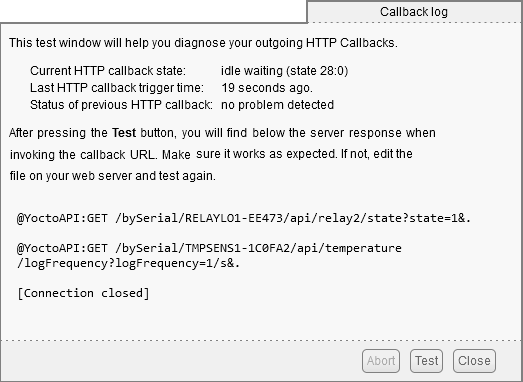
The result of the test callback with a Yocto-PowerRelay and a Yocto-Temperature
If the result meets your expectations, close the debug window and then click on the OK button.
7.9. Spontaneous connections
On top of the connections linked to outgoing callbacks described in the sections above, YoctoHub-Ethernet occasionally tries to establish outgoing connections. These connections are the following:
- DHCP connection: If the hub's IP address is configured to be assigned by DHCP, the YoctoHub-Ethernet makes periodic connections to the DHCP server specified in the hub configuration. If this connection cannot be made, the hub is assigned a default IP address.
- DNS connection: whenever YoctoHub-Ethernet needs to connect to an external server, it makes a connection to a DNS server to obtain the IP address corresponding to the name of the server it is about to contact. If these DNS connections cannot be made, the default NTP server cannot be contacted and HTTP callbacks only work if they are defined by an explicit IP address.
- NTP connection: to keep its internal clock synchronized, the hub regularly connects to an NTP server. You can change the address of this server by modifying the "ntpServer" option in the "network" function. If these NTP connections cannot be made, the hub's internal clock starts to drift.
- SSDP and Multicast DNS: the YoctoHub-Ethernet periodically performs SSDP and Multicast DNS announcements to notify its presence on the network. These connections can be disabled by modifying the "discoverable" attribute of the "network" function.
- Installing Yocto-Visualization (for web): When the user initiates the installation of Yocto-Visualization (for web) from the YoctoHub-Ethernet interface, the hub automatically downloads the most recent installation file from www.yoctopuce.com
- Version test: every time the property or configuration window of a module is opened, YoctoHub-Ethernet makes a request to www.yoctopuce.com to check if the module firmware is up to date. This query contains only the serial number of the module and is used to tell the user if a new firmware is available.
- Firmware download: Each time the firmware update window is opened, YoctoHub-Ethernet makes a request to www.yoctopuce.com to retrieve the most recent firmware. This connection saves the user from having to download the latest firmware manually.
Note that the last two connections are in fact established by the web browser displaying the YoctoHub-Ethernet user interface. Moreover, these connections are purely optional, if they cannot be established, the application continues to function normally.
Here is a table summarizing the exact parameters of these connections:
| Justification | Protocol Port | Target address | How to disable |
|---|---|---|---|
| Dynamic IP adress | DHCP UDP 67 | broadcast | configuring a static IP address |
| Name resolution | DNS UDP 53 | configured DNS server | configuring the IP address of the NTP server and defining callbacks by IP address |
| Updating the clock | NTP UDP 123 | 1.yoctopuce.pool.ntp.org or configured server |
setting the NTP server to 255.255.255.255 |
| Discovery | SSDP UDP 1900 | multicast 239.255.255.250 |
disabling discoverable |
| Discovery | MDNS UDP 5353 | multicast 224.0.0.251 |
disabling discoverable |
| Installing YV4web | HTTP TCP 80 | www.yoctopuce.com | do not use the quick link on the web interface |
| Version test | HTTPS TCP 443 | www.yoctopuce.com | do not use the YoctoHub-Ethernet web interface |
| Downloading firmware | HTTPS TCP 443 | www.yoctopuce.com | do not update through the web interface |
8. Personalizing the web interface
Your YoctoHub-Ethernet contains a small embedded file system, allowing it to store personalized files for its own use. You can manipulate the file system thanks to the yocto_files library. You can store there the files you want to. If need be, you can store a web application enabling you to manage modules connected to your YoctoHub-Ethernet.
8.1. Using the file system
Interactive use
The YoctoHub-Ethernet web interface provides a succinct interface to manipulate the content of the file system: simply click the configuration button corresponding to your module in the hub interface, then the manage files button. The files are listed and you can view them, erase them, or add new ones (downloads).
Because of its small size, the file system does not have an explicit concept of directories. You can nevertheless use the slash sign "/" inside file names to sort them as if they were in directories.
Programmed use
Use the yocto_files library to manage the file system. Basic functions are available:
- upload creates a new file on the module, with a content that you provide;
- get_list lists the files on the module, including their content size and CRC32;
- download retrieves in a variable the content of a file present on the module;
- remove erases a file from the module;
- format resets the file system to an empty, not fragmented state.
A piece of software using a well designed file system should always start by making sure that all the files necessary for its working are available on the module and, if needed, upload them on the module. We can thus transparently manage software updates and application deployment on new modules. To make file versions easier to detect, the get_list method returns for each file a 32 bit signature called CRC (Cyclic Redundancy Check) which identifies in a reliable manner the file content. Thus, if the file CRC corresponds, there is less than one chance over 4 billions that the content is not the correct one. You can even compute in advance in your software the CRC of the content you want, and therefore check it without having to download the files. The CRC function used by the Yoctopuce file system is the same as Ethernet, Gzip, PNG, etc. Its characteristic value for the nine character string "123456789" is 0xCBF43926.
HTTP use
You can access the files that your have downloaded on your YoctoHub-Ethernet by HTTP at the root of the module (at the same level as the REST API). This allows you to load personalized HTML and Javascript interface pages, for example. You cannot, however, replace the content of a file preloaded on the module, you can only add new ones.
UI and optimisation
Since you can store files on the hub file system, you can easily build a web application to control the devices connected to the hub and store it directly on the hub. This is a very convenient way to build system remote controlled by tablets or smart phones. However the web server embedded in the hub have limited connectivity capabilities: only a few number of sockets can be opened at the same time. Since most web browsers tend to open as many connection as they can to load all elements in a web page, this might lead to very long loading time. To prevent this, try to keep your UI pages as compact as possible by embedding the javascript, CSS code and if possible, images in base64 code.
8.2. Limitations
The file system embedded on your YoctoHub-Ethernet has some technical limitations:
- Its maximal storage space is 3.5Mo, allocated in blocks enabling to store up to about 800 files.
- Erasing a file does not necessarily immediately free all the space used by the file. The non freed space is completely reused if you create a new file with the same name, but not necessarily if you create files with a distinct name each time. For this reason, it is not recommended to automatically create files with distinct names.
- You can recover the complete non freed space with the format command which frees all the files.
- Each firmware update implicitly provokes a complete reformatting of the file system.
- As all flash memories, the memory used to store the files has a life of about 100'000 erasing cycles. It is enough, but it is not infinite. Make sure that you do not write and erase files uselessly and very quickly in a loop, or you may destroy your module.
9. Installing Yocto-Visualization (for web)
Yocto-Visualization (for web) is a small web application that allows you to easily visualize the values measured by Yoctopuce sensors.
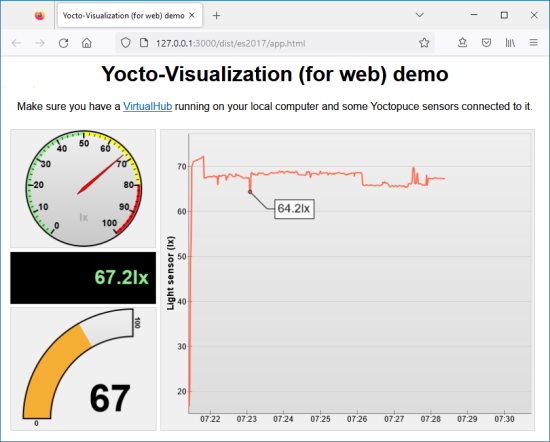
Yocto-Visualization (for web) interface
You can install Yocto-Visualization (for web) as a YoctoHub-Ethernet plug-in, directly through the YoctoHub-Ethernet web configuration interface.
To install Yocto-Visualization (for web) from the YoctoHub-Ethernet web interface
- In the YoctoHub-Ethernet interface, open the YoctoHub-Ethernet configuration window by clicking on configure.
- In the Network configuration section, opposite to Yocto-Visualization-4web, click on start installer.
- Then you only need to follow the steps by clicking on Next repeatedly and then on OK. Simply make sure that in the port is present only once in the Hub address field.
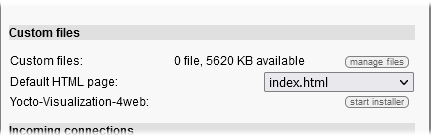
The Network configuration section from the YoctoHub-Ethernet configuration window
To use Yocto-Visualization (for web), please refer to the blog posts on the Yoctopuce web site.
10. Programming
10.1. Accessing connected modules
The YoctoHub-Ethernet behaves itself exactly like a computer running VirtualHub. The only difference between a program using the Yoctopuce API with modules in native USB and the same program with Yoctopuce modules connected to a YoctoHub-Ethernet is located at the level of the registerHub function call. To use USB modules connected natively, the registerHub parameter is usb. To use modules connected to a YoctoHub-Ethernet, you must simply replace this parameter by the IP address of the YoctoHub-Ethernet. For instance, in Delphi:
YAPI.RegisterHub("usb",errmsg);
becomes
YAPI.RegisterHub("192.168.0.10",errmsg); // The hub IP address is 192.168.0.10
10.2. Controlling the YoctoHub-Ethernet
From the programming API standpoint, the YoctoHub-Ethernet is a module like any other. You can perfectly manage it from the Yoctopuce API. To do so, you need the following classes:
Module
This class, shared by all Yoctopuce modules, enables you to control the module itself. You can drive the Yocto-led, know the USB power consumption of the YoctoHub-Ethernet, and so on.
Network
This class enables you to manage the network part of the YoctoHub-Ethernet. You can control the link state, read the MAC address, change the YoctoHub-Ethernet IP address, know the power consumption on PoE, and so on.
Hub
This class provides the connection status between the programming library and the YoctoHubs or VirtualHubs that have been registered.
HubPort
This class enables you to manage the hub part. You can enable or disable the YoctoHub-Ethernet ports, you can also know which module is connected to which port.
Files
This class enables you to access files stored in the flash memory of the YoctoHub-Ethernet. The YoctoHub-Ethernet contains a small file system which allows you to store, for example, a web application controlling the modules connected to the YoctoHub-Ethernet.
You can find some examples on how to drive the YoctoHub-Ethernet by software in the Yoctopuce programming libraries, available free of charge on the Yoctopuce web site.
11. High-level API Reference
This chapter summarizes the high-level API functions to drive your YoctoHub-Ethernet. Syntax and exact type names may vary from one language to another, but, unless otherwise stated, all the functions are available in every language. For detailed information regarding the types of arguments and return values for a given language, refer to the definition file for this language (yocto_api.* as well as the other yocto_* files that define the function interfaces).
For languages which support exceptions, all of these functions throw exceptions in case of error by default, rather than returning the documented error value for each function. This is by design, to facilitate debugging. It is however possible to disable the use of exceptions using the yDisableExceptions() function, in case you prefer to work with functions that return error values.
This chapter does not explain Yoctopuce programming concepts, in order to stay as concise as possible. You will find more details in the documentation of the devices you plan to connect to your YoctoHub-Ethernet.
11.1. Class YModule
Global parameters control interface for all Yoctopuce devices
The YModule class can be used with all Yoctopuce USB devices. It can be used to control the module global parameters, and to enumerate the functions provided by each module.
In order to use the functions described here, you should include:
js | <script type='text/javascript' src='yocto_api.js'></script> |
cpp | #include "yocto_api.h" |
m | #import "yocto_api.h" |
pas | uses yocto_api; |
vb | yocto_api.vb |
cs | yocto_api.cs |
java | import com.yoctopuce.YoctoAPI.YModule; |
uwp | import com.yoctopuce.YoctoAPI.YModule; |
py | from yocto_api import * |
php | require_once('yocto_api.php'); |
ts | in HTML: import { YAPI, YErrorMsg, YModule, YSensor } from '../../dist/esm/yocto_api_browser.js'; in Node.js: import { YAPI, YErrorMsg, YModule, YSensor } from 'yoctolib-cjs/yocto_api_nodejs.js'; |
es | in HTML: <script src="../../lib/yocto_api.js"></script> in node.js: require('yoctolib-es2017/yocto_api.js'); |
dnp | import YoctoProxyAPI.YModuleProxy |
cp | #include "yocto_module_proxy.h" |
vi | YModule.vi |
ml | import YoctoProxyAPI.YModuleProxy" |
| Global functions | |||||||||||||
|---|---|---|---|---|---|---|---|---|---|---|---|---|---|
| YModule.FindModule(func) | |||||||||||||
Allows you to find a module from its serial number or from its logical name. | |||||||||||||
| |||||||||||||
| YModule.FindModuleInContext(yctx, func) | |||||||||||||
Retrieves a module for a given identifier in a YAPI context. | |||||||||||||
| |||||||||||||
| YModule.FirstModule() | |||||||||||||
Starts the enumeration of modules currently accessible. | |||||||||||||
| |||||||||||||
| YModule properties | |||||||||||||
| module→Beacon [writable] | |||||||||||||
State of the localization beacon. | |||||||||||||
| |||||||||||||
| module→FirmwareRelease [read-only] | |||||||||||||
Version of the firmware embedded in the module. | |||||||||||||
| |||||||||||||
| module→FunctionId [read-only] | |||||||||||||
Retrieves the hardware identifier of the nth function on the module. | |||||||||||||
| |||||||||||||
| module→HardwareId [read-only] | |||||||||||||
Unique hardware identifier of the module. | |||||||||||||
| |||||||||||||
| module→IsOnline [read-only] | |||||||||||||
Checks if the module is currently reachable. | |||||||||||||
| |||||||||||||
| module→LogicalName [writable] | |||||||||||||
Logical name of the module. | |||||||||||||
| |||||||||||||
| module→Luminosity [writable] | |||||||||||||
Luminosity of the module informative LEDs (from 0 to 100). | |||||||||||||
| |||||||||||||
| module→ProductId [read-only] | |||||||||||||
USB device identifier of the module. | |||||||||||||
| |||||||||||||
| module→ProductName [read-only] | |||||||||||||
Commercial name of the module, as set by the factory. | |||||||||||||
| |||||||||||||
| module→ProductRelease [read-only] | |||||||||||||
Release number of the module hardware, preprogrammed at the factory. | |||||||||||||
| |||||||||||||
| module→SerialNumber [read-only] | |||||||||||||
Serial number of the module, as set by the factory. | |||||||||||||
| |||||||||||||
| YModule methods | |||||||||||||
| module→addFileToHTTPCallback(filename) | |||||||||||||
Adds a file to the uploaded data at the next HTTP callback. | |||||||||||||
| |||||||||||||
| module→checkFirmware(path, onlynew) | |||||||||||||
Tests whether the byn file is valid for this module. | |||||||||||||
| |||||||||||||
| module→clearCache() | |||||||||||||
Invalidates the cache. | |||||||||||||
| |||||||||||||
| module→describe() | |||||||||||||
Returns a descriptive text that identifies the module. | |||||||||||||
| |||||||||||||
| module→download(pathname) | |||||||||||||
Downloads the specified built-in file and returns a binary buffer with its content. | |||||||||||||
| |||||||||||||
| module→functionBaseType(functionIndex) | |||||||||||||
Retrieves the base type of the nth function on the module. | |||||||||||||
| |||||||||||||
| module→functionCount() | |||||||||||||
Returns the number of functions (beside the "module" interface) available on the module. | |||||||||||||
| |||||||||||||
| module→functionId(functionIndex) | |||||||||||||
Retrieves the hardware identifier of the nth function on the module. | |||||||||||||
| |||||||||||||
| module→functionName(functionIndex) | |||||||||||||
Retrieves the logical name of the nth function on the module. | |||||||||||||
| |||||||||||||
| module→functionType(functionIndex) | |||||||||||||
Retrieves the type of the nth function on the module. | |||||||||||||
| |||||||||||||
| module→functionValue(functionIndex) | |||||||||||||
Retrieves the advertised value of the nth function on the module. | |||||||||||||
| |||||||||||||
| module→get_allSettings() | |||||||||||||
Returns all the settings and uploaded files of the module. | |||||||||||||
| |||||||||||||
| module→get_beacon() | |||||||||||||
Returns the state of the localization beacon. | |||||||||||||
| |||||||||||||
| module→get_errorMessage() | |||||||||||||
Returns the error message of the latest error with this module object. | |||||||||||||
| |||||||||||||
| module→get_errorType() | |||||||||||||
Returns the numerical error code of the latest error with this module object. | |||||||||||||
| |||||||||||||
| module→get_firmwareRelease() | |||||||||||||
Returns the version of the firmware embedded in the module. | |||||||||||||
| |||||||||||||
| module→get_functionIds(funType) | |||||||||||||
Retrieve all hardware identifier that match the type passed in argument. | |||||||||||||
| |||||||||||||
| module→get_hardwareId() | |||||||||||||
Returns the unique hardware identifier of the module. | |||||||||||||
| |||||||||||||
| module→get_icon2d() | |||||||||||||
Returns the icon of the module. | |||||||||||||
| |||||||||||||
| module→get_lastLogs() | |||||||||||||
Returns a string with last logs of the module. | |||||||||||||
| |||||||||||||
| module→get_logicalName() | |||||||||||||
Returns the logical name of the module. | |||||||||||||
| |||||||||||||
| module→get_luminosity() | |||||||||||||
Returns the luminosity of the module informative LEDs (from 0 to 100). | |||||||||||||
| |||||||||||||
| module→get_parentHub() | |||||||||||||
Returns the serial number of the YoctoHub on which this module is connected. | |||||||||||||
| |||||||||||||
| module→get_persistentSettings() | |||||||||||||
Returns the current state of persistent module settings. | |||||||||||||
| |||||||||||||
| module→get_productId() | |||||||||||||
Returns the USB device identifier of the module. | |||||||||||||
| |||||||||||||
| module→get_productName() | |||||||||||||
Returns the commercial name of the module, as set by the factory. | |||||||||||||
| |||||||||||||
| module→get_productRelease() | |||||||||||||
Returns the release number of the module hardware, preprogrammed at the factory. | |||||||||||||
| |||||||||||||
| module→get_rebootCountdown() | |||||||||||||
Returns the remaining number of seconds before the module restarts, or zero when no reboot has been scheduled. | |||||||||||||
| |||||||||||||
| module→get_serialNumber() | |||||||||||||
Returns the serial number of the module, as set by the factory. | |||||||||||||
| |||||||||||||
| module→get_subDevices() | |||||||||||||
Returns a list of all the modules that are plugged into the current module. | |||||||||||||
| |||||||||||||
| module→get_upTime() | |||||||||||||
Returns the number of milliseconds spent since the module was powered on. | |||||||||||||
| |||||||||||||
| module→get_url() | |||||||||||||
Returns the URL used to access the module. | |||||||||||||
| |||||||||||||
| module→get_usbCurrent() | |||||||||||||
Returns the current consumed by the module on the USB bus, in milli-amps. | |||||||||||||
| |||||||||||||
| module→get_userData() | |||||||||||||
Returns the value of the userData attribute, as previously stored using method set_userData. | |||||||||||||
| |||||||||||||
| module→get_userVar() | |||||||||||||
Returns the value previously stored in this attribute. | |||||||||||||
| |||||||||||||
| module→hasFunction(funcId) | |||||||||||||
Tests if the device includes a specific function. | |||||||||||||
| |||||||||||||
| module→isOnline() | |||||||||||||
Checks if the module is currently reachable, without raising any error. | |||||||||||||
| |||||||||||||
| module→isOnline_async(callback, context) | |||||||||||||
Checks if the module is currently reachable, without raising any error. | |||||||||||||
|
| |||||||||||||
| module→load(msValidity) | |||||||||||||
Preloads the module cache with a specified validity duration. | |||||||||||||
| |||||||||||||
| module→load_async(msValidity, callback, context) | |||||||||||||
Preloads the module cache with a specified validity duration (asynchronous version). | |||||||||||||
|
| |||||||||||||
| module→log(text) | |||||||||||||
Adds a text message to the device logs. | |||||||||||||
| |||||||||||||
| module→nextModule() | |||||||||||||
Continues the module enumeration started using yFirstModule(). | |||||||||||||
| |||||||||||||
| module→reboot(secBeforeReboot) | |||||||||||||
Schedules a simple module reboot after the given number of seconds. | |||||||||||||
| |||||||||||||
| module→registerBeaconCallback(callback) | |||||||||||||
Register a callback function, to be called when the localization beacon of the module has been changed. | |||||||||||||
| |||||||||||||
| module→registerConfigChangeCallback(callback) | |||||||||||||
Register a callback function, to be called when a persistent settings in a device configuration has been changed (e.g. | |||||||||||||
| |||||||||||||
| module→registerLogCallback(callback) | |||||||||||||
Registers a device log callback function. | |||||||||||||
| |||||||||||||
| module→revertFromFlash() | |||||||||||||
Reloads the settings stored in the nonvolatile memory, as when the module is powered on. | |||||||||||||
| |||||||||||||
| module→saveToFlash() | |||||||||||||
Saves current settings in the nonvolatile memory of the module. | |||||||||||||
| |||||||||||||
| module→set_allSettings(settings) | |||||||||||||
Restores all the settings of the device. | |||||||||||||
| |||||||||||||
| module→set_allSettingsAndFiles(settings) | |||||||||||||
Restores all the settings and uploaded files to the module. | |||||||||||||
| |||||||||||||
| module→set_beacon(newval) | |||||||||||||
Turns on or off the module localization beacon. | |||||||||||||
| |||||||||||||
| module→set_logicalName(newval) | |||||||||||||
Changes the logical name of the module. | |||||||||||||
| |||||||||||||
| module→set_luminosity(newval) | |||||||||||||
Changes the luminosity of the module informative leds. | |||||||||||||
| |||||||||||||
| module→set_userData(data) | |||||||||||||
Stores a user context provided as argument in the userData attribute of the function. | |||||||||||||
| |||||||||||||
| module→set_userVar(newval) | |||||||||||||
Stores a 32 bit value in the device RAM. | |||||||||||||
| |||||||||||||
| module→triggerConfigChangeCallback() | |||||||||||||
Triggers a configuration change callback, to check if they are supported or not. | |||||||||||||
| |||||||||||||
| module→triggerFirmwareUpdate(secBeforeReboot) | |||||||||||||
Schedules a module reboot into special firmware update mode. | |||||||||||||
| |||||||||||||
| module→updateFirmware(path) | |||||||||||||
Prepares a firmware update of the module. | |||||||||||||
| |||||||||||||
| module→updateFirmwareEx(path, force) | |||||||||||||
Prepares a firmware update of the module. | |||||||||||||
| |||||||||||||
| module→wait_async(callback, context) | |||||||||||||
Waits for all pending asynchronous commands on the module to complete, and invoke the user-provided callback function. | |||||||||||||
|
11.2. Class YNetwork
Network interface control interface, available for instance in the YoctoHub-Ethernet, the YoctoHub-GSM-4G, the YoctoHub-Wireless-SR or the YoctoHub-Wireless-n
YNetwork objects provide access to TCP/IP parameters of Yoctopuce devices that include a built-in network interface.
In order to use the functions described here, you should include:
es | in HTML: <script src="../../lib/yocto_network.js"></script> in node.js: require('yoctolib-es2017/yocto_network.js'); |
js | <script type='text/javascript' src='yocto_network.js'></script> |
cpp | #include "yocto_network.h" |
m | #import "yocto_network.h" |
pas | uses yocto_network; |
vb | yocto_network.vb |
cs | yocto_network.cs |
java | import com.yoctopuce.YoctoAPI.YNetwork; |
uwp | import com.yoctopuce.YoctoAPI.YNetwork; |
py | from yocto_network import * |
php | require_once('yocto_network.php'); |
ts | in HTML: import { YNetwork } from '../../dist/esm/yocto_network.js'; in Node.js: import { YNetwork } from 'yoctolib-cjs/yocto_network.js'; |
dnp | import YoctoProxyAPI.YNetworkProxy |
cp | #include "yocto_network_proxy.h" |
vi | YNetwork.vi |
ml | import YoctoProxyAPI.YNetworkProxy |
| Global functions | |||||||||||||
|---|---|---|---|---|---|---|---|---|---|---|---|---|---|
| YNetwork.FindNetwork(func) | |||||||||||||
Retrieves a network interface for a given identifier. | |||||||||||||
| |||||||||||||
| YNetwork.FindNetworkInContext(yctx, func) | |||||||||||||
Retrieves a network interface for a given identifier in a YAPI context. | |||||||||||||
| |||||||||||||
| YNetwork.FirstNetwork() | |||||||||||||
Starts the enumeration of network interfaces currently accessible. | |||||||||||||
| |||||||||||||
| YNetwork.FirstNetworkInContext(yctx) | |||||||||||||
Starts the enumeration of network interfaces currently accessible. | |||||||||||||
| |||||||||||||
| YNetwork.GetSimilarFunctions() | |||||||||||||
Enumerates all functions of type Network available on the devices currently reachable by the library, and returns their unique hardware ID. | |||||||||||||
| |||||||||||||
| YNetwork properties | |||||||||||||
| network→AdminPassword [writable] | |||||||||||||
Hash string if a password has been set for user "admin", or an empty string otherwise. | |||||||||||||
| |||||||||||||
| network→AdvertisedValue [read-only] | |||||||||||||
Short string representing the current state of the function. | |||||||||||||
| |||||||||||||
| network→CallbackCredentials [writable] | |||||||||||||
Hashed version of the notification callback credentials if set, or an empty string otherwise. | |||||||||||||
| |||||||||||||
| network→CallbackEncoding [writable] | |||||||||||||
Encoding standard to use for representing notification values. | |||||||||||||
| |||||||||||||
| network→CallbackInitialDelay [writable] | |||||||||||||
Initial waiting time before first callback notifications, in seconds. | |||||||||||||
| |||||||||||||
| network→CallbackMaxDelay [writable] | |||||||||||||
Waiting time between two HTTP callbacks when there is nothing new. | |||||||||||||
| |||||||||||||
| network→CallbackMethod [writable] | |||||||||||||
HTTP method used to notify callbacks for significant state changes. | |||||||||||||
| |||||||||||||
| network→CallbackMinDelay [writable] | |||||||||||||
Minimum waiting time between two HTTP callbacks, in seconds. | |||||||||||||
| |||||||||||||
| network→CallbackSchedule [writable] | |||||||||||||
HTTP callback schedule strategy, as a text string. | |||||||||||||
| |||||||||||||
| network→CallbackTemplate [writable] | |||||||||||||
Activation state of the custom template file to customize callback format. | |||||||||||||
| |||||||||||||
| network→CallbackUrl [writable] | |||||||||||||
Callback URL to notify of significant state changes. | |||||||||||||
| |||||||||||||
| network→DefaultPage [writable] | |||||||||||||
HTML page to serve for the URL "/"" of the hub. | |||||||||||||
| |||||||||||||
| network→Discoverable [writable] | |||||||||||||
Activation state of the multicast announce protocols to allow easy discovery of the module in the network neighborhood (uPnP/Bonjour protocol). | |||||||||||||
| |||||||||||||
| network→FriendlyName [read-only] | |||||||||||||
Global identifier of the function in the format MODULE_NAME.FUNCTION_NAME. | |||||||||||||
| |||||||||||||
| network→FunctionId [read-only] | |||||||||||||
Hardware identifier of the network interface, without reference to the module. | |||||||||||||
| |||||||||||||
| network→HardwareId [read-only] | |||||||||||||
Unique hardware identifier of the function in the form SERIAL.FUNCTIONID. | |||||||||||||
| |||||||||||||
| network→HttpPort [writable] | |||||||||||||
TCP port used to serve the hub web UI. | |||||||||||||
| |||||||||||||
| network→IpAddress [read-only] | |||||||||||||
IP address currently in use by the device. | |||||||||||||
| |||||||||||||
| network→IsOnline [read-only] | |||||||||||||
Checks if the function is currently reachable. | |||||||||||||
| |||||||||||||
| network→LogicalName [writable] | |||||||||||||
Logical name of the function. | |||||||||||||
| |||||||||||||
| network→MacAddress [read-only] | |||||||||||||
MAC address of the network interface. | |||||||||||||
| |||||||||||||
| network→NtpServer [writable] | |||||||||||||
IP address of the NTP server to be used by the device. | |||||||||||||
| |||||||||||||
| network→PrimaryDNS [writable] | |||||||||||||
IP address of the primary name server to be used by the module. | |||||||||||||
| |||||||||||||
| network→Readiness [read-only] | |||||||||||||
Current established working mode of the network interface. | |||||||||||||
| |||||||||||||
| network→SecondaryDNS [writable] | |||||||||||||
IP address of the secondary name server to be used by the module. | |||||||||||||
| |||||||||||||
| network→SerialNumber [read-only] | |||||||||||||
Serial number of the module, as set by the factory. | |||||||||||||
| |||||||||||||
| network→UserPassword [writable] | |||||||||||||
Hash string if a password has been set for "user" user, or an empty string otherwise. | |||||||||||||
| |||||||||||||
| network→WwwWatchdogDelay [writable] | |||||||||||||
Allowed downtime of the WWW link (in seconds) before triggering an automated reboot to try to recover Internet connectivity. | |||||||||||||
| |||||||||||||
| YNetwork methods | |||||||||||||
| network→callbackLogin(username, password) | |||||||||||||
Connects to the notification callback and saves the credentials required to log into it. | |||||||||||||
| |||||||||||||
| network→clearCache() | |||||||||||||
Invalidates the cache. | |||||||||||||
| |||||||||||||
| network→describe() | |||||||||||||
Returns a short text that describes unambiguously the instance of the network interface in the form TYPE(NAME)=SERIAL.FUNCTIONID. | |||||||||||||
| |||||||||||||
| network→get_adminPassword() | |||||||||||||
Returns a hash string if a password has been set for user "admin", or an empty string otherwise. | |||||||||||||
| |||||||||||||
| network→get_advertisedValue() | |||||||||||||
Returns the current value of the network interface (no more than 6 characters). | |||||||||||||
| |||||||||||||
| network→get_callbackCredentials() | |||||||||||||
Returns a hashed version of the notification callback credentials if set, or an empty string otherwise. | |||||||||||||
| |||||||||||||
| network→get_callbackEncoding() | |||||||||||||
Returns the encoding standard to use for representing notification values. | |||||||||||||
| |||||||||||||
| network→get_callbackInitialDelay() | |||||||||||||
Returns the initial waiting time before first callback notifications, in seconds. | |||||||||||||
| |||||||||||||
| network→get_callbackMaxDelay() | |||||||||||||
Returns the waiting time between two HTTP callbacks when there is nothing new. | |||||||||||||
| |||||||||||||
| network→get_callbackMethod() | |||||||||||||
Returns the HTTP method used to notify callbacks for significant state changes. | |||||||||||||
| |||||||||||||
| network→get_callbackMinDelay() | |||||||||||||
Returns the minimum waiting time between two HTTP callbacks, in seconds. | |||||||||||||
| |||||||||||||
| network→get_callbackSchedule() | |||||||||||||
Returns the HTTP callback schedule strategy, as a text string. | |||||||||||||
| |||||||||||||
| network→get_callbackTemplate() | |||||||||||||
Returns the activation state of the custom template file to customize callback format. | |||||||||||||
| |||||||||||||
| network→get_callbackUrl() | |||||||||||||
Returns the callback URL to notify of significant state changes. | |||||||||||||
| |||||||||||||
| network→get_currentDNS() | |||||||||||||
Returns the IP address of the DNS server currently used by the device. | |||||||||||||
| |||||||||||||
| network→get_defaultPage() | |||||||||||||
Returns the HTML page to serve for the URL "/"" of the hub. | |||||||||||||
| |||||||||||||
| network→get_discoverable() | |||||||||||||
Returns the activation state of the multicast announce protocols to allow easy discovery of the module in the network neighborhood (uPnP/Bonjour protocol). | |||||||||||||
| |||||||||||||
| network→get_errorMessage() | |||||||||||||
Returns the error message of the latest error with the network interface. | |||||||||||||
| |||||||||||||
| network→get_errorType() | |||||||||||||
Returns the numerical error code of the latest error with the network interface. | |||||||||||||
| |||||||||||||
| network→get_friendlyName() | |||||||||||||
Returns a global identifier of the network interface in the format MODULE_NAME.FUNCTION_NAME. | |||||||||||||
| |||||||||||||
| network→get_functionDescriptor() | |||||||||||||
Returns a unique identifier of type YFUN_DESCR corresponding to the function. | |||||||||||||
| |||||||||||||
| network→get_functionId() | |||||||||||||
Returns the hardware identifier of the network interface, without reference to the module. | |||||||||||||
| |||||||||||||
| network→get_hardwareId() | |||||||||||||
Returns the unique hardware identifier of the network interface in the form SERIAL.FUNCTIONID. | |||||||||||||
| |||||||||||||
| network→get_httpPort() | |||||||||||||
Returns the TCP port used to serve the hub web UI. | |||||||||||||
| |||||||||||||
| network→get_ipAddress() | |||||||||||||
Returns the IP address currently in use by the device. | |||||||||||||
| |||||||||||||
| network→get_ipConfig() | |||||||||||||
Returns the IP configuration of the network interface. | |||||||||||||
| |||||||||||||
| network→get_logicalName() | |||||||||||||
Returns the logical name of the network interface. | |||||||||||||
| |||||||||||||
| network→get_macAddress() | |||||||||||||
Returns the MAC address of the network interface. | |||||||||||||
| |||||||||||||
| network→get_module() | |||||||||||||
Gets the YModule object for the device on which the function is located. | |||||||||||||
| |||||||||||||
| network→get_module_async(callback, context) | |||||||||||||
Gets the YModule object for the device on which the function is located (asynchronous version). | |||||||||||||
|
| |||||||||||||
| network→get_ntpServer() | |||||||||||||
Returns the IP address of the NTP server to be used by the device. | |||||||||||||
| |||||||||||||
| network→get_poeCurrent() | |||||||||||||
Returns the current consumed by the module from Power-over-Ethernet (PoE), in milliamps. | |||||||||||||
| |||||||||||||
| network→get_primaryDNS() | |||||||||||||
Returns the IP address of the primary name server to be used by the module. | |||||||||||||
| |||||||||||||
| network→get_readiness() | |||||||||||||
Returns the current established working mode of the network interface. | |||||||||||||
| |||||||||||||
| network→get_router() | |||||||||||||
Returns the IP address of the router on the device subnet (default gateway). | |||||||||||||
| |||||||||||||
| network→get_secondaryDNS() | |||||||||||||
Returns the IP address of the secondary name server to be used by the module. | |||||||||||||
| |||||||||||||
| network→get_serialNumber() | |||||||||||||
Returns the serial number of the module, as set by the factory. | |||||||||||||
| |||||||||||||
| network→get_subnetMask() | |||||||||||||
Returns the subnet mask currently used by the device. | |||||||||||||
| |||||||||||||
| network→get_userData() | |||||||||||||
Returns the value of the userData attribute, as previously stored using method set_userData. | |||||||||||||
| |||||||||||||
| network→get_userPassword() | |||||||||||||
Returns a hash string if a password has been set for "user" user, or an empty string otherwise. | |||||||||||||
| |||||||||||||
| network→get_wwwWatchdogDelay() | |||||||||||||
Returns the allowed downtime of the WWW link (in seconds) before triggering an automated reboot to try to recover Internet connectivity. | |||||||||||||
| |||||||||||||
| network→isOnline() | |||||||||||||
Checks if the network interface is currently reachable, without raising any error. | |||||||||||||
| |||||||||||||
| network→isOnline_async(callback, context) | |||||||||||||
Checks if the network interface is currently reachable, without raising any error (asynchronous version). | |||||||||||||
|
| |||||||||||||
| network→isReadOnly() | |||||||||||||
Indicates whether changes to the function are prohibited or allowed. | |||||||||||||
| |||||||||||||
| network→load(msValidity) | |||||||||||||
Preloads the network interface cache with a specified validity duration. | |||||||||||||
| |||||||||||||
| network→loadAttribute(attrName) | |||||||||||||
Returns the current value of a single function attribute, as a text string, as quickly as possible but without using the cached value. | |||||||||||||
| |||||||||||||
| network→load_async(msValidity, callback, context) | |||||||||||||
Preloads the network interface cache with a specified validity duration (asynchronous version). | |||||||||||||
|
| |||||||||||||
| network→muteValueCallbacks() | |||||||||||||
Disables the propagation of every new advertised value to the parent hub. | |||||||||||||
| |||||||||||||
| network→nextNetwork() | |||||||||||||
Continues the enumeration of network interfaces started using yFirstNetwork(). | |||||||||||||
| |||||||||||||
| network→ping(host) | |||||||||||||
Pings host to test the network connectivity. | |||||||||||||
| |||||||||||||
| network→registerValueCallback(callback) | |||||||||||||
Registers the callback function that is invoked on every change of advertised value. | |||||||||||||
| |||||||||||||
| network→set_adminPassword(newval) | |||||||||||||
Changes the password for the "admin" user. | |||||||||||||
| |||||||||||||
| network→set_callbackCredentials(newval) | |||||||||||||
Changes the credentials required to connect to the callback address. | |||||||||||||
| |||||||||||||
| network→set_callbackEncoding(newval) | |||||||||||||
Changes the encoding standard to use for representing notification values. | |||||||||||||
| |||||||||||||
| network→set_callbackInitialDelay(newval) | |||||||||||||
Changes the initial waiting time before first callback notifications, in seconds. | |||||||||||||
| |||||||||||||
| network→set_callbackMaxDelay(newval) | |||||||||||||
Changes the waiting time between two HTTP callbacks when there is nothing new. | |||||||||||||
| |||||||||||||
| network→set_callbackMethod(newval) | |||||||||||||
Changes the HTTP method used to notify callbacks for significant state changes. | |||||||||||||
| |||||||||||||
| network→set_callbackMinDelay(newval) | |||||||||||||
Changes the minimum waiting time between two HTTP callbacks, in seconds. | |||||||||||||
| |||||||||||||
| network→set_callbackSchedule(newval) | |||||||||||||
Changes the HTTP callback schedule strategy, as a text string. | |||||||||||||
| |||||||||||||
| network→set_callbackTemplate(newval) | |||||||||||||
Enable the use of a template file to customize callbacks format. | |||||||||||||
| |||||||||||||
| network→set_callbackUrl(newval) | |||||||||||||
Changes the callback URL to notify significant state changes. | |||||||||||||
| |||||||||||||
| network→set_defaultPage(newval) | |||||||||||||
Changes the default HTML page returned by the hub. | |||||||||||||
| |||||||||||||
| network→set_discoverable(newval) | |||||||||||||
Changes the activation state of the multicast announce protocols to allow easy discovery of the module in the network neighborhood (uPnP/Bonjour protocol). | |||||||||||||
| |||||||||||||
| network→set_httpPort(newval) | |||||||||||||
Changes the the TCP port used to serve the hub web UI. | |||||||||||||
| |||||||||||||
| network→set_logicalName(newval) | |||||||||||||
Changes the logical name of the network interface. | |||||||||||||
| |||||||||||||
| network→set_ntpServer(newval) | |||||||||||||
Changes the IP address of the NTP server to be used by the module. | |||||||||||||
| |||||||||||||
| network→set_periodicCallbackSchedule(interval, offset) | |||||||||||||
Setup periodic HTTP callbacks (simplified function). | |||||||||||||
| |||||||||||||
| network→set_primaryDNS(newval) | |||||||||||||
Changes the IP address of the primary name server to be used by the module. | |||||||||||||
| |||||||||||||
| network→set_secondaryDNS(newval) | |||||||||||||
Changes the IP address of the secondary name server to be used by the module. | |||||||||||||
| |||||||||||||
| network→set_userData(data) | |||||||||||||
Stores a user context provided as argument in the userData attribute of the function. | |||||||||||||
| |||||||||||||
| network→set_userPassword(newval) | |||||||||||||
Changes the password for the "user" user. | |||||||||||||
| |||||||||||||
| network→set_wwwWatchdogDelay(newval) | |||||||||||||
Changes the allowed downtime of the WWW link (in seconds) before triggering an automated reboot to try to recover Internet connectivity. | |||||||||||||
| |||||||||||||
| network→triggerCallback() | |||||||||||||
Trigger an HTTP callback quickly. | |||||||||||||
| |||||||||||||
| network→unmuteValueCallbacks() | |||||||||||||
Re-enables the propagation of every new advertised value to the parent hub. | |||||||||||||
| |||||||||||||
| network→useDHCP(fallbackIpAddr, fallbackSubnetMaskLen, fallbackRouter) | |||||||||||||
Changes the configuration of the network interface to enable the use of an IP address received from a DHCP server. | |||||||||||||
| |||||||||||||
| network→useDHCPauto() | |||||||||||||
Changes the configuration of the network interface to enable the use of an IP address received from a DHCP server. | |||||||||||||
| |||||||||||||
| network→useStaticIP(ipAddress, subnetMaskLen, router) | |||||||||||||
Changes the configuration of the network interface to use a static IP address. | |||||||||||||
| |||||||||||||
| network→wait_async(callback, context) | |||||||||||||
Waits for all pending asynchronous commands on the module to complete, and invoke the user-provided callback function. | |||||||||||||
|
11.3. Class YHub
In order to use the functions described here, you should include:
js | <script type='text/javascript' src='yocto_module.js'></script> |
cpp | #include "yocto_module.h" |
m | #import "yocto_module.h" |
pas | uses yocto_module; |
vb | yocto_module.vb |
cs | yocto_module.cs |
java | import com.yoctopuce.YoctoAPI.YHub; |
uwp | import com.yoctopuce.YoctoAPI.YHub; |
py | from yocto_module import * |
php | require_once('yocto_module.php'); |
ts | in HTML: import { YHub } from '../../dist/esm/yocto_module.js'; in Node.js: import { YHub } from 'yoctolib-cjs/yocto_module.js'; |
es | in HTML: <script src="../../lib/yocto_module.js"></script> in node.js: require('yoctolib-es2017/yocto_module.js'); |
dnp | import YoctoProxyAPI.YHubProxy |
cp | #include "yocto_module_proxy.h" |
ml | import YoctoProxyAPI.YHubProxy |
| Global functions | ||||||||||||
|---|---|---|---|---|---|---|---|---|---|---|---|---|
| YHub.FirstHubInUse() | ||||||||||||
Starts the enumeration of hubs currently in use by the API. | ||||||||||||
| ||||||||||||
| YHub.FirstHubInUseInContext(yctx) | ||||||||||||
Starts the enumeration of hubs currently in use by the API in a given YAPI context. | ||||||||||||
| ||||||||||||
| YHub methods | ||||||||||||
| hub→get_connectionUrl() | ||||||||||||
Returns the URL currently in use to communicate with this hub. | ||||||||||||
| ||||||||||||
| hub→get_errorMessage() | ||||||||||||
Returns the error message of the latest error with the hub. | ||||||||||||
| ||||||||||||
| hub→get_errorType() | ||||||||||||
Returns the numerical error code of the latest error with the hub. | ||||||||||||
| ||||||||||||
| hub→get_knownUrls() | ||||||||||||
Returns all known URLs that have been used to register this hub. | ||||||||||||
| ||||||||||||
| hub→get_networkTimeout() | ||||||||||||
Returns the network connection delay for this hub. | ||||||||||||
| ||||||||||||
| hub→get_registeredUrl() | ||||||||||||
Returns the URL that has been used first to register this hub. | ||||||||||||
| ||||||||||||
| hub→get_serialNumber() | ||||||||||||
Returns the hub serial number, if the hub was already connected once. | ||||||||||||
| ||||||||||||
| hub→get_userData() | ||||||||||||
Returns the value of the userData attribute, as previously stored using method set_userData. | ||||||||||||
| ||||||||||||
| hub→isInUse() | ||||||||||||
Tells if this hub is still registered within the API. | ||||||||||||
| ||||||||||||
| hub→isOnline() | ||||||||||||
Tells if there is an active communication channel with this hub. | ||||||||||||
| ||||||||||||
| hub→isReadOnly() | ||||||||||||
Tells if write access on this hub is blocked. | ||||||||||||
| ||||||||||||
| hub→nextHubInUse() | ||||||||||||
Continues the module enumeration started using YHub.FirstHubInUse(). | ||||||||||||
| ||||||||||||
| hub→set_networkTimeout(networkMsTimeout) | ||||||||||||
Modifies tthe network connection delay for this hub. | ||||||||||||
| ||||||||||||
| hub→set_userData(data) | ||||||||||||
Stores a user context provided as argument in the userData attribute of the function. | ||||||||||||
|
11.4. Class YHubPort
YoctoHub slave port control interface, available for instance in the YoctoHub-Ethernet, the YoctoHub-GSM-4G, the YoctoHub-Shield or the YoctoHub-Wireless-n
The YHubPort class provides control over the power supply for slave ports on a YoctoHub. It provide information about the device connected to it. The logical name of a YHubPort is always automatically set to the unique serial number of the Yoctopuce device connected to it.
In order to use the functions described here, you should include:
es | in HTML: <script src="../../lib/yocto_hubport.js"></script> in node.js: require('yoctolib-es2017/yocto_hubport.js'); |
js | <script type='text/javascript' src='yocto_hubport.js'></script> |
cpp | #include "yocto_hubport.h" |
m | #import "yocto_hubport.h" |
pas | uses yocto_hubport; |
vb | yocto_hubport.vb |
cs | yocto_hubport.cs |
java | import com.yoctopuce.YoctoAPI.YHubPort; |
uwp | import com.yoctopuce.YoctoAPI.YHubPort; |
py | from yocto_hubport import * |
php | require_once('yocto_hubport.php'); |
ts | in HTML: import { YHubPort } from '../../dist/esm/yocto_hubport.js'; in Node.js: import { YHubPort } from 'yoctolib-cjs/yocto_hubport.js'; |
dnp | import YoctoProxyAPI.YHubPortProxy |
cp | #include "yocto_hubport_proxy.h" |
vi | YHubPort.vi |
ml | import YoctoProxyAPI.YHubPortProxy |
| Global functions | |||||||||||||
|---|---|---|---|---|---|---|---|---|---|---|---|---|---|
| YHubPort.FindHubPort(func) | |||||||||||||
Retrieves a YoctoHub slave port for a given identifier. | |||||||||||||
| |||||||||||||
| YHubPort.FindHubPortInContext(yctx, func) | |||||||||||||
Retrieves a YoctoHub slave port for a given identifier in a YAPI context. | |||||||||||||
| |||||||||||||
| YHubPort.FirstHubPort() | |||||||||||||
Starts the enumeration of YoctoHub slave ports currently accessible. | |||||||||||||
| |||||||||||||
| YHubPort.FirstHubPortInContext(yctx) | |||||||||||||
Starts the enumeration of YoctoHub slave ports currently accessible. | |||||||||||||
| |||||||||||||
| YHubPort.GetSimilarFunctions() | |||||||||||||
Enumerates all functions of type HubPort available on the devices currently reachable by the library, and returns their unique hardware ID. | |||||||||||||
| |||||||||||||
| YHubPort properties | |||||||||||||
| hubport→AdvertisedValue [read-only] | |||||||||||||
Short string representing the current state of the function. | |||||||||||||
| |||||||||||||
| hubport→Enabled [writable] | |||||||||||||
True if the YoctoHub port is powered, false otherwise. | |||||||||||||
| |||||||||||||
| hubport→FriendlyName [read-only] | |||||||||||||
Global identifier of the function in the format MODULE_NAME.FUNCTION_NAME. | |||||||||||||
| |||||||||||||
| hubport→FunctionId [read-only] | |||||||||||||
Hardware identifier of the YoctoHub slave port, without reference to the module. | |||||||||||||
| |||||||||||||
| hubport→HardwareId [read-only] | |||||||||||||
Unique hardware identifier of the function in the form SERIAL.FUNCTIONID. | |||||||||||||
| |||||||||||||
| hubport→IsOnline [read-only] | |||||||||||||
Checks if the function is currently reachable. | |||||||||||||
| |||||||||||||
| hubport→LogicalName [writable] | |||||||||||||
Logical name of the function. | |||||||||||||
| |||||||||||||
| hubport→PortState [read-only] | |||||||||||||
Current state of the YoctoHub port. | |||||||||||||
| |||||||||||||
| hubport→SerialNumber [read-only] | |||||||||||||
Serial number of the module, as set by the factory. | |||||||||||||
| |||||||||||||
| YHubPort methods | |||||||||||||
| hubport→clearCache() | |||||||||||||
Invalidates the cache. | |||||||||||||
| |||||||||||||
| hubport→describe() | |||||||||||||
Returns a short text that describes unambiguously the instance of the YoctoHub slave port in the form TYPE(NAME)=SERIAL.FUNCTIONID. | |||||||||||||
| |||||||||||||
| hubport→get_advertisedValue() | |||||||||||||
Returns the current value of the YoctoHub slave port (no more than 6 characters). | |||||||||||||
| |||||||||||||
| hubport→get_baudRate() | |||||||||||||
Returns the current baud rate used by this YoctoHub port, in kbps. | |||||||||||||
| |||||||||||||
| hubport→get_enabled() | |||||||||||||
Returns true if the YoctoHub port is powered, false otherwise. | |||||||||||||
| |||||||||||||
| hubport→get_errorMessage() | |||||||||||||
Returns the error message of the latest error with the YoctoHub slave port. | |||||||||||||
| |||||||||||||
| hubport→get_errorType() | |||||||||||||
Returns the numerical error code of the latest error with the YoctoHub slave port. | |||||||||||||
| |||||||||||||
| hubport→get_friendlyName() | |||||||||||||
Returns a global identifier of the YoctoHub slave port in the format MODULE_NAME.FUNCTION_NAME. | |||||||||||||
| |||||||||||||
| hubport→get_functionDescriptor() | |||||||||||||
Returns a unique identifier of type YFUN_DESCR corresponding to the function. | |||||||||||||
| |||||||||||||
| hubport→get_functionId() | |||||||||||||
Returns the hardware identifier of the YoctoHub slave port, without reference to the module. | |||||||||||||
| |||||||||||||
| hubport→get_hardwareId() | |||||||||||||
Returns the unique hardware identifier of the YoctoHub slave port in the form SERIAL.FUNCTIONID. | |||||||||||||
| |||||||||||||
| hubport→get_logicalName() | |||||||||||||
Returns the logical name of the YoctoHub slave port. | |||||||||||||
| |||||||||||||
| hubport→get_module() | |||||||||||||
Gets the YModule object for the device on which the function is located. | |||||||||||||
| |||||||||||||
| hubport→get_module_async(callback, context) | |||||||||||||
Gets the YModule object for the device on which the function is located (asynchronous version). | |||||||||||||
|
| |||||||||||||
| hubport→get_portState() | |||||||||||||
Returns the current state of the YoctoHub port. | |||||||||||||
| |||||||||||||
| hubport→get_serialNumber() | |||||||||||||
Returns the serial number of the module, as set by the factory. | |||||||||||||
| |||||||||||||
| hubport→get_userData() | |||||||||||||
Returns the value of the userData attribute, as previously stored using method set_userData. | |||||||||||||
| |||||||||||||
| hubport→isOnline() | |||||||||||||
Checks if the YoctoHub slave port is currently reachable, without raising any error. | |||||||||||||
| |||||||||||||
| hubport→isOnline_async(callback, context) | |||||||||||||
Checks if the YoctoHub slave port is currently reachable, without raising any error (asynchronous version). | |||||||||||||
|
| |||||||||||||
| hubport→isReadOnly() | |||||||||||||
Indicates whether changes to the function are prohibited or allowed. | |||||||||||||
| |||||||||||||
| hubport→load(msValidity) | |||||||||||||
Preloads the YoctoHub slave port cache with a specified validity duration. | |||||||||||||
| |||||||||||||
| hubport→loadAttribute(attrName) | |||||||||||||
Returns the current value of a single function attribute, as a text string, as quickly as possible but without using the cached value. | |||||||||||||
| |||||||||||||
| hubport→load_async(msValidity, callback, context) | |||||||||||||
Preloads the YoctoHub slave port cache with a specified validity duration (asynchronous version). | |||||||||||||
|
| |||||||||||||
| hubport→muteValueCallbacks() | |||||||||||||
Disables the propagation of every new advertised value to the parent hub. | |||||||||||||
| |||||||||||||
| hubport→nextHubPort() | |||||||||||||
Continues the enumeration of YoctoHub slave ports started using yFirstHubPort(). | |||||||||||||
| |||||||||||||
| hubport→registerValueCallback(callback) | |||||||||||||
Registers the callback function that is invoked on every change of advertised value. | |||||||||||||
| |||||||||||||
| hubport→set_enabled(newval) | |||||||||||||
Changes the activation of the YoctoHub port. | |||||||||||||
| |||||||||||||
| hubport→set_logicalName(newval) | |||||||||||||
Changes the logical name of the YoctoHub slave port. | |||||||||||||
| |||||||||||||
| hubport→set_userData(data) | |||||||||||||
Stores a user context provided as argument in the userData attribute of the function. | |||||||||||||
| |||||||||||||
| hubport→unmuteValueCallbacks() | |||||||||||||
Re-enables the propagation of every new advertised value to the parent hub. | |||||||||||||
| |||||||||||||
| hubport→wait_async(callback, context) | |||||||||||||
Waits for all pending asynchronous commands on the module to complete, and invoke the user-provided callback function. | |||||||||||||
|
11.5. Class YFiles
Filesystem control interface, available for instance in the Yocto-Color-V2, the Yocto-SPI, the YoctoHub-Ethernet or the YoctoHub-GSM-4G
The YFiles class is used to access the filesystem embedded on some Yoctopuce devices. This filesystem makes it possible for instance to design a custom web UI (for networked devices) or to add fonts (on display devices).
In order to use the functions described here, you should include:
js | <script type='text/javascript' src='yocto_files.js'></script> |
cpp | #include "yocto_files.h" |
m | #import "yocto_files.h" |
pas | uses yocto_files; |
vb | yocto_files.vb |
cs | yocto_files.cs |
java | import com.yoctopuce.YoctoAPI.YFiles; |
uwp | import com.yoctopuce.YoctoAPI.YFiles; |
py | from yocto_files import * |
php | require_once('yocto_files.php'); |
ts | in HTML: import { YFiles } from '../../dist/esm/yocto_files.js'; in Node.js: import { YFiles } from 'yoctolib-cjs/yocto_files.js'; |
es | in HTML: <script src="../../lib/yocto_files.js"></script> in node.js: require('yoctolib-es2017/yocto_files.js'); |
dnp | import YoctoProxyAPI.YFilesProxy |
cp | #include "yocto_files_proxy.h" |
vi | YFiles.vi |
ml | import YoctoProxyAPI.YFilesProxy |
| Global functions | |||||||||||||
|---|---|---|---|---|---|---|---|---|---|---|---|---|---|
| YFiles.FindFiles(func) | |||||||||||||
Retrieves a filesystem for a given identifier. | |||||||||||||
| |||||||||||||
| YFiles.FindFilesInContext(yctx, func) | |||||||||||||
Retrieves a filesystem for a given identifier in a YAPI context. | |||||||||||||
| |||||||||||||
| YFiles.FirstFiles() | |||||||||||||
Starts the enumeration of filesystems currently accessible. | |||||||||||||
| |||||||||||||
| YFiles.FirstFilesInContext(yctx) | |||||||||||||
Starts the enumeration of filesystems currently accessible. | |||||||||||||
| |||||||||||||
| YFiles.GetSimilarFunctions() | |||||||||||||
Enumerates all functions of type Files available on the devices currently reachable by the library, and returns their unique hardware ID. | |||||||||||||
| |||||||||||||
| YFiles properties | |||||||||||||
| files→AdvertisedValue [read-only] | |||||||||||||
Short string representing the current state of the function. | |||||||||||||
| |||||||||||||
| files→FilesCount [read-only] | |||||||||||||
Number of files currently loaded in the filesystem. | |||||||||||||
| |||||||||||||
| files→FriendlyName [read-only] | |||||||||||||
Global identifier of the function in the format MODULE_NAME.FUNCTION_NAME. | |||||||||||||
| |||||||||||||
| files→FunctionId [read-only] | |||||||||||||
Hardware identifier of the filesystem, without reference to the module. | |||||||||||||
| |||||||||||||
| files→HardwareId [read-only] | |||||||||||||
Unique hardware identifier of the function in the form SERIAL.FUNCTIONID. | |||||||||||||
| |||||||||||||
| files→IsOnline [read-only] | |||||||||||||
Checks if the function is currently reachable. | |||||||||||||
| |||||||||||||
| files→LogicalName [writable] | |||||||||||||
Logical name of the function. | |||||||||||||
| |||||||||||||
| files→SerialNumber [read-only] | |||||||||||||
Serial number of the module, as set by the factory. | |||||||||||||
| |||||||||||||
| YFiles methods | |||||||||||||
| files→clearCache() | |||||||||||||
Invalidates the cache. | |||||||||||||
| |||||||||||||
| files→describe() | |||||||||||||
Returns a short text that describes unambiguously the instance of the filesystem in the form TYPE(NAME)=SERIAL.FUNCTIONID. | |||||||||||||
| |||||||||||||
| files→download(pathname) | |||||||||||||
Downloads the requested file and returns a binary buffer with its content. | |||||||||||||
| |||||||||||||
| files→download_async(pathname, callback, context) | |||||||||||||
Downloads the requested file and returns a binary buffer with its content. | |||||||||||||
|
| |||||||||||||
| files→fileExist(filename) | |||||||||||||
Test if a file exist on the filesystem of the module. | |||||||||||||
| |||||||||||||
| files→format_fs() | |||||||||||||
Reinitialize the filesystem to its clean, unfragmented, empty state. | |||||||||||||
| |||||||||||||
| files→get_advertisedValue() | |||||||||||||
Returns the current value of the filesystem (no more than 6 characters). | |||||||||||||
| |||||||||||||
| files→get_errorMessage() | |||||||||||||
Returns the error message of the latest error with the filesystem. | |||||||||||||
| |||||||||||||
| files→get_errorType() | |||||||||||||
Returns the numerical error code of the latest error with the filesystem. | |||||||||||||
| |||||||||||||
| files→get_filesCount() | |||||||||||||
Returns the number of files currently loaded in the filesystem. | |||||||||||||
| |||||||||||||
| files→get_freeSpace() | |||||||||||||
Returns the free space for uploading new files to the filesystem, in bytes. | |||||||||||||
| |||||||||||||
| files→get_friendlyName() | |||||||||||||
Returns a global identifier of the filesystem in the format MODULE_NAME.FUNCTION_NAME. | |||||||||||||
| |||||||||||||
| files→get_functionDescriptor() | |||||||||||||
Returns a unique identifier of type YFUN_DESCR corresponding to the function. | |||||||||||||
| |||||||||||||
| files→get_functionId() | |||||||||||||
Returns the hardware identifier of the filesystem, without reference to the module. | |||||||||||||
| |||||||||||||
| files→get_hardwareId() | |||||||||||||
Returns the unique hardware identifier of the filesystem in the form SERIAL.FUNCTIONID. | |||||||||||||
| |||||||||||||
| files→get_list(pattern) | |||||||||||||
Returns a list of YFileRecord objects that describe files currently loaded in the filesystem. | |||||||||||||
| |||||||||||||
| files→get_logicalName() | |||||||||||||
Returns the logical name of the filesystem. | |||||||||||||
| |||||||||||||
| files→get_module() | |||||||||||||
Gets the YModule object for the device on which the function is located. | |||||||||||||
| |||||||||||||
| files→get_module_async(callback, context) | |||||||||||||
Gets the YModule object for the device on which the function is located (asynchronous version). | |||||||||||||
|
| |||||||||||||
| files→get_serialNumber() | |||||||||||||
Returns the serial number of the module, as set by the factory. | |||||||||||||
| |||||||||||||
| files→get_userData() | |||||||||||||
Returns the value of the userData attribute, as previously stored using method set_userData. | |||||||||||||
| |||||||||||||
| files→isOnline() | |||||||||||||
Checks if the filesystem is currently reachable, without raising any error. | |||||||||||||
| |||||||||||||
| files→isOnline_async(callback, context) | |||||||||||||
Checks if the filesystem is currently reachable, without raising any error (asynchronous version). | |||||||||||||
|
| |||||||||||||
| files→isReadOnly() | |||||||||||||
Indicates whether changes to the function are prohibited or allowed. | |||||||||||||
| |||||||||||||
| files→load(msValidity) | |||||||||||||
Preloads the filesystem cache with a specified validity duration. | |||||||||||||
| |||||||||||||
| files→loadAttribute(attrName) | |||||||||||||
Returns the current value of a single function attribute, as a text string, as quickly as possible but without using the cached value. | |||||||||||||
| |||||||||||||
| files→load_async(msValidity, callback, context) | |||||||||||||
Preloads the filesystem cache with a specified validity duration (asynchronous version). | |||||||||||||
|
| |||||||||||||
| files→muteValueCallbacks() | |||||||||||||
Disables the propagation of every new advertised value to the parent hub. | |||||||||||||
| |||||||||||||
| files→nextFiles() | |||||||||||||
Continues the enumeration of filesystems started using yFirstFiles(). | |||||||||||||
| |||||||||||||
| files→registerValueCallback(callback) | |||||||||||||
Registers the callback function that is invoked on every change of advertised value. | |||||||||||||
| |||||||||||||
| files→remove(pathname) | |||||||||||||
Deletes a file, given by its full path name, from the filesystem. | |||||||||||||
| |||||||||||||
| files→set_logicalName(newval) | |||||||||||||
Changes the logical name of the filesystem. | |||||||||||||
| |||||||||||||
| files→set_userData(data) | |||||||||||||
Stores a user context provided as argument in the userData attribute of the function. | |||||||||||||
| |||||||||||||
| files→unmuteValueCallbacks() | |||||||||||||
Re-enables the propagation of every new advertised value to the parent hub. | |||||||||||||
| |||||||||||||
| files→upload(pathname, content) | |||||||||||||
Uploads a file to the filesystem, to the specified full path name. | |||||||||||||
| |||||||||||||
| files→wait_async(callback, context) | |||||||||||||
Waits for all pending asynchronous commands on the module to complete, and invoke the user-provided callback function. | |||||||||||||
|
12. Troubleshooting
12.1. Where to start?
If it is the first time that you use a Yoctopuce module and you do not really know where to start, have a look at the Yoctopuce blog. There is a section dedicated to beginners 16.
12.2. Programming examples don't seem to work
Most of Yoctopuce API programming examples are command line programs and require some parameters to work properly. You have to start them from your operating system command prompt, or configure your IDE to run them with the proper parameters. 17.
12.3. Linux and USB
To work correctly under Linux, the library needs to have write access to all the Yoctopuce USB peripherals. However, by default under Linux, USB privileges of the non-root users are limited to read access. To avoid having to run the library as root, you need to create a new udev rule to authorize one or several users to have write access to the Yoctopuce peripherals.
To add a new udev rule to your installation, you must add a file with a name following the "##-arbitraryName.rules" format, in the "/etc/udev/rules.d" directory. When the system is starting, udev reads all the files with a ".rules" extension in this directory, respecting the alphabetical order (for example, the "51-custom.rules" file is interpreted AFTER the "50-udev-default.rules" file).
The "50-udev-default" file contains the system default udev rules. To modify the default behavior, you therefore need to create a file with a name that starts with a number larger than 50, that will override the system default rules. Note that to add a rule, you need a root access on the system.
In the udev_conf directory of the VirtualHub for Linux18 archive, there are two rule examples which you can use as a basis.
Example 1: 51-yoctopuce.rules
This rule provides all the users with read and write access to the Yoctopuce USB devices. Access rights for all other devices are not modified. If this scenario suits you, you only need to copy the "51-yoctopuce_all.rules" file into the "/etc/udev/rules.d" directory and to restart your system.
# udev rules to allow write access to all users # for Yoctopuce USB devices SUBSYSTEM=="usb", ATTR{idVendor}=="24e0", MODE="0666"
Example 2: 51-yoctopuce_group.rules
This rule authorizes the "yoctogroup" group to have read and write access to Yoctopuce USB peripherals. Access rights for all other peripherals are not modified. If this scenario suits you, you only need to copy the "51-yoctopuce_group.rules" file into the "/etc/udev/rules.d" directory and restart your system.
# udev rules to allow write access to all users of "yoctogroup" # for Yoctopuce USB devices SUBSYSTEM=="usb", ATTR{idVendor}=="24e0", MODE="0664", GROUP="yoctogroup"
12.4. ARM Platforms: HF and EL
There are two main flavors of executable on ARM: HF (Hard Float) binaries, and EL (EABI Little Endian) binaries. These two families are not compatible at all. The compatibility of a given ARM platform with of one of these two families depends on the hardware and on the OS build. ArmHL and ArmEL compatibility problems are quite difficult to detect. Most of the time, the OS itself is unable to make a difference between an HF and an EL executable and will return meaningless messages when you try to use the wrong type of binary.
All pre-compiled Yoctopuce binaries are provided in both formats, as two separate ArmHF et ArmEL executables. If you do not know what family your ARM platform belongs to, just try one executable from each family.
12.5. Powered module but invisible for the OS
If your YoctoHub-Ethernet is connected by USB, if its blue led is on, but if the operating system cannot see the module, check that you are using a true USB cable with data wires, and not a charging cable. Charging cables have only power wires.
12.6. Another process named xxx is already using yAPI
If when initializing the Yoctopuce API, you obtain the "Another process named xxx is already using yAPI" error message, it means that another application is already using Yoctopuce USB modules. On a single machine only one process can access Yoctopuce modules by USB at a time. You can easily work around this limitation by using VirtualHub and the network mode 19.
12.7. Disconnections, erratic behavior
If your YoctoHub-Ethernet behaves erratically and/or disconnects itself from the USB bus without apparent reason, check that it is correctly powered. Avoid cables with a length above 2 meters. If needed, insert a powered USB hub 20 21.
12.8. After a failed firmware update, the device stopped working
If a firmware update of your YoctoHub-Ethernet fails, it is possible that the module is no longer working. If this is the case, plug in your module while holding down the Yocto-Button. The Yocto-LED should light up brightly and remain steady. Release the button. Your YoctoHub-Ethernet should then appear at the bottom of the VirtualHub user interface as a module waiting to be flashed. This operation also reverts the module to its factory configuration.
12.9. Registering VirtualHub disconnects another instance
If, when performing a call to RegisterHub() with a VirtualHub address, another previously registered VirtualHub disconnects, make sure the machine running these VirtualHubs do not have the same Hostname. Same Hostname can happen very easily when the operating system is installed from a monolithic image, Raspberry Pi are the best example. The Yoctopuce API uses serial numbers to communicate with devices and VirtualHub serial numbers are created on the fly based the hostname of the machine running VirtualHub.
12.10. Dropped commands
If, after sending a bunch of commands to a Yoctopuce device, you are under the impression that the last ones have been ignored, a typical example is a quick and dirty program meant to configure a device, make sure you used a YAPI.FreeAPI() at the end of the program. Commands are sent to Yoctopuce modules asynchronously thanks to a background thread. When the main program terminates, that thread is killed no matter if some command are left to be sent. However API.FreeAPI() waits until there is no more command to send before freeing the API resources and returning.
12.11. Some network cables don't work..
..with the YoctoHub-Ethernet although they work fine with other network equipments. Unlike most modern network equipments, the YoctoHub-Ethernet doesn't feature auto-MDIX capability. that means you have to use the network cable matching your application: a straight through cable (the most common variety) to connect it to a switch and and cross-over cable to connect it directly to a computer's network port.
12.12. Can't contact sub devices by USB
The point of the YoctoHub-Ethernet is to provide network access to connected sub-devices, it does not behave like a common USB hub. The YoctoHub-Ethernet's USB port is just meant for power and Hub configuration. Access to sub device is only possible through a network connection.
12.13. Network Readiness stuck at 3- LAN ready
Check your outbound Internet connectivity and make sure you don't have an invalid callback set in the YoctoHub-Ethernet configuration
12.14. Damaged device
Yoctopuce strives to reduce the production of electronic waste. If you believe that your YoctoHub-Ethernet is not working anymore, start by contacting Yoctopuce support by e-mail to diagnose the failure. Even if you know that the device was damaged by mistake, Yoctopuce engineers might be able to repair it, and thus avoid creating electronic waste.
 Waste Electrical and Electronic Equipment (WEEE)
If you really want to get rid of your YoctoHub-Ethernet, do not throw it
away in a trash bin but bring it to your local WEEE recycling point. In this
way, it will be disposed properly by a specialized WEEE recycling center.
Waste Electrical and Electronic Equipment (WEEE)
If you really want to get rid of your YoctoHub-Ethernet, do not throw it
away in a trash bin but bring it to your local WEEE recycling point. In this
way, it will be disposed properly by a specialized WEEE recycling center.
13. Characteristics
You can find below a summary of the main technical characteristics of your YoctoHub-Ethernet module.
| Product ID | YHUBETH1 |
| Hardware release† | Rev. E |
| USB connector | micro-B |
| Thickness | 22 mm |
| Width | 58 mm |
| Length | 60 mm |
| Weight | 34 g |
| Channels | 3 ports |
| Max Current (continuous) | 2 A |
| Protection class, according to IEC 61140 | class III |
| Normal operating temperature | 5...40 °C |
| Extended operating temperature‡ | -30...85 °C |
| USB consumption | 130 mA |
| Network connection | Fast-Ethernet |
| RoHS compliance | RoHS III (2011/65/UE+2015/863) |
| USB Vendor ID | 0x24E0 |
| USB Device ID | 0x000E |
| Suggested enclosure | YoctoBox-HubEth-Transp |
| Harmonized tariff code | 9032.9000 |
| Made in | Switzerland |
† These specifications are for the current hardware revision. Specifications for earlier revisions may differ.
‡ The extended temperature range is defined based on components specifications and has been tested during a limited duration (1h). When using the device in harsh environments for a long period of time, we strongly advise to run extensive tests before going to production.

14. Index
AAPI T
techspec Y
YFiles YHub YHubPort YModule YNetwork
- http://www.yoctopuce.com/EN/virtualhub.php ←
- support@yoctopuce.com ←
- short-short-short long-long-long short-short-short ←
- su
pport @yoct opuce .com ← - The Yoctopuce Micro-USB-Hub is a standard USB hub and does not work either. ←
- www.yoctopuce.com/FR/products/yoctohub-shield ←
- http://www.yoctopuce.com/EN/virtualhub.php ←
- http://www.yoctopuce.com/EN/libraries.php ←
- The YoctoHub-Ethernet extracts its power from the Ethernet cable with the help of the AG9705M component. This component implements alternatives A and B described in the 802.3af norm. The galvanic isolation between the module and the network supports 1500V. ←
- http://www.yoctopuce.com/EN/products/accessories-and-connectors/fix-2-5mm ←
- http://www.yoctopuce.com/EN/products/accessories-and-connectors/board2board-127 ←
- The YoctoHub-Ethernet interface is regularly tested on Firefox, Chrome, Opera, and Brave. It probably also works on Safari. ←
- Never trust people telling you that their software does not have bugs :-) ←
- www.yoctopuce.com/EN/firmwares.php ←
- https://www.yoctopuce.com/EN/article/new-a-virtualhub-that-works-through-the-web ←
- see: http://www.yoctopuce.com/EN/blog_by_categories/for-the-beginners ←
- see: http://www.yoctopuce.com/EN/article/about-programming-examples ←
- http://www.yoctopuce.com/FR/virtualhub.php ←
- see: http://www.yoctopuce.com/EN/article/error-message-another-process-is-already-using-yapi ←
- see: http://www.yoctopuce.com/EN/article/usb-cables-size-matters ←
- see: http://www.yoctopuce.com/EN/article/how-many-usb-devices-can-you-connect ←
