![]() For an internal project, we had to write an extension for Firefox which had to interact with a Yoctopuce module. As extensions are written in JavaScript, we were able to use our EcmaScript library. We thought that other people could be interested and this week we show you how to implement a WebExtension displaying the temperature of a Yocto-Meteo in your browser icon bar.
For an internal project, we had to write an extension for Firefox which had to interact with a Yoctopuce module. As extensions are written in JavaScript, we were able to use our EcmaScript library. We thought that other people could be interested and this week we show you how to implement a WebExtension displaying the temperature of a Yocto-Meteo in your browser icon bar.
Actually, browser extensions are simply web pages written in HTML and JavaScript which the browser loads automatically. On top of accessing the usual DOM, extensions can access specific APIs enabling them to modify the appearance and the behavior of the browser.
Almost all the browsers allow you to install extensions. However, as with JavaScript at the beginning, there is no real standard and each browser implemented extensions in its own way. WebExtensions are however what is the closest to a standard and allow you to write extensions compatible with Chrome, Firefox and Opera.
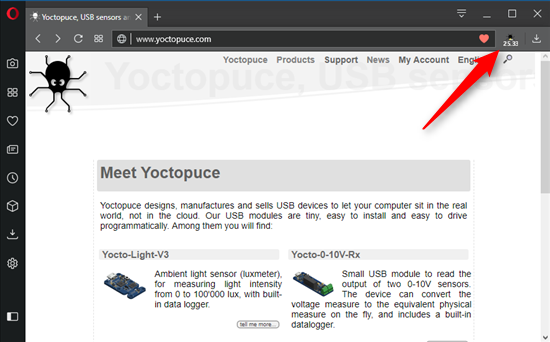
In this example, we are going to write a WebExtension displaying, in the browser address bar, a button which displays the current value of a Yocto-Meteo.
In this post, we concentrate on how to use the Yoctopuce library in the extension. We are not going to explain in details how WebExtensions work because the documentation offered by Mozilla is very well done and is available in many languages: WebExtensions documentation.
But, briefly, a WebExtension is simply a directory with a manifest.json JSON file which references JavaSript and HTML files to be run. You can run some scripts in the background and others only when clicking on a button.
The manifest.json file
In this example, we must define a button which displays the popup.html file and run the background-script.js in the background. The button is defined in the "browser_action" section and takes as arguments an icon and the name of the HTML page it must display.
The background section allows you to load all the scripts that must be run as soon as the extension is loaded. We must therefore add the files of our EcmaScript library and the "background_script.js" file.
The manifest.json file:
"manifest_version": 2,
"name": "Yocto-Meteo-watcher",
...
"browser_action": {
"default_icon": "icons/icon_32.png",
"default_popup": "popup.html"
},
....
"background": {
"scripts": [
"yoctolib/yocto_api.js",
"yoctolib/yocto_temperature.js",
"yoctolib/yocto_humidity.js",
"yoctolib/yocto_pressure.js",
"background-script.js"
]
},
...
}
The background-script.js script
The background-script.js script starts by initializing the library thanks to the YAPI.RegisterHub method, providing it the URL of the used YoctoHub or VirtualHub, and programs a timer which periodically retrieves the temperature of the Yocto-Meteo and displays it with the chrome.browserAction.setBadgeText function.
When running for the first time, we initialize the ytemperature, yhumidity, and ypressure global variables with the YFindXXX functions of the library. For the next runs, we check that the temperature sensor is still connected, we retrieve the current value with the get_currentValue() method and we display it on top of the button icon.
var yhumidity = null;
var ypressure = null;
var serial = "";
async function startDemo() {
await YAPI.LogUnhandledPromiseRejections();
// Setup the API to use the VirtualHub on local machine
let url = await get_hub_url();
let errmsg = new YErrorMsg();
if (await YAPI.RegisterHub(url, errmsg) !== YAPI.SUCCESS) {
console.log('Cannot contact ' + url + ': ' + errmsg.msg);
return;
}
refresh();
}
async function refresh() {
try {
let errmsg = new YErrorMsg();
if (yhumidity === null) {
await YAPI.UpdateDeviceList(errmsg);
yhumidity = YHumidity.FirstHumidity();
if (yhumidity) {
let module = await yhumidity.module();
serial = await module.get_serialNumber();
ytemperature = YTemperature.FindTemperature(serial + ".temperature");
ypressure = YPressure.FindPressure(serial + ".pressure");
}
}
let text = "";
if (ytemperature && await ytemperature.isOnline()) {
let temp = await ytemperature.get_currentValue();
text = temp.toString();
}
chrome.browserAction.setBadgeText({text: text});
} catch (e) {
console.log(e);
chrome.browserAction.setBadgeText({text: "!"});
}
timer = setTimeout(refresh, 1000);
}
...

We display the temperature in the extension icon
The popup.html page
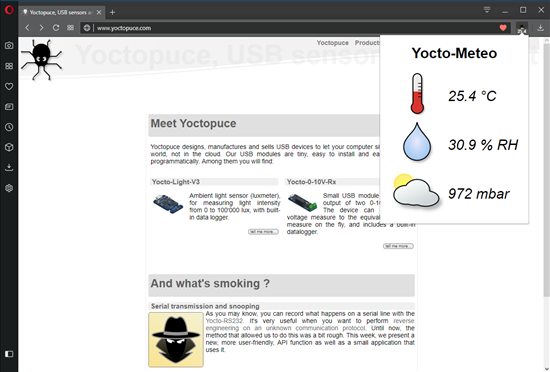
We still have to write the content of the popup.html which must display the current value of the three sensors of the Yocto-Meteo. This page loads a popup.js file updating the page content with the sensor values.
The HTML page:
<body>
<h1>Yocto-Meteo</h1>
<table>
<tr class="element">
<td class="icon" ><img src="../icons/temp_96.png" alt="Temperature"></td>
<td><span class="sensorvalue" id="temp"></span></td>
</tr>
<tr class="element">
<td class="icon"><img src="../icons/hum_96.png" alt="Humidity"></td>
<td><span class="sensorvalue" id="hum"></span></td>
</tr>
<tr class="element">
<td class="icon"><img src="../icons/cloud_96.png" alt="Pressure"></td>
<td><span class="sensorvalue" id="pres"></span></td>
</tr>
</table>
</body>
</html>
The popup.js script regularly refreshes the page content with the value of the three sensors using the ytemperature, yhumidity, and ypressure global variables that we defined in the background-script.js script. To access these variables, we must use the chrome.extension.getBackgroundPage() function which returns the context of the background-script.js script.
if (sensor && sensor.isOnline()) {
let value = await sensor.get_currentValue();
document.getElementById(tag).innerHTML =
value.toString() + " " + await sensor.get_unit();
} else {
document.getElementById(tag).innerHTML = "Offline";
}
}
async function refresh() {
let bgpage = chrome.extension.getBackgroundPage();
await updateSensor(bgpage.ytemperature, "temp");
await updateSensor(bgpage.yhumidity, "hum");
await updateSensor(bgpage.ypressure, "pres");
timer = setTimeout(refresh, 500);
}
document.addEventListener('DOMContentLoaded', async () => {
await refresh();
});

By clicking on the icon, we display the state of the Yocto-Meteo
As usual, you can find the complete source code on GitHub:
https://github.com/yoctopuce-examples/web_extension_demo.
Testing and publishing the extension
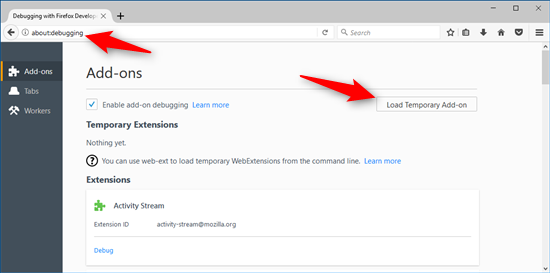
The process to install and test an extension differs on each browser. But for each browser there is an option enabling you to install an extension from a local directory. For Firefox, for example, you must go to URL about:debugging then click on the "Load temporary Add-on" button.

In all the browsers you can install extensions locally
To publish an extension, there as well, the process varies depending on the browser, but usually you must zip the content of the directory and upload it on the browser "store" so that the package is signed and can be installed on any machine.
Conclusion
It's very easy to use our EcmaScript library in a WebExtension. You must simply copy the files and reference them. The only difficulties you will encounter are issues with APIs which are not always implemented in all the browsers. Fortunately, the Yoctopuce library doesn't use any of these APIs.


