![]() A few weeks ago, we explained how to use our modules with PHP. At the time, we explained how to use PHP in direct mode, but there is another way: the HTTP callback mode. This week, we are going to tell you how to write your first PHP script working in HTTP callback mode.
A few weeks ago, we explained how to use our modules with PHP. At the time, we explained how to use PHP in direct mode, but there is another way: the HTTP callback mode. This week, we are going to tell you how to write your first PHP script working in HTTP callback mode.
The HTTP callback mode differs from the traditional mode because it's the YoctoHub, or the VirtualHub, which creates the connection with the PHP script. We could explain the HTTP callback mode in this way: "Every x seconds, the YoctoHub connects itself to a server to inform it of the state of all the modules and to retrieve the instructions that need to be sent to the Yoctopuce modules". This implies several paradigm shifts.
First, as we explained it in a post, this enables you to go through NAT filters and thus to avoid configuring routers and other firewalls.
Second, communication is not continuous. That is, the YoctoHub cannot connect itself to a PHP script and send it sensor values continuously. Limitations inherent to PHP make it so that the YoctoHub must send all the values in one batch, treat a potential answer from the script, and then disconnect itself.
Third, you can't retrieve data logger information in HTTP callback mode.
Finally, the library can only access modules connected to the YoctoHub that connects itself. For example, if you have a Yocto-Meteo on YoctoHub A and a Yocto-Display on YoctoHub B, you can't directly display the Yocto-Meteo temperature on the Yocto-Display screen. When the YoctoHub A is connected, the application must store the temperature value of the Yocto-Meteo and wait for the YoctoHub B to connect itself to display this temperature on the Yocto-Display.
Example
To illustrate the use of the HTTP callback mode, we are going to write a PHP script which switches the input of a relay when the temperature goes above 25░C.
The PHP script
The first step is to write the code of the PHP script. We must start by including the required files. We must include the traditional yocto_api.php file to enable us to use the library, but also the yocto_temperature and yocto_relay.php files to use the YTemperature and YRelay classes.
include('Sources/yocto_api.php');
include('Sources/yocto_temperature.php');
include('Sources/yocto_relay.php');
We must then initialize the library in the HTTP callback mode. To do so, we call the YAPI::RegisterHub() method, but instead of giving the IP address of the YoctoHub as parameter, we use the "callback" keyword.
From then on, the remainder of the code is almost identical to what we would write in direct mode. We check that there is a temperature sensor and a relay function.
if (is_null($t)){
die("No temperature sensor found");
}
$r = YRelay::FirstRelay();
if (is_null($r)) {
die("No relay sensor found");
}
We must switch the relay output depending on the current temperature. Note that we switch the relay to state B if the temperature goes above 25, while we go back to state A only if the temperature goes under 24. This is called a schmitt trigger and prevents the relay from oscillating when the temperature is right at the trigger threshold.
if ($value>25)
$r->set_state(YRelay::STATE_B);
if ($value<24)
$r->set_state(YRelay::STATE_A);
In a traditional program, we would put this test in a loop with a short delay, but in HTTP callback mode, this isn't possible. We must end the script execution and wait for the next connection of the YoctoHub to get a new value.
YAPI::FreeAPI();
?>
When everything is put together, the complete code looks like this:
include('Sources/yocto_api.php');
include('Sources/yocto_temperature.php');
include('Sources/yocto_relay.php');
YAPI::RegisterHub("callback");
$t = YTemperature::FirstTemperature();
if (is_null($t)){
die("No temperature sensor found");
}
$r = YRelay::FirstRelay();
if (is_null($r)) {
die("No temperature sensor found");
}
$value = $t->get_currentValue();
if ($value>25)
$r->set_state(YRelay::STATE_B);
if ($value<24)
$r->set_state(YRelay::STATE_A);
Print("temperature = $value\n");
YAPI::FreeAPI();
?>
Configuring the PHP server
For the HTTP callback mode to work, you must enable the PHP option allow_url_fopen. If this option is disabled, the call to YAPI::RegisterHub triggers an error with the message "URL file-access is disabled in the server configuration".
Unfortunately, most providers don't enable this option by default and you must enable it manually. Some providers allow you to modify this option from their administration console, but it's not common.
In 90% of the cases, you can enable this option by creating a .htaccess file in the same directory as your script with the following content:
php_flag "allow_url_fopen" "On"
For other providers, you must create a .user.ini file with the following content:
allow_url_fopen = 1
In case of doubt, contact your provider to know how to enable this option.
Configuring the YoctoHub
Now that you have installed the script on a correctly configured PHP server, you must configure the YoctoHub, or VirtualHub, so that it connects itself to it on a regular interval.
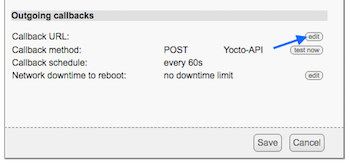
Access the YoctoHub web interface, click on the YoctoHub configure button and then click on the edit button of the Outgoing callbacks section.

Click on the configure button on the first line

Click on the edit button of the Outgoing callbacks section
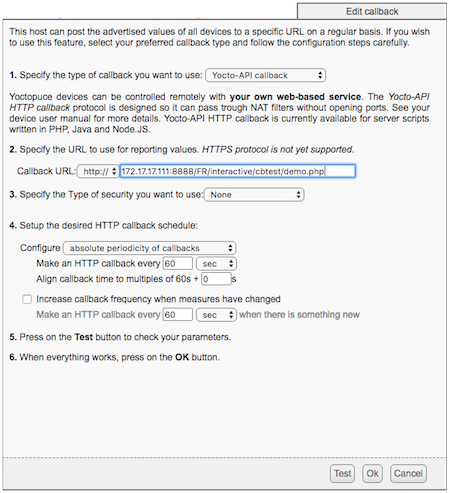
In the callback configuration window, select the "Yocto-API callback" type. You must then provide the URL of the script you have previously created. Make sure that the URL actually starts with http:// as the "ws://" option is not supported by the PHP library. Don't specify any security type.
The last two parameters allow you to define the interval at which the YoctoHub must contact the script. You can define a default interval and a shorter interval if one of the sensors connected to the YoctoHub has changed state.
For our example, we configure the YoctoHub to connect to the script every minute.

YoctoHub configuration to use our script
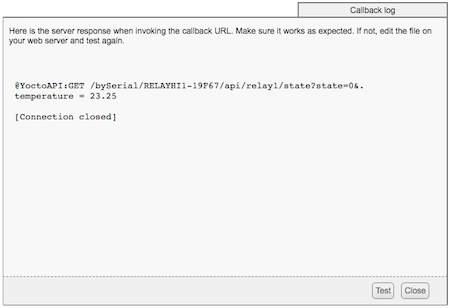
Before you close the window, we recommend that you check the configuration with the test button. If everything works, the value of the temperature sensor should be displayed.

The test window when everything works
You can now close the configuration window and save the configuration.
What's next
We kept this example very simple as the aim of this post is to help you start and write your first script. But now that you succeeded to commute a relay, we bet that you'd like to build something more complex. In this case, you should consider reading the following posts:


